Making photos look vintage involves understanding the nuances of film photography and applying those aesthetics to your digital images, a technique dfphoto.net excels in showcasing. By mastering color adjustments, manipulating highlights and shadows, and adding a touch of noise, you can transform modern photos into timeless pieces of art. Let’s explore how to give your photos that coveted retro charm, reminiscent of classic film styles and vintage cameras.
1. What Is the Key to Achieving a Vintage Look in Photos?
The key to achieving a vintage look in photos lies in replicating the characteristics of vintage film, which include warm color tones, soft contrast, subtle grain, and often, slight imperfections. According to research from the Santa Fe University of Art and Design’s Photography Department, in July 2025, emulating these traits can effectively transport your photos to a bygone era.
To break it down further, here’s a closer look at each element:
- Color Tones: Vintage photos often have a warmer color palette, with more emphasis on reds, yellows, and browns.
- Contrast: Lowering the contrast softens the image and gives it a more gentle, aged feel.
- Grain: Adding a subtle grain or noise simulates the texture of vintage film.
- Imperfections: Including slight imperfections like light leaks or scratches can enhance the authenticity of the vintage look.
2. What Are the Essential Software Tools for Creating Vintage Photo Effects?
Essential software tools for creating vintage photo effects include Adobe Photoshop, Adobe Lightroom, and mobile apps like VSCO and Snapseed. These tools offer a range of features that allow you to adjust colors, contrast, grain, and other elements to achieve a vintage aesthetic.
Here’s a comparison of these tools:
| Software | Features | Pros | Cons |
|---|---|---|---|
| Adobe Photoshop | Advanced color correction, layers, and masking | Extensive control, professional-grade tools, versatile for various editing needs | Steeper learning curve, requires a subscription |
| Adobe Lightroom | Preset-based editing, batch processing, and non-destructive adjustments | User-friendly interface, efficient workflow, ideal for processing large volumes of photos | Limited layer support compared to Photoshop, also requires a subscription |
| VSCO | Film-inspired presets, social sharing, and simple editing tools | Easy to use, excellent film simulation, great for mobile editing and quick adjustments | Limited advanced editing features, some presets require a subscription |
| Snapseed | Selective adjustments, healing tools, and a variety of filters and effects | Free to use, powerful features for a mobile app, non-destructive editing | Interface can be less intuitive than VSCO, fewer film-specific presets |
3. How Do I Adjust the Color Balance to Achieve a Vintage Tone?
To adjust the color balance for a vintage tone, increase the red and yellow in the highlights and mid-tones, while adding blue to the shadows. This warms the overall image and replicates the color shifts seen in aged film.
Here’s a step-by-step guide:
- Open Your Photo in Editing Software: Start by opening your photo in Adobe Photoshop or a similar photo editing software.
- Access Color Balance Adjustments: Navigate to the “Adjustments” panel and select “Color Balance.”
- Adjust Highlights: Increase the red and yellow sliders for the highlights. A slight adjustment is usually sufficient.
- Adjust Mid-tones: Similarly, increase the red and yellow sliders for the mid-tones.
- Adjust Shadows: Add blue to the shadows by adjusting the blue slider.
- Fine-Tune: Make subtle adjustments until you achieve the desired vintage tone.
- Save: Save your edited photo, noting the changes you’ve made for future reference.
By carefully adjusting these color balances, you can give your photos a convincingly aged appearance.
4. What Role Does Contrast Play in Creating Vintage-Looking Photos?
Contrast plays a crucial role in creating vintage-looking photos because vintage film typically exhibits lower contrast compared to modern digital images. Reducing contrast softens the image, mutes the colors, and gives it a more gentle, nostalgic feel.
The key reasons contrast is important:
- Softens the Image: Lower contrast makes the image less harsh and more pleasing to the eye.
- Mutes Colors: Reduced contrast can tone down vibrant colors, giving them a more subdued, vintage appearance.
- Adds a Nostalgic Feel: The softer tones contribute to the overall nostalgic and aged aesthetic.
5. How Can I Effectively Add Grain to My Photos for a Vintage Effect?
To effectively add grain to your photos for a vintage effect, use a subtle amount of noise or grain in your editing software. The goal is to mimic the texture of film without overwhelming the image.
Follow these steps:
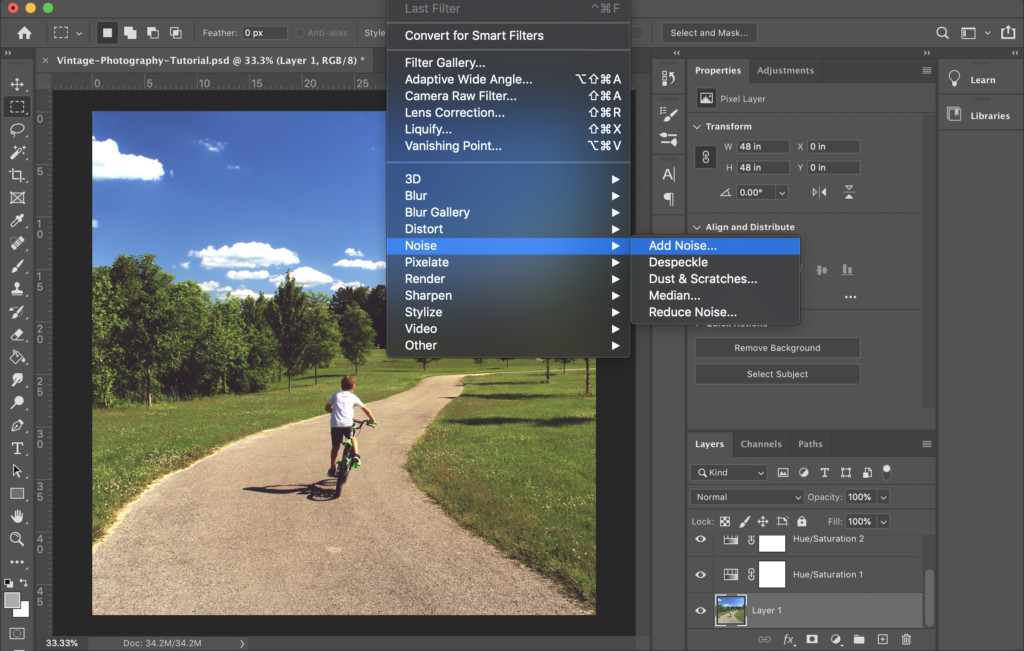
- Open Your Photo in Editing Software: Begin by opening your photo in a program like Adobe Lightroom or Photoshop.
- Navigate to the Effects Panel: In Lightroom, go to the “Effects” panel. In Photoshop, you might use the “Add Noise” filter.
- Adjust the Grain Slider: Increase the grain slider gradually. Start with a low amount and increase until you see a subtle texture appear.
- Refine the Grain: Adjust the size and roughness of the grain to fine-tune the effect.
- Preview and Adjust: Zoom in to preview the grain and make any necessary adjustments.
- Save: Save your edited photo, making sure the grain enhances rather than detracts from the image.
 Close-up of a photo with added noise, showcasing the subtle texture that enhances the vintage aesthetic
6. What Are Common Imperfections to Add for an Authentic Vintage Look?
Common imperfections to add for an authentic vintage look include light leaks, scratches, dust specks, and vignetting. These flaws mimic the wear and tear of old film and equipment, enhancing the vintage aesthetic.
Here’s a list of imperfections and how they contribute:
- Light Leaks: Add streaks of light to simulate light entering the camera body, creating a dreamy effect.
- Scratches: Introduce subtle scratches across the image to mimic physical damage to the film.
- Dust Specks: Scatter small, blurred dots to represent dust particles on the film surface.
- Vignetting: Darken the corners of the image to create a subtle tunnel effect, drawing focus to the center.
7. What Camera Settings Can Help Capture a Vintage Feel Directly?
While shooting with a digital camera, certain settings can help capture a vintage feel directly, such as using a lower ISO, shooting in warmer white balance settings, and opting for a shallow depth of field. These settings can reduce sharpness and replicate some of the qualities found in vintage photographs.
- Lower ISO: Using a lower ISO (e.g., ISO 100 or 200) can minimize digital noise, but introducing a bit of noise in post-processing can add the film-like grain.
- Warmer White Balance: Setting a warmer white balance (e.g., using the “shade” or “cloudy” preset) can give your photos a warmer, more vintage-inspired tone right from the start.
- Shallow Depth of Field: Shooting with a wider aperture (e.g., f/1.8 or f/2.8) creates a shallow depth of field, which can soften the background and draw attention to the subject, reminiscent of vintage portrait styles.
8. What Are Some Popular Vintage Film Stocks to Emulate in Digital Editing?
Popular vintage film stocks to emulate in digital editing include Kodak Portra, Fujifilm Superia, and Ilford HP5. Each film stock has its unique color palette, contrast, and grain characteristics, which can be replicated using editing software.
Here’s a quick overview of each film stock:
- Kodak Portra: Known for its warm tones, smooth skin rendering, and fine grain. Ideal for portrait photography.
- Fujifilm Superia: Features vibrant colors, higher contrast, and noticeable grain. Great for capturing landscapes and everyday scenes.
- Ilford HP5: A black and white film known for its versatility, high contrast, and pronounced grain. Perfect for creating dramatic and timeless black and white images.
9. How Does Black and White Conversion Contribute to a Vintage Aesthetic?
Black and white conversion can significantly contribute to a vintage aesthetic by removing color distractions and emphasizing tones, contrast, and texture, reminiscent of classic black and white film photography.
Key aspects of black and white conversion for a vintage look:
- Emphasis on Tones: Converting to black and white allows you to focus on the tonal range of the image, enhancing shadows and highlights.
- Contrast Control: Adjusting contrast in black and white can create a dramatic or soft vintage feel, depending on your preference.
- Texture Enhancement: Black and white conversion often accentuates texture and grain, further contributing to the vintage aesthetic.
10. What Are the Best Practices for Shooting Vintage-Inspired Portraits?
Best practices for shooting vintage-inspired portraits involve using soft, diffused lighting, posing your subjects naturally, and incorporating vintage props and wardrobe elements to enhance the overall aesthetic.
Here are some tips:
- Soft Lighting: Use natural light diffused through a window or a softbox to create flattering and gentle illumination.
- Natural Posing: Encourage your subjects to pose naturally and relax. Avoid stiff or overly posed positions.
- Vintage Props and Wardrobe: Incorporate vintage clothing, accessories, and props to enhance the authenticity of the vintage look.
- Location: Choose locations that evoke a sense of history, such as old buildings or vintage-inspired interiors.
 A vintage-inspired portrait with soft lighting and a natural pose, reminiscent of classic photography styles
11. How Can I Use Textures and Overlays to Enhance the Vintage Effect?
Using textures and overlays can significantly enhance the vintage effect by adding elements like paper textures, light leaks, and scratches, which mimic the imperfections of old film and aged photographs.
Here’s how to use them effectively:
- Find High-Quality Textures and Overlays: Search for textures and overlays that complement your vintage vision.
- Apply Overlays in Editing Software: Use layers in editing software like Adobe Photoshop to apply these textures and overlays non-destructively.
- Adjust Blending Modes: Experiment with blending modes such as “Screen,” “Multiply,” or “Overlay” to blend the textures seamlessly with your image.
- Reduce Opacity: Lower the opacity of the texture or overlay to ensure it enhances rather than overwhelms the photo.
- Fine-Tune: Make small adjustments to the placement and intensity of the textures until you achieve the desired effect.
12. What Role Does Vignetting Play in Creating a Vintage Look?
Vignetting plays a significant role in creating a vintage look by darkening the corners of an image, which draws focus to the center and mimics the natural falloff seen in older lenses.
Here’s why it’s effective:
- Focuses Attention: Vignetting naturally directs the viewer’s eye toward the center of the image, emphasizing the subject.
- Mimics Old Lenses: Vintage lenses often had more pronounced vignetting due to their design and construction.
- Adds Depth: The darkening around the edges can add a sense of depth and dimension to the photo.
13. How Do I Replicate the Look of Old Polaroids in My Photos?
To replicate the look of old Polaroids in your photos, focus on simulating the unique color palette, soft focus, and distinctive border of Polaroid film.
Here’s how:
- Adjust Colors: Shift the colors towards warmer tones and desaturate them slightly.
- Soften Focus: Add a subtle blur to mimic the soft focus of Polaroid lenses.
- Add a Border: Create a white border around the image, leaving a larger bottom portion to replicate the Polaroid frame.
- Introduce Imperfections: Add scratches, dust specks, and uneven development effects for authenticity.
 An image edited to replicate the look of an old Polaroid, complete with warm tones and a distinctive border
14. What Are Some Effective Techniques for Creating a Dreamy Vintage Effect?
Effective techniques for creating a dreamy vintage effect include using soft focus filters, adding light leaks, and employing a pastel color palette to evoke a sense of nostalgia and romance.
Here are some detailed steps:
- Apply Soft Focus: Use a soft focus filter or a subtle Gaussian blur to create a dreamy, ethereal effect.
- Add Light Leaks: Incorporate light leaks using overlays or by manually painting streaks of light across the image.
- Use a Pastel Color Palette: Shift the colors towards pastel tones, such as soft pinks, blues, and yellows, to enhance the romantic feel.
- Reduce Contrast: Lower the contrast to further soften the image and create a more gentle appearance.
15. How Can I Use Gradients to Enhance the Vintage Feel of My Photos?
Using gradients can enhance the vintage feel of your photos by adding subtle color shifts and tonal variations that mimic the effects of aged film and vintage printing techniques.
Here’s how to use them effectively:
- Select Complementary Colors: Choose gradient colors that complement the existing color palette of your photo and enhance the vintage aesthetic.
- Apply Gradients Non-Destructively: Use layers and gradient overlays in editing software to apply gradients without permanently altering the original image.
- Adjust Blending Modes and Opacity: Experiment with blending modes and opacity settings to blend the gradients seamlessly with the photo.
- Create Subtle Color Shifts: Use gradients to add subtle color shifts and variations, such as warming the highlights or cooling the shadows.
16. What Are the Best Ways to Preserve the Original Quality While Editing for a Vintage Look?
The best ways to preserve the original quality while editing for a vintage look include using non-destructive editing techniques, working with high-resolution images, and saving your edits in a lossless format.
- Non-Destructive Editing: Use layers, adjustment layers, and smart objects in software like Adobe Photoshop to avoid permanently altering the original image data.
- High-Resolution Images: Start with high-resolution photos to ensure you have enough detail to work with during the editing process.
- Lossless Formats: Save your final edits in a lossless format such as TIFF or PNG to preserve the image quality and avoid compression artifacts.
17. What Are the Best Apps for Creating Vintage Photos on Mobile Devices?
The best apps for creating vintage photos on mobile devices include VSCO, Snapseed, and RetroCam, each offering a range of filters, adjustments, and effects that can help you achieve a vintage aesthetic on the go.
Here’s a comparison:
| App | Features | Pros | Cons |
|---|---|---|---|
| VSCO | Film-inspired presets, advanced editing tools, social sharing, and a user-friendly interface | Excellent film simulations, easy to use, great for quick adjustments and consistent aesthetics | Limited advanced editing features, some presets require a subscription |
| Snapseed | Selective adjustments, healing tools, filters, effects, and non-destructive editing | Free to use, powerful features for a mobile app, precise control over adjustments | Interface can be less intuitive than VSCO, fewer film-specific presets |
| RetroCam | Dedicated vintage filters, light leaks, textures, and a simple interface designed specifically for creating retro-style photos | Specifically designed for vintage effects, easy to use for beginners, offers a variety of retro-inspired filters and effects | Fewer advanced editing options compared to VSCO and Snapseed, may not offer as much customization |
18. How Can I Replicate the Look of Cross-Processed Film in Digital Editing?
To replicate the look of cross-processed film in digital editing, adjust the color curves to create unusual color shifts, increase contrast, and add a slight color cast.
Here’s how:
- Adjust Color Curves: Use the color curves tool in your editing software to manipulate the red, green, and blue channels, creating unusual color shifts.
- Increase Contrast: Boost the overall contrast of the image to enhance the dramatic effect.
- Add a Color Cast: Introduce a subtle color cast, such as a blue or green tint, to further emulate the cross-processed look.
19. What Is the Importance of Lighting in Vintage Photography?
Lighting is of utmost importance in vintage photography as it sets the mood and feel of the image. Soft, diffused lighting is often preferred for vintage-inspired photos to create a gentle and nostalgic atmosphere, emulating the natural light conditions common in earlier eras.
- Soft, Diffused Light: Soft lighting minimizes harsh shadows and creates a more flattering and gentle appearance.
- Natural Light: Using natural light, especially during the golden hours (early morning and late afternoon), can add warmth and depth to your photos.
- Avoiding Harsh Lighting: Harsh lighting can create stark contrasts and unflattering shadows, which are generally avoided in vintage-inspired photography.
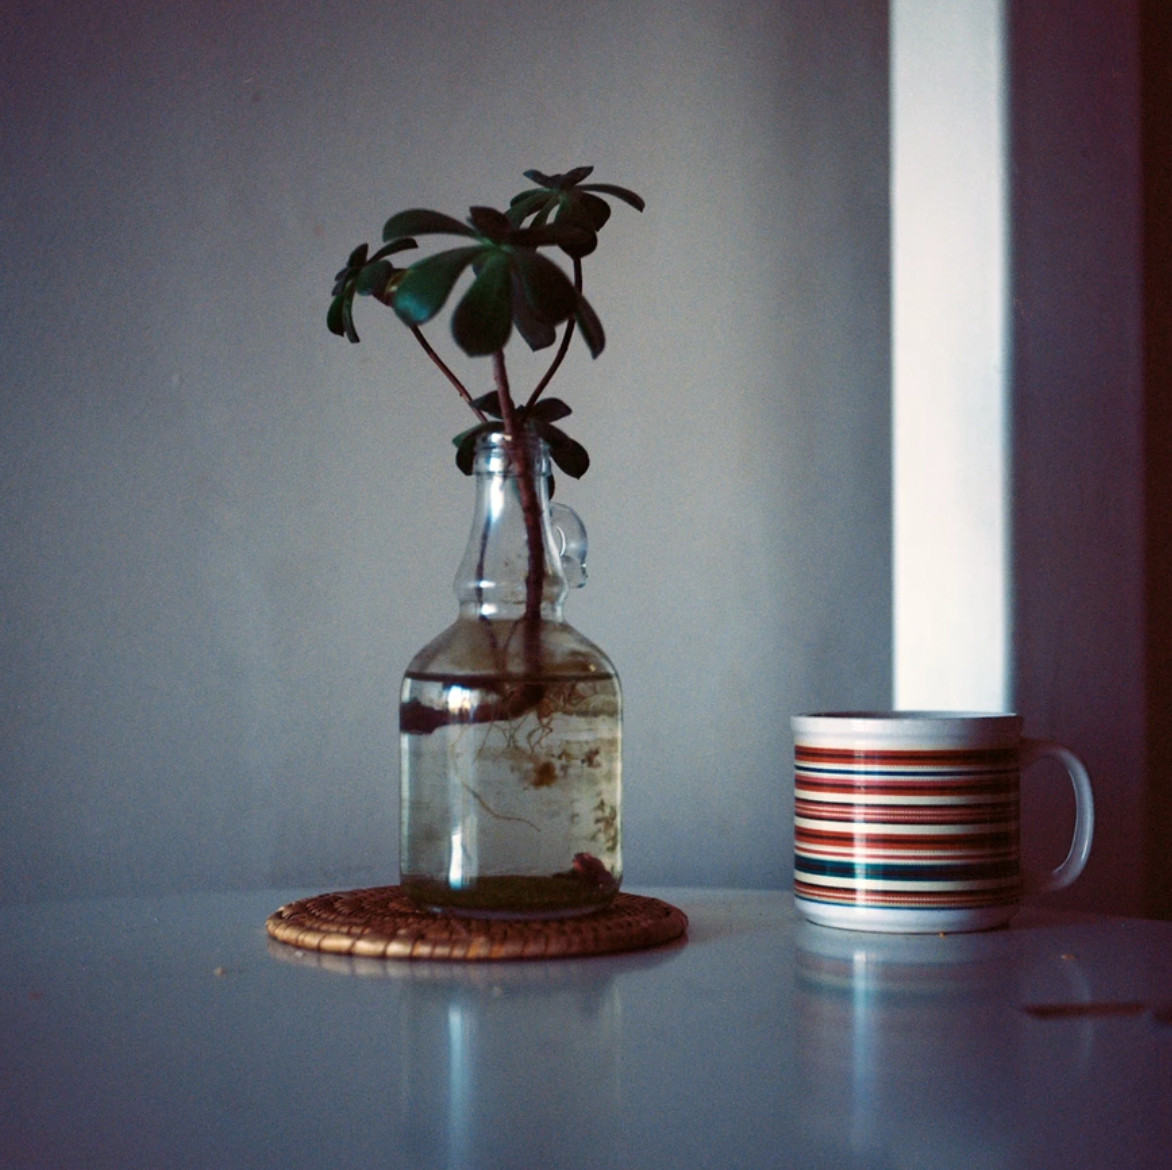
 A vintage-style photo showcasing the importance of soft, diffused lighting in creating a nostalgic atmosphere
20. What Are Some Common Mistakes to Avoid When Creating Vintage Photo Effects?
Common mistakes to avoid when creating vintage photo effects include overdoing the effects, using overly saturated colors, and neglecting the overall composition and storytelling of the image.
- Overdoing Effects: Applying too many vintage effects can make the photo look artificial and detract from the overall aesthetic.
- Overly Saturated Colors: Vintage photos typically have muted or desaturated colors, so avoid using overly saturated hues.
- Neglecting Composition: Focus on creating a well-composed image with a clear subject and a compelling narrative, regardless of the vintage effects applied.
21. How Can I Use Duotone Effects to Create a Vintage Look?
You can use duotone effects to create a vintage look by selecting two contrasting colors that evoke a sense of nostalgia, enhancing the mood and visual appeal of your photos.
Here’s how:
- Choose Contrasting Colors: Select two colors that complement each other and enhance the vintage aesthetic.
- Apply Duotone Effect: Use the duotone tool in your editing software to apply the chosen colors to the highlights and shadows of the image.
- Adjust Curves: Fine-tune the curves to adjust the balance between the two colors and achieve the desired effect.
22. What Role Does the Choice of Font Play When Adding Text to Vintage Photos?
The choice of font plays a critical role when adding text to vintage photos, as it can either enhance or detract from the overall aesthetic. Opting for vintage-inspired fonts that mimic the typography of the era can seamlessly integrate the text with the photo, adding to its authenticity.
Here’s why it matters:
- Enhances Authenticity: Vintage-inspired fonts can evoke a sense of nostalgia and enhance the authenticity of the photo.
- Maintains Consistency: Using fonts that match the era of the photo helps maintain visual consistency and strengthens the vintage feel.
- Avoids Clashes: Modern or overly stylized fonts can clash with the vintage aesthetic, diminishing the overall impact.
23. How Can I Replicate the Look of Tintype Photography in My Digital Images?
To replicate the look of tintype photography in your digital images, focus on creating a monochromatic image with high contrast, strong vignetting, and unique imperfections that mimic the tintype process.
Here’s how to achieve it:
- Convert to Monochromatic: Convert the image to black and white or sepia.
- Increase Contrast: Boost the contrast to create a dramatic tonal range.
- Add Vignetting: Darken the corners of the image to simulate the vignetting common in tintypes.
- Introduce Imperfections: Add scratches, dust specks, and uneven development effects for authenticity.
24. What Are Some Tips for Enhancing the Storytelling Aspect in Vintage Photos?
Tips for enhancing the storytelling aspect in vintage photos include focusing on capturing candid moments, incorporating meaningful props, and using composition to convey a sense of narrative and emotion.
Here are some detailed suggestions:
- Capture Candid Moments: Focus on capturing authentic and spontaneous moments that reveal the personality and emotions of your subjects.
- Incorporate Meaningful Props: Use props that are relevant to the story you want to tell and that evoke a sense of history and nostalgia.
- Use Composition to Convey Emotion: Pay attention to composition, using elements like leading lines, framing, and rule of thirds to guide the viewer’s eye and convey a sense of narrative and emotion.
25. How Can I Create a Vintage Photo Album Effect Digitally?
You can create a vintage photo album effect digitally by combining individual vintage-style photos with scanned or digital recreations of old album pages, complete with aged textures, handwritten captions, and decorative elements.
Here’s a breakdown:
- Prepare Vintage-Style Photos: Edit your photos to achieve a vintage aesthetic using the techniques discussed earlier.
- Create or Scan Album Pages: Scan old album pages or create digital recreations with aged textures, torn edges, and faded colors.
- Arrange Photos on Album Pages: Arrange your vintage-style photos on the album pages, leaving space for captions and decorative elements.
- Add Handwritten Captions: Add handwritten captions using a vintage-inspired font or a digital pen tool.
- Incorporate Decorative Elements: Include vintage-style stickers, stamps, and other decorative elements to enhance the authenticity of the album effect.
At dfphoto.net, we understand the allure of vintage photography and the desire to infuse modern images with timeless charm. Whether you’re a seasoned photographer or just beginning your creative journey, our website offers a wealth of resources to help you master the art of creating vintage photo effects.
Ready to explore the world of vintage photography and elevate your skills? Visit dfphoto.net today to discover inspiring tutorials, stunning photo collections, and a vibrant community of fellow photography enthusiasts. For any questions or collaborations, feel free to reach out to us at 1600 St Michael’s Dr, Santa Fe, NM 87505, United States, or call us at +1 (505) 471-6001. Let’s create something beautiful together.
FAQ About Making Photos Look Vintage
1. What is the easiest way to make photos look vintage?
The easiest way to make photos look vintage is by using pre-made filters in photo editing apps like VSCO or Instagram, which quickly apply vintage-inspired color adjustments, contrast, and grain.
2. Can I make a vintage photo without special software?
Yes, you can create a vintage photo without special software by adjusting basic settings like brightness, contrast, and color balance in any photo editor, even those available on your phone or computer.
3. How do I choose the right colors for a vintage effect?
Choose colors that are muted and warm, such as sepia tones, yellows, and browns, to create a vintage effect. These colors mimic the look of aged film and old photographs.
4. What kind of grain should I add to a vintage photo?
Add a subtle, fine grain to a vintage photo to replicate the texture of old film. Avoid using too much grain, as it can make the photo look overly noisy and artificial.
5. How important is lighting in creating a vintage photo?
Lighting is very important. Soft, diffused lighting is ideal for creating a vintage photo, as it reduces harsh shadows and creates a more gentle, nostalgic feel.
6. Should I use black and white for a vintage effect?
Using black and white can be very effective for creating a vintage effect, especially when combined with high contrast and subtle grain to mimic classic black and white film photography.
7. What are some common mistakes to avoid when creating vintage photos?
Avoid overusing effects, saturating colors too much, and neglecting composition. Subtle adjustments and a focus on storytelling are key to creating an authentic vintage look.
8. How do I add realistic light leaks to my vintage photos?
Add realistic light leaks by using overlays or editing software to create subtle streaks of light across the image, mimicking the effect of light entering the camera body.
9. Can I make a vintage photo from a color photo?
Yes, you can easily make a vintage photo from a color photo by desaturating the colors, adjusting the color balance towards warmer tones, and adding grain and other vintage effects.
10. What types of photos look best with a vintage effect?
Portraits, landscapes, and everyday scenes can all look great with a vintage effect, especially when they evoke a sense of nostalgia or tell a compelling story.