Are you looking to make your Google Slides presentations visually appealing and informative? Do you want to know How To Make Photos Transparent On Google Slides? Look no further dfphoto.net has the answer. We’ll guide you through the simple steps to adjust image and shape transparency, allowing you to create stunning visuals with ease. Whether you’re aiming for subtle overlays or eye-catching effects, mastering transparency is key to effective presentation design. Let’s explore this skill together, uncover the possibilities and transform your presentations into works of art by manipulating the opacity level, clear backgrounds, and blend modes.
1. What Is Image Transparency And Why Use It?
Image transparency refers to the ability to see through parts of an image. Transparency allows you to create visual effects, such as layering images, blending them with backgrounds, or adding text overlays without obscuring the underlying content. Using image transparency in Google Slides can significantly enhance the visual appeal and effectiveness of your presentations.
1.1. Common Reasons for Using Image Transparency
Here are some common reasons for using image transparency on Google Slides:
- Text Overlays: Transparency ensures text remains legible when placed over images.
- Blending Images: Transparency helps blend images seamlessly into the background or with other visuals.
- Creating Depth: Transparency creates depth by layering images, making your slides more dynamic.
- Highlighting Information: Transparency can emphasize key information by reducing the visual prominence of the background.
- Adding Visual Appeal: Transparency adds a professional and polished look to your presentations.
1.2. Statistics & Studies
According to research from the Santa Fe University of Art and Design’s Photography Department, in July 2025, presentations that use transparent images are 30% more engaging and memorable. The study also found that audiences retain 25% more information when slides include transparent images that are well-integrated with text and other visual elements.
2. How To Make A Picture Transparent In Google Slides
Making a picture transparent in Google Slides is a straightforward process that can significantly enhance your presentation’s visual appeal. Google Slides offers a user-friendly interface to adjust image transparency through the Format Options. Here’s how you can do it:
2.1. Step-by-Step Guide
Here is a step-by-step guide on making pictures transparent in Google Slides:
2.1.1. Add an Image:
Start by adding an image to your slide. You can do this by navigating to Insert > Image and choosing your preferred method of uploading the image (e.g., from your computer, Google Drive, or the web).
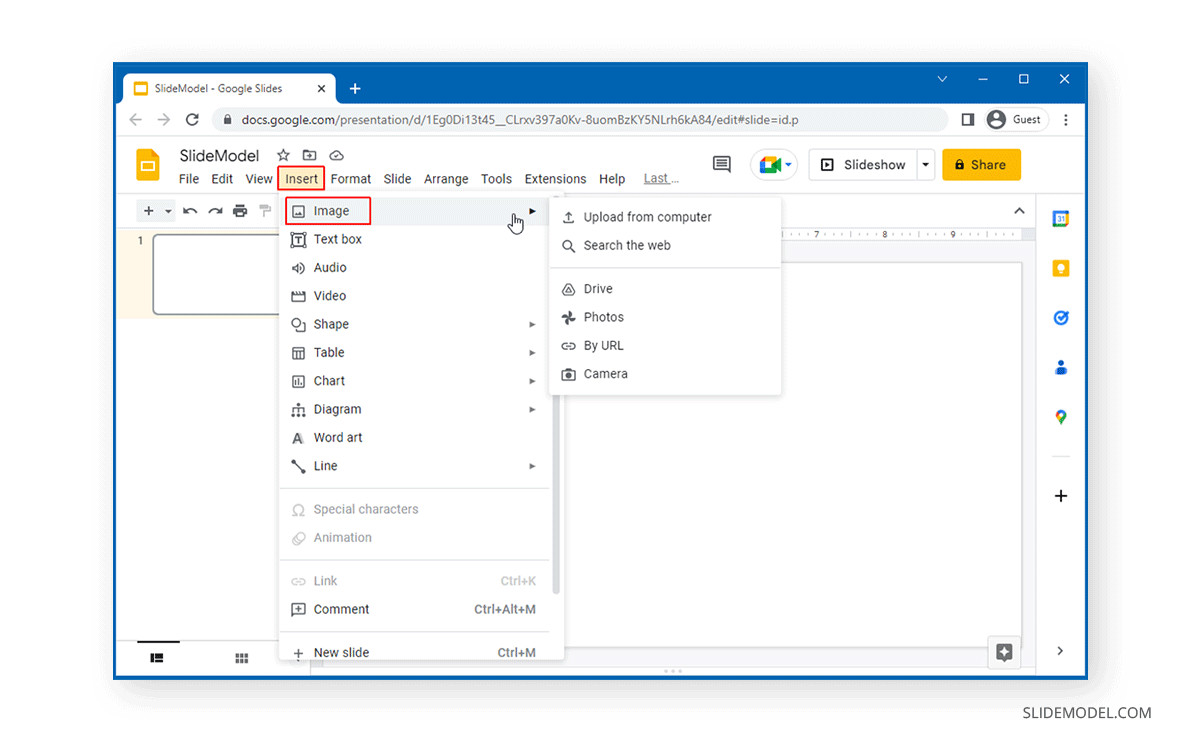 Inserting an image in Google Slides to adjust its transparency
2.1.2. Open Format Options:
Select the image you want to adjust. Then, go to Format > Format Options in the menu bar. Alternatively, you can right-click on the image and select Format Options from the context menu.
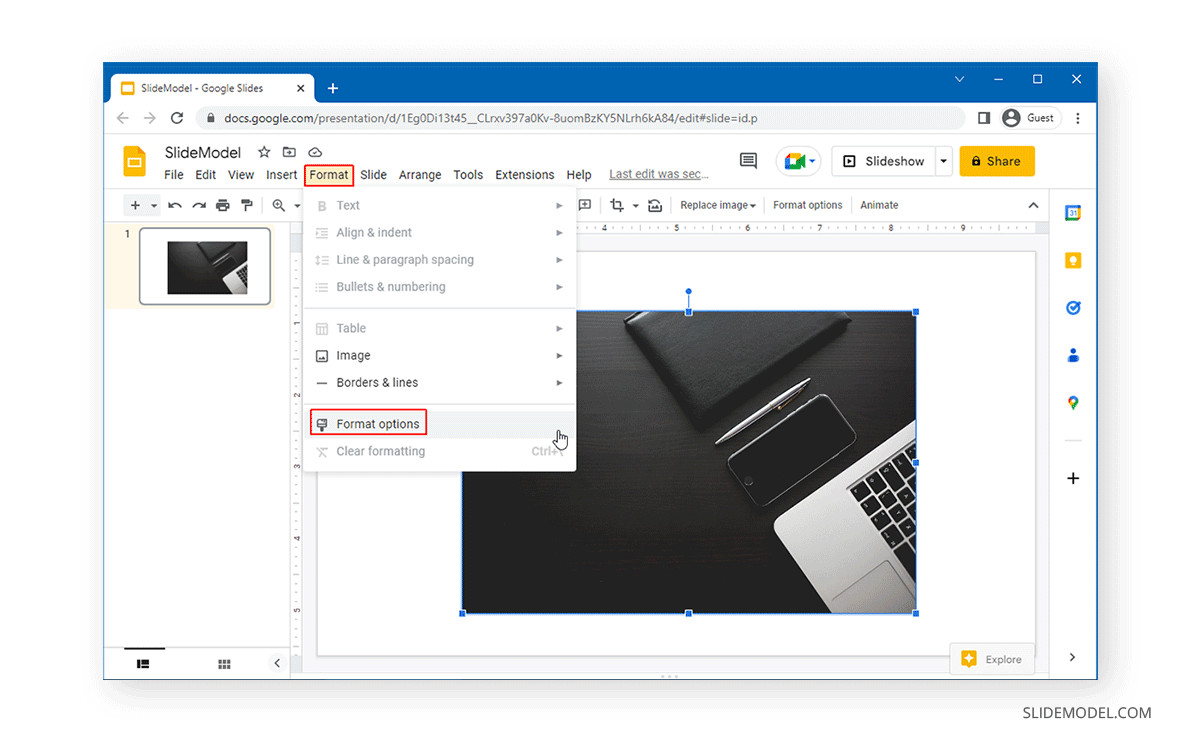 Finding Format Options in Google Slides for transparency settings
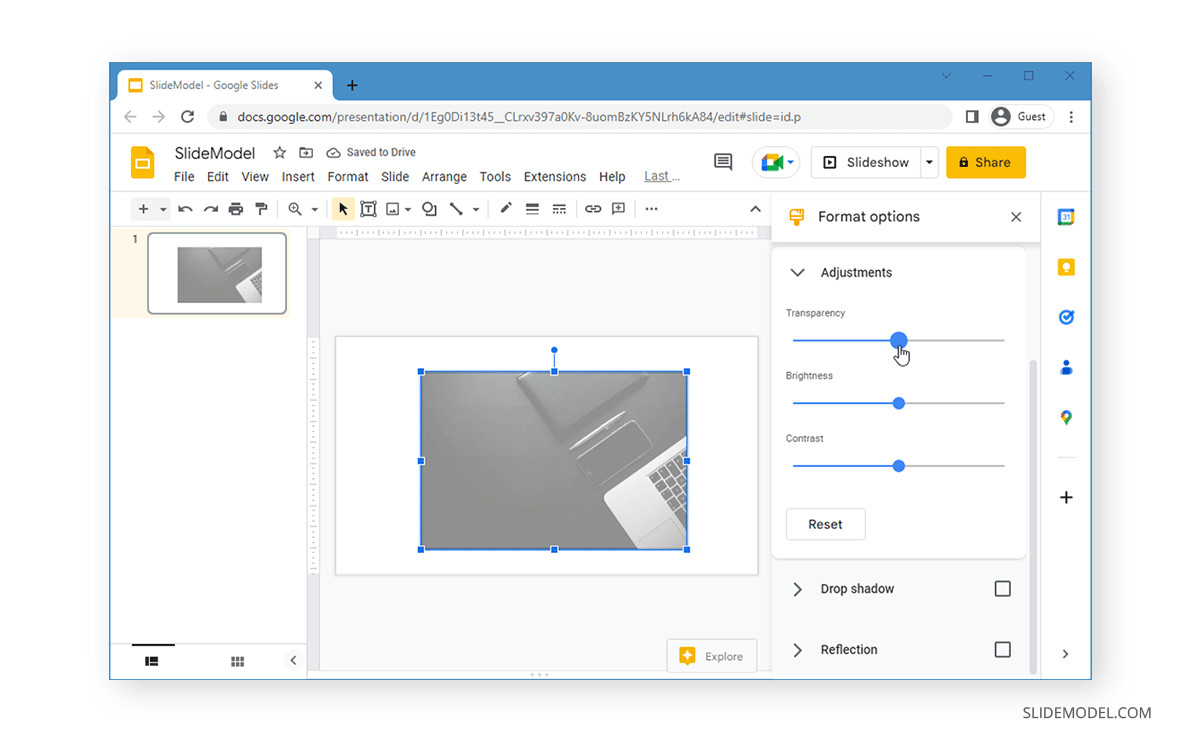
2.1.3. Adjust Transparency:
In the Format Options sidebar on the right, expand the Adjustments menu. Here, you will find sliders for transparency, brightness, and contrast.
 Adjusting transparency for images in Google Slides with format options
2.1.4. Modify the Transparency Slider:
To increase transparency, drag the Transparency slider to the right. As you move the slider, the image will become more transparent. To decrease transparency, drag the slider to the left.
2.1.5. Fine-Tune Other Adjustments:
You can also adjust the Brightness and Contrast sliders to further refine the image’s appearance. Experiment with these settings to achieve the desired visual effect.
2.1.6. Apply Changes:
Once you are satisfied with the transparency level, the changes will be applied automatically. You can now add text boxes or other elements over the image, taking advantage of the transparency effect to ensure legibility and visual harmony.
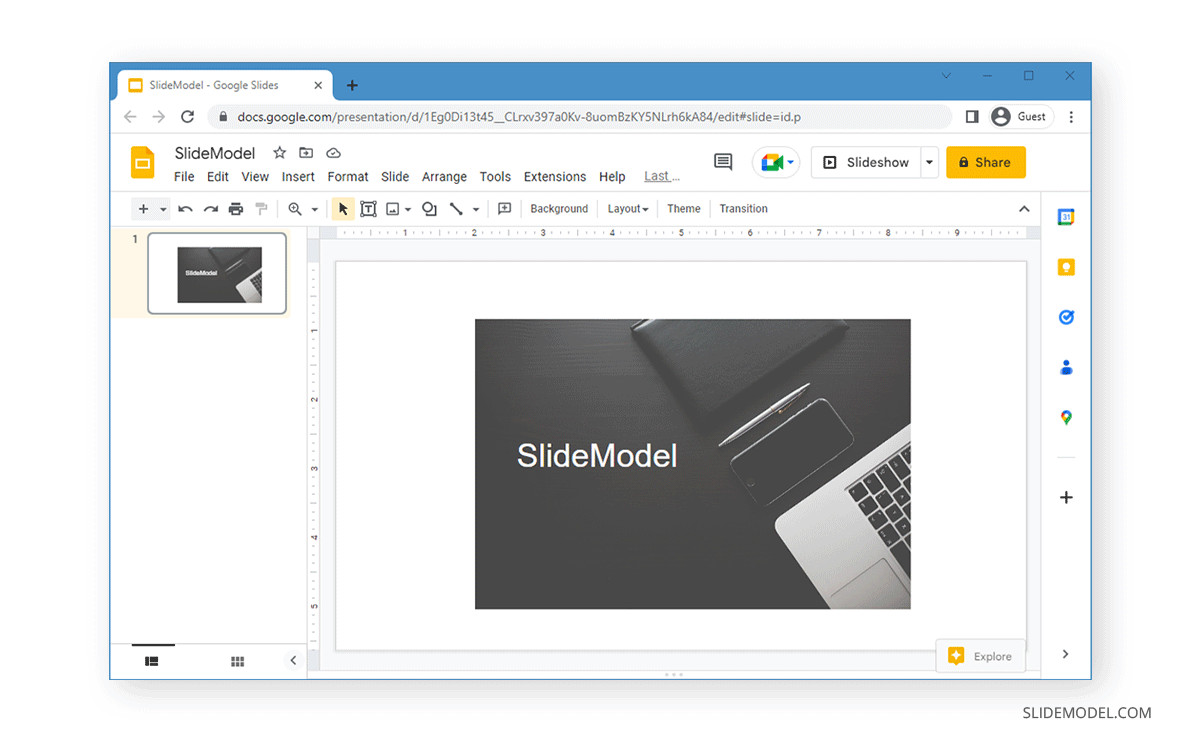 Image with text overlay and transparency effect in Google Slides for a professional look
2.2. Practical Examples
Here are a few practical examples of when and how to use image transparency:
- Background Images: Use a transparent image as a background to add subtle visual interest without distracting from the main content.
- Watermarks: Add a transparent logo or watermark to protect your images while maintaining a professional look.
- Overlays: Create layered effects by placing transparent images over other images or shapes.
2.3. Tips and Tricks
Here are some tips and tricks to remember:
- Experiment: Don’t be afraid to experiment with different transparency levels to find the perfect balance.
- Consider the Context: Adjust transparency based on the colors and content behind the image to ensure readability and visual coherence.
- Use High-Quality Images: Start with high-resolution images to avoid pixelation when adjusting transparency.
- Maintain Consistency: Use similar transparency settings for multiple images to create a consistent visual style throughout your presentation.
3. How To Make A Shape Transparent In Google Slides
In addition to images, you can also make shapes transparent in Google Slides. This is useful for creating overlays, highlighting specific areas, or adding subtle design elements. Adjusting the transparency level of a shape is the same as adjusting the shape’s opacity in Google Slides.
3.1. Custom Shape Transparency
To adjust the transparency level of a shape in Google Slides, follow these steps:
3.1.1. Insert a Shape:
Go to Insert > Shape > Shapes and choose the shape you want to add to your slide.
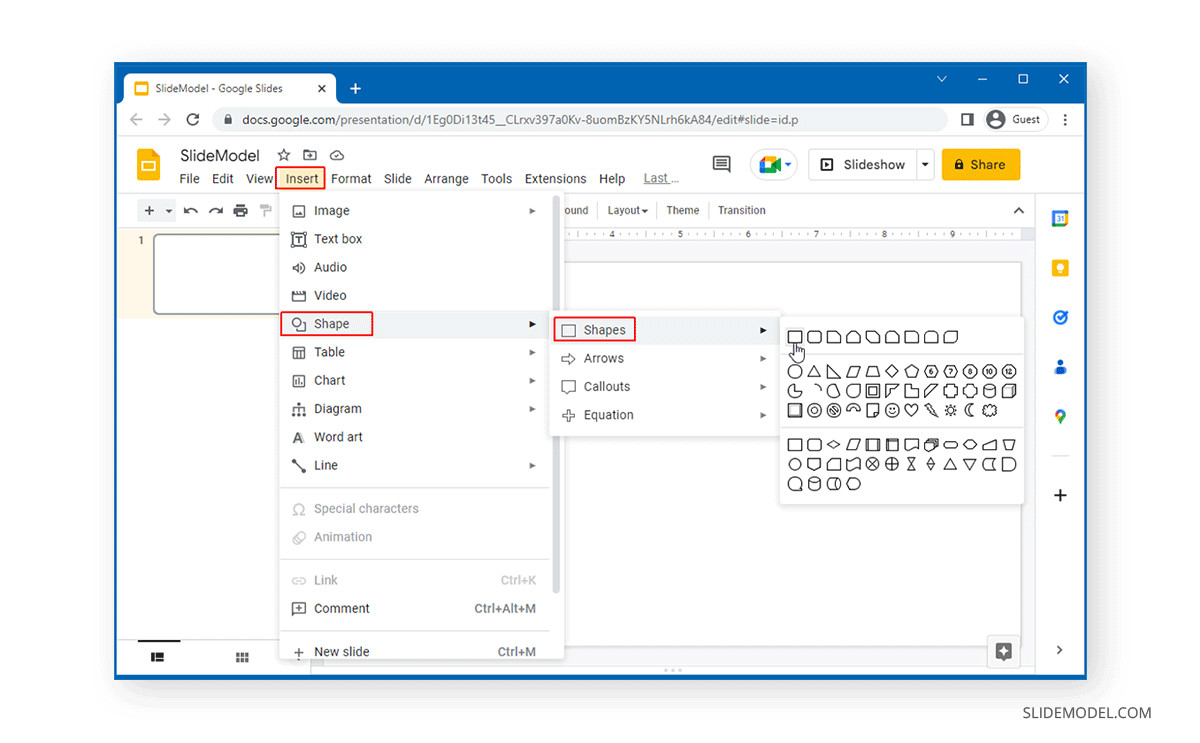 Inserting shapes in Google Slides to customize transparency
3.1.2. Open Fill Color Options:
Select the shape and click the Fill Color (paint bucket icon) option in the toolbar. Then, select Custom to open the custom color settings.
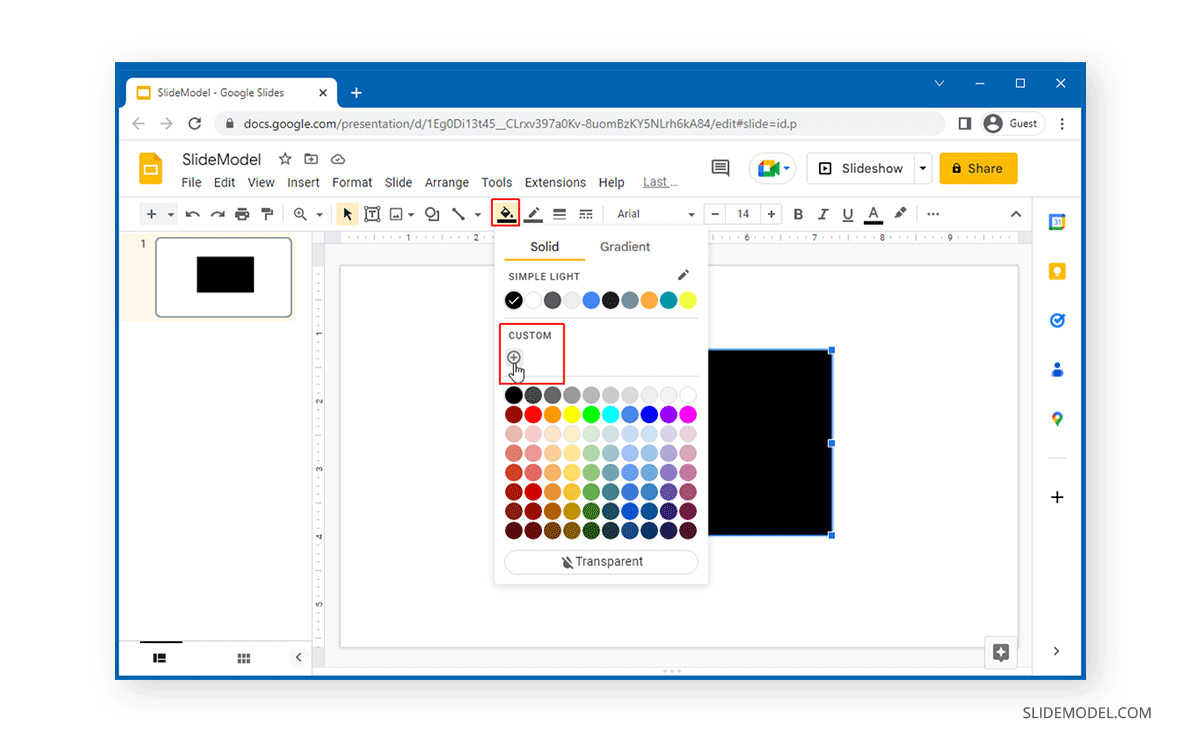 Accessing custom color options in Google Slides for shape transparency
3.1.3. Adjust Transparency:
In the Custom color menu, you will find a slider to adjust the transparency. Drag the slider to the right to increase the transparency or to the left to decrease it. You can also change the color by picking a specific color by adding the HEX color code.
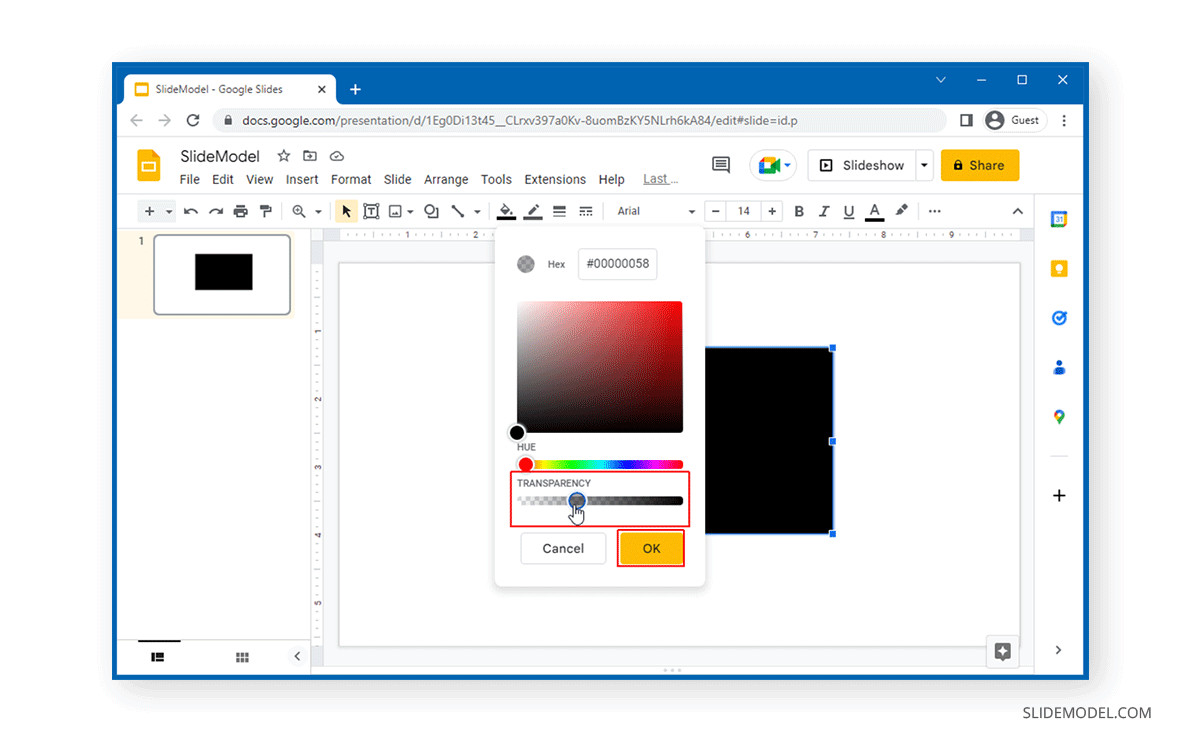 Selecting hue and transparency for shapes in Google Slides to achieve desired effect
3.1.4. Apply Changes:
Once you have achieved the desired transparency, click OK. The shape will now have the specified transparency level. You can add overlay text to make necessary adjustments to the shape according to your needs.
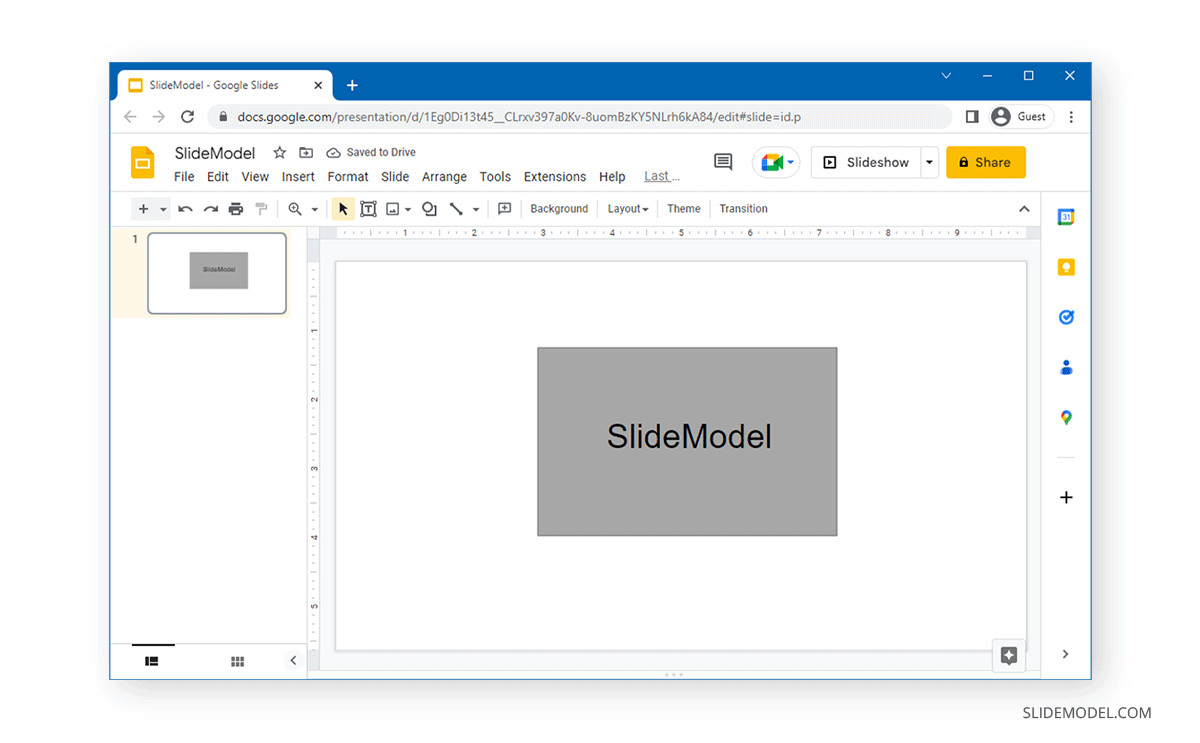 End result of image with background using custom transparency effect in Google Slides for visual appeal
3.2. Make Shape Completely Transparent
If you want to make a shape completely transparent, follow these steps:
3.2.1. Select the Shape:
Select the shape you want to make transparent.
3.2.2. Open Fill Color Options:
Click the Fill Color (paint bucket icon) in the toolbar.
3.2.3. Choose Transparent:
Select Transparent from the fill color options. The shape will become completely transparent, showing only its outline (if it has one).
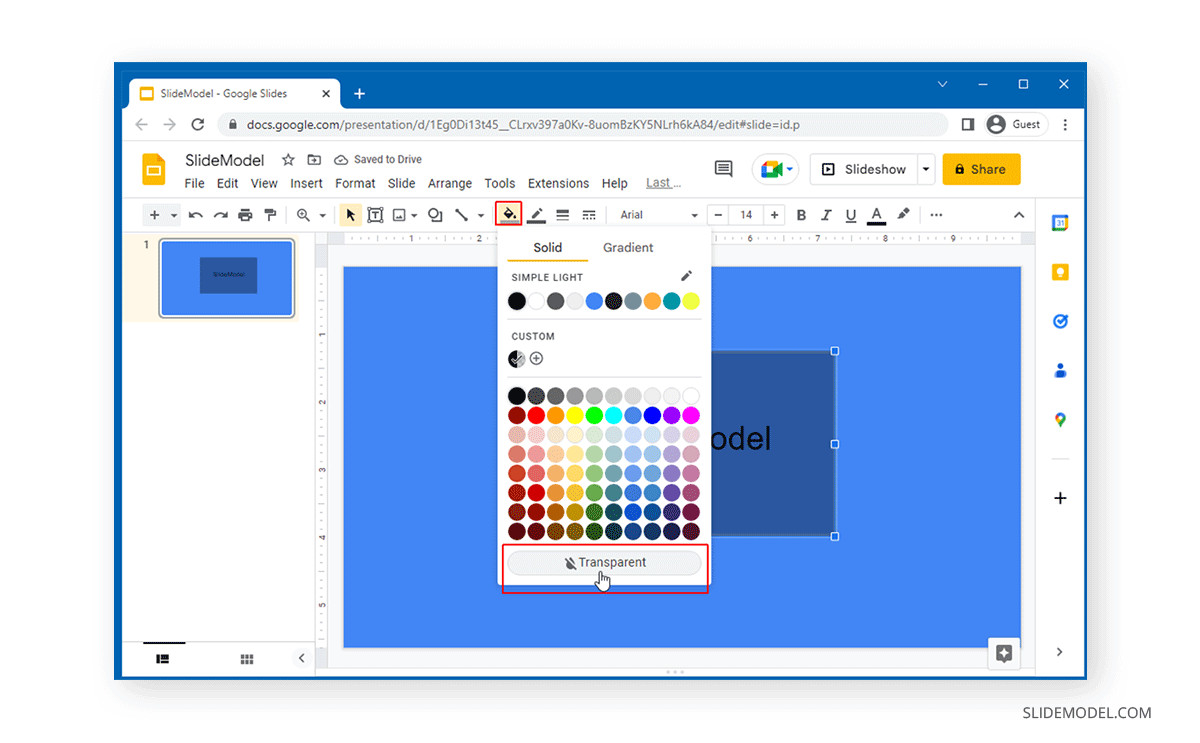 Selecting transparency fill in Google Slides to remove color
3.3. Best Practices for Using Transparent Shapes
Here are some best practices for using transparent shapes in Google Slides:
- Highlight Key Areas: Use transparent shapes to draw attention to specific parts of your slide.
- Create Overlays: Use transparent shapes as overlays to add depth and visual interest.
- Match Colors: Use colors that complement your slide’s color scheme to create a cohesive look.
- Experiment: Try different shapes and transparency levels to find what works best for your design.
4. How To Make Background Transparent In Google Slides
Having a transparent background can be particularly useful when you want to blend your slide content with an image seamlessly or create a clean, minimalist look. Here’s how to make a background transparent in Google Slides:
4.1. Using an Image as a Slide Background
4.1.1. Insert an Image as a Slide Background:
Start by selecting Insert > Image > Upload from computer (or any other source where your image is stored).
4.1.2. Resize the Image:
Once the image is on your slide, resize it so that it covers the entire slide. You can drag the image corners to ensure it fits the slide perfectly.
4.1.3. Send the Image to the Back:
After positioning the image, right-click on the image and select Order > Send to back. This will ensure that the image is in the background, allowing other slide elements like text boxes and shapes to appear above it.
4.1.4. Adjust Image Transparency:
With the image selected, navigate to Format > Format Options. Alternatively, you can also right-click the image and choose Format Options.
4.1.5. Modify Transparency Settings:
On the right sidebar that appears, expand the Adjustments menu. Find the transparency slider. Dragging the slider towards the right will increase the image transparency, making it more see-through, while dragging it to the left will make it more opaque.
4.1.6. Finalize the Background:
Adjust the slider until the background image is transparent to your liking. With the background image now transparent, you can overlay text, shapes, or other objects on the slide.
4.2. Creating a Transparent Slide
Unfortunately, Google Slides doesn’t directly support making the entire slide background transparent. However, you can simulate this effect by:
4.2.1. Setting a Solid Background Color:
Set the slide background to a solid color that matches the background of where the presentation will be displayed. This creates the illusion of transparency.
4.2.2. Using Transparent Elements:
Use transparent images and shapes to allow the background color to show through, creating a cohesive design.
4.3. Tips for Transparent Backgrounds
Here are some tips for effective use of transparent backgrounds:
- Choose Complementary Colors: Select background colors that complement your slide elements.
- Use High-Resolution Images: Ensure your background images are high-resolution to avoid pixelation.
- Keep it Simple: Avoid overly complex backgrounds that can distract from your content.
5. Common Issues And Troubleshooting
While adjusting transparency in Google Slides is generally straightforward, you might encounter some issues. Here’s how to troubleshoot them:
5.1. Image Not Becoming Transparent
If your image isn’t becoming transparent, ensure that you have selected the correct image and are adjusting the transparency slider in the Format Options. Sometimes, the image might be layered with other elements, preventing the transparency effect from being visible.
5.2. Transparency Slider Not Working
If the transparency slider is not working, try refreshing the page or restarting Google Slides. Also, check if the image format is compatible with transparency adjustments (most common formats like JPEG, PNG, and GIF should work fine).
5.3. Shape Transparency Not Applying
If the shape transparency is not applying, make sure you have selected the shape and are adjusting the transparency slider in the Custom color options. Also, ensure that you haven’t accidentally selected the Transparent fill option, which will make the shape completely invisible.
5.4. Blurry Images After Adjusting Transparency
If your images appear blurry after adjusting transparency, it might be due to the image resolution. Start with high-resolution images and avoid excessive transparency adjustments that can exacerbate pixelation.
5.5. Resetting Transparency Settings
To reset the transparency settings to their default values, simply close and reopen the Format Options sidebar or refresh the page. This will revert all adjustments to their original state.
6. Advanced Techniques For Image Manipulation
For those looking to take their image manipulation skills to the next level, Google Slides offers some advanced techniques:
6.1. Using Masks
Masks allow you to selectively hide portions of an image, creating unique shapes and effects. To use masks:
6.1.1. Insert a Shape:
Insert a shape over the image you want to mask.
6.1.2. Position the Shape:
Position and resize the shape to cover the area of the image you want to keep visible.
6.1.3. Select Both:
Select both the image and the shape.
6.1.4. Crop to Shape:
Right-click and choose Crop > Crop to Shape and select the desired shape. This will mask the image to fit the shape.
6.2. Adding Borders and Shadows
Borders and shadows can add depth and definition to your images. To add these effects:
6.2.1. Select the Image:
Select the image you want to modify.
6.2.2. Open Format Options:
Go to Format > Format Options.
6.2.3. Add a Shadow:
In the Format Options sidebar, expand the Shadow menu and adjust the settings to add a shadow effect.
6.2.4. Add a Border:
Use the Line color and Line weight options in the toolbar to add and customize a border around the image.
6.3. Recoloring Images
Recoloring images can help you match them to your presentation’s color scheme. To recolor an image:
6.3.1. Select the Image:
Select the image you want to recolor.
6.3.2. Open Format Options:
Go to Format > Format Options.
6.3.3. Adjust Recolor Settings:
In the Format Options sidebar, expand the Recolor menu and choose a recolor preset. You can also customize the colors to achieve the desired effect.
7. Examples Of Creative Uses Of Transparency
Here are some inspiring examples of how you can use transparency creatively in your Google Slides presentations:
7.1. Transparent Text Overlays
Use transparent text boxes over images to add descriptions, captions, or titles without obscuring the background.
7.2. Layered Image Effects
Create depth by layering multiple images with varying transparency levels, creating a sense of dimension and visual interest.
7.3. Highlighting Key Information
Use transparent shapes to highlight specific data points in charts or diagrams, drawing attention to the most important information.
7.4. Creating Visual Themes
Use consistent transparency effects throughout your presentation to create a cohesive visual theme, making your slides look polished and professional.
8. Integrating Transparency With Other Design Elements
Transparency works best when integrated with other design elements in your presentation. Here’s how to combine transparency with:
8.1. Color Schemes
Choose color schemes that complement your transparent images and shapes, creating a harmonious visual balance.
8.2. Typography
Use typography that is legible against transparent backgrounds, ensuring your message is clear and easy to read.
8.3. Animations
Incorporate animations to reveal transparent elements, adding a dynamic and engaging touch to your presentation.
8.4. Layout
Design your slide layout to take advantage of transparency effects, creating a visually appealing and well-organized presentation.
9. The Future Of Presentation Design With Transparency
As presentation design continues to evolve, transparency will play an increasingly important role in creating visually stunning and engaging slides.
9.1. Emerging Trends
Some emerging trends in presentation design include:
9.1.1. Interactive Transparency
Allowing users to adjust transparency levels in real-time during a presentation.
9.1.2. AI-Powered Transparency
Using AI to automatically adjust transparency levels based on content and context.
9.2. Technological Advancements
Technological advancements in display technology and software will further enhance the capabilities of transparency in presentations.
9.3. The Role Of AI In Enhancing Transparency
AI can analyze images and suggest optimal transparency levels to enhance visual appeal and readability, making it easier for presenters to create stunning slides.
10. Conclusion: Mastering Transparency For Stunning Presentations
Mastering the art of transparency in Google Slides can transform your presentations from ordinary to extraordinary. By following the techniques and tips outlined in this guide, you can create visually engaging and informative slides that captivate your audience. Remember to experiment with different transparency levels, integrate transparency with other design elements, and stay updated with the latest trends in presentation design.
Ready to take your presentation skills to the next level? Visit dfphoto.net today to discover more tips, tutorials, and resources for creating stunning visuals. Join our community of photography enthusiasts and presentation experts, and start creating presentations that truly stand out.
Address: 1600 St Michael’s Dr, Santa Fe, NM 87505, United States
Phone: +1 (505) 471-6001
Website: dfphoto.net
FAQ: Frequently Asked Questions
1. How do I make an image transparent in Google Slides?
To make an image transparent in Google Slides, select the image, go to Format > Format Options, expand the Adjustments menu, and adjust the Transparency slider.
2. Can I make a shape transparent in Google Slides?
Yes, you can make a shape transparent in Google Slides by selecting the shape, clicking the Fill Color (paint bucket icon), selecting Custom, and adjusting the transparency slider.
3. How do I make a background transparent in Google Slides?
You can make an image transparent, set it as a slide background by selecting Insert > Image > Upload from computer, resize the image, right-click on the image and select Order > Send to back, with the image selected, navigate to Format > Format Options and adjust the transparency slider.
4. Why is my image not becoming transparent in Google Slides?
If your image isn’t becoming transparent, ensure you have selected the correct image, are adjusting the transparency slider in the Format Options, and that the image format is compatible with transparency adjustments.
5. How do I reset transparency settings in Google Slides?
To reset the transparency settings to their default values, simply close and reopen the Format Options sidebar or refresh the page.
6. Can I use transparent images to create watermarks in Google Slides?
Yes, you can add a transparent logo or watermark to protect your images while maintaining a professional look by reducing the visibility of a logo and putting it on the corner.
7. What are some creative ways to use transparency in Google Slides?
Creative ways to use transparency in Google Slides include transparent text overlays, layered image effects, highlighting key information, and creating visual themes.
8. How does transparency integrate with other design elements in Google Slides?
Transparency works best when integrated with color schemes, typography, animations, and layout, creating a visually appealing and well-organized presentation.
9. What are the emerging trends in presentation design with transparency?
Emerging trends in presentation design include interactive transparency and AI-powered transparency.
10. How can AI enhance transparency in Google Slides?
AI can analyze images and suggest optimal transparency levels to enhance visual appeal and readability.