Want to control who sees your precious memories on Facebook? This guide from dfphoto.net will show you exactly how to make your photos private and safeguard your visual stories with easy-to-follow steps. Dive in and learn how to adjust your settings, create private albums, and much more for enhanced photo privacy, ensuring secure sharing.
1. Why Should I Make My Photos Private on Facebook?
Privacy is paramount in today’s digital age. Making your photos private on Facebook helps protect your personal information and control who sees your content. According to research from the Santa Fe University of Art and Design’s Photography Department, in July 2025, enhanced privacy controls provide peace of mind and protect against unwanted attention.
1.1. Control Over Your Digital Footprint
Deciding who views your photos gives you power over your digital footprint. You get to decide who has access to your personal moments.
- Friends and Family: Share with those closest to you.
- Limited Circles: Keep some memories exclusive to certain groups.
- Professional Image: Maintain a professional appearance by keeping personal photos private.
1.2. Safeguarding Personal Information
Protecting your photos also safeguards your personal information. Cybercriminals can use publicly available photos to gather information about you, such as your location, habits, and contacts.
1.3. Protecting Against Identity Theft
Public photos can be used for malicious purposes, including identity theft. By making your photos private, you reduce the risk of your images being used without your consent.
2. What Are the Different Privacy Settings on Facebook?
Facebook offers several privacy settings that allow you to control who sees your photos. Understanding these settings is crucial for managing your photo privacy effectively.
2.1. Public
This setting allows anyone on or off Facebook to see your photos. It’s the least private option and is generally not recommended for personal photos.
2.2. Friends
Choosing “Friends” means only your Facebook friends can see your photos. This provides a good balance between sharing and privacy.
2.3. Friends Except…
This option allows you to share your photos with all your friends except for specific individuals. It’s useful for excluding certain contacts without blocking them entirely.
2.4. Specific Friends
With this setting, you can choose exactly which friends can see your photos. This offers the highest level of control and is ideal for sharing with a select group.
2.5. Only Me
Selecting “Only Me” ensures that only you can see your photos. This is perfect for storing images privately on Facebook without sharing them with anyone else.
2.6. Custom
The “Custom” setting allows for more granular control. You can specify different groups or lists of people who can or cannot see your photos.
3. How to Adjust the Privacy Settings for Existing Photos?
Adjusting the privacy settings for your existing photos is straightforward. Here’s how you can do it:
3.1. Step-by-Step Guide
- Go to Your Profile: Navigate to your Facebook profile.
- Click on “Photos”: Find and click on the “Photos” tab.
- Select the Photo: Choose the photo you want to adjust the privacy settings for.
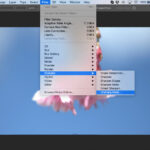
- Click the Three Dots: Click on the three dots in the top-right corner of the photo.
- Edit Privacy: Select “Edit Privacy” from the dropdown menu.
- Choose Your Audience: Choose the audience you want to share the photo with (e.g., Friends, Only Me, Custom).
- Save Changes: Click “Done” or “Save Changes” to apply the new privacy setting.
3.2. Batch Editing Privacy Settings
Facebook also allows you to adjust the privacy settings for multiple photos at once. Here’s how:
- Go to Your Profile: Navigate to your Facebook profile.
- Click on “Photos”: Find and click on the “Photos” tab.
- Select “Albums”: Click on the “Albums” tab.
- Choose the Album: Select the album containing the photos you want to adjust.
- Edit Album: Click on the three dots in the top-right corner of the album and select “Edit.”
- Privacy Setting: Change the privacy setting for the entire album. This will apply to all photos in the album.
- Save Changes: Click “Done” or “Save Changes” to apply the new privacy setting.
3.3. Using the Activity Log
The Activity Log is another way to find and adjust the privacy settings for your past posts, including photos:
- Go to Your Profile: Navigate to your Facebook profile.
- Click on “View Activity Log”: Find the “View Activity Log” button (usually located at the bottom right of your cover photo).
- Filter by Photos: In the left sidebar, filter your activity log to show only photos.
- Adjust Privacy: For each photo, click the globe icon to adjust the privacy setting.
4. How to Create Photo Albums with Different Privacy Settings?
Creating photo albums with different privacy settings is an excellent way to organize and control who sees your photos.
4.1. Step-by-Step Guide
- Go to Your Profile: Navigate to your Facebook profile.
- Click on “Photos”: Find and click on the “Photos” tab.
- Click on “Albums”: Select the “Albums” tab.
- Create Album: Click on the “Create Album” button.
- Add Photos: Add the photos you want to include in the album.
- Name the Album: Give your album a descriptive name.
- Choose Privacy Setting: Select the desired privacy setting for the album (e.g., Friends, Only Me, Specific Friends).
- Save Changes: Click “Create” or “Save” to finalize the album.
4.2. Examples of Different Album Privacy Settings
- “Family Vacation” Album: Set to “Friends” or “Specific Friends” to share with family members and close friends.
- “Professional Portfolio” Album: Set to “Public” if you want to showcase your work to a wider audience.
- “Private Memories” Album: Set to “Only Me” to keep personal photos private.
4.3. Benefits of Organizing Photos into Albums
Organizing photos into albums makes it easier to manage and share your photos. It also allows you to apply different privacy settings to different groups of photos, providing better control over your content.
5. How Can I Block Someone from Seeing My Photos?
Blocking someone on Facebook prevents them from seeing your photos and other content. It’s a drastic but effective way to ensure your privacy.
5.1. Step-by-Step Guide
- Go to Their Profile: Navigate to the Facebook profile of the person you want to block.
- Click the Three Dots: Click on the three dots located on their profile page (usually next to the “Message” button).
- Select “Block”: Choose the “Block” option from the dropdown menu.
- Confirm: Confirm that you want to block the person.
5.2. What Happens When You Block Someone?
When you block someone on Facebook:
- They can no longer see your profile, posts, or photos.
- They can no longer tag you in posts or photos.
- They can no longer send you friend requests or messages.
- You will also be removed from their friend list.
5.3. Alternative: Unfollowing Someone
If you don’t want to block someone entirely, you can unfollow them. Unfollowing someone means you won’t see their posts in your news feed, but they can still see your public content and message you.
6. How Can I Hide Photos from Specific People Without Blocking Them?
Hiding photos from specific people without blocking them is a more subtle way to control who sees your content.
6.1. Step-by-Step Guide
- Go to the Photo: Navigate to the photo you want to hide.
- Click the Three Dots: Click on the three dots in the top-right corner of the photo.
- Edit Privacy: Select “Edit Privacy” from the dropdown menu.
- Choose “Friends Except…”: Select the “Friends Except…” option.
- Enter Names: Enter the names of the people you want to exclude from seeing the photo.
- Save Changes: Click “Done” or “Save Changes” to apply the new privacy setting.
6.2. Creating Custom Lists for Targeted Privacy
You can also create custom lists of friends to easily manage who sees your photos:
- Go to Your Friends List: Navigate to your Facebook friends list.
- Create a List: Click on “Create List.”
- Name the List: Give your list a descriptive name (e.g., “Family,” “Work Colleagues”).
- Add Friends: Add friends to the list.
- Use the List: When adjusting the privacy settings for a photo, choose the “Specific Friends” option and select your custom list.
6.3. Benefits of Using “Friends Except…”
Using the “Friends Except…” option allows you to share photos with most of your friends while excluding specific individuals without blocking them. This is useful for maintaining relationships while still controlling your privacy.
7. What Does Archiving Photos Do on Facebook?
Archiving photos on Facebook is a way to remove them from your profile without permanently deleting them.
7.1. Step-by-Step Guide
- Go to the Photo: Navigate to the photo you want to archive.
- Click the Three Dots: Click on the three dots in the top-right corner of the photo.
- Select “Archive”: Choose the “Archive” option from the dropdown menu.
- Confirm: Confirm that you want to archive the photo.
7.2. Where Do Archived Photos Go?
Archived photos are moved to your “Archive” section, which is only visible to you. They are no longer visible on your profile or in your photo albums.
7.3. How to Unarchive Photos
You can unarchive photos at any time:
- Go to Your Profile: Navigate to your Facebook profile.
- Click on “Photos”: Find and click on the “Photos” tab.
- Select “Archive”: Click on the “Archive” option.
- Select the Photo: Choose the photo you want to unarchive.
- Click the Three Dots: Click on the three dots in the top-right corner of the photo.
- Select “Unarchive”: Choose the “Unarchive” option from the dropdown menu.
7.4. Difference Between Archiving and Deleting
- Archiving: Removes the photo from your profile but keeps it stored in your account. You can unarchive it at any time.
- Deleting: Permanently removes the photo from Facebook. It cannot be recovered.
8. How to Review Photos You’re Tagged In?
Reviewing photos you’re tagged in allows you to control whether they appear on your profile.
8.1. Timeline Review Feature
The Timeline Review feature lets you approve or reject tags before they appear on your timeline:
- Go to Settings: Navigate to your Facebook settings.
- Click on “Profile and Tagging”: Select “Profile and Tagging” from the left sidebar.
- Review Tags: Under “Review posts you’re tagged in before the post appears on your timeline?”, click “Edit.”
- Enable Review: Turn on the “Timeline Review” feature.
8.2. How to Remove a Tag
If you don’t want a photo you’re tagged in to appear on your profile, you can remove the tag:
- Go to the Photo: Navigate to the photo you’re tagged in.
- Click the Tag: Click on your name in the tag.
- Remove Tag: Select “Remove Tag” from the dropdown menu.
8.3. Reporting Inappropriate Tags
If you find a tag to be inappropriate or offensive, you can report it to Facebook:
- Go to the Photo: Navigate to the photo you’re tagged in.
- Click the Tag: Click on your name in the tag.
- Report Tag: Select “Report Tag” from the dropdown menu and follow the instructions.
9. What Are the Best Practices for Maintaining Photo Privacy on Facebook?
Maintaining photo privacy on Facebook requires ongoing effort. Here are some best practices to follow:
9.1. Regularly Reviewing Privacy Settings
Facebook’s privacy settings can change, so it’s important to regularly review and adjust your settings to ensure they align with your preferences.
9.2. Being Mindful of What You Share
Think before you post. Consider whether the photo or information you’re sharing is something you want everyone to see.
9.3. Educating Friends and Family About Privacy
Encourage your friends and family to respect your privacy preferences. Let them know if you’re not comfortable with them sharing certain photos or information about you.
9.4. Using Strong Passwords and Security Features
Protect your Facebook account with a strong password and enable security features like two-factor authentication to prevent unauthorized access.
9.5. Staying Informed About Facebook’s Privacy Policies
Stay up-to-date on Facebook’s privacy policies and how they affect your content. This will help you make informed decisions about what you share and who you share it with.
10. How to Download Your Photos from Facebook?
Downloading your photos from Facebook is a good way to back them up and ensure you have a copy in case you ever want to leave the platform.
10.1. Step-by-Step Guide
- Go to Settings: Navigate to your Facebook settings.
- Click on “Your Facebook Information”: Select “Your Facebook Information” from the left sidebar.
- Download Your Information: Click on “Download Your Information.”
- Select Photos and Videos: Choose the “Photos and Videos” option.
- Choose Date Range and Format: Select the date range and format for your download.
- Request Download: Click “Create File” to request the download.
- Download File: Once the file is ready, you’ll receive a notification. Click the notification to download the file.
10.2. Choosing the Right Format and Quality
When downloading your photos, choose the highest quality and most compatible format to ensure your photos look their best.
10.3. Backing Up Your Photos to External Storage
After downloading your photos, back them up to an external storage device or cloud storage service to protect them from loss or damage.
11. What Are Some Common Mistakes to Avoid When Managing Photo Privacy?
Managing photo privacy on Facebook can be tricky. Here are some common mistakes to avoid:
11.1. Not Adjusting Default Privacy Settings
Facebook’s default privacy settings may not align with your preferences. Take the time to adjust them to ensure your content is shared with the right audience.
11.2. Oversharing Personal Information
Avoid sharing sensitive personal information in your photos or captions, as this could put you at risk.
11.3. Ignoring Tag Suggestions
Be careful about accepting tag suggestions, as they may not always be accurate or appropriate.
11.4. Neglecting to Review Tagged Photos
Regularly review photos you’re tagged in to ensure they align with your privacy preferences.
11.5. Assuming Friends Have the Same Privacy Standards
Don’t assume that your friends have the same privacy standards as you. Be mindful of what you share about them and respect their preferences.
12. How Does Facebook’s Facial Recognition Technology Affect Photo Privacy?
Facebook’s facial recognition technology can affect your photo privacy by automatically identifying and tagging you in photos.
12.1. Understanding Facial Recognition Settings
Facebook allows you to control whether facial recognition technology is used to identify you in photos.
- Go to Settings: Navigate to your Facebook settings.
- Click on “Face Recognition”: Select “Face Recognition” from the left sidebar.
- Adjust Settings: Adjust the settings to control whether Facebook recognizes you in photos and videos.
12.2. Opting Out of Facial Recognition
You can choose to opt out of facial recognition entirely, which will prevent Facebook from automatically identifying you in photos.
12.3. Implications for Privacy
Facial recognition technology raises privacy concerns, as it allows Facebook to collect and store data about your face. Be aware of these implications and adjust your settings accordingly.
13. How Do Third-Party Apps Impact My Photo Privacy on Facebook?
Third-party apps can access your Facebook photos and information, so it’s important to be careful about which apps you grant access to.
13.1. Reviewing App Permissions
Regularly review the permissions you’ve granted to third-party apps and revoke access to any apps you no longer use or trust.
- Go to Settings: Navigate to your Facebook settings.
- Click on “Apps and Websites”: Select “Apps and Websites” from the left sidebar.
- Review and Remove Apps: Review the list of apps and websites and remove any you no longer need.
13.2. Limiting Data Sharing with Apps
When granting access to an app, be mindful of the data you’re sharing. Limit the amount of information the app can access to protect your privacy.
13.3. Using Facebook’s Privacy Checkup Tool
Facebook’s Privacy Checkup tool can help you review your privacy settings and manage your app permissions.
14. What Are the Legal and Ethical Considerations for Sharing Photos Online?
Sharing photos online involves legal and ethical considerations.
14.1. Copyright and Ownership
Be aware of copyright laws and ownership rights when sharing photos online. Don’t share photos without permission from the copyright holder.
14.2. Consent and Privacy
Obtain consent from individuals before sharing photos of them online. Respect their privacy and preferences.
14.3. Avoiding Defamation and Misrepresentation
Be careful not to defame or misrepresent individuals in your photos or captions. Avoid sharing content that could harm their reputation.
14.4. Being Responsible with Sensitive Content
Be responsible when sharing sensitive content, such as photos of children or private events. Protect the privacy and safety of those involved.
15. What Are the Future Trends in Photo Privacy on Social Media?
Photo privacy on social media is constantly evolving. Here are some future trends to watch:
15.1. Enhanced Privacy Controls
Social media platforms are likely to offer more granular privacy controls in the future, allowing users to customize their privacy settings even further.
15.2. AI-Powered Privacy Tools
AI-powered tools may be used to automatically detect and protect sensitive information in photos, such as faces, locations, and personal data.
15.3. Decentralized Social Media
Decentralized social media platforms may offer greater privacy and control over your data, as they are not subject to the same regulations and restrictions as traditional platforms.
15.4. Increased User Awareness
As users become more aware of privacy issues, they are likely to demand greater control over their data and content, leading to more privacy-friendly social media platforms.
15.5. Blockchain Technology
Blockchain technology may be used to create secure and transparent systems for managing and sharing photos online, ensuring greater privacy and control over your content.
Making your photos private on Facebook is essential for protecting your personal information and controlling your online presence. By understanding and adjusting your privacy settings, creating private albums, and following best practices, you can safeguard your visual stories and share them with confidence. Explore more tips and tricks on dfphoto.net to enhance your photography skills and learn how to capture stunning images.
Ready to take control of your photo privacy? Visit dfphoto.net for detailed guides, inspiration, and a vibrant community. Elevate your photography experience and connect with fellow enthusiasts today. For any questions or assistance, reach out to us at:
Address: 1600 St Michael’s Dr, Santa Fe, NM 87505, United States
Phone: +1 (505) 471-6001
Website: dfphoto.net
FAQ: How to Make Photos Private on Facebook
1. How do I change the privacy setting of a single photo on Facebook?
To change the privacy setting of a single photo on Facebook, go to the photo, click the three dots in the top-right corner, select “Edit Privacy,” and choose your desired audience (e.g., Friends, Only Me, Custom).
2. Can I make an entire album private on Facebook?
Yes, you can make an entire album private on Facebook. Edit the album, change the privacy setting for the entire album, and save your changes. This will apply to all photos in the album.
3. What does it mean to archive a photo on Facebook?
Archiving a photo on Facebook removes it from your profile but keeps it stored in your account. It is no longer visible to your friends but remains accessible to you in the “Archive” section.
4. How do I block someone from seeing my photos on Facebook?
To block someone from seeing your photos on Facebook, go to their profile, click the three dots, select “Block,” and confirm your decision.
5. Is there a way to hide a photo from specific people without blocking them?
Yes, you can hide a photo from specific people without blocking them by using the “Friends Except…” option when editing the privacy settings of the photo.
6. How can I review photos I’m tagged in before they appear on my timeline?
Enable the Timeline Review feature in your Facebook settings to review and approve tags before they appear on your timeline.
7. What happens when I remove a tag from a photo on Facebook?
When you remove a tag from a photo on Facebook, the photo will no longer appear on your profile, but it will still be visible on the profile of the person who posted it.
8. How do third-party apps affect my photo privacy on Facebook?
Third-party apps can access your Facebook photos and information based on the permissions you grant them. Review app permissions regularly and limit data sharing to protect your privacy.
9. How do I download my photos from Facebook?
To download your photos from Facebook, go to your settings, click “Your Facebook Information,” select “Download Your Information,” choose “Photos and Videos,” and request the download.
10. What should I do if I accidentally share a photo publicly that I wanted to keep private?
If you accidentally share a photo publicly that you wanted to keep private, immediately edit the privacy setting of the photo to your desired audience (e.g., Friends, Only Me) to limit its visibility.