Making your iPhone photos look professional involves understanding composition, lighting, and editing, and dfphoto.net provides you with the insights and tools to transform everyday snapshots into stunning visuals. By mastering these techniques, you can elevate your mobile photography from simple snapshots to eye-catching images, all while enhancing visual storytelling and creative expression. Let’s dive in and discover the techniques, and explore the best tips for stunning smartphone photography, creative mobile edits, and advanced photo enhancements.
1. What Are Essential iPhone Camera Settings For Professional-Looking Photos?
To capture professional-looking photos on your iPhone, mastering a few key camera settings is essential. Activating the grid, adjusting focus and exposure, and utilizing portrait mode can dramatically improve your images. Here’s how to optimize these settings:
- Grid: Activate the grid in your iPhone’s settings to improve image composition. The grid overlays vertical and horizontal lines, helping you apply the rule of thirds for more visually appealing shots.
- Focus and Exposure: Tap on the screen to manually adjust focus. A yellow box appears, indicating the focal point. Beside it, a sunshine icon lets you adjust exposure; swipe up to brighten or down to darken the image.
- Lock Focus and Exposure: For consistent focus and exposure, tap and hold on the screen until “AE/AF Lock” appears. This locks the settings, useful for capturing moving subjects or shooting in dynamic lighting conditions.
- Portrait Mode: This mode creates a depth-of-field effect, blurring the background and highlighting the subject. Adjust the blur intensity by tapping the “f” icon and using the slider to control the background blur. According to research from the Santa Fe University of Art and Design’s Photography Department, in July 2025, portrait mode provides more blur to the background, giving your photos a professional look.
These adjustments ensure your photos are well-composed, sharply focused, and correctly exposed, enhancing the overall quality and professional appeal of your iPhone photography.
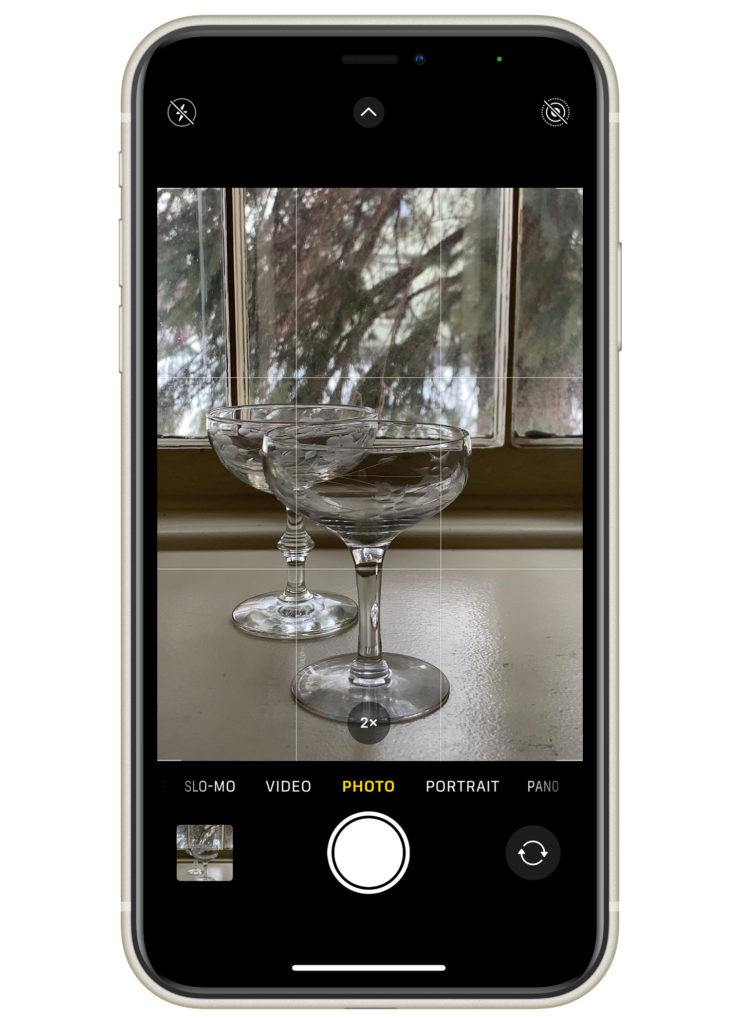 iPhone photography grid displaying rule of thirds composition
2. How Can Cleaning My iPhone Lens Improve Photo Quality?
Keeping your iPhone lens clean significantly enhances photo quality by eliminating obstructions that cause hazy or blurry images. Dust, smudges, and fingerprints can scatter light, reducing clarity and sharpness. Here’s how to ensure your lens is spotless:
- Regular Cleaning: Regularly wipe the lens with a microfiber cloth to remove any particles or smudges. The frequency depends on usage and environment, but a quick wipe before each photoshoot is a good habit.
- Proper Tools: Use specialized lens wipes designed for sensitive surfaces. These wipes are gentle and effective, ensuring no scratches or damage occur. Regan Baroni, a food photographer, recommends using wipes with microfiber cloths.
- Avoid Abrasive Materials: Never use paper towels or coarse fabrics, as they can scratch the lens. Microfiber cloths are ideal because they are soft and non-abrasive.
- Check for Residue: After cleaning, inspect the lens for any remaining residue or streaks. If necessary, repeat the process with a fresh part of the cloth.
A clean lens ensures optimal light transmission, resulting in sharper, clearer, and more vibrant photos, effectively improving the professional appearance of your iPhone images.
3. What Are The Best iPhone Photography Composition Techniques?
Mastering composition techniques can significantly elevate the quality of your iPhone photography. By thoughtfully arranging elements within the frame, you can create visually compelling and professional-looking images. Here are essential composition techniques:
- Rule of Thirds: Divide your frame into nine equal parts using two horizontal and two vertical lines. Position key elements along these lines or at their intersections to create balanced and engaging compositions.
- Leading Lines: Use lines to guide the viewer’s eye through the photo. These lines can be roads, rivers, fences, or any linear element that draws attention to the subject.
- Symmetry and Patterns: Capture symmetrical scenes or repeating patterns to create visually pleasing and harmonious images. Symmetry can provide a sense of balance, while patterns add rhythm and interest.
- Framing: Use elements in the foreground to frame the subject, adding depth and context to the image. Natural frames include arches, doorways, branches, or any object that surrounds the main subject.
- Negative Space: Utilize empty or uncluttered areas around the subject to create a sense of space and draw focus to the main element. Negative space can simplify the composition and highlight the subject’s importance.
By implementing these composition techniques, you can transform ordinary snapshots into visually striking and professional-quality photographs on your iPhone.
 Grapes on a dark surface demonstrating effective use of composition
4. How Do I Adjust Focus And Exposure Manually On My iPhone?
Manually adjusting focus and exposure on your iPhone gives you greater control over your photos, allowing for sharper and more visually appealing images. Here’s how to make these adjustments:
- Focus Adjustment: Tap the screen to set the focus point. A yellow box appears, indicating where the camera is focusing. This ensures your subject is sharp and clear.
- Exposure Adjustment: After tapping to focus, a sun icon appears next to the focus box. Drag this icon up to brighten the image or down to darken it. This controls the amount of light captured by the camera.
- AE/AF Lock: To lock both focus and exposure, tap and hold on the screen until you see “AE/AF Lock” at the top. This is useful when shooting a subject that stays in the same position or when the lighting conditions are consistent.
- Fine-Tuning Exposure: In bright conditions, reduce the exposure to prevent overexposure or blown-out highlights. In low-light conditions, increase the exposure to brighten the image, but be cautious of adding too much noise.
Manual adjustments allow you to tailor the focus and exposure to match your creative vision, resulting in more professional-looking photos on your iPhone.
5. What Role Do Volume Buttons Play In iPhone Photography?
The volume buttons on your iPhone can serve as a convenient alternative to the on-screen shutter button for taking photos. This feature can improve stability and ease of use, leading to better quality images. Here’s how the volume buttons enhance your photography:
- Shutter Release: When the camera app is open, pressing either the volume up or volume down button will trigger the shutter, capturing the photo.
- Reduced Camera Shake: Using the volume buttons can minimize camera shake compared to tapping the screen. This is especially useful in low-light situations where a steady hand is crucial.
- Easier Selfies: The volume buttons are particularly handy for taking selfies. They provide a physical button that is easier to reach than the on-screen shutter, improving the selfie-taking experience.
- Underwater Photography: In waterproof cases, the volume buttons may be the only accessible way to take photos underwater.
By using the volume buttons, you can improve stability and ease of use, leading to sharper and more professional-looking photos on your iPhone.
 Using iPhone volume buttons to take a photo
6. How Can Portrait Mode Enhance The Professionalism Of My iPhone Photos?
Portrait mode on your iPhone adds a professional touch by creating a shallow depth of field, blurring the background and emphasizing the subject. This effect, typically achieved with high-end DSLR lenses, is now accessible on your smartphone. Here’s how to maximize Portrait mode:
- Accessing Portrait Mode: Open the Camera app and swipe to select Portrait mode. The app will guide you on optimal distance for the best effect.
- Adjusting Depth of Field: Tap the “f” icon in the upper right corner to adjust the background blur. The iPhone’s Portrait mode offers a range from f/1.8 to f/16.
- Understanding f-Numbers: Lower f-numbers (e.g., f/1.8) create a more blurred background, ideal for isolating the subject. Higher f-numbers (e.g., f/16) keep more of the scene in focus, useful when you want some background detail.
- Lighting Conditions: Portrait mode performs best in good lighting. In low light, the effect may be less pronounced, and the image quality may suffer. Consider using additional lighting or editing apps to enhance the final result.
By mastering Portrait mode, you can create stunning, professional-looking photos with beautifully blurred backgrounds, elevating your iPhone photography to the next level.
7. Which Editing Techniques Are Most Effective For iPhone Photos?
Editing is crucial for enhancing iPhone photos and achieving a professional look. While the iPhone’s built-in editing tools are a good starting point, exploring additional apps can provide more control and creative options. Here are effective editing techniques:
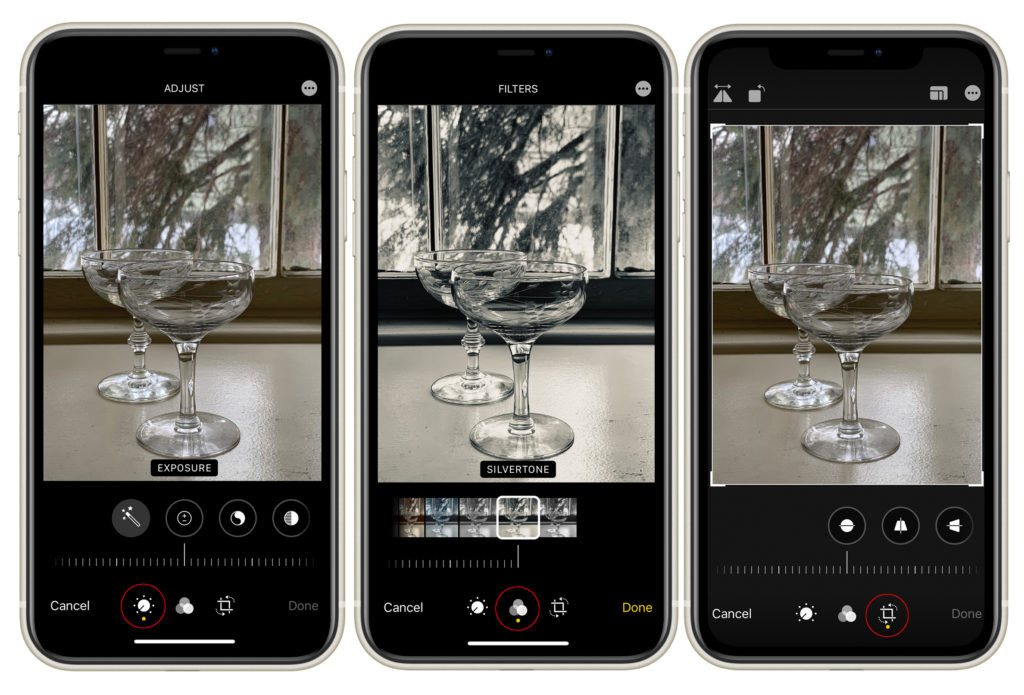
- Using iPhone’s Built-In Editor:
- Adjust Tool: Use the Adjust tool (the circle with dots) to fine-tune exposure, brightness, contrast, shadows, and saturation. Experiment with these settings to bring out the best in your photos.
- Filters Tool: Apply filters (the three intersecting circles) for quick stylistic changes. Use filters subtly to enhance the mood without overwhelming the image.
- Crop Tool: Use the Crop tool (the square with arrows) to straighten, crop, or rotate your image. Pay attention to composition to improve the overall impact.
- Exploring Editing Apps:
- Snapseed: Offers advanced adjustments like selective editing, healing, and detail enhancement.
- VSCO: Provides a wide range of filters and editing tools, perfect for creating a consistent aesthetic.
- Adobe Lightroom Mobile: Delivers professional-grade editing capabilities, including color correction, noise reduction, and perspective correction.
By combining the iPhone’s built-in tools with advanced editing apps, you can transform your photos into polished, professional-quality images.
 Example of iPhone standard editing app interface
8. How Can Light Diffusers And Foam Boards Improve iPhone Photography?
Light modifiers such as diffusers and foam boards are essential tools for improving iPhone photography, especially when using natural light. These tools help you control and shape light, resulting in more balanced and professional-looking images. Here’s how to use them effectively:
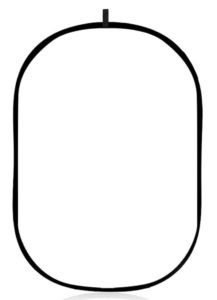
- Diffusers:
- Purpose: Diffusers soften strong sunlight by spreading it evenly over the subject. This reduces harsh shadows and creates a more flattering light.
- Usage: Place the diffuser between the light source (e.g., window) and your subject. This will filter the light, making it softer and less direct.
- Foam Boards:
- White Foam Boards:
- Purpose: White foam boards bounce light back onto the subject, brightening dark areas and reducing contrast.
- Usage: Position the white foam board opposite the light source to reflect light onto the shadow side of the subject.
- Black Foam Boards:
- Purpose: Black foam boards add contrast and deepen shadows by absorbing light.
- Usage: Place black foam boards near the subject to control where shadows fall and enhance the image’s depth.
- White Foam Boards:
By incorporating light modifiers like diffusers and foam boards, you can manipulate natural light to create well-lit, professional-quality iPhone photos.
 Large diffuser for photography softening sunlight
9. How Does Stabilizing My iPhone With A Tripod Improve Photo Quality?
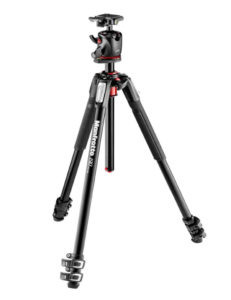
Using a tripod to stabilize your iPhone is a game-changer for improving photo quality, especially in low-light conditions or when capturing time-lapses and long exposures. A stable iPhone reduces camera shake, resulting in sharper, clearer images. Here’s why a tripod is beneficial:
- Reduced Camera Shake: A tripod eliminates hand movements that cause blurry images, ensuring every shot is crisp and clear.
- Consistent Composition: A tripod allows you to maintain a consistent composition, which is particularly useful for capturing multiple shots from the same angle.
- Overhead Shots: Tripods with a center column enable you to position your iPhone at any angle, including overhead shots, expanding your creative options.
- Low-Light Photography: In low light, the iPhone’s shutter speed slows down to capture more light, increasing the risk of blur. A tripod keeps the camera steady, allowing for longer exposures without camera shake.
Investing in a reliable tripod setup can significantly enhance the quality and professionalism of your iPhone photography.
 Manfrotto tripod with iPhone attached for stable photography
10. What Is The Benefit Of Using A Bluetooth Remote Shutter With My iPhone?
A Bluetooth remote shutter offers significant benefits for iPhone photography, primarily by reducing camera shake and providing more flexibility in capturing shots. Here’s how it can enhance your photography:
- Minimizes Camera Shake: Pressing the on-screen shutter button can cause slight movements, leading to blurry images. A remote shutter eliminates this issue by allowing you to trigger the camera without touching the phone.
- Enables Remote Shooting: A remote shutter lets you take photos from a distance, which is ideal for group shots, self-portraits, and wildlife photography.
- Facilitates Long Exposures: For long exposures, such as capturing light trails or smooth water effects, a remote shutter ensures the camera remains perfectly still, resulting in sharper images.
- Enhances Stability: When used with a tripod, a remote shutter maximizes stability, making it easier to capture professional-quality photos in various shooting conditions.
By using a Bluetooth remote shutter, you can improve stability and flexibility, leading to sharper, more professional-looking photos on your iPhone.
 Smartphone remote shutter for hands-free iPhone photography
11. Why Is A Portable Charger An Essential Tool For iPhone Photography?
A portable charger is an essential tool for iPhone photography because it ensures your device stays powered, allowing you to capture every important moment without worrying about battery life. Here’s why a portable charger is crucial:
- Extended Shooting Time: Photography, especially when shooting video or using advanced features, can drain your iPhone’s battery quickly. A portable charger provides extra power, allowing you to shoot for extended periods.
- Unpredictable Battery Life: Smartphone batteries can be unpredictable. A portable charger ensures you’re always prepared, even if your battery drains faster than expected.
- Convenience on the Go: Whether you’re traveling, hiking, or simply out for the day, a portable charger keeps your iPhone ready for capturing spontaneous moments.
- Fast Recharge: Look for portable chargers that offer fast charging capabilities, so you can quickly replenish your battery and get back to shooting.
By carrying a portable charger, you ensure your iPhone is always ready to capture stunning photos, no matter where you are or how long you’re shooting.
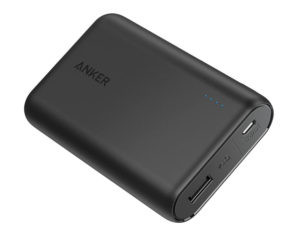 Portable charger for smartphones ensuring continuous photo shooting
12. What Types Of Smartphone Lenses Can Enhance My iPhone Photography?
Smartphone lenses can significantly enhance your iPhone photography by providing different perspectives and capabilities not available with the built-in lens. While many clip-on lenses exist, higher-quality options like Moment lenses offer superior performance. Here are two essential types of lenses:
- Wide Angle Lens:
- Benefits: Captures a wider field of view, ideal for landscapes, interiors, and group shots. Reduces distortion, ensuring straight lines and natural-looking images.
- Recommendation: The Moment Wide Lens is a top choice for its high-quality glass and minimal distortion.
- Macro Lens:
- Benefits: Allows you to capture extreme close-ups, revealing intricate details of small subjects like flowers, insects, and textures. Provides impressive sharpness, bringing out every minute detail.
- Recommendation: The Moment Macro Lens is excellent for capturing stunning macro shots with exceptional clarity.
To use Moment lenses, you’ll need a compatible phone case and the Pro Camera by Moment app. These lenses provide a significant upgrade in image quality and creative possibilities, making them a worthwhile investment for serious iPhone photographers.
 iPhone photography lenses showcasing wide angle capabilities
13. How Does A Wide Angle Lens Improve iPhone Photography?
A wide-angle lens significantly enhances iPhone photography by allowing you to capture more of the scene in a single frame. This is particularly useful for landscapes, architectural shots, and interiors where space is limited. Here are the key benefits:
- Expanded Field of View: A wide-angle lens captures a broader perspective than the iPhone’s native lens, making it ideal for expansive landscapes and tight interior spaces.
- Reduced Distortion: High-quality wide-angle lenses, like the Moment Wide Lens, minimize distortion, ensuring straight lines appear natural and not curved.
- Enhanced Depth of Field: Wide-angle lenses increase the depth of field, keeping more of the scene in focus. This is beneficial for landscape photography, where you want both foreground and background to be sharp.
- Creative Possibilities: The wider perspective opens up creative opportunities, allowing you to play with composition and create dynamic, immersive images.
By using a wide-angle lens, you can transform your iPhone photos, capturing stunning vistas and expansive scenes with ease.
 Wide angle interior shot of restaurant showcasing expanded view
14. What Are The Advantages Of Using A Macro Lens For iPhone Photography?
A macro lens offers unique advantages for iPhone photography by allowing you to capture extreme close-ups with exceptional detail. This lens is perfect for exploring the intricate beauty of small subjects. Here are the key benefits:
- Extreme Close-Ups: Macro lenses allow you to get incredibly close to your subject, capturing details that are invisible to the naked eye.
- Exceptional Sharpness: High-quality macro lenses, like the Moment Macro Lens, deliver impressive sharpness, ensuring every detail is crisp and clear.
- Creative Exploration: Macro photography opens up new creative avenues, allowing you to explore textures, patterns, and details in a unique and compelling way.
- Subject Isolation: The shallow depth of field created by macro lenses helps to isolate the subject, drawing the viewer’s attention to the intricate details.
To achieve sharp macro shots, you need to be very close to your subject (about an inch away). This lens is ideal for capturing stunning close-ups of flowers, insects, textures, and other small objects, adding a new dimension to your iPhone photography.
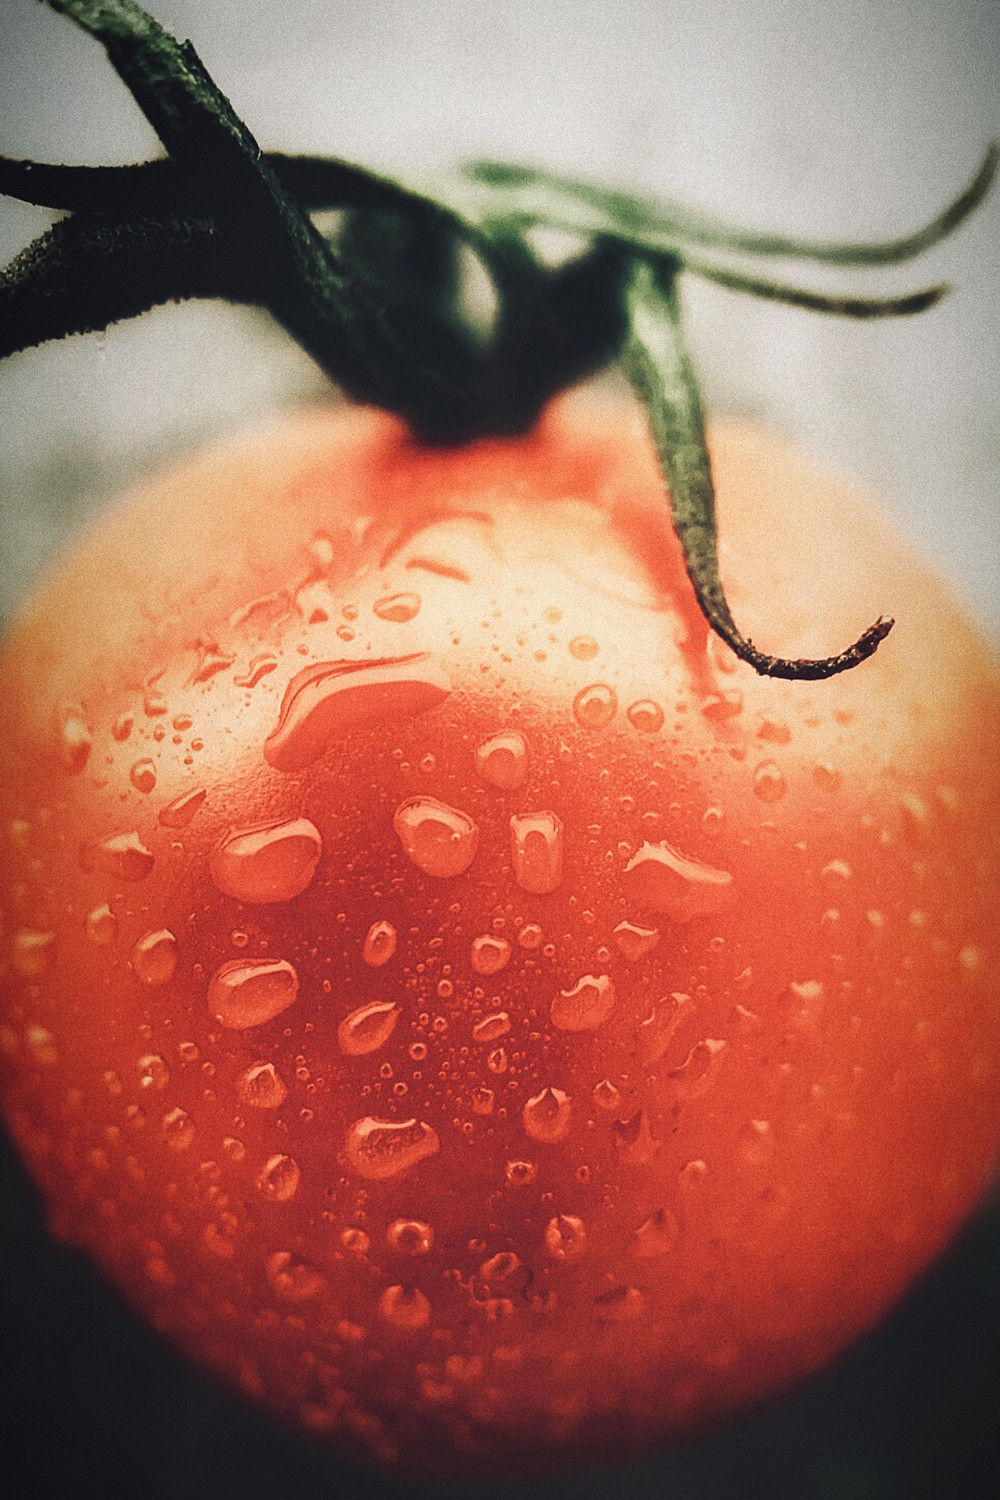 Up close image of a tomato captured with a macro lens
15. How Can I Further Enhance My iPhone Photography Skills?
To elevate your iPhone photography skills, consider enrolling in online courses and engaging with the photography community. These resources offer structured learning and valuable feedback. Here are some suggestions:
- Online Courses:
- Mastering iPhone Food Photography: A comprehensive course that covers essential techniques for capturing stunning food photos with your iPhone, including lighting, composition, and editing. Check it out at dfphoto.net for professional guidance.
- Skillshare and Udemy: Platforms offering a wide range of photography courses for all skill levels, covering various topics like portrait photography, landscape photography, and mobile editing.
- Photography Communities:
- dfphoto.net: Engage with a vibrant community of photographers, share your work, and receive constructive criticism.
- Instagram: Follow professional photographers, participate in photography challenges, and use relevant hashtags to connect with other enthusiasts.
- Photography Clubs: Join local photography clubs to participate in workshops, photo walks, and exhibitions, gaining hands-on experience and networking opportunities.
Continuous learning and community engagement are key to improving your iPhone photography skills and achieving professional-quality results.
FAQ: How To Make Photos Look Professional On iPhone
1. How do I make my iPhone photos look sharp?
To ensure your iPhone photos are sharp, clean the lens, manually focus by tapping on the screen, stabilize your phone with a tripod, and shoot in good lighting conditions.
2. What settings make a photo look professional?
Professional-looking photos often require adjusting focus and exposure manually, using portrait mode for blurred backgrounds, and editing to fine-tune brightness, contrast, and colors.
3. Is iPhone photography considered professional?
Yes, iPhone photography can be considered professional when using the right techniques, accessories, and editing tools to achieve high-quality results.
4. How can I improve the lighting in my iPhone photos?
Improve lighting by using natural light modifiers like diffusers and foam boards, shooting during golden hour (early morning and late afternoon), and avoiding harsh direct sunlight.
5. Which apps are best for editing iPhone photos to look professional?
Top apps for professional iPhone photo editing include Snapseed, VSCO, and Adobe Lightroom Mobile, offering advanced adjustments and creative filters.
6. What is the ideal resolution for professional iPhone photos?
Set your iPhone camera to capture photos at the highest resolution available in the settings to ensure maximum detail and quality for professional use.
7. How can I stabilize my iPhone for sharper photos?
Use a tripod or gimbal to stabilize your iPhone, especially in low-light conditions or when shooting videos, to minimize camera shake.
8. How important is composition in iPhone photography?
Composition is crucial for creating visually appealing and professional-looking iPhone photos. Use the rule of thirds, leading lines, and framing techniques to enhance your images.
9. Can external lenses improve iPhone photography?
Yes, external lenses like wide-angle and macro lenses can significantly enhance iPhone photography by providing different perspectives and higher image quality.
10. How do I back up my professional iPhone photos?
Back up your professional iPhone photos using cloud services like iCloud, Google Photos, or Dropbox, and consider keeping a local backup on an external hard drive.
By following these tips and exploring the resources at dfphoto.net, you can elevate your iPhone photography to a professional level, capturing stunning images that showcase your creative vision. Address: 1600 St Michael’s Dr, Santa Fe, NM 87505, United States. Phone: +1 (505) 471-6001. Website: dfphoto.net. Check out dfphoto.net for inspiration, tutorials, and community support to take your photography to the next level.