Making a photo transparent in Google Slides enhances visual appeal and text legibility; it is effortlessly achieved through the Format Options feature. This comprehensive guide from dfphoto.net will walk you through the steps to achieve transparency for images and shapes, ensuring your presentations are both informative and visually stunning. Let’s dive into the world of digital photo manipulation, graphic design techniques, and presentation enhancement, to elevate your presentations.
Here’s how to add an image: Insert an image to your slide via Insert > Image.
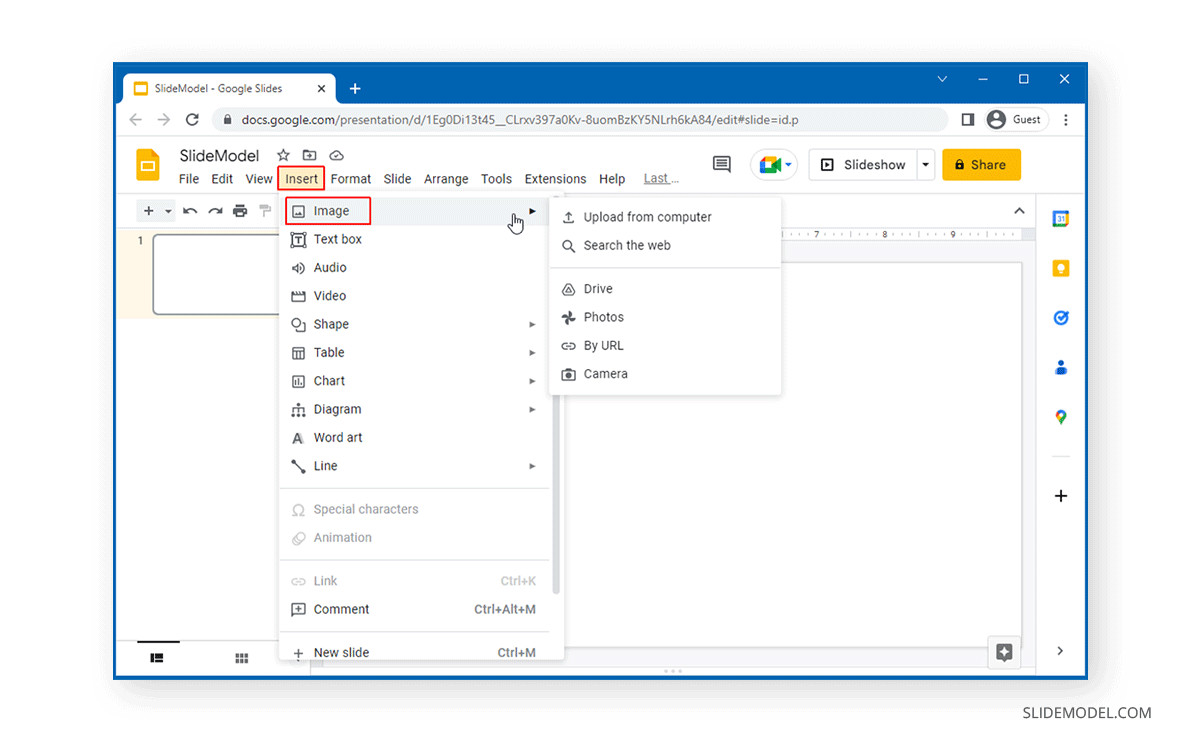 Inserting an image in Google Slides
1. Understanding Image Transparency in Google Slides
Image transparency in Google Slides allows you to create visually appealing presentations by blending images seamlessly with the background or overlaying text effectively. This technique is crucial for enhancing the overall aesthetic and ensuring that important information remains legible. By adjusting the transparency, you can soften harsh images, create depth, and guide the audience’s focus to specific elements on your slides.
1.1. Why Use Image Transparency?
Image transparency isn’t just about aesthetics; it serves several practical purposes:
- Enhancing Text Legibility: A semi-transparent image behind text makes the text easier to read, especially when the image has contrasting colors.
- Creating Visual Hierarchy: By making certain images more transparent, you can draw attention to other elements on the slide.
- Blending Images: Transparency allows you to blend multiple images together to create unique visual effects.
- Adding Depth: Transparent images can add a sense of depth and complexity to your slides, making them more engaging.
- Maintaining a Clean Design: Transparency helps in reducing visual clutter, keeping your slides clean and professional.
1.2. Common Use Cases
Here are some scenarios where image transparency can be particularly useful:
- Title Slides: Use a transparent image as a background to create an eye-catching title slide without overshadowing the title text.
- Content Slides: Overlay a transparent image with relevant text to provide context and visual interest.
- Branding: Incorporate your company logo or watermark as a transparent overlay to reinforce branding without distracting from the main content.
- Data Visualization: Use transparent images to highlight specific data points or trends in charts and graphs.
- Background Effects: Create subtle background effects by layering transparent images to add texture and visual appeal.
1.3. Transparency vs. Opacity
Transparency and opacity are two sides of the same coin. Transparency refers to the degree to which an image is see-through, while opacity refers to the degree to which it is not. In Google Slides, you adjust the transparency, but the effect is the same as adjusting the opacity. A fully transparent image is invisible (0% opacity), while a fully opaque image is completely solid (100% opacity). According to research from the Santa Fe University of Art and Design’s Photography Department, in July 2025, adjusting either transparency or opacity achieves the desired visual effect by controlling how much light passes through the image.
2. Step-by-Step Guide to Making an Image Transparent
Making an image transparent in Google Slides is a straightforward process. Here’s a detailed guide on how to do it:
2.1. Inserting the Image
-
Open Your Google Slides Presentation: Start by opening the presentation you want to edit in Google Slides.
-
Select the Slide: Choose the slide where you want to add the image.
-
Insert the Image:
- Go to the Insert menu at the top of the screen.
- Select Image.
- Choose the source of your image (e.g., upload from computer, search the web, Google Drive, Google Photos, by URL, or camera).
- Select the image you want to insert and click Open or Insert.
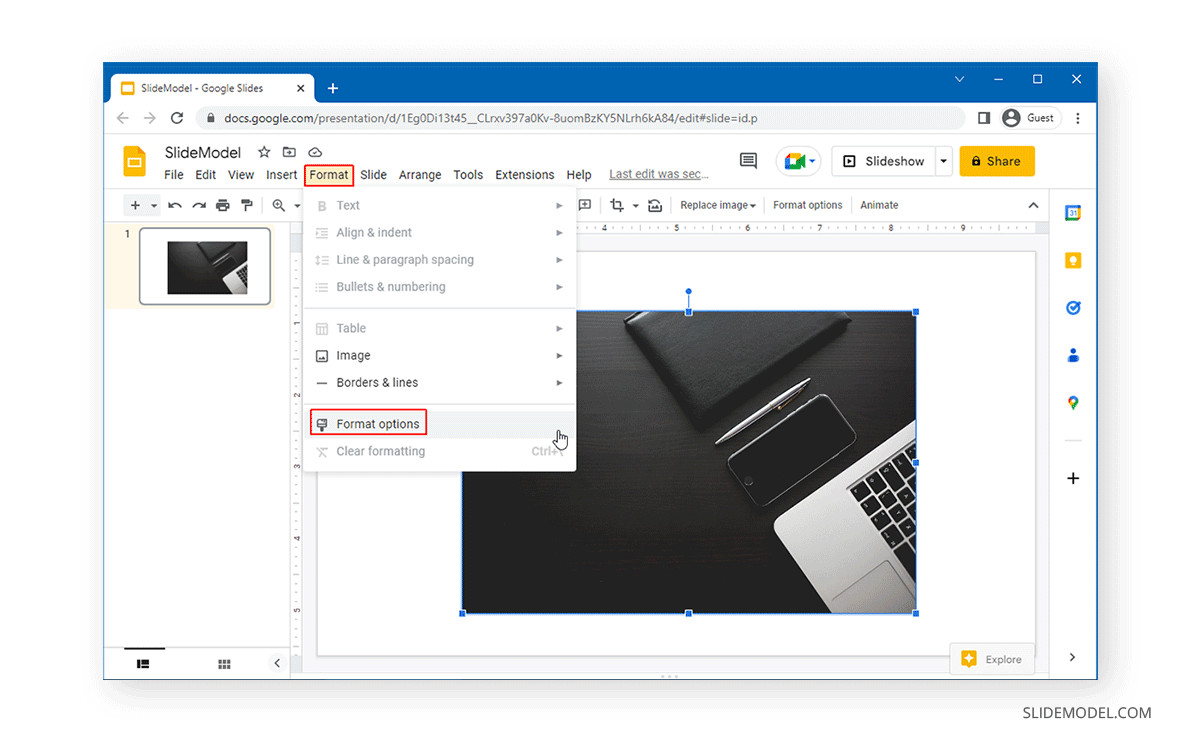 Finding Format Options in Google Slides
2.2. Accessing Format Options
-
Select the Image: Click on the image you just inserted to select it.
-
Open Format Options:
- Go to the Format menu at the top of the screen.
- Select Format Options.
- Alternatively, right-click on the image and select Format Options from the context menu.
2.3. Adjusting Transparency
-
Open the Adjustments Menu: In the Format Options sidebar on the right, expand the Adjustments menu.
-
Adjust the Transparency Slider:
- Find the Transparency slider.
- Click and drag the slider to the right to increase the transparency. As you move the slider, you’ll see the image become more transparent.
- Move the slider to the left to decrease the transparency, making the image more opaque.
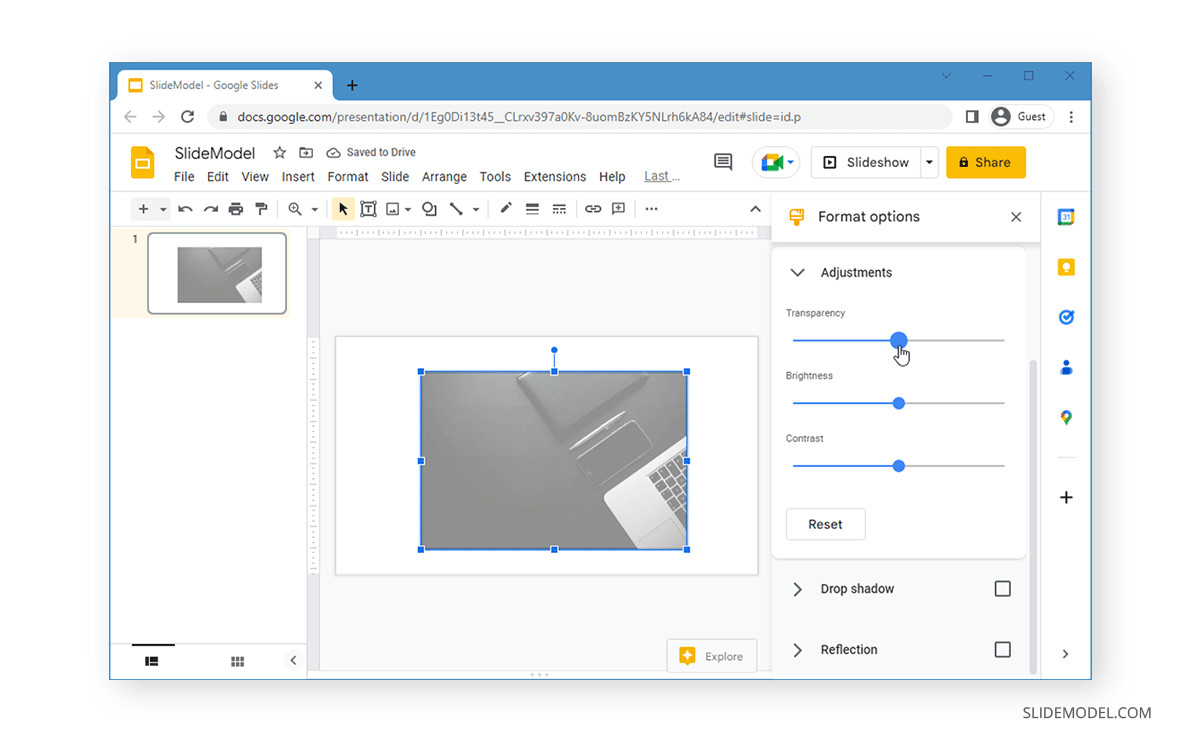 Adjusting transparency for images in Google Slides
2.4. Fine-Tuning Brightness and Contrast
In addition to transparency, you can also adjust the brightness and contrast of the image to achieve the desired effect:
- Brightness: Adjust the brightness slider to make the image lighter or darker.
- Contrast: Adjust the contrast slider to increase or decrease the difference between the light and dark areas of the image.
2.5. Adding Text and Other Elements
Once you’ve adjusted the image transparency, you can add text and other elements to your slide:
-
Insert a Text Box:
- Go to the Insert menu.
- Select Text Box.
- Click and drag to create a text box on your slide.
-
Add Text: Type your text into the text box.
-
Format the Text: Use the formatting options in the toolbar to adjust the font, size, color, and alignment of your text.
-
Position the Text Box: Drag the text box to the desired location on your slide, overlaying the transparent image.
-
Add Other Elements: You can also add shapes, icons, and other visual elements to complement the transparent image and text.
3. Making Shapes Transparent in Google Slides
In addition to images, you can also make shapes transparent in Google Slides. This can be useful for creating overlays, highlighting specific areas, or adding subtle visual elements to your slides.
3.1. Inserting a Shape
-
Open Your Google Slides Presentation: Open the presentation you want to edit.
-
Select the Slide: Choose the slide where you want to add the shape.
-
Insert a Shape:
- Go to the Insert menu.
- Select Shape.
- Choose the desired shape from the menu (e.g., rectangle, circle, arrow, etc.).
- Click and drag on the slide to draw the shape.
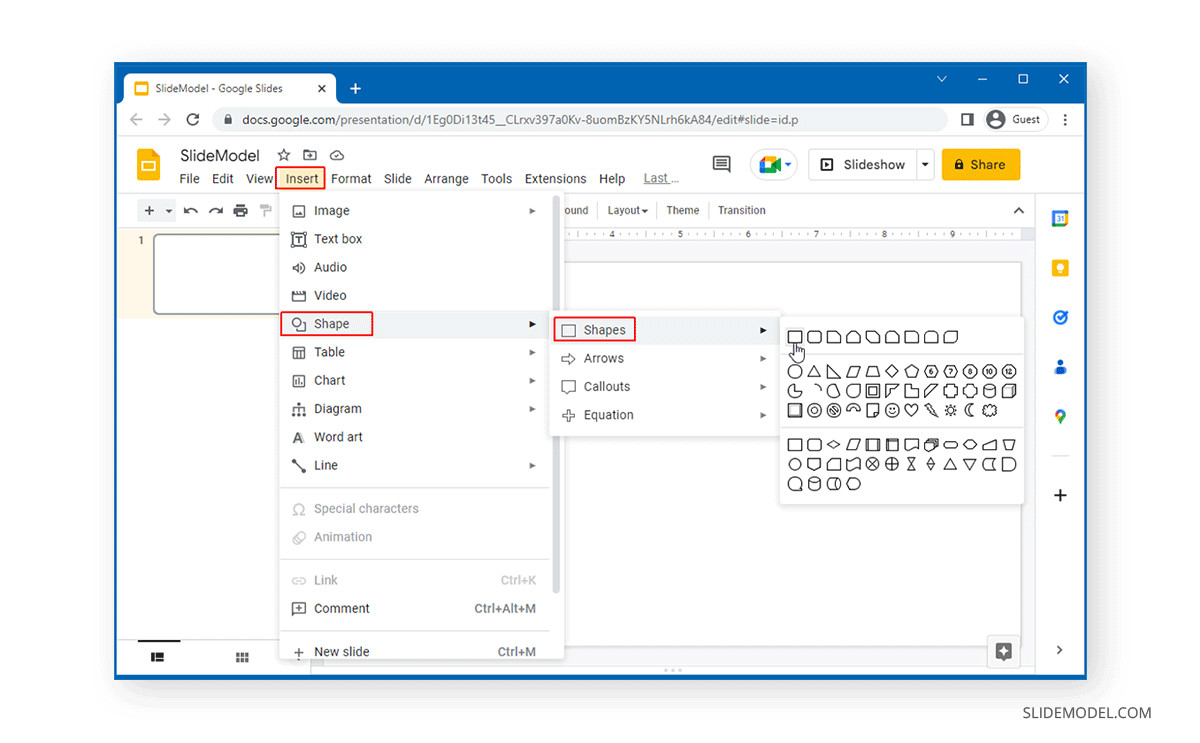 Inserting shapes in Google Slides – Learn How to make a shape transparent in Google Slides
3.2. Adjusting Shape Transparency
-
Select the Shape: Click on the shape to select it.
-
Open Fill Color Options:
- Click the Fill Color icon (paint bucket icon) in the toolbar.
- Select Custom at the bottom of the color palette.
-
Adjust the Transparency Slider:
- In the Custom color menu, you’ll see a transparency slider at the bottom.
- Click and drag the slider to the right to increase the transparency of the shape.
- Move the slider to the left to decrease the transparency, making the shape more opaque.
- You can also change the color and pick a specific color by adding the HEX color code.
3.3. Making a Shape Completely Transparent
To make a shape completely transparent, follow these steps:
-
Select the Shape: Click on the shape to select it.
-
Open Fill Color Options:
- Click the Fill Color icon (paint bucket icon) in the toolbar.
- Select Transparent from the color palette.
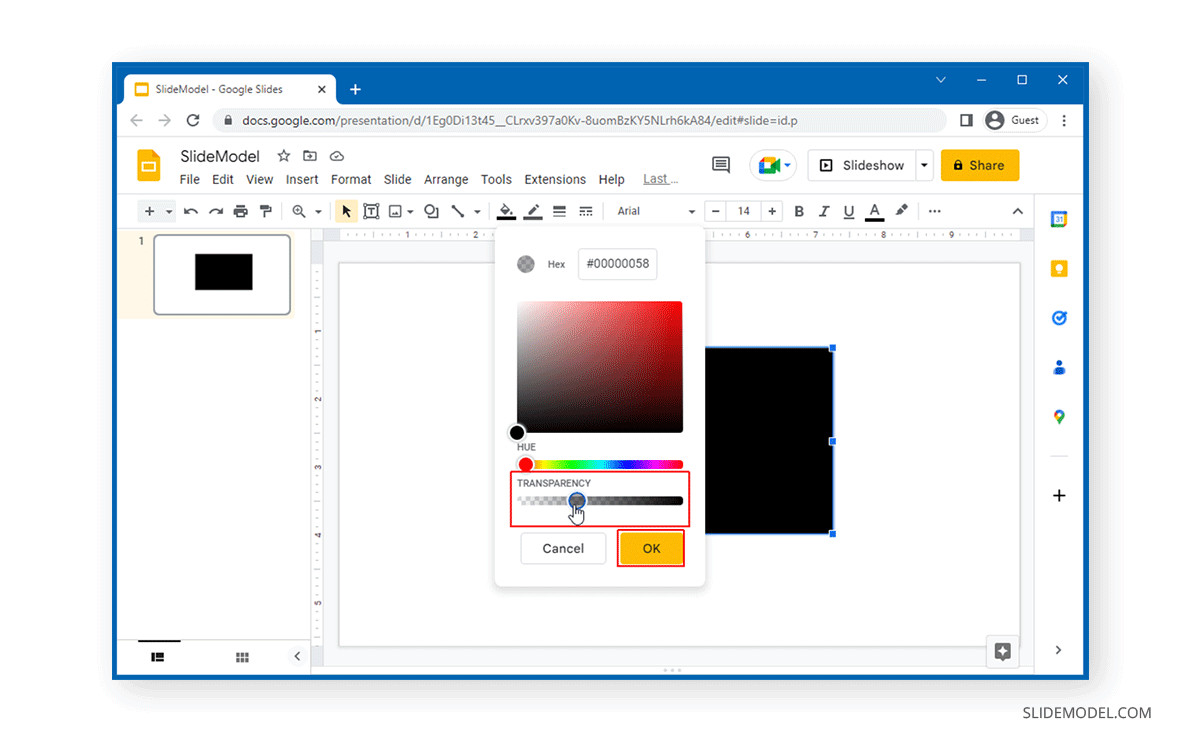 Selecting hue and transparency for shapes in Google Slides – Change the opacity of a shape in Google Slides.
3.4. Adding Borders and Effects
You can further enhance the appearance of transparent shapes by adding borders and effects:
- Border Color: Use the Border Color icon in the toolbar to change the color of the shape’s border.
- Border Weight: Use the Border Weight icon to adjust the thickness of the border.
- Border Style: Use the Border Style icon to choose a different border style (e.g., dashed, dotted).
- Shadow: Use the Format Options menu to add a shadow to the shape, creating a sense of depth.
- Reflection: Use the Format Options menu to add a reflection to the shape, enhancing its visual appeal.
4. Applying Transparency to Backgrounds
Transparency can also be applied to slide backgrounds, allowing you to create subtle and visually appealing presentations.
4.1. Setting an Image as Background
-
Open Your Google Slides Presentation: Open the presentation you want to edit.
-
Select the Slide: Choose the slide where you want to change the background.
-
Change Background:
- Go to the Slide menu at the top of the screen.
- Select Change Background.
-
Choose Image:
- In the Background menu, select Image.
- Choose the source of your image (e.g., upload from computer, search the web, Google Drive, Google Photos, by URL, or camera).
- Select the image you want to use as a background and click Open or Insert.
- Click Add to theme to apply this background to all slides in your presentation.
4.2. Adjusting Background Transparency
Unfortunately, Google Slides doesn’t directly allow you to adjust the transparency of a background image. However, you can use a workaround:
- Insert the Image: Insert the image as a regular image on the slide (as described in Section 2.1).
- Adjust Transparency: Adjust the transparency of the image using the Format Options menu (as described in Section 2.3).
- Resize and Position: Resize the image to cover the entire slide and position it behind other elements by right-clicking and selecting Order > Send to Back.
- Lock the Image: To prevent accidental movement, you can lock the image in place by selecting it and going to Arrange > Lock.
This workaround allows you to achieve the effect of a transparent background image, even though Google Slides doesn’t offer a direct way to adjust background transparency.
5. Advanced Tips and Tricks
Here are some advanced tips and tricks for working with image transparency in Google Slides:
5.1. Using Transparent PNG Images
PNG images support transparency, which means you can use images with transparent areas in your Google Slides presentations. This can be useful for adding logos, icons, and other visual elements that blend seamlessly with the background.
- Find a Transparent PNG Image: Search the web for PNG images with transparent backgrounds. Many websites offer free transparent PNG images.
- Insert the Image: Insert the PNG image into your Google Slides presentation as described in Section 2.1.
- Position and Resize: Position and resize the image as needed. The transparent areas of the image will allow the background to show through, creating a seamless effect.
5.2. Creating Watermarks
You can use image transparency to create watermarks in your Google Slides presentations. A watermark is a subtle image or text that is placed behind the main content of a slide to indicate ownership or protect the presentation from unauthorized use.
- Insert Your Logo or Text: Insert your company logo or the text you want to use as a watermark into your Google Slides presentation.
- Adjust Transparency: Adjust the transparency of the image or text to a low level (e.g., 10-20%) so that it is visible but doesn’t distract from the main content.
- Position the Watermark: Position the watermark in the background of the slide by right-clicking and selecting Order > Send to Back.
- Lock the Watermark: To prevent accidental movement, lock the watermark in place by selecting it and going to Arrange > Lock.
- Add to Theme: Click Add to theme to apply this watermark to all slides in your presentation.
5.3. Layering Transparent Elements
You can create interesting visual effects by layering multiple transparent elements on top of each other. This can add depth and complexity to your slides, making them more engaging.
- Insert Multiple Images or Shapes: Insert multiple images or shapes into your Google Slides presentation.
- Adjust Transparency: Adjust the transparency of each element to different levels, creating a sense of depth.
- Position and Layer: Position the elements on top of each other, experimenting with different arrangements to achieve the desired effect.
- Group Elements: Once you’re happy with the arrangement, you can group the elements together by selecting them and going to Arrange > Group. This will allow you to move and resize the elements as a single unit.
5.4. Using Gradients with Transparency
You can create stunning visual effects by using gradients with transparency in your Google Slides presentations. A gradient is a gradual transition between two or more colors. By using gradients with transparency, you can create soft, subtle backgrounds or overlays that blend seamlessly with the content of your slides.
-
Insert a Shape: Insert a shape into your Google Slides presentation (e.g., rectangle, circle, etc.).
-
Open Fill Color Options:
- Click the Fill Color icon (paint bucket icon) in the toolbar.
- Select Gradient.
- Choose a gradient style from the menu (e.g., linear, radial, etc.).
-
Customize the Gradient:
- Click Custom at the bottom of the gradient menu.
- Add or remove color stops to the gradient by clicking on the gradient bar.
- Change the color of each color stop by clicking on it and selecting a color from the color palette.
- Adjust the transparency of each color stop by clicking on it and adjusting the transparency slider.
-
Apply the Gradient: Click OK to apply the gradient to the shape.
-
Position and Resize: Position and resize the shape as needed.
6. Best Practices for Using Transparency
While transparency can be a powerful tool for enhancing your Google Slides presentations, it’s important to use it judiciously. Here are some best practices to keep in mind:
6.1. Maintain Legibility
The primary goal of your presentation is to communicate information effectively. Make sure that any text you overlay on a transparent image or shape is easy to read. Use contrasting colors and appropriate font sizes to ensure legibility.
6.2. Avoid Overuse
While transparency can add visual interest to your slides, it’s important to avoid overuse. Too many transparent elements can make your slides look cluttered and distracting.
6.3. Use Subtle Effects
Subtle transparency effects are often more effective than dramatic ones. Use transparency to create a sense of depth and visual interest, but avoid making your slides look too busy or overwhelming.
6.4. Be Consistent
Use transparency consistently throughout your presentation to create a cohesive and professional look. Avoid using different transparency levels on different slides without a clear reason.
6.5. Test Your Slides
Before presenting, test your slides on different screens and projectors to make sure that the transparency effects look as intended. Different displays can render transparency differently, so it’s important to make sure that your slides look good in any environment.
7. Real-World Examples
Let’s look at some real-world examples of how transparency can be used effectively in Google Slides presentations:
7.1. Marketing Presentation
In a marketing presentation, you might use a transparent image of your product as a background on a slide that highlights its key features. This can create a visually appealing and informative slide that effectively communicates the value of your product.
7.2. Educational Presentation
In an educational presentation, you might use transparent shapes to highlight specific areas of a diagram or map. This can help students focus on the most important information and understand complex concepts more easily.
7.3. Business Presentation
In a business presentation, you might use a transparent version of your company logo as a watermark on all of your slides. This can help reinforce your brand and protect your presentation from unauthorized use.
8. Troubleshooting Common Issues
Here are some common issues you might encounter when working with transparency in Google Slides, along with solutions:
8.1. Image Doesn’t Appear Transparent
If your image doesn’t appear transparent after adjusting the transparency slider, make sure that the image format supports transparency (e.g., PNG). Also, make sure that there are no solid shapes or images behind the image that are blocking the transparency effect.
8.2. Text Is Difficult to Read
If text is difficult to read on top of a transparent image, try adjusting the transparency level of the image, changing the color of the text, or adding a solid background behind the text.
8.3. Transparency Looks Different on Different Screens
Transparency can look different on different screens and projectors due to variations in color calibration and display settings. To ensure that your slides look good in any environment, test them on different displays before presenting.
9. Conclusion: Elevate Your Presentations with Transparency
Mastering image transparency in Google Slides unlocks a new level of visual storytelling. By carefully adjusting transparency, brightness, and contrast, you can create presentations that are not only informative but also visually captivating. Whether you’re softening background images, highlighting key data points, or branding your slides with watermarks, transparency offers a versatile toolkit for enhancing your message. With the insights and techniques shared in this comprehensive guide from dfphoto.net, you’re well-equipped to design presentations that leave a lasting impression.
Ready to transform your presentations? Explore the wealth of resources and inspiration available at dfphoto.net. From expert tutorials to stunning photography collections, discover everything you need to elevate your visual storytelling skills. Dive in today and unlock the full potential of your presentations.
Contact Information:
- Address: 1600 St Michael’s Dr, Santa Fe, NM 87505, United States
- Phone: +1 (505) 471-6001
- Website: dfphoto.net
10. Frequently Asked Questions (FAQ)
10.1. How do I make an image partially transparent in Google Slides?
To make an image partially transparent, select the image, go to “Format Options,” expand the “Adjustments” menu, and use the “Transparency” slider to adjust the level of transparency.
10.2. Can I make a shape completely invisible in Google Slides?
Yes, you can make a shape completely transparent by selecting the shape, clicking the “Fill Color” icon, and choosing “Transparent.”
10.3. How do I adjust the transparency of a background image in Google Slides?
Google Slides doesn’t directly support adjusting the transparency of a background image. As a workaround, insert the image as a regular image, adjust its transparency, resize it to cover the slide, and send it to the back.
10.4. What image formats support transparency in Google Slides?
PNG images support transparency, allowing you to use images with transparent areas in your presentations.
10.5. How can I create a watermark in Google Slides?
To create a watermark, insert your logo or text, adjust its transparency to a low level, position it in the background of the slide, and lock it in place.
10.6. Why does my transparent image look different on different screens?
Transparency can look different on different screens due to variations in color calibration and display settings. Test your slides on different displays to ensure they look as intended.
10.7. How do I layer multiple transparent elements in Google Slides?
Insert multiple images or shapes, adjust the transparency of each element to different levels, position them on top of each other, and group them together.
10.8. Can I use gradients with transparency in Google Slides?
Yes, you can create gradients with transparency by inserting a shape, opening the “Fill Color” options, selecting “Gradient,” customizing the gradient with color stops, and adjusting the transparency of each color stop.
10.9. How do I ensure text is legible on top of a transparent image?
Use contrasting colors for the text and image, adjust the transparency level of the image, or add a solid background behind the text.
10.10. What are some best practices for using transparency in Google Slides?
Maintain legibility, avoid overuse, use subtle effects, be consistent, and test your slides on different screens.