Making a photo stencil opens up a world of creative possibilities, from unique art projects to personalized crafts. At dfphoto.net, we’re dedicated to helping you unlock your artistic potential through photography and related techniques. This guide provides comprehensive instructions and tips for creating photo stencils, ensuring you achieve professional-looking results. By mastering this technique, you can transform your photos into striking works of art. Stencil art, DIY projects, craft ideas.
1. What Is a Photo Stencil and Why Create One?
A photo stencil is a template created from a photograph, used to reproduce the image onto another surface using paint, ink, or other media. It’s a fantastic way to merge photography with other art forms.
1.1. Unleashing Creativity
Creating a stencil from a photo opens many creative avenues:
- Custom Art: Design unique artwork for your home or as gifts.
- DIY Projects: Personalize clothing, furniture, and other items.
- Crafting: Enhance scrapbooks, greeting cards, and other crafts.
- Mixed Media: Combine stencils with other artistic techniques for innovative effects.
1.2. Target Audience and Their Needs
The primary audience for this content includes:
- Amateur and Professional Photographers (18-55): Seeking new ways to use their photos.
- Photography Enthusiasts (20-55): Interested in the artistic applications of photography.
- Beginner Photographers (18-35): Looking for creative projects to enhance their skills.
- Individuals Interested in Printing and Displaying Photos (20-45): Exploring unique presentation methods.
These individuals need guidance on techniques, inspiration, and practical tips to create stunning photo stencils.
2. Understanding the Basics of Stencil Creation
Before diving into the how-to, let’s cover some essential concepts.
2.1. Key Concepts
- Thresholding: Converting a grayscale image into a binary image (black and white) by setting a threshold value. Pixels above the threshold become white, and those below become black.
- Image Simplification: Reducing the complexity of an image to make it suitable for stencil creation.
- Connectivity: Ensuring that all parts of the stencil are connected to avoid floating pieces when cutting.
- Negative Space: The areas that are cut out of the stencil, allowing paint or ink to pass through.
2.2. Essential Tools and Materials
To create photo stencils, you’ll need:
- Computer: For photo editing and stencil design.
- Photo Editing Software: Such as Adobe Photoshop, GIMP, or online stencil creators.
- Printer: To print the stencil design.
- Stencil Material: Heavy cardstock, mylar, or acetate sheets.
- Cutting Tools: X-ACTO knife, scissors, or a stencil cutting machine.
- Cutting Mat: To protect your work surface.
- Pencil or Marker: For tracing or marking the stencil.
3. How to Make a Photo Stencil Using Photoshop
Photoshop is a powerful tool for creating high-quality photo stencils. Here’s a step-by-step guide.
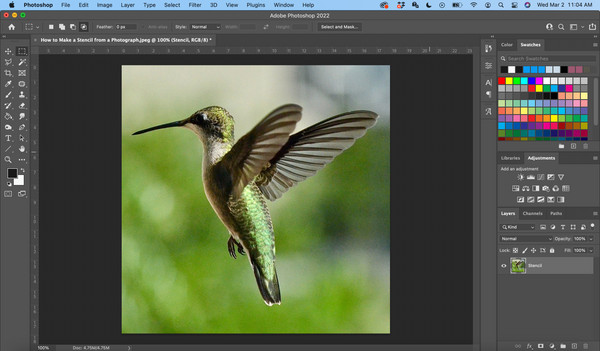
3.1. Step 1: Open Your Image in Photoshop
Launch Photoshop and open the photo you want to turn into a stencil. Go to File > Open and select your image.
 Open image in photoshop
Alt: Opening a photograph in Adobe Photoshop for stencil creation, showcasing the file menu and open option.
3.2. Step 2: Convert to Black and White
To simplify the image, convert it to black and white. Go to Image > Adjustments > Black & White. Adjust the sliders to achieve the desired contrast and detail.
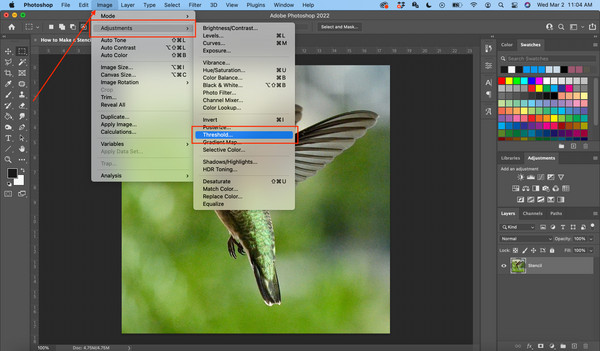
3.3. Step 3: Apply Threshold Adjustment
The threshold adjustment converts the image into a pure black and white stencil. Go to Image > Adjustments > Threshold. A slider will appear, allowing you to adjust the level of detail in the stencil.
 Threshold in photoshop
Alt: Applying the Threshold adjustment in Photoshop to convert a photo into a high-contrast black and white stencil, highlighting the image adjustments menu.
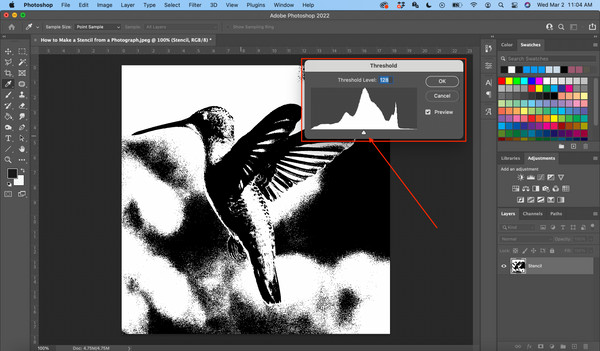
3.4. Step 4: Adjust the Threshold Level
Drag the Threshold slider to see the detail in your photograph change. Drag it until you have minimal detail but enough of the image outline.
 Photoshop threshold slider
Alt: Using the threshold slider in Photoshop to adjust the detail level of a stencil, illustrating how the image transforms with different threshold settings.
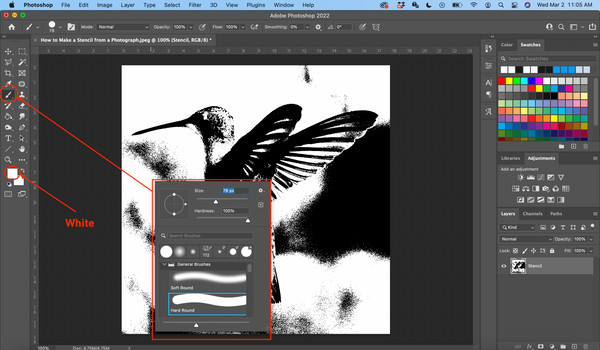
3.5. Step 5: Clean Up the Image
Use the white paintbrush to clean up the image and erase whatever you do not want showing in your stencil. Fill your white spaces with the black paintbrush tool.
Keep in mind that the black areas of your image will be removed and painted over. Each detail of the stencil you want to be shown will need to be connected. Create lines with your white paintbrush to attach any isolated parts of your stencil to the photograph.
 White paint brush to clean up background
Alt: Cleaning up the background of a stencil in Photoshop using a white paintbrush to remove unwanted details and ensure clear stencil lines.
3.6. Step 6: Apply the Cutout Filter
To simplify the lines and edges of the stencil, apply the Cutout filter. Go to Filter > Filter Gallery > Artistic > Cutout. Adjust the settings to achieve the desired level of simplification. This cutout filter will make the lines in your stencil straightened and easier to cut.
 Artistic cutout
Alt: Applying the artistic cutout filter in Photoshop to simplify and refine the lines of a photo stencil, improving its suitability for cutting and painting.
3.7. Step 7: Fine-Tune the Stencil
Now you can make adjustments to your stencil. There are a variety of filters or sliders that will alter your stencil. The Edge Simplicity slider will let you straighten edges.
3.8. Step 8: Final Review
Give your stencil a final look before you print. Make sure everything is connected and ready to go.
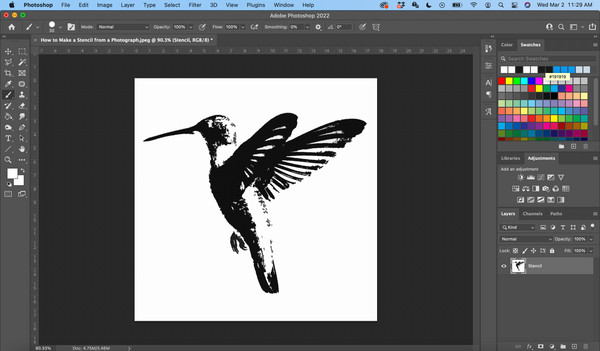 Final image
Alt: Reviewing the final photo stencil in Photoshop to ensure all elements are connected and the design is ready for printing and cutting, confirming the stencil’s integrity.
3.9. Step 9: Print the Stencil
Print your stencil out on heavy cardstock.
3.10. Step 10: Cut Out the Stencil
Remove all of the black colors from your stencil with X-ACTO knife or scissors. You should be left with a white stencil.
4. Alternative Methods: Online Stencil Creators
If you don’t have access to Photoshop, several online stencil creators offer a simple way to convert photos into stencils.
4.1. Stencil Graffiti Creator
This is one of the highly ranked stencil creator websites that is super easy to use.
- First, you will need to go to the site and upload your photography by choosing the Choose Stencil Image icon.
- Next, you have the option us their version of the spray can tool or use their brick option. Using the spray can let you pick the color you are using for your image. The brick tool allows you to select a texture.
- Next just export. Your stencil image is finished
4.2. Stencil Creator
The Stencil Creator service has many functions to step up your stencil game. Although it has more access to different functions, it is still easy to use.
- Upload the image you want to convert into a stencil.
- Now you can choose the color and depth of your effect.
- This is the fun part where you can experiment with all available functions. You will see tools like contrast, effect levels, and color transformation. You can also use filters like Gaussian blur.
4.3. Photo2Stencil
The last stencil service on my list is Photo2Stencil. Here is a more basic stencil creator that can easily be uploaded to the stencil site. It may not offer as many bells and whistles as the stencil creator options above, and it gets the job done You can also save the stencil you created as a vector image
You can create stencils for your projects whenever you need them with the list above. Even if you do not have the popular Photoshop or Illustrator programs
5. Advanced Techniques for Photo Stencil Creation
For those looking to elevate their stencil-making skills, consider these advanced techniques.
5.1. Using Layers in Photoshop
Layers allow you to work on different parts of the image independently.
- Duplicate the Background Layer: Right-click on the background layer and select “Duplicate Layer.”
- Apply Threshold to the Top Layer: Adjust the threshold on the duplicated layer to create the stencil effect.
- Add a New Layer for Cleanup: Create a new layer to paint and refine the stencil without affecting the original image.
5.2. Creating Multi-Layer Stencils
Multi-layer stencils allow you to add depth and color to your stencil art.
- Separate Color Regions: Identify distinct color regions in your image.
- Create Separate Layers for Each Region: Convert each region into a separate stencil layer.
- Cut and Apply Each Layer: Layer the stencils to create a multi-colored image.
5.3. Using Vector Graphics
Vector graphics software like Adobe Illustrator can create precise and scalable stencils.
- Import Your Image: Open your image in Illustrator.
- Image Trace: Use the “Image Trace” feature to convert the image into vector paths.
- Simplify and Refine: Adjust the settings to simplify the paths and remove unwanted details.
6. Tips for Cutting and Applying Stencils
The cutting and application process is just as important as the design.
6.1. Cutting Techniques
- Use a Sharp Blade: A sharp blade ensures clean cuts and prevents tearing.
- Cut on a Cutting Mat: Protect your work surface and extend the life of your blade.
- Start with Small Details: Cut out small, intricate details first.
- Work Slowly and Steadily: Avoid rushing to prevent mistakes.
6.2. Application Techniques
- Secure the Stencil: Use adhesive spray or tape to hold the stencil in place.
- Use the Right Paint: Choose a paint that is suitable for the surface you are stenciling.
- Apply Thin Coats: Apply thin, even coats of paint to prevent bleeding.
- Use a Stencil Brush or Sponge: These tools provide better control and prevent paint from seeping under the stencil.
- Remove the Stencil Carefully: Lift the stencil straight up to avoid smudging the paint.
7. Inspiration and Ideas for Photo Stencil Projects
Get inspired with these creative project ideas.
7.1. Home Decor
- Wall Art: Create custom wall art using photo stencils.
- Furniture Decoration: Stencil designs onto furniture for a unique touch.
- Textile Art: Personalize fabrics with stencil designs.
7.2. Fashion and Accessories
- T-Shirt Designs: Create custom t-shirts with photo stencils.
- Bag Personalization: Add stencil designs to bags and accessories.
- Shoe Customization: Personalize your shoes with unique stencil patterns.
7.3. Crafts and Hobbies
- Scrapbooking: Enhance scrapbook pages with photo stencils.
- Greeting Cards: Create personalized greeting cards with stencil designs.
- Mixed Media Art: Combine stencils with other art forms for innovative effects.
8. Troubleshooting Common Issues
Even with careful planning, issues can arise. Here’s how to troubleshoot them.
8.1. Paint Bleeding Under the Stencil
- Solution: Ensure the stencil is securely attached, use thin coats of paint, and use a stencil brush or sponge.
8.2. Tearing the Stencil
- Solution: Use a sharp blade, cut slowly and steadily, and use durable stencil material.
8.3. Difficulty Cutting Intricate Details
- Solution: Simplify the design, use a smaller blade, and take breaks to avoid fatigue.
8.4. Uneven Paint Application
- Solution: Use a stencil brush or sponge, apply even pressure, and use multiple thin coats.
9. Maintaining Your Stencils
Proper maintenance ensures your stencils last longer and remain in good condition.
9.1. Cleaning
- Clean After Each Use: Remove paint or ink immediately after use.
- Use Appropriate Cleaners: Use soap and water for water-based paints, and appropriate solvents for oil-based paints.
- Avoid Harsh Chemicals: Harsh chemicals can damage the stencil material.
9.2. Storage
- Store Flat: Store stencils flat to prevent bending or warping.
- Use a Portfolio or Binder: Store stencils in a portfolio or binder with protective sleeves.
- Avoid Direct Sunlight: Direct sunlight can fade or damage the stencil material.
10. Staying Updated with Trends
The world of photography and art is ever-evolving. Stay updated with the latest trends to keep your creations fresh and exciting.
10.1. Following Industry Blogs and Websites
- dfphoto.net: Your go-to resource for photography tips, techniques, and inspiration.
- Popular Photography: A leading magazine for photography enthusiasts.
- Photography Life: An online resource for photographers of all levels.
10.2. Attending Workshops and Seminars
- Santa Fe University of Art and Design: Known for its excellent photography programs and workshops. Located at Address: 1600 St Michael’s Dr, Santa Fe, NM 87505, United States, Phone: +1 (505) 471-6001, Website: dfphoto.net.
- Local Art Centers: Many local art centers offer workshops on stencil art and related techniques.
10.3. Participating in Online Communities
- Photography Forums: Engage with other photographers and artists in online forums.
- Social Media Groups: Join social media groups dedicated to stencil art and photography.
- Online Classes: Take online classes to learn new techniques and stay updated with trends.
FAQ: Your Questions About Photo Stencils Answered
1. What is the best software for creating photo stencils?
Adobe Photoshop is a great choice. Photoshop is the best software for creating photo stencils due to its advanced features and flexibility, but GIMP (free) and online stencil creators are also viable options.
2. What materials are best for making stencils?
Heavy cardstock, mylar, or acetate sheets are great choices. Heavy cardstock is economical, while mylar and acetate are more durable for repeated use.
3. How do I prevent paint from bleeding under the stencil?
Ensure the stencil is securely attached, use thin coats of paint, and use a stencil brush or sponge.
4. Can I create multi-colored stencils from photos?
Yes, you can, but it requires creating separate stencils for each color layer.
5. How do I clean a stencil after use?
Use soap and water for water-based paints and appropriate solvents for oil-based paints. Avoid harsh chemicals.
6. What kind of paint should I use for stenciling?
Choose a paint that is suitable for the surface you are stenciling. Acrylic paints work well for many surfaces.
7. How do I store stencils to keep them in good condition?
Store stencils flat to prevent bending or warping. Use a portfolio or binder with protective sleeves.
8. Can I use a regular printer to print stencils?
Yes, but ensure your printer can handle the stencil material (e.g., heavy cardstock).
9. How do I simplify an image for stencil creation?
Use the threshold adjustment and cutout filter in Photoshop to reduce detail and simplify lines.
10. Where can I find inspiration for stencil projects?
Explore online art communities, home decor magazines, and DIY project websites for inspiration.
Conclusion: Unleash Your Creativity with Photo Stencils
Creating photo stencils is a rewarding way to merge photography with other art forms. Whether you’re a photographer, artist, or DIY enthusiast, the possibilities are endless. By following the techniques and tips outlined in this guide, you can create stunning photo stencils that reflect your unique style and vision.
Ready to take your photography and artistic skills to the next level? Visit dfphoto.net today to discover more tutorials, inspiration, and resources. Explore our extensive collection of photography guides, connect with a vibrant community of artists, and unlock your creative potential. Let dfphoto.net be your partner in turning your photos into remarkable works of art. Discover new techniques, find inspiration, and connect with a thriving community of photographers and artists. Visit dfphoto.net today and start your creative journey Photo techniques, artistic inspiration, photography community.