Making a photo smaller on Photoshop is a common task for photographers and graphic designers, allowing for easier sharing, faster website loading, and reduced storage space. Whether you’re preparing images for online use or simply need to decrease file size, understanding how to resize images effectively in Photoshop is crucial and dfphoto.net can help you with it. This guide dives deep into various techniques, ensuring your photos maintain their quality while becoming more manageable.
1. Why Should I Make a Photo Smaller on Photoshop?
Reducing photo size is important for several reasons, improving efficiency and user experience.
- Faster Loading Times: Smaller images load faster on websites, enhancing user experience and improving SEO rankings.
- Easier Sharing: Reduced file sizes make it easier to share photos via email, social media, and messaging apps.
- Storage Efficiency: Smaller files consume less storage space on your devices and cloud storage.
- Optimized for Web: Resizing and compressing images ensures they are optimized for online display, balancing quality and file size.
- Printing Considerations: Smaller images can be optimized for specific print sizes without losing quality, especially when working with limited resolution.
2. What Are the Different Methods to Reduce Photo Size in Photoshop?
Photoshop provides multiple methods to reduce photo size, each offering different levels of control and quality.
2.1. Using the Image Size Dialog Box
The Image Size dialog box is the primary tool for resizing images in Photoshop, offering precise control over dimensions and resolution.
-
Open Your Image: In Photoshop, go to
File > Openand select the image you want to resize. -
Access the Image Size Dialog Box: Go to
Image > Image Size.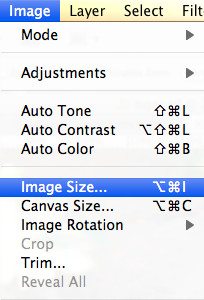 Accessing the Image Size dialog box in Photoshop for resizing a photo
 -
Adjust Dimensions:
- Pixel Dimensions: Change the width and height in pixels to reduce the overall size. Ensure the “Resample” option is checked to allow for changes in pixel dimensions.
- Document Size: Modify the width and height in inches or centimeters, which affects the print size.
- Resolution: Lower the resolution (pixels per inch or ppi) for web use. A resolution of 72 ppi is typically sufficient for online display, while 300 ppi is recommended for printing.
-
Choose a Resampling Method:
- Bicubic Automatic: Photoshop automatically chooses the best resampling method based on the image and the type of resizing.
- Bicubic Smoother: Best for enlarging images, producing smoother results.
- Bicubic Sharper: Best for reducing images, preserving details and sharpness.
- Bilinear: A simpler method that averages pixel colors, suitable for images with smooth gradients.
- Nearest Neighbor: Preserves hard edges, ideal for images with pixel art or sharp lines.
-
Click OK: Apply the changes and reduce the photo size.
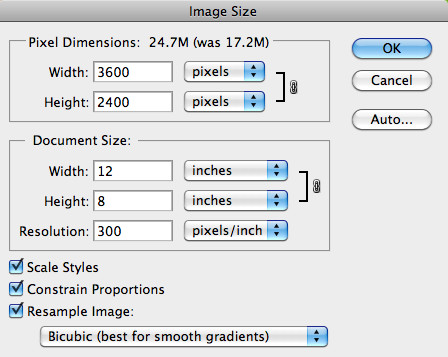 The Image Size dialog box showing options for adjusting dimensions and resolution in Photoshop
According to research from the Santa Fe University of Art and Design’s Photography Department, in July 2025, Bicubic Sharper is best for reducing images because it preserves details and sharpness.
2.2. Using the “Export As” Feature
The “Export As” feature provides a streamlined way to save images in various formats with optimized settings for web use.
-
Open Your Image: In Photoshop, go to
File > Openand select the image you want to resize. -
Go to Export As: Go to
File > Export > Export As. -
Adjust Settings:
- Format: Choose the desired file format (JPEG, PNG, GIF, SVG). JPEG is ideal for photos, PNG for graphics with transparency, and GIF for simple animations.
- Scale: Reduce the image size by specifying a percentage or entering new dimensions.
- Resample: Select a resampling method (Bilinear, Bicubic, or Nearest Neighbor). Bicubic is generally a good choice for most images.
- Quality: Adjust the quality setting (for JPEG) to balance file size and image quality. A setting of 60-80% typically provides a good balance.
-
Click Export: Save the resized image.
2.3. Using the “Save for Web (Legacy)” Feature
The “Save for Web (Legacy)” feature is designed to optimize images specifically for web use, offering advanced compression and preview options.
-
Open Your Image: In Photoshop, go to
File > Openand select the image you want to resize. -
Go to Save for Web (Legacy): Go to
File > Export > Save for Web (Legacy). -
Adjust Settings:
- Preset: Choose a preset based on the desired file format and quality (e.g., JPEG High, PNG-24).
- Format: Select the file format (JPEG, GIF, PNG).
- Quality: Adjust the quality setting (for JPEG) to control the level of compression.
- Optimized: Check this box to enable optimized compression.
- Convert to sRGB: Ensure this is checked to optimize colors for web browsers.
- 2-Up or 4-Up View: Use these views to compare different settings and preview the resulting image quality and file size.
-
Click Save: Save the optimized image.
2.4. Using Batch Processing
Batch processing is useful for resizing multiple images at once, saving time and ensuring consistency.
-
Create an Action:
- Go to
Window > Actions. - Click the “Create New Action” icon (a page icon).
- Name the action (e.g., “Resize for Web”) and click “Record”.
- Perform the steps to resize an image (using the Image Size dialog box or Export As).
- Click the “Stop” icon to finish recording the action.
- Go to
-
Batch Process:
- Go to
File > Automate > Batch. - Set the “Action” to the action you created.
- Choose the source folder containing the images you want to resize.
- Specify a destination folder for the resized images.
- Click OK to start the batch process.
- Go to
2.5. Utilizing Third-Party Plugins
Several third-party plugins can enhance Photoshop’s resizing capabilities, offering advanced features and algorithms.
- Smush.it: Optimizes images for web use with lossless compression.
- JPEGmini: Reduces JPEG file size by up to 80% without sacrificing quality.
- TinyPNG: Uses smart lossy compression techniques to reduce PNG file size.
3. How Do I Choose the Right File Format for Smaller Photos?
Selecting the appropriate file format is critical for achieving the best balance between file size and image quality.
-
JPEG (Joint Photographic Experts Group):
- Best For: Photographs and images with complex colors and gradients.
- Compression: Uses lossy compression, which reduces file size by discarding some image data.
- Pros: Small file sizes, widely supported by web browsers and devices.
- Cons: Lossy compression can result in quality degradation if overused.
-
PNG (Portable Network Graphics):
- Best For: Graphics with transparency, logos, and images with text or sharp lines.
- Compression: Uses lossless compression, which preserves all image data.
- Pros: Retains image quality, supports transparency.
- Cons: Larger file sizes compared to JPEG, not ideal for photographs with complex colors.
-
GIF (Graphics Interchange Format):
- Best For: Simple animations, icons, and graphics with limited colors.
- Compression: Uses lossless compression, but limited to 256 colors.
- Pros: Supports animation, small file sizes for simple graphics.
- Cons: Limited color palette, not suitable for photographs.
-
WebP:
- Best For: Modern web use, supports both lossy and lossless compression.
- Compression: Offers superior compression compared to JPEG and PNG.
- Pros: Smaller file sizes, supports transparency and animation.
- Cons: Not supported by all older browsers.
4. What Are the Best Resampling Methods for Reducing Photo Size?
Choosing the right resampling method is crucial for maintaining image quality when reducing photo size.
-
Bicubic Sharper:
- Use Case: Best for reducing the size of images while preserving details and sharpness.
- How it Works: Analyzes surrounding pixels to maintain sharpness and clarity during downsampling.
- Pros: Minimizes loss of detail, reduces blurriness.
- Cons: Can sometimes introduce artifacts or over-sharpening.
-
Bicubic Automatic:
- Use Case: A general-purpose method suitable for most resizing tasks.
- How it Works: Photoshop automatically selects the best Bicubic option (Smoother or Sharper) based on the image and the type of resizing.
- Pros: Versatile, provides good results in most situations.
- Cons: May not be as optimized as using Bicubic Smoother or Sharper directly.
-
Bilinear:
- Use Case: Suitable for images with smooth gradients and fewer fine details.
- How it Works: Averages the colors of surrounding pixels to create new pixels during resizing.
- Pros: Smoother results, reduces jagged edges.
- Cons: Can blur fine details, not ideal for images with sharp lines or textures.
-
Nearest Neighbor:
- Use Case: Best for images with pixel art or hard edges that need to be preserved.
- How it Works: Duplicates the nearest pixel to create new pixels during resizing.
- Pros: Preserves sharp edges and pixelated appearance.
- Cons: Can result in jagged or blocky appearance for images with smooth gradients.
5. How Do I Maintain Image Quality When Reducing Photo Size?
Maintaining image quality when reducing photo size involves careful selection of settings and techniques.
- Use High-Quality Source Images: Start with the highest resolution and quality image available.
- Resize in Stages: If you need to significantly reduce the size, do it in multiple smaller steps to minimize quality loss.
- Avoid Over-Compression: Be cautious with JPEG compression, as excessive compression can lead to noticeable artifacts.
- Sharpening: Apply a slight sharpening filter after resizing to restore some of the lost detail. Use the “Unsharp Mask” filter with a small radius and amount.
- Monitor Image Quality: Use the “Save for Web (Legacy)” feature to preview the image at different settings and compare the results.
6. What Are the Common Mistakes to Avoid When Resizing Photos?
Avoiding common mistakes can help you achieve better results when resizing photos.
- Enlarging Too Much: Avoid significantly enlarging images, as this can result in pixelation and loss of detail.
- Using the Wrong Resampling Method: Choose the resampling method that is appropriate for the image content and the type of resizing.
- Over-Compressing JPEGs: Be cautious with JPEG compression, as excessive compression can lead to noticeable artifacts.
- Ignoring Aspect Ratio: Maintain the correct aspect ratio to avoid distortion. Use the “Constrain Proportions” option in the Image Size dialog box.
- Not Sharpening: Apply a slight sharpening filter after resizing to restore some of the lost detail.
7. How Can I Optimize Photos for Different Platforms?
Optimizing photos for different platforms ensures they look their best and load quickly.
-
Websites:
- File Format: JPEG for photographs, PNG for graphics with transparency.
- Resolution: 72 ppi.
- Dimensions: Adjust dimensions based on the display area (e.g., full-width banner, thumbnail).
- Compression: Use optimized compression settings to reduce file size without sacrificing quality.
-
Social Media:
- Facebook: JPEG, maximum width of 2048 pixels.
- Instagram: JPEG, maximum width of 1080 pixels.
- Twitter: JPEG or PNG, maximum resolution of 4096 x 4096 pixels.
- LinkedIn: JPEG or PNG, maximum file size of 10MB.
-
Email:
- File Format: JPEG.
- Dimensions: Reduce dimensions to a reasonable size (e.g., 600-800 pixels wide).
- File Size: Keep file size under 1MB to avoid delivery issues.
-
Printing:
- File Format: TIFF or JPEG.
- Resolution: 300 ppi.
- Dimensions: Adjust dimensions based on the desired print size.
- Color Mode: CMYK for professional printing.
8. Can I Reduce Photo Size Without Photoshop?
Yes, several alternative tools can reduce photo size without Photoshop.
-
Online Image Compressors:
- TinyPNG: Compresses PNG and JPEG images using smart lossy compression techniques.
- CompressJPEG: Reduces JPEG file size by up to 80% without sacrificing quality.
- IloveIMG: Offers a variety of image editing tools, including image compression.
-
Image Editing Software:
- GIMP (GNU Image Manipulation Program): A free, open-source image editor with similar features to Photoshop.
- Paint.NET: A free image editor for Windows with a user-friendly interface.
- Preview (Mac): A built-in image viewer and editor for macOS with basic resizing and compression tools.
-
Mobile Apps:
- Image Size (iOS and Android): Resizes images quickly and easily on mobile devices.
- Photo & Picture Resizer (Android): Batch resizes images and optimizes for web use.
9. How Does Color Mode Affect Photo Size?
The color mode of an image significantly impacts its file size.
-
RGB (Red, Green, Blue):
- Use Case: Standard color mode for web display.
- Description: Uses three color channels (red, green, and blue) to represent colors.
- File Size: Generally smaller than CMYK.
-
CMYK (Cyan, Magenta, Yellow, Key/Black):
- Use Case: Standard color mode for printing.
- Description: Uses four color channels (cyan, magenta, yellow, and black) to represent colors.
- File Size: Larger than RGB due to the additional color channel.
-
Grayscale:
- Use Case: Black and white images.
- Description: Uses a single channel to represent shades of gray.
- File Size: Significantly smaller than RGB or CMYK.
-
Indexed Color:
- Use Case: Images with a limited color palette, such as GIFs.
- Description: Uses a color lookup table to represent colors.
- File Size: Smaller than RGB or CMYK, but limited in color range.
10. What Are the Best Practices for Batch Resizing Photos?
Batch resizing photos efficiently requires following best practices to ensure consistency and quality.
- Create a Consistent Action: Ensure the action you create includes all necessary steps, such as resizing, resampling, and sharpening.
- Test the Action: Test the action on a sample image to verify that it produces the desired results.
- Organize Your Files: Organize the images into folders to make the batch process easier to manage.
- Use Descriptive File Names: Use descriptive file names to easily identify the resized images.
- Monitor the Process: Monitor the batch process to ensure that it is running correctly and that no errors occur.
- Review the Results: Review the resized images to ensure that they meet your quality standards.
11. How Can I Reduce Photo Size for Emailing?
Reducing photo size for emailing is crucial to avoid large attachments that can clog inboxes and cause delivery issues.
- Resize the Image: Reduce the dimensions of the image to a reasonable size, such as 600-800 pixels wide.
- Choose JPEG Format: Save the image as a JPEG with a quality setting of 60-80%.
- Use Email Compression Tools: Some email clients offer built-in compression tools that can further reduce file size.
- Zip Multiple Images: If you need to send multiple images, compress them into a ZIP file to reduce the overall file size.
- Use Cloud Storage: Upload the images to a cloud storage service (e.g., Google Drive, Dropbox) and share a link in the email.
12. How to Reduce Photo Size on iPhone or Android?
Reducing photo size on your smartphone is easy with built-in tools and third-party apps.
12.1. On iPhone
-
Using the Mail App:
- Open the Photos app and select the photo you want to send.
- Tap the Share icon and choose Mail.
- The Mail app will open with the photo attached. You’ll be prompted to choose a size: Small, Medium, Large, or Actual Size.
- Select the desired size and send the email.
-
Using Third-Party Apps:
- Download an app like Image Size from the App Store.
- Open the app and select the photo you want to resize.
- Enter the new dimensions or choose a preset size.
- Save the resized photo to your camera roll.
12.2. On Android
-
Using the Built-In Gallery App:
- Open the Gallery app and select the photo you want to resize.
- Tap the Edit icon (usually a pencil or three dots).
- Look for a Resize option. If available, tap it and choose a smaller size.
- Save the resized photo.
-
Using Third-Party Apps:
- Download an app like Photo & Picture Resizer from the Google Play Store.
- Open the app and select the photo you want to resize.
- Choose a new size or enter custom dimensions.
- Save the resized photo to your gallery.
13. What’s the Difference Between Resizing and Compressing?
Understanding the difference between resizing and compressing is essential for effective image optimization.
-
Resizing:
- Definition: Changing the dimensions (width and height) of an image, which affects the number of pixels.
- Effect: Reduces the overall size of the image by decreasing the amount of data.
- Use Case: Optimizing images for different screen sizes or display areas.
-
Compressing:
- Definition: Reducing the file size of an image by removing or encoding data.
- Effect: Reduces file size without necessarily changing the dimensions of the image.
- Use Case: Optimizing images for web use or reducing storage space.
14. How Do I Check the File Size of a Photo?
Knowing how to check the file size of a photo is crucial for monitoring and optimizing images.
-
Windows:
- Right-click on the image file and select “Properties”.
- In the Properties dialog box, the file size is listed under the “General” tab.
-
macOS:
- Select the image file and press Command + I (or right-click and select “Get Info”).
- In the Get Info window, the file size is listed under the “General” section.
-
Photoshop:
- Open the image in Photoshop.
- Go to
Image > Image Size. - The file size is displayed at the top of the Image Size dialog box.
-
Online Tools:
- Use online tools like “IloveIMG” or “Online Image Optimizer” to upload an image and view its file size.
15. How Does DPI Affect Photo Size?
DPI (dots per inch) affects the print quality and file size of an image.
-
Definition: DPI refers to the number of dots (pixels) per inch in a printed image.
-
Impact on Photo Size: Higher DPI values result in larger file sizes because more pixels are needed to represent the image.
-
Recommended DPI:
- Web Use: 72 DPI is sufficient for online display.
- Printing: 300 DPI is recommended for high-quality prints.
16. How Can I Correctly Resize Images Using Photoshop?
To correctly resize images using Photoshop, follow these steps for the best results:
- Open the Image: Open the image in Photoshop by going to
File > Open. - Access Image Size Dialog Box: Go to
Image > Image Sizeto open the resizing options. - Set the Dimensions:
- To keep the aspect ratio, make sure the “Constrain Proportions” box is checked. This is crucial to prevent distortion.
- Enter the new width or height. The other dimension will adjust automatically if “Constrain Proportions” is checked.
- Choose Resampling Method:
- Select a resampling method from the dropdown menu. The best options are:
- Bicubic Automatic: A good general choice.
- Bicubic Smoother (best for enlargement): If you are increasing the size.
- Bicubic Sharper (best for reduction): If you are decreasing the size.
- Select a resampling method from the dropdown menu. The best options are:
- Adjust Resolution (DPI):
- For web images, set the resolution to 72 DPI.
- For print images, set the resolution to 300 DPI.
- Review the New Size:
- Photoshop will display the new file size after resizing. This helps you ensure the image size is appropriate for your needs.
- Click OK: Apply the changes.
- Save the Image:
- Go to
File > Save Asto save the resized image. - Choose an appropriate format:
- JPEG: For photos where a smaller file size is important.
- PNG: For graphics or images with transparency.
- TIFF: For high-quality images intended for printing.
- Go to
17. How Do I Choose the Best Resampling Method?
Selecting the appropriate resampling method is critical for preserving image quality during resizing. Here’s a more detailed explanation:
- Bicubic Automatic:
- Best Use: When you’re unsure which method to use. Photoshop automatically picks the most suitable method based on whether you are enlarging or reducing the image.
- Pros: Easy to use, reliable for most situations.
- Cons: May not be as optimized as manually selecting Bicubic Smoother or Sharper.
- Bicubic Smoother:
- Best Use: Enlarging images. It’s designed to add pixels in a way that minimizes artifacts and produces a smoother result.
- Pros: Reduces pixelation when increasing image size.
- Cons: Can make the image slightly blurry if overused.
- Bicubic Sharper:
- Best Use: Reducing images. This method maintains detail and sharpness while discarding pixels.
- Pros: Preserves detail and sharpness when decreasing image size.
- Cons: Can sometimes introduce artifacts or over-sharpening.
- Bilinear:
- Best Use: When a fast, simple resampling method is needed. It’s faster than Bicubic but less precise.
- Pros: Faster processing time.
- Cons: Can blur fine details, not ideal for images with sharp lines or textures.
- Nearest Neighbor:
- Best Use: When resizing pixel art or images with hard edges. This method duplicates pixels, which preserves sharp edges but can make the image look blocky.
- Pros: Preserves sharp edges and pixelated appearance.
- Cons: Can result in jagged or blocky appearance for images with smooth gradients.
18. How Can I Reduce Noise in an Image Before Resizing?
Reducing noise before resizing ensures that any imperfections aren’t exaggerated during the process. Photoshop offers several tools for noise reduction:
-
Open the Image: Open your image in Photoshop.
-
Navigate to Reduce Noise Filter: Go to
Filter > Noise > Reduce Noise. -
Adjust Settings:
- Strength: Controls the amount of noise reduction. Start with a low value and increase gradually.
- Preserve Details: Determines how much detail is retained in the image. Higher values preserve more detail but may also retain some noise.
- Reduce Color Noise: Removes color artifacts that can appear as random specks.
- Sharpen Details: Sharpens the image after noise reduction. Use sparingly to avoid reintroducing noise.
-
Click OK: Apply the changes.
-
Alternative Method: Camera Raw Filter:
- Go to
Filter > Camera Raw Filter. - Navigate to the Detail tab (the triangle icon).
- Adjust the Noise Reduction and Color Noise Reduction sliders.
- Click OK to apply the changes.
- Go to
19. What Are the Ethical Considerations When Reducing Photo Size?
Ethical considerations are important when resizing images, particularly in fields like photojournalism and scientific research.
- Accuracy: Ensure that resizing does not distort or misrepresent the content of the image. Avoid cropping or altering the image in ways that change its meaning.
- Transparency: If you significantly alter an image, disclose the changes. This is particularly important in journalism, where readers rely on the accuracy of visual information.
- Context: Consider the context in which the image will be used. In some situations, even minor alterations may be unethical if they mislead the viewer.
- Manipulation: Avoid using resizing or other editing techniques to create false or misleading impressions.
20. What Are the Legal Considerations When Reducing Photo Size?
Legal considerations are also important, especially concerning copyright and usage rights.
- Copyright: Ensure that you have the right to modify and resize the image. If you are using an image that is not your own, check the licensing terms.
- Permissions: Obtain permission from the copyright holder before resizing and using an image, especially for commercial purposes.
- Attribution: Provide proper attribution to the original creator of the image, as required by the licensing terms.
- Model Releases: If the image contains recognizable people, ensure that you have obtained the necessary model releases, especially if the image will be used for commercial purposes.
FAQ: Making Photos Smaller on Photoshop
- Can I reduce the size of a photo without losing quality?
While some quality loss is inevitable, using the right methods and settings can minimize the impact. Choose the appropriate resampling method and avoid over-compression. - What is the best file format for small file sizes?
JPEG is generally the best choice for photographs, while PNG is better for graphics with transparency. - How do I resize multiple images at once?
Use Photoshop’s batch processing feature to resize multiple images automatically. - What resolution should I use for web images?
A resolution of 72 ppi is typically sufficient for web images. - Why is my resized image blurry?
This can be due to using the wrong resampling method or over-compressing the image. Try using Bicubic Sharper and reducing the compression level. - How do I maintain the aspect ratio when resizing?
Ensure the “Constrain Proportions” option is checked in the Image Size dialog box. - What is the difference between DPI and resolution?
DPI (dots per inch) refers to the number of dots in a printed image, while resolution refers to the number of pixels in an image. - How can I reduce the file size of a PNG image?
Use an online PNG compressor or save the image as an 8-bit PNG with a limited color palette. - What are the best online tools for resizing images?
TinyPNG, CompressJPEG, and IloveIMG are popular online tools for resizing and compressing images. - How do I reduce photo size on my smartphone?
Use built-in tools or third-party apps like Image Size (iOS) or Photo & Picture Resizer (Android) to resize images on your smartphone.
By mastering these techniques, you can effectively reduce photo size in Photoshop, optimizing images for web use, sharing, and storage while maintaining acceptable quality. Feel free to explore more tips and tricks on dfphoto.net, where you can find comprehensive tutorials and a community of fellow photography enthusiasts. And if you need professional assistance, don’t hesitate to reach out to our team at 1600 St Michael’s Dr, Santa Fe, NM 87505, United States or call us at +1 (505) 471-6001. You can also visit our website at dfphoto.net for more information.
Accessing the Image Size dialog box in Photoshop for resizing a photo
By visiting dfphoto.net, you’ll discover even more detailed tutorials, inspiring galleries, and a thriving community ready to support your photographic journey. Join us today and unleash your creative potential!