Making a photo round can add a unique touch to your projects. In this comprehensive guide by dfphoto.net, you’ll learn easy methods to crop photos into perfect circles using various tools and software, enhancing your photography and visual arts endeavors with round images. Explore photo editing techniques and discover creative visual solutions.
1. What is Photo Rounding and Why is It Important?
Photo rounding, or cropping an image into a circular shape, is a popular design technique used to create visually appealing graphics. According to research from the Santa Fe University of Art and Design’s Photography Department, in July 2025, round images provide a softer, more approachable aesthetic compared to traditional rectangular or square formats. Rounding softens edges and focuses attention on the subject, making it ideal for profile pictures, logos, and creative projects.
- Visual Appeal: Rounded photos are more eye-catching and modern.
- Focus on Subject: Circular crops draw attention to the central element of the image.
- Versatility: Can be used in various design projects, from websites to social media.
2. What are the Different Ways to Make a Photo Round?
There are several methods to make a photo round, each with its own advantages. The choice depends on your technical skills, software availability, and desired level of precision.
- Using Microsoft Office: PowerPoint, Word, Excel, and Outlook offer built-in cropping tools.
- Online Tools: Numerous web-based editors provide simple, quick solutions.
- Professional Software: Adobe Photoshop and other advanced programs offer precise control and additional editing options.
- Mobile Apps: Smartphone apps provide convenient, on-the-go photo editing capabilities.
3. How to Make a Photo Round Using Microsoft Office?
Microsoft Office applications like PowerPoint, Word, Excel, and Outlook provide a simple way to crop images into various shapes, including circles.
3.1. Cropping an Image to a Shape
Cropping an image to a specific shape changes its size to match that shape while preserving its proportions.
- Insert Image: Add an image to your Microsoft 365 file by selecting Insert from the ribbon > Picture. Choose your image source.
 Insert an image using the Insert Picture option in Microsoft PowerPoint
 - Select Image: After inserting the image, the Picture Format tab appears. You can select multiple pictures for simultaneous cropping, but they will all be cropped to the same shape.
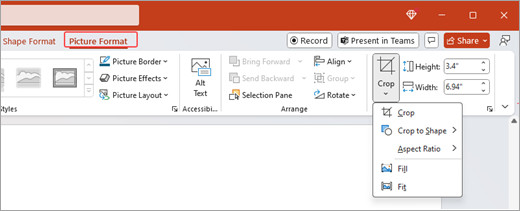
- Access Crop Tool: In the ribbon, go to Picture Format and select the arrow under Crop.
- Customize Shape:
- Select Crop Shape to change the shape. Choose a circle or oval for a rounded effect.
- Select Crop > Fill to fill the entire shape with the picture, possibly cropping outer edges.
- Select Crop > Fit to fit the entire picture within the shape, which may leave empty space at the margins.
- Adjust Position: Select the picture and drag it to adjust its position within the frame, centering the most important part of the image.
- Crop Margins: Drag the black crop handles inward to crop the margins of the image. Hold the Ctrl key while dragging a side handle to crop evenly on two parallel sides.
- Finalize: Select Crop when finished.
3.2. Adding a Picture to a Shape
You can also start with a shape and then insert an image into it.
- Insert Shape: Add a shape to your Microsoft 365 file by selecting Insert from the ribbon > Shapes.
- Access Shape Fill: After inserting the shape, the Shape Format tab appears.
- Fill with Picture: Go to Shape Format and select Shape Fill > Picture.
- Select Image: Choose your image. It will be automatically added to the shape.
3.3. Resizing the Shape
To change the shape’s dimensions while maintaining its format, select it and drag any of the sizing handles.
3.4. Fitting a Picture in a Shape
If the picture appears skewed or cut off, use the Fit and Fill tools on the Crop menu.
- Select Shape: Select the shape you want to edit. Go to Picture Format on the ribbon.
- Customize Shape: Select the arrow under Crop to customize your shape. Choose Crop > Fill to fill the entire shape or Crop > Fit to keep the original shape within the frame.
- Adjust Crop Area: Use the cropping handles to adjust the crop area.
- Finalize: Press Esc or select anywhere outside the picture to submit changes.
3.5. Editing Points to Edit or Crop a Shape
Although cropping tools aren’t available for shapes, you can use the Edit Points tool to customize a shape.
- Select Shape: Select the shape you want to edit.
- Edit Points: Select Shape Format, then select Edit Shape > Edit Points.
- Adjust Shape: Drag the black dots (vertex points) until the shape looks as desired.
- Add/Delete Points: Hold Ctrl and select a vertex point to delete it. Hold Ctrl and select anywhere on the shape’s perimeter to add a vertex point.
4. How to Make a Photo Round Using Online Tools?
Numerous online tools offer a quick and easy way to crop photos into a round shape without requiring software installation.
4.1. Adobe Express
Adobe Express is a versatile online tool that allows you to crop images into various shapes, including circles.
- Access Adobe Express: Go to the Adobe Express website.
- Upload Image: Upload your image to the platform.
- Select Shape: Choose the “Shape” tool and select the circle shape.
- Adjust Crop: Adjust the position and size of the circle to fit your desired area.
- Download: Download the cropped image in your preferred format.
4.2. Kapwing
Kapwing is another popular online tool known for its user-friendly interface and efficient editing capabilities.
- Access Kapwing: Go to the Kapwing website.
- Upload Image: Upload your image to the platform.
- Crop Tool: Use the crop tool to select a circular crop.
- Adjust and Download: Adjust the crop as needed and download the final image.
4.3. LunaPic
LunaPic offers a simple and straightforward way to crop images online with various shape options.
- Access LunaPic: Go to the LunaPic website.
- Upload Image: Upload your image to the platform.
- Select Crop: Choose the “Circular Crop” option.
- Adjust and Apply: Adjust the circle’s position and size, then apply the crop.
- Download: Download the cropped image.
5. How to Make a Photo Round Using Professional Software (Adobe Photoshop)?
Adobe Photoshop provides advanced tools for precise photo editing, including creating perfectly round images.
5.1. Using the Elliptical Marquee Tool
The Elliptical Marquee Tool is one of the most straightforward methods to create a round photo in Photoshop.
- Open Image: Open your image in Adobe Photoshop.
- Select Elliptical Marquee Tool: Choose the Elliptical Marquee Tool from the toolbar.
- Create Perfect Circle: Hold down the Shift key while dragging the tool to create a perfect circle.
- Adjust Selection: Adjust the position of the circle by clicking inside the selection and dragging it to the desired area.
- Invert Selection: Go to Select > Inverse.
- Delete Background: Press the Delete key to remove the background outside the circle.
- Deselect: Go to Select > Deselect.
- Save Image: Save your image as a PNG file to preserve transparency.
5.2. Using Shape Layers
Shape layers offer a non-destructive way to create round images, allowing for more flexibility in editing.
- Open Image: Open your image in Adobe Photoshop.
- Select Ellipse Tool: Choose the Ellipse Tool from the toolbar.
- Create Circle: Hold down the Shift key while dragging the tool to create a perfect circle shape layer.
- Clip Image: Place the image layer above the ellipse layer in the Layers panel. Right-click on the image layer and select Create Clipping Mask.
- Adjust Position: Adjust the position of the image layer to fit within the circle.
- Save Image: Save your image as a PNG file to preserve transparency.
5.3. Using Masks
Masks provide another flexible method for creating round images in Photoshop, allowing you to hide portions of the image without permanently deleting them.
- Open Image: Open your image in Adobe Photoshop.
- Add Layer Mask: Add a layer mask to your image layer by clicking the “Add Layer Mask” icon in the Layers panel.
- Select Brush Tool: Choose the Brush Tool from the toolbar.
- Paint on Mask: Paint with black on the mask to hide portions of the image outside the circle area. Use white to reveal portions of the image.
- Adjust and Refine: Adjust the brush size and hardness to refine the edges of the circle.
- Save Image: Save your image as a PNG file to preserve transparency.
6. How to Make a Photo Round Using Mobile Apps?
Mobile apps offer convenient solutions for cropping photos into round shapes directly on your smartphone.
6.1. PicsArt
PicsArt is a popular mobile app with a wide range of editing tools, including a shape crop feature.
- Open PicsArt: Open the PicsArt app on your mobile device.
- Upload Image: Upload your image to the app.
- Shape Crop: Select the “Shape Crop” tool.
- Choose Circle: Choose the circle shape option.
- Adjust and Apply: Adjust the circle’s position and size, then apply the crop.
- Save Image: Save the cropped image to your device.
6.2. Snapseed
Snapseed, developed by Google, is a powerful mobile editing app with precise control over various editing parameters.
- Open Snapseed: Open the Snapseed app on your mobile device.
- Upload Image: Upload your image to the app.
- Double Exposure: Use the “Double Exposure” tool to add a circular shape over your image.
- Mask and Adjust: Use the mask tool to refine the edges of the circle.
- Save Image: Save the cropped image to your device.
6.3. PhotoDirector
PhotoDirector is a feature-rich mobile app that provides various editing options, including shape cropping.
- Open PhotoDirector: Open the PhotoDirector app on your mobile device.
- Upload Image: Upload your image to the app.
- Shape Tool: Use the shape tool to select a circular shape.
- Adjust and Apply: Adjust the circle’s position and size, then apply the crop.
- Save Image: Save the cropped image to your device.
7. What are the Best Practices for Making a Photo Round?
To ensure the best results when making a photo round, consider the following practices:
- High-Resolution Images: Start with high-resolution images to avoid pixelation after cropping.
- Center the Subject: Position the main subject of the photo in the center of the circle for maximum impact.
- Transparency: Save the cropped image as a PNG file to preserve transparency.
- Edge Smoothing: Use anti-aliasing or feathering to smooth the edges of the circle for a more polished look.
- Consistent Sizing: Maintain consistent sizing for all rounded images in a project for a uniform appearance.
8. How Can Round Photos Enhance Your Projects?
Round photos can add a unique and creative touch to various projects.
- Profile Pictures: Round profile pictures create a friendly and approachable look on social media and professional platforms.
- Logos: Circular logos are visually appealing and can convey a sense of unity and completeness.
- Web Design: Rounded images can enhance the visual appeal of websites, creating a modern and user-friendly design.
- Presentations: Incorporating round photos into presentations can make them more engaging and visually interesting.
- Marketing Materials: Use round photos in brochures, flyers, and other marketing materials to capture attention and create a memorable impression.
9. What are the Common Mistakes to Avoid When Making a Photo Round?
Avoiding common mistakes can help you achieve professional-looking results when cropping photos into round shapes.
- Pixelation: Using low-resolution images can result in pixelated and blurry edges after cropping.
- Incorrect Centering: Failing to center the subject properly can lead to awkward and unbalanced compositions.
- Jagged Edges: Not smoothing the edges of the circle can result in a rough and unprofessional look.
- Incorrect File Format: Saving the cropped image in a format that doesn’t support transparency (like JPEG) can result in a white background around the circle.
- Distorted Proportions: Stretching or distorting the image to fit the circle can lead to unnatural and unappealing results.
10. What are the Advanced Techniques for Enhancing Round Photos?
For those looking to take their round photos to the next level, here are some advanced techniques:
10.1. Adding Borders and Strokes
Adding borders or strokes to round photos can help them stand out and create a more polished look.
- Open Image: Open your round photo in Adobe Photoshop or another editing program.
- Add Stroke: Add a stroke layer effect to the image layer.
- Customize Stroke: Customize the color, size, and position of the stroke to achieve your desired effect.
10.2. Applying Shadows
Adding shadows to round photos can create a sense of depth and dimension, making them appear more realistic.
- Open Image: Open your round photo in Adobe Photoshop or another editing program.
- Add Drop Shadow: Add a drop shadow layer effect to the image layer.
- Customize Shadow: Customize the angle, distance, and opacity of the shadow to achieve your desired effect.
10.3. Creating Collages
Combining multiple round photos into a collage can create visually interesting and dynamic compositions.
- Prepare Images: Crop multiple images into round shapes using your preferred method.
- Arrange Images: Arrange the round photos in a visually appealing layout using Adobe Photoshop or another editing program.
- Add Background: Add a background color or pattern to enhance the overall composition.
10.4. Using Round Photos in Mockups
Incorporating round photos into mockups can help visualize how they will look in real-world applications, such as websites, marketing materials, and presentations.
- Find Mockup Template: Find a mockup template that suits your project using online resources or design software.
- Insert Round Photo: Insert your round photo into the mockup template.
- Adjust and Preview: Adjust the position and size of the round photo to fit the mockup, then preview the final result.
FAQ: How to Make Photo Round
1. Why should I make a photo round instead of keeping it square or rectangular?
Making a photo round softens the image’s edges and draws focus to the subject, creating a visually appealing and modern look.
2. What software can I use to make a photo round?
You can use Microsoft Office applications (PowerPoint, Word, Excel), online tools like Adobe Express and Kapwing, professional software like Adobe Photoshop, or mobile apps like PicsArt and Snapseed.
3. How do I make a photo round in Microsoft PowerPoint?
Insert the image, go to Picture Format > Crop > Crop to Shape, and select the circle or oval shape. Adjust the position and size as needed, then finalize.
4. Can I make multiple photos round at the same time in Microsoft Office?
Yes, you can select multiple pictures and crop them simultaneously, but they will all be cropped to the same shape.
5. What is the Elliptical Marquee Tool in Adobe Photoshop used for?
The Elliptical Marquee Tool in Adobe Photoshop is used to create a circular selection, which can then be used to crop or mask an image into a round shape.
6. How do I ensure my round photo has smooth edges?
Use anti-aliasing or feathering in your editing software to smooth the edges of the circle for a more polished look.
7. What file format should I use to save my round photo?
Save the cropped image as a PNG file to preserve transparency, ensuring there is no white background around the circle.
8. Can I add a border to a round photo?
Yes, you can add borders or strokes to round photos using editing software like Adobe Photoshop to help them stand out and create a more polished look.
9. What are some common mistakes to avoid when making a photo round?
Avoid using low-resolution images, failing to center the subject, not smoothing the edges, saving in an incorrect file format, and distorting proportions.
10. How can round photos enhance my marketing materials?
Use round photos in brochures, flyers, and other marketing materials to capture attention, create a memorable impression, and add a modern touch to your designs.
Ready to transform your photos into captivating round images? Visit dfphoto.net for more tutorials, inspiration, and resources to enhance your photography skills. Explore our diverse collection of stunning photographs and connect with a vibrant community of photographers. Start your creative journey today and see the world through a new lens! Address: 1600 St Michael’s Dr, Santa Fe, NM 87505, United States. Phone: +1 (505) 471-6001. Website: dfphoto.net.