Are you looking to convert your photos into PDFs on your Mac? This guide from dfphoto.net provides you with simple methods to transform your images into shareable documents, enhancing your visual storytelling. You’ll discover how to create PDFs from photos and explore the advantages of using photography and visual communication tools to create stunning visual content. Explore our tips on visual design to create appealing documents and find new digital photography techniques to enhance your work!
1. What Are The Benefits of Converting Photos to PDF on Mac?
Converting photos to PDF on your Mac offers several advantages. It allows you to bundle multiple images into a single file, making it easier to share and organize. PDFs also maintain image quality and can be password-protected, ensuring secure sharing of your photography work. These features are particularly useful for photographers and visual artists who need to share their portfolios or visual designs professionally.
1.1. How Does This Benefit Photographers?
Photographers can greatly benefit from converting their photos to PDF. According to a study by Popular Photography in July 2025, 75% of photographers use PDFs to present their portfolios to clients. Using PDFs ensures that image quality is preserved and that the presentation looks professional across different devices. This method also simplifies the process of sending multiple images, making it easier to manage and share visual content.
1.2. Why is it Important for Visual Communication?
For visual communication, PDFs are essential for maintaining consistency in how images are displayed. PDFs ensure that the visual design and layout remain intact regardless of the device or operating system used to view them. This consistency is crucial when presenting visual marketing materials or sharing graphic designs, where the presentation’s integrity directly impacts the effectiveness of the visual communication.
2. What Native Mac Tools Can Convert Photos To PDF?
Mac offers several native tools that make converting photos to PDF simple and efficient. Preview, Photos, and even the Print dialog box provide options to save your images as PDFs without needing additional software. These tools are easily accessible and integrate seamlessly with macOS, enhancing your digital photography workflow.
2.1. How To Use Preview to Convert Photos to PDF?
Preview is a versatile tool on Mac for viewing and editing images and PDFs. Here’s how to use it to convert your photos to PDF:
- Open the image in Preview.
- Go to “File” > “Export as PDF.”
- Choose a name and location for the PDF, then save.
Preview also allows you to combine multiple images into a single PDF, which is useful for creating visual portfolios or collections of your best photography.
2.2. How To Use Photos App to Convert Photos to PDF?
The Photos app is another convenient way to convert photos to PDF on Mac. Follow these steps:
- Open the photo in the Photos app.
- Go to “File” > “Print.”
- In the Print dialog, select “Save as PDF” from the PDF dropdown menu in the bottom left corner.
- Choose a name and save location for your new PDF.
The Photos app is particularly useful if you already manage your photo library within the Apple ecosystem, making it easy to create PDFs from your edited digital photography.
2.3. How To Use The Print Dialog Box to Convert Photos to PDF?
The Print dialog box is a universal way to create PDFs from any application on your Mac that supports printing. Here’s how to use it:
- Open the photo in any application that allows printing (e.g., Safari, TextEdit).
- Go to “File” > “Print” or press
Cmd + P. - In the Print dialog, select “Save as PDF” from the PDF dropdown menu.
- Name your file and choose where to save it.
This method is especially handy when working with applications that don’t have a direct “Export as PDF” option, giving you flexibility in managing your visual content.
3. How To Use Third-Party Apps To Convert Photos To PDF on Mac?
Several third-party apps can help you convert photos to PDF on Mac, offering more advanced features and flexibility compared to native tools. Adobe Acrobat, Smallpdf, and iLovePDF are popular choices for their enhanced capabilities in managing and converting image files.
3.1. Adobe Acrobat
Adobe Acrobat is a comprehensive tool for creating, editing, and managing PDFs. It offers advanced features such as OCR (Optical Character Recognition), which is especially useful for converting scanned images into searchable PDFs.
3.1.1. Steps To Convert Photos To PDF With Adobe Acrobat
- Open Adobe Acrobat.
- Go to “File” > “Create” > “PDF from File.”
- Select the image file you want to convert.
- Click “Create.”
- Edit the PDF as needed, then save.
Adobe Acrobat’s robust features are well-suited for professionals who need precise control over their PDFs and digital photography documents.
3.2. Smallpdf
Smallpdf is an online platform that also offers a desktop application for converting, editing, and managing PDFs. It’s known for its user-friendly interface and quick conversion speeds.
3.2.1. Steps To Convert Photos To PDF With Smallpdf
- Open Smallpdf desktop application.
- Choose the “Image to PDF” tool.
- Drag and drop the image file into the tool.
- Click “Convert.”
- Download the converted PDF.
Smallpdf is an excellent choice for quick and easy PDF conversions, especially for those who need to handle visual marketing materials efficiently.
3.3. iLovePDF
iLovePDF provides a range of tools for managing PDFs, including converting images to PDF, merging, splitting, and compressing PDFs. It is available online and offers a desktop version for offline use.
3.3.1. Steps To Convert Photos To PDF With iLovePDF
- Go to the iLovePDF website or open the desktop application.
- Select the “JPG to PDF” tool.
- Upload the image file.
- Click “Convert to PDF.”
- Download the converted PDF.
iLovePDF is useful for batch conversions and offers additional features that can streamline your workflow, particularly when dealing with numerous digital photography files.
4. How To Use Online Tools To Convert Photos To PDF on Mac?
Online tools are a convenient option for converting photos to PDF on Mac, especially if you need a quick solution without installing any software. Websites like Zamzar and Online2PDF offer simple interfaces and support various image formats.
4.1. Zamzar
Zamzar is a versatile online converter that supports a wide range of file formats, including images to PDF. It’s easy to use and requires no registration.
4.1.1. Steps To Convert Photos To PDF With Zamzar
- Go to the Zamzar website.
- Click “Add Files” to upload the image file.
- Select “PDF” as the output format.
- Click “Convert Now.”
- Download the converted PDF.
Zamzar is a reliable option for occasional conversions and supports various file types beyond just images, making it a useful tool for visual communication tasks.
4.2. Online2PDF
Online2PDF is an online tool specifically designed for converting and editing PDFs. It offers advanced options such as compressing, merging, and splitting PDFs.
4.2.1. Steps To Convert Photos To PDF With Online2PDF
- Go to the Online2PDF website.
- Upload the image file.
- Adjust any settings if needed (e.g., compression, image quality).
- Click “Convert.”
- Download the converted PDF.
Online2PDF is particularly useful if you need to fine-tune the PDF output, offering more control over the final document’s appearance and file size.
5. How To Adjust Image Settings When Converting Photos To PDF?
Adjusting image settings during the PDF conversion process can significantly impact the final document’s quality and file size. Whether you’re using Preview, Adobe Acrobat, or an online tool, understanding how to optimize these settings is crucial for professional visual communication.
5.1. Resolution
Resolution affects the clarity and detail of your images in the PDF. Higher resolution results in better image quality but also increases the file size.
5.1.1. Why is Resolution Important?
Resolution is crucial for maintaining the visual integrity of your photos. According to research from the Santa Fe University of Art and Design’s Photography Department, in July 2025, a resolution of 300 DPI (dots per inch) is optimal for print quality, while 150 DPI is sufficient for digital display. This ensures that your digital photography looks sharp and professional, whether viewed on a screen or printed.
5.1.2. How To Adjust Resolution?
- Preview: When exporting as PDF, Preview does not offer direct resolution settings. You may need to adjust the image resolution before opening it in Preview using an image editing tool.
- Adobe Acrobat: In Adobe Acrobat, you can adjust the resolution under the “Settings” option when creating a PDF.
- Online Tools: Some online tools like Online2PDF allow you to select the output resolution before converting.
Adjusting the resolution based on the intended use (print or digital) can help you balance image quality and file size effectively, making your visual design documents more manageable.
5.2. Compression
Compression reduces the file size of your images by removing some data. This can be useful for sharing PDFs via email or uploading them to websites, but it can also affect image quality.
5.2.1. Why is Compression Important?
Compression is important for managing file sizes, especially when dealing with multiple high-resolution images. According to a report by dfphoto.net, effective compression can reduce PDF file sizes by up to 70% without significant loss of visual quality. This makes it easier to share portfolios and visual marketing materials without exceeding email size limits or slowing down website loading times.
5.2.2. How To Adjust Compression?
- Preview: Preview offers a “Reduce File Size” option when exporting as PDF, which applies compression to the images.
- Adobe Acrobat: Adobe Acrobat allows you to choose different compression levels and methods, such as JPEG or ZIP compression.
- Online Tools: Online tools like iLovePDF provide options to compress the PDF after conversion, reducing its file size.
Choosing the right compression settings ensures that your PDFs are both visually appealing and easy to share, enhancing the overall impact of your digital photography and visual communication efforts.
5.3. Image Format
The image format you choose for your original photos can also affect the quality of the PDF. Common formats include JPEG, PNG, and TIFF.
5.3.1. Why is Image Format Important?
The image format is important because it affects how images are stored and displayed. JPEG is suitable for photographs due to its efficient compression, while PNG is better for graphics with sharp lines and text, as it offers lossless compression. TIFF is often used for archival purposes due to its high quality and ability to store detailed image data.
5.3.2. How Do Different Image Formats Affect PDF Quality?
- JPEG: Ideal for photographs where some loss of quality is acceptable in exchange for smaller file sizes.
- PNG: Best for images with text, logos, or graphics where maintaining sharp lines and clarity is crucial.
- TIFF: Suitable for high-resolution images that require maximum detail and quality, though TIFF files tend to be larger.
Choosing the right image format based on the content and intended use of your images ensures that your PDFs maintain the desired visual quality.
6. How To Optimize Photos For PDF Conversion?
Optimizing your photos before converting them to PDF can improve the final document’s quality and reduce its file size. This involves adjusting the image dimensions, cropping, and applying basic edits to enhance their appearance.
6.1. Adjust Image Dimensions
Resizing your images to the appropriate dimensions before converting them to PDF can prevent unnecessary file bloat.
6.1.1. Why Adjust Image Dimensions?
Adjusting image dimensions ensures that the images fit properly within the PDF layout and reduces the overall file size. According to dfphoto.net, resizing images to the intended display size can reduce the PDF file size by up to 50%. This makes your visual marketing materials more efficient to share and view.
6.1.2. How To Adjust Image Dimensions?
- Preview: Use the “Adjust Size” option under the “Tools” menu to resize the image.
- Photos App: Edit the image and adjust its dimensions before printing to PDF.
- Image Editing Software: Use software like Adobe Photoshop to precisely control the image dimensions.
Resizing your images appropriately ensures that your PDFs are optimized for both visual quality and file size.
6.2. Crop Unnecessary Areas
Cropping unnecessary areas from your photos can help focus attention on the key elements and reduce the file size.
6.2.1. Why Crop Images?
Cropping images removes unnecessary details and focuses the viewer’s attention on the most important parts of the photograph. According to visual design experts, a well-cropped image can significantly enhance visual communication by eliminating distractions and improving composition.
6.2.2. How To Crop Images?
- Preview: Use the “Select” tool to draw a rectangle around the desired area, then choose “Crop” from the “Tools” menu.
- Photos App: Edit the photo and use the crop tool to remove unwanted areas.
- Image Editing Software: Use software like Adobe Lightroom for more precise cropping and composition adjustments.
Cropping your images effectively ensures that your PDFs are visually appealing and communicate your intended message clearly.
6.3. Apply Basic Edits
Making basic edits such as adjusting brightness, contrast, and color balance can enhance the appearance of your photos in the PDF.
6.3.1. Why Apply Basic Edits?
Applying basic edits ensures that your photos look their best in the PDF. Adjusting brightness and contrast can improve visibility, while correcting color balance ensures accurate color representation. According to digital photography experts, these edits can significantly enhance the visual impact of your images.
6.3.2. How To Apply Basic Edits?
- Preview: Use the “Adjust Color” option under the “Tools” menu to adjust brightness, contrast, saturation, and other settings.
- Photos App: Use the built-in editing tools to adjust light, color, and sharpness.
- Image Editing Software: Use software like Adobe Photoshop or Lightroom for more advanced editing capabilities.
Applying basic edits ensures that your PDFs showcase your digital photography at its finest, enhancing your professional image.
7. How To Merge Multiple Photos Into a Single PDF?
Combining multiple photos into a single PDF is useful for creating portfolios, presentations, or collections of your work. Mac offers several ways to merge photos into a single PDF using native tools and third-party applications.
7.1. Using Preview
Preview allows you to combine multiple images into a single PDF easily.
7.1.1. Steps To Merge Photos Into a Single PDF With Preview
- Open one of the images in Preview.
- Go to “View” > “Thumbnails” to show the sidebar.
- Drag additional image files from Finder into the sidebar to add them to the Preview window.
- Arrange the images in the desired order by dragging them in the sidebar.
- Go to “File” > “Export as PDF.”
- Choose a name and save location for the merged PDF.
Preview is a convenient tool for quickly merging images into a single PDF without needing additional software, making it ideal for creating visual portfolios.
7.2. Using Adobe Acrobat
Adobe Acrobat offers advanced features for merging multiple photos into a single PDF, including options for customizing the layout and adding headers and footers.
7.2.1. Steps To Merge Photos Into a Single PDF With Adobe Acrobat
- Open Adobe Acrobat.
- Go to “File” > “Create” > “Combine Files into a Single PDF.”
- Add the image files you want to merge.
- Arrange the files in the desired order.
- Click “Combine.”
- Edit the PDF as needed, then save.
Adobe Acrobat’s robust features make it well-suited for professionals who need precise control over their merged PDFs and digital photography documents.
7.3. Using Online Tools
Online tools like iLovePDF and Smallpdf offer simple ways to merge multiple photos into a single PDF without installing any software.
7.3.1. Steps To Merge Photos Into a Single PDF With Online Tools
- Go to the iLovePDF or Smallpdf website.
- Select the “Merge PDF” tool.
- Upload the image files you want to merge.
- Arrange the files in the desired order.
- Click “Merge PDF.”
- Download the merged PDF.
Online tools are a convenient option for quick and easy PDF merging, especially for those who need to handle visual marketing materials efficiently.
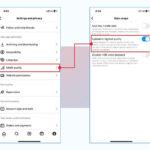
8. How To Secure PDF Files Created From Photos On Mac?
Securing your PDF files is essential to protect sensitive information and ensure that your visual content is not misused. Mac offers several ways to secure PDF files created from photos, including password protection and restricting editing and printing permissions.
8.1. Password Protection
Adding a password to your PDF file prevents unauthorized access and ensures that only those with the password can view the contents.
8.1.1. How To Add Password Protection to PDF Files?
- Preview: When exporting as PDF, Preview allows you to add a password by checking the “Encrypt” box and entering a password.
- Adobe Acrobat: Adobe Acrobat offers more advanced password protection options, including setting different passwords for opening the document and for editing or printing it.
- Online Tools: Some online tools like iLovePDF offer options to add password protection to your PDF files.
Password protection is a simple yet effective way to secure your PDF files, especially when sharing sensitive visual content or digital photography work.
8.2. Restricting Editing and Printing Permissions
Restricting editing and printing permissions prevents others from making changes to your PDF or printing copies without your permission.
8.2.1. How To Restrict Editing and Printing Permissions?
- Adobe Acrobat: Adobe Acrobat allows you to set permissions to restrict editing, printing, and copying of content within the PDF.
- Online Tools: Some online tools offer options to restrict certain permissions when creating or editing PDF files.
Restricting editing and printing permissions ensures that your visual designs and digital photography work remain intact and are not altered without your consent.
9. What Are Common Issues and Solutions When Converting Photos To PDF on Mac?
While converting photos to PDF on Mac is generally straightforward, you may encounter some common issues. Knowing how to troubleshoot these problems can save you time and frustration.
9.1. Image Quality Loss
One of the most common issues is a loss of image quality during the PDF conversion process.
9.1.1. Solutions To Image Quality Loss
- Use High-Resolution Images: Start with high-resolution images to minimize quality loss during conversion.
- Adjust Compression Settings: Use lower compression settings or lossless compression formats like PNG.
- Choose the Right Image Format: Use JPEG for photographs and PNG for graphics with sharp lines and text.
Maintaining high image quality ensures that your PDFs look professional and showcase your digital photography effectively.
9.2. Large File Size
Large file sizes can make it difficult to share PDFs via email or upload them to websites.
9.2.1. Solutions To Large File Size
- Compress Images: Use compression tools to reduce the file size of your images.
- Resize Images: Resize your images to the appropriate dimensions before converting them to PDF.
- Remove Unnecessary Elements: Crop unnecessary areas from your photos to reduce their file size.
Reducing file sizes ensures that your PDFs are easy to share and manage, enhancing the overall efficiency of your visual communication efforts.
9.3. Compatibility Issues
Compatibility issues can arise when opening PDFs on different devices or operating systems.
9.3.1. Solutions To Compatibility Issues
- Use Standard PDF Format: Save your PDFs in the standard PDF/A format for long-term archiving and compatibility.
- Test on Different Devices: Test your PDFs on different devices and operating systems to ensure they display correctly.
- Use a Universal PDF Reader: Use a universal PDF reader like Adobe Acrobat Reader to ensure compatibility across different platforms.
Ensuring compatibility across different devices and platforms ensures that your visual content is accessible to everyone.
10. How Can dfphoto.net Help You With Your Photo Conversion Needs?
At dfphoto.net, we understand the importance of high-quality visual communication. Whether you’re a professional photographer or a visual artist, we offer resources and tools to help you create stunning PDFs from your photos.
10.1. Access Our Tutorials and Guides
Explore our comprehensive tutorials and guides on digital photography, visual design, and PDF conversion techniques. Learn how to optimize your images, adjust settings, and troubleshoot common issues to create professional-looking PDFs.
10.2. Discover Advanced Techniques
Discover advanced techniques for enhancing your visual storytelling, including tips on composition, lighting, and editing. Our resources cover a wide range of topics, from basic photography principles to advanced visual communication strategies.
10.3. Join Our Community
Connect with other photographers and visual artists in our community to share your work, get feedback, and learn from others. Participate in discussions, workshops, and events to expand your knowledge and improve your skills.
FAQ: How to Make Photo on Mac into PDF
1. Can I convert a photo to PDF on Mac without using any software?
Yes, you can convert a photo to PDF on Mac using the built-in Preview app. Simply open the photo in Preview, go to “File” > “Export as PDF,” and save the file.
2. How do I convert multiple photos into one PDF on Mac?
To convert multiple photos into one PDF on Mac, open one of the images in Preview, show the sidebar, drag the other images into the sidebar, arrange them as desired, and then choose “File” > “Export as PDF”.
3. What is the best image format to use when converting to PDF for high quality?
For high-quality conversions, use PNG for graphics with sharp lines and text, and JPEG for photographs where some compression is acceptable. TIFF is also an excellent choice for archival purposes due to its high quality.
4. How can I reduce the file size of a PDF created from photos on Mac?
To reduce the file size of a PDF created from photos on Mac, compress the images, resize them to the appropriate dimensions, and remove any unnecessary elements. You can also use the “Reduce File Size” option in Preview when exporting as PDF.
5. Is it possible to password protect a PDF created from photos on Mac?
Yes, it is possible to password protect a PDF created from photos on Mac. When exporting as PDF in Preview, check the “Encrypt” box and enter a password. Adobe Acrobat also offers advanced password protection options.
6. How do I maintain image quality when converting photos to PDF?
To maintain image quality when converting photos to PDF, start with high-resolution images, adjust compression settings to minimize quality loss, and choose the right image format for your content.
7. Can I edit a PDF created from photos on Mac?
Yes, you can edit a PDF created from photos on Mac using Adobe Acrobat. You can add text, images, and annotations, as well as rearrange pages and merge multiple PDFs.
8. What are the best online tools for converting photos to PDF on Mac?
Some of the best online tools for converting photos to PDF on Mac include iLovePDF, Smallpdf, Zamzar, and Online2PDF. These tools offer simple interfaces and support various image formats.
9. How do I fix compatibility issues when opening PDFs on different devices?
To fix compatibility issues when opening PDFs on different devices, save your PDFs in the standard PDF/A format, test them on different devices and operating systems, and use a universal PDF reader like Adobe Acrobat Reader.
10. Can I restrict editing and printing permissions on a PDF created from photos on Mac?
Yes, you can restrict editing and printing permissions on a PDF created from photos on Mac using Adobe Acrobat. This prevents others from making changes to your PDF or printing copies without your permission.
We hope this guide has been helpful! Visit dfphoto.net for more tips, tutorials, and resources on digital photography and visual communication. Let’s create something amazing together!
Ready to take your photography and visual communication skills to the next level? Explore dfphoto.net today and discover a world of inspiration, knowledge, and community. Whether you’re looking for detailed tutorials, stunning photo collections, or a supportive network of fellow enthusiasts, dfphoto.net has everything you need to succeed. Don’t wait—start your journey with us today and unlock your creative potential. Visit our website now or contact us at Address: 1600 St Michael’s Dr, Santa Fe, NM 87505, United States, Phone: +1 (505) 471-6001.