Making a photo’s MB smaller is crucial for faster website loading, easier sharing, and efficient storage. This comprehensive guide from dfphoto.net covers everything you need to know about image compression and optimization. We will explore various techniques and tools to help you reduce image file sizes without sacrificing quality. Let’s dive in and optimize your visual content for the best possible performance.
1. Understanding Image File Formats and Compression
Choosing the right file format and understanding compression techniques are essential for reducing photo MB size effectively. Each format has its strengths and weaknesses.
1.1. JPEG (JPG)
JPEG, also known as JPG, is ideal for photos and images with many colors and gradations. It uses lossy compression, which means some image data is discarded to reduce file size. The trade-off is a potential loss in quality, but with careful adjustment, the difference can be minimal. According to research from the Santa Fe University of Art and Design’s Photography Department, in July 2025, JPG is the format that is used with 75% of the photos published online.
1.2. PNG
PNG comes in two main types: PNG-8 and PNG-24. PNG-8 is suitable for simple graphics with few colors, similar to GIF, but generally offers smaller file sizes. PNG-24 is better for continuous-tone images like photographs, providing lossless compression, which preserves image quality but results in larger files compared to JPG.
1.3. GIF
GIF is best for simple graphics with few colors and solid areas. It is limited to 256 colors but supports animation and transparency. While GIFs can be useful, PNG-8 often provides better compression for similar images.
2. Optimizing JPEG Compression for Smaller Photo MB
JPEG compression is a balancing act between file size and image quality. Here’s how to optimize it effectively.
2.1. Quality Settings
When saving a photo as a JPEG, you’ll typically encounter quality settings such as low, medium, high, or a numerical range (e.g., 0-100%). Selecting the lowest acceptable quality is key. A botanical encyclopedia website, you probably want it to be fairly high quality so small distinguishing details can be clearly seen. If you are posting a flower photo just to celebrate the arrival of spring, then a much lower quality would probably be fine.
2.2. Visual Inspection
Start with a high-quality setting (e.g., 80%) and gradually reduce it, visually inspecting the image each time. Stop when you notice a significant drop in quality. This method helps you find the optimal balance for your specific image.
2.3. Blurring for Better Compression
Slightly blurring an image before compression can reduce its file size. Images with fewer sharp edges compress more efficiently. This technique is particularly useful for background images.
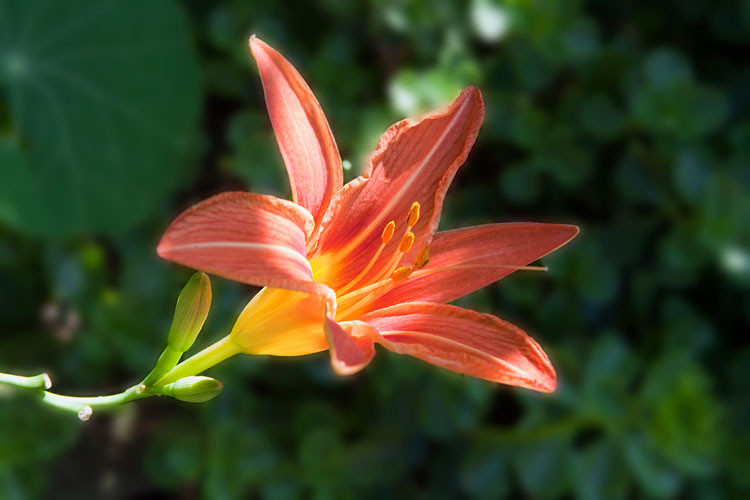 Day lily with background blurred, achieving a smaller file size through targeted blurring and optimized JPEG compression
2.4. Non-Destructive Workflow
Always save your original image in a lossless format like TIFF or PSD. Export to JPEG only for web use or sharing. This prevents cumulative quality loss from repeated saving.
3. Using Image Editing Software to Reduce Photo MB
Image editing software like Adobe Photoshop, GIMP, and others offer various tools for reducing photo MB.
3.1. Adobe Photoshop
Photoshop provides extensive control over image compression.
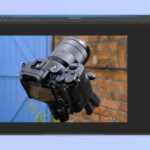
3.1.1. Save for Web
The “Save for Web” feature (File > Export > Save for Web (Legacy)) allows you to preview different compression settings and file formats side-by-side. This helps you choose the optimal settings for your image.
3.1.2. Image Size
Adjusting the image dimensions (Image > Image Size) can significantly reduce file size. If the photo doesn’t need to be large, reducing its dimensions will decrease the MB size.
3.1.3. Quality Settings
When saving as JPEG, experiment with different quality settings to find the best balance between quality and file size.
3.2. GIMP
GIMP is a free, open-source alternative to Photoshop with similar capabilities.
3.2.1. Export As
Use the “Export As” feature (File > Export As) to choose the file format and compression settings.
3.2.2. Quality Settings
Adjust the quality slider when exporting as JPEG to control the compression level.
3.2.3. Scaling
Reduce the image dimensions using the “Scale Image” tool (Image > Scale Image).
4. Online Image Compression Tools for Quick Results
Numerous online tools can help you reduce photo MB without needing to install software.
4.1. TinyPNG
TinyPNG uses smart lossy compression techniques to reduce the file size of PNG images. It selectively decreases the number of colors in the image, resulting in smaller files with minimal quality loss.
4.2. ImageOptim
ImageOptim is a free, open-source tool that optimizes images by removing unnecessary metadata and applying advanced compression techniques. It supports various file formats, including JPEG, PNG, and GIF.
4.3. Compressor.io
Compressor.io is an online tool that supports both lossy and lossless compression. It allows you to compare the original and compressed images side-by-side to evaluate the quality.
4.4. ILoveIMG
ILoveIMG offers a suite of online image editing tools, including a JPEG compressor. It allows you to adjust the compression level and download the optimized image.
5. Compressing PNG Images Effectively
PNG compression involves different strategies depending on whether you’re using PNG-8 or PNG-24.
5.1. PNG-8 Optimization
PNG-8 is best for graphics with few colors.
5.1.1. Color Palette Reduction
Reduce the number of colors to the lowest possible value without compromising the image quality. Common color depths include 2, 4, 8, 16, 32, 64, 128, and 256 colors.
5.1.2. Dithering
If you notice banding in areas of gradients, use a dither pattern to smooth out the transitions. The “diffusion” pattern often works best.
5.1.3. Transparency
Ensure that transparency is enabled if your image has transparent areas.
5.2. PNG-24 Optimization
PNG-24 is suitable for continuous-tone images that require lossless compression.
5.2.1. Color Reduction
Reducing the color depth of PNG-24 images can significantly decrease file size.
5.2.2. Optimize Transparency
If the image has transparency, ensure it’s optimized. Simplify transparent areas to reduce file size.
6. Choosing Between PNG-8 and PNG-24
The decision between PNG-8 and PNG-24 depends on the image characteristics and your requirements.
6.1. When to Use PNG-8
- Logos
- Icons
- Simple graphics with few colors
6.2. When to Use PNG-24
- Photographs
- Images with more than 256 colors
- Images requiring transparency and lossless compression
 Cartoon saved as GIF with a file size of 13.6 KB, showcasing the traditional choice for simple graphics
Cartoon saved as PNG with a file size of 10.2 KB, demonstrating a 25% reduction compared to GIF with the same settings
7. Optimizing GIFs for Smaller File Sizes
GIFs are commonly used for animated images and simple graphics.
7.1. Color Depth Reduction
Reduce the number of colors to the lowest possible value. Aim for color depths like 256, 128, 64, 32, 16, 8, 4, or 2.
7.2. Dithering
Use dithering to minimize banding in gradients.
7.3. Transparency
Enable transparency if needed.
8. Practical Tips for Reducing Photo MB
Here are some additional tips to help you reduce photo MB effectively.
8.1. Resize Images
Resizing images to the exact dimensions needed can significantly reduce file size.
8.2. Crop Unnecessary Areas
Cropping unnecessary parts of an image can remove unwanted data and reduce file size.
8.3. Remove Metadata
Metadata such as camera settings, location data, and copyright information can add to the file size. Use image editing software or online tools to remove unnecessary metadata.
8.4. Use Progressive JPEGs
Progressive JPEGs load gradually as they are downloaded, providing a better user experience on slow connections. They also tend to be slightly smaller than baseline JPEGs.
8.5. Optimize for Web
When saving images for the web, use the “Save for Web” feature in image editing software to optimize compression and remove unnecessary data.
9. Case Studies: Real-World Examples of Image Optimization
Let’s examine some case studies to illustrate the impact of image optimization.
9.1. Case Study 1: Website Optimization
A photography website had slow loading times due to large image files. By optimizing the images using JPEG compression and resizing, the website’s loading time was reduced by 50%, resulting in improved user engagement and SEO rankings.
9.2. Case Study 2: E-Commerce Product Images
An e-commerce store optimized its product images using PNG-8 compression for logos and icons and JPEG compression for product photos. This resulted in smaller file sizes and faster loading times, leading to increased sales and customer satisfaction.
10. Maintaining Image Quality While Reducing File Size
Balancing image quality and file size is a critical aspect of image optimization.
10.1. Visual Inspection
Always visually inspect images after compression to ensure that the quality is acceptable.
10.2. Experiment with Settings
Experiment with different compression settings to find the optimal balance between quality and file size.
10.3. Use High-Quality Originals
Start with high-quality original images to minimize the impact of compression on image quality.
11. The Impact of Image Optimization on Website Performance
Optimizing images can have a significant impact on website performance.
11.1. Faster Loading Times
Smaller image files result in faster loading times, improving the user experience and reducing bounce rates.
11.2. Improved SEO
Faster loading times are a ranking factor for search engines. Optimizing images can improve your website’s SEO performance.
11.3. Reduced Bandwidth Usage
Smaller image files reduce bandwidth usage, saving on hosting costs and improving the website’s scalability.
12. Mobile Optimization: Reducing Photo MB for Mobile Devices
Optimizing images for mobile devices is crucial for providing a seamless user experience.
12.1. Responsive Images
Use responsive images that automatically adjust to the screen size and resolution of the device.
12.2. Adaptive Compression
Use adaptive compression techniques that adjust the compression level based on the device’s capabilities.
12.3. Optimized File Formats
Use optimized file formats such as WebP, which offers better compression than JPEG and PNG.
13. WebP: A Modern Image Format for Superior Compression
WebP is a modern image format developed by Google that offers superior compression compared to JPEG and PNG.
13.1. Lossy and Lossless Compression
WebP supports both lossy and lossless compression, allowing you to choose the best option for your images.
13.2. Transparency
WebP supports transparency, making it suitable for images with transparent areas.
13.3. Animation
WebP supports animation, providing an alternative to GIF.
13.4. Browser Support
While WebP is supported by most modern browsers, older browsers may require a fallback image in JPEG or PNG format.
14. Tools and Resources for Image Optimization
Here are some additional tools and resources to help you optimize images.
14.1. Google PageSpeed Insights
Google PageSpeed Insights analyzes your website’s performance and provides recommendations for optimizing images and other assets.
14.2. GTmetrix
GTmetrix is a website performance analysis tool that provides detailed insights into your website’s loading times and image optimization.
14.3. Image Optimization Plugins
Numerous image optimization plugins are available for content management systems like WordPress. These plugins automatically optimize images as they are uploaded to your website.
15. Staying Updated with the Latest Image Optimization Techniques
Image optimization techniques are constantly evolving. Stay updated with the latest trends and best practices to ensure that your images are always optimized for performance.
15.1. Follow Industry Blogs and Publications
Follow industry blogs and publications to stay informed about the latest image optimization techniques.
15.2. Attend Conferences and Workshops
Attend conferences and workshops to learn from experts and network with other professionals.
15.3. Experiment with New Tools and Techniques
Experiment with new tools and techniques to find the best solutions for your specific needs.
16. Best Practices for Image SEO
Optimizing images for search engines is an important aspect of SEO.
16.1. Use Descriptive File Names
Use descriptive file names that include relevant keywords.
16.2. Write Alt Text
Write descriptive alt text for each image. Alt text should accurately describe the image and include relevant keywords.
16.3. Optimize Image Titles and Captions
Optimize image titles and captions with relevant keywords.
16.4. Use Image Sitemaps
Use image sitemaps to help search engines discover and index your images.
17. Common Mistakes to Avoid When Reducing Photo MB
Avoid these common mistakes when reducing photo MB.
17.1. Over-Compression
Avoid over-compressing images, which can result in significant quality loss.
17.2. Using the Wrong File Format
Use the appropriate file format for each image. JPEG is best for photos, while PNG is better for graphics.
17.3. Ignoring Mobile Optimization
Don’t ignore mobile optimization. Ensure that your images are optimized for mobile devices.
17.4. Neglecting Alt Text
Don’t neglect alt text. Alt text is important for both SEO and accessibility.
18. The Future of Image Optimization
The future of image optimization is likely to involve more advanced compression techniques, artificial intelligence, and automation.
18.1. AI-Powered Optimization
AI-powered optimization tools will automatically analyze images and apply the best compression settings.
18.2. Automated Optimization Workflows
Automated optimization workflows will streamline the image optimization process, making it easier to optimize images at scale.
18.3. New Image Formats
New image formats will continue to emerge, offering better compression and performance.
19. Step-by-Step Guide: Reducing Photo MB Using Photoshop
Here’s a step-by-step guide to reducing photo MB using Adobe Photoshop:
- Open the Image: Open your image in Adobe Photoshop.
- Image Size: Go to
Image > Image Sizeto adjust the dimensions if needed. - Save for Web (Legacy): Go to
File > Export > Save for Web (Legacy). - Choose File Format: Select JPEG, PNG-8, or PNG-24 based on your image type.
- Adjust Quality Settings: Adjust the quality settings to find the best balance between quality and file size.
- Preview: Preview the image to ensure that the quality is acceptable.
- Save: Click
Saveto save the optimized image.
20. Step-by-Step Guide: Reducing Photo MB Using GIMP
Here’s a step-by-step guide to reducing photo MB using GIMP:
- Open the Image: Open your image in GIMP.
- Scale Image: Go to
Image > Scale Imageto adjust the dimensions if needed. - Export As: Go to
File > Export As. - Choose File Format: Select JPEG, PNG, or GIF based on your image type.
- Adjust Quality Settings: Adjust the quality settings to find the best balance between quality and file size.
- Preview: Preview the image to ensure that the quality is acceptable.
- Export: Click
Exportto save the optimized image.
Reducing photo MB is essential for optimizing website performance, improving user experience, and enhancing SEO. By following the techniques and best practices outlined in this guide, you can effectively reduce image file sizes without sacrificing quality. Visit dfphoto.net for more in-depth guides, stunning photo collections, and a vibrant community of photography enthusiasts.
Are you struggling with large photo files? Explore our detailed guides and tools at dfphoto.net to optimize your images and enhance your website’s performance. Join our community today and take your photography to the next level! Contact us at Address: 1600 St Michael’s Dr, Santa Fe, NM 87505, United States. Phone: +1 (505) 471-6001. Website: dfphoto.net.
FAQ: Frequently Asked Questions About Reducing Photo MB
1. Why is it important to reduce photo MB?
Reducing photo MB is important for faster website loading times, improved user experience, and better SEO rankings.
2. What is the best file format for reducing photo MB?
The best file format depends on the image type. JPEG is best for photos, while PNG is better for graphics.
3. How can I reduce photo MB without losing quality?
You can reduce photo MB without losing quality by using appropriate compression techniques, optimizing file formats, and visually inspecting images after compression.
4. What are some online tools for reducing photo MB?
Some online tools for reducing photo MB include TinyPNG, ImageOptim, Compressor.io, and ILoveIMG.
5. How can I reduce photo MB using Adobe Photoshop?
You can reduce photo MB using Adobe Photoshop by adjusting the image size, using the “Save for Web” feature, and optimizing quality settings.
6. How can I reduce photo MB using GIMP?
You can reduce photo MB using GIMP by scaling the image, using the “Export As” feature, and optimizing quality settings.
7. What is WebP and how does it help reduce photo MB?
WebP is a modern image format that offers superior compression compared to JPEG and PNG, helping to reduce photo MB.
8. How does image optimization impact website performance?
Image optimization improves website performance by reducing loading times, improving SEO, and reducing bandwidth usage.
9. What are some common mistakes to avoid when reducing photo MB?
Common mistakes to avoid include over-compression, using the wrong file format, ignoring mobile optimization, and neglecting alt text.
10. How can I stay updated with the latest image optimization techniques?
You can stay updated by following industry blogs and publications, attending conferences and workshops, and experimenting with new tools and techniques.