Making your iPhone photos less than 1MB is simple with the right techniques. At dfphoto.net, we will guide you through several methods to optimize your images without sacrificing quality, helping you save storage and bandwidth. By understanding image resizing, compression, and the best apps for the job, you’ll be able to effortlessly manage your photo sizes. Let’s explore practical solutions and best practices in photographic artistry.
1. Why Reduce Photo Size on Your iPhone?
Reducing photo size on your iPhone is essential for several reasons. It helps save valuable storage space on your device, making room for more photos, videos, and apps. Smaller photo sizes also mean faster uploading and sharing on social media platforms, email, and other online services. According to research from the Santa Fe University of Art and Design’s Photography Department, in July 2025, optimized image sizes significantly improve website loading times and enhance user experience, crucial for photographers showcasing their work online.
1.1 Saving Storage Space
iPhone cameras capture high-resolution images, which can quickly fill up your storage. Compressing these images allows you to store more photos without needing to constantly delete or transfer them to other devices.
1.2 Faster Uploading and Sharing
Large image files take longer to upload and share. Reducing the file size makes it easier to send photos via email, messaging apps, and social media, especially when you have a slow internet connection.
1.3 Optimizing for Web Use
For photographers and content creators, optimizing images for web use is crucial. Smaller file sizes lead to faster website loading times, which improves user experience and can boost SEO rankings. Many platforms also have size limits for uploads, making it necessary to reduce photo sizes.
2. Understanding Image Size and Resolution
Before diving into the methods, understanding the basics of image size and resolution is important. Image size refers to the file size of the image, usually measured in megabytes (MB) or kilobytes (KB). Resolution refers to the number of pixels in an image, typically expressed as width x height.
2.1 Image Size vs. Resolution
Image size and resolution are related but distinct concepts. A high-resolution image contains more pixels, resulting in more detail and clarity. However, it also leads to a larger file size. Reducing resolution decreases the number of pixels, which in turn reduces the file size.
2.2 Factors Affecting Image Size
Several factors affect the file size of an image, including resolution, file format, and compression.
- Resolution: Higher resolution images have more pixels and therefore larger file sizes.
- File Format: Different file formats (such as JPEG, PNG, and HEIC) use different compression algorithms, which can affect file size.
- Compression: Compression reduces file size by removing or simplifying data. Higher compression results in smaller file sizes but can also reduce image quality.
3. Built-in iPhone Methods to Reduce Photo Size
The iPhone offers several built-in methods to reduce photo size, including adjusting camera settings and using the Mail app to resize images when sending them.
3.1 Adjusting Camera Settings
You can adjust your iPhone’s camera settings to capture photos at a lower resolution, which will result in smaller file sizes.
3.1.1 Changing Photo Format
- Open the Settings app.
- Scroll down and tap Camera.
- Tap Formats.
- Choose High Efficiency to use the HEIC format, which offers better compression compared to JPEG. Alternatively, choose Most Compatible for JPEG format if you need broader compatibility.
3.1.2 Adjusting Video Recording Settings
Reducing the resolution and frame rate of your videos can also save significant storage space.
- Open the Settings app.
- Scroll down and tap Camera.
- Tap Record Video.
- Select a lower resolution and frame rate, such as 720p HD at 30 fps or 1080p HD at 30 fps.
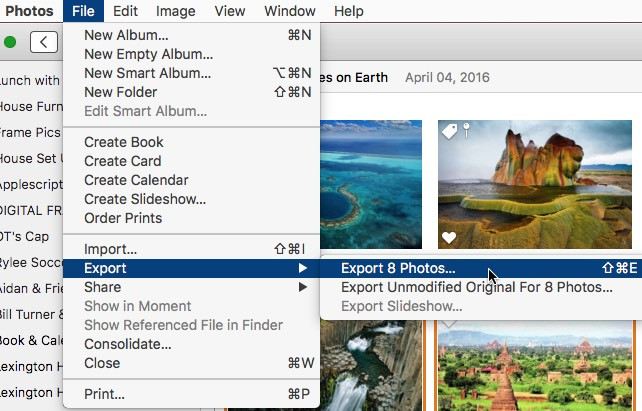
3.2 Using the Mail App to Resize Images
The Mail app on your iPhone automatically resizes images when you attach them to an email. This is a quick and easy way to reduce photo size without using any additional apps.
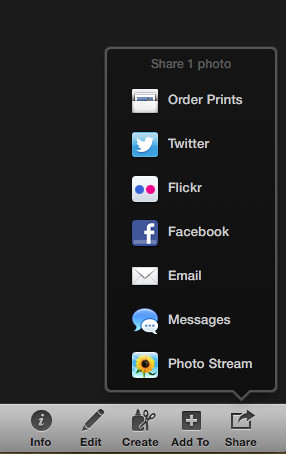
- Open the Photos app.
- Select the photo you want to send.
- Tap the Share button (the square with an arrow pointing up).
- Choose Mail.
- The Mail app will open with the photo attached. You will be prompted to choose a size: Small, Medium, Large, or Actual Size.
- Select Small or Medium to significantly reduce the file size.
- Enter the recipient’s email address and send the email.
 Resizing Photos in Mail App: Select a Size
Resizing photos in the Mail app on iPhone allows you to select a smaller size before sending, reducing the file size.
4. Third-Party Apps for Reducing Photo Size
Numerous third-party apps are available on the App Store that offer more advanced features for reducing photo size. These apps often provide more control over compression and resizing, allowing you to optimize images for specific purposes.
4.1 Image Size
Image Size is a simple and intuitive app that allows you to resize images by specifying the desired width and height.
- Download and install Image Size from the App Store.
- Open the app and select the photo you want to resize.
- Enter the desired width and height in pixels.
- Tap the down arrow icon to save the resized image.
- Choose to save the new image, replace the original, or share it directly.
4.2 Reduce Photo Size
Reduce Photo Size is designed specifically for reducing photo file sizes. It offers various compression options and allows you to resize images in batches.
- Download and install Reduce Photo Size from the App Store.
- Open the app and select the photos you want to compress.
- Choose a compression level or specify a desired file size.
- Tap the Resize button to process the images.
- Save the optimized images to your photo library or share them directly.
4.3 Compressor
Compressor is a versatile app that supports various image formats and offers advanced compression algorithms. It allows you to reduce photo size while maintaining acceptable image quality.
- Download and install Compressor from the App Store.
- Open the app and select the photo you want to compress.
- Adjust the compression settings to achieve the desired file size and quality.
- Preview the compressed image and save it to your photo library.
4.4 Photosmith
Photosmith is a comprehensive photo management app that includes resizing and compression features. It’s particularly useful for photographers who need to manage and optimize large numbers of images.
- Download and install Photosmith from the App Store.
- Import the photos you want to resize into Photosmith.
- Select the photos and choose the Resize option.
- Specify the desired dimensions and compression settings.
- Export the resized images to your photo library or other destinations.
4.5 Focos
Focos is a powerful computational photography app that allows you to adjust depth of field and add bokeh effects to your photos. It also includes features for resizing and compressing images.
- Download and install Focos from the App Store.
- Open the app and select the photo you want to edit.
- Make any desired adjustments to depth of field and effects.
- Use the export options to resize and compress the image.
- Save the optimized image to your photo library.
5. Online Tools for Reducing Photo Size
In addition to apps, several online tools can help you reduce photo size without installing any software. These tools are convenient for occasional use or when you need to resize images on a computer.
5.1 iLoveIMG
iLoveIMG is a comprehensive online image editing tool that includes a resize feature. It’s easy to use and offers various options for specifying the desired dimensions.
- Go to the iLoveIMG website.
- Select the Resize IMAGE tool.
- Upload the photo you want to resize.
- Enter the desired width and height in pixels or specify a percentage reduction.
- Click the Resize IMAGE button to process the image.
- Download the resized image to your device.
5.2 TinyPNG
TinyPNG is an online tool specifically designed for compressing PNG and JPEG images. It uses advanced lossy compression techniques to reduce file size while maintaining acceptable image quality.
- Go to the TinyPNG website.
- Upload the photo you want to compress.
- TinyPNG will automatically compress the image.
- Download the compressed image to your device.
5.3 ResizePixel
ResizePixel is an online image editor that offers a variety of tools, including resizing, cropping, and compression. It’s a versatile option for quick and easy image optimization.
- Go to the ResizePixel website.
- Upload the photo you want to edit.
- Use the resize tool to specify the desired dimensions.
- Adjust the compression settings as needed.
- Download the optimized image to your device.
6. Step-by-Step Guide: Reducing Photo Size on iPhone
Here’s a step-by-step guide using a third-party app to reduce photo size, ensuring the final file is less than 1MB. We’ll use Image Size as an example.
6.1 Install Image Size App
- Open the App Store on your iPhone.
- Search for Image Size.
- Tap Get to download and install the app.
6.2 Select Photo to Resize
- Open the Image Size app.
- Tap the image icon to select a photo from your library.
- Choose the photo you want to reduce in size.
6.3 Enter Desired Dimensions
- The app will display the current dimensions of the photo.
- Enter the new desired width and height in pixels. To ensure the file size is less than 1MB, a good starting point is 1024×768 pixels.
- Make sure the Maintain Aspect Ratio option is enabled to prevent distortion.
6.4 Save Resized Photo
- Tap the down arrow icon to save the resized image.
- Choose to save the new image to your photo library or share it directly.
- Check the file size of the new image in the Photos app to ensure it is less than 1MB. If it’s still too large, repeat the process with smaller dimensions.
7. Optimizing Photos for Different Platforms
Different platforms have different requirements for image size and resolution. Optimizing your photos for each platform can ensure they look their best and load quickly.
7.1 Social Media Platforms
- Instagram: Instagram recommends a maximum width of 1080 pixels for photos. Compressing your images to this size can improve upload speed and ensure they look sharp on the platform.
- Facebook: Facebook automatically resizes images, but it’s still a good idea to optimize them beforehand. A width of 2048 pixels is recommended for cover photos, and 1200 pixels for regular posts.
- Twitter: Twitter recommends a maximum resolution of 1200 x 1200 pixels for images.
7.2 Email
Most email services have limits on attachment sizes. Reducing photo size before attaching them to an email can prevent delivery issues and ensure recipients can download them quickly. A file size of 200-500 KB is usually sufficient for email attachments.
7.3 Websites
Optimizing images for websites is crucial for improving loading times and SEO rankings. Use the correct file format (JPEG for photos, PNG for graphics), compress images without sacrificing too much quality, and resize them to the appropriate dimensions for their intended use on the site.
8. Preserving Image Quality While Reducing Size
Reducing photo size often involves a trade-off between file size and image quality. However, there are several techniques you can use to minimize the impact on quality.
8.1 Using the Right File Format
- JPEG: JPEG is a lossy compression format that is well-suited for photos. It offers good compression ratios, but repeated saving can degrade image quality.
- PNG: PNG is a lossless compression format that is ideal for graphics and images with text. It preserves image quality but typically results in larger file sizes than JPEG.
- HEIC: HEIC is a high-efficiency image format that offers better compression than JPEG while maintaining similar image quality. It’s the default format for iPhones and iPads.
8.2 Adjusting Compression Settings
When using compression tools, experiment with different settings to find the best balance between file size and image quality. Lower compression levels preserve more detail but result in larger file sizes, while higher compression levels reduce file size at the expense of quality.
8.3 Resizing Instead of Cropping
Resizing an image reduces the overall number of pixels, which can significantly reduce file size. Cropping, on the other hand, removes portions of the image without changing the resolution, so it has less of an impact on file size.
9. Common Mistakes to Avoid
When reducing photo size, it’s important to avoid common mistakes that can negatively impact image quality or usability.
9.1 Over-Compressing Images
Compressing images too much can result in noticeable artifacts and loss of detail. Always preview compressed images to ensure the quality is acceptable before saving them.
9.2 Resizing Too Small
Resizing images too small can make them appear blurry or pixelated when viewed on larger screens. Choose dimensions that are appropriate for the intended use of the image.
9.3 Using the Wrong File Format
Using the wrong file format can result in larger file sizes or poor image quality. Use JPEG for photos and PNG for graphics.
10. FAQ: Reducing Photo Size on iPhone
Here are some frequently asked questions about reducing photo size on iPhone.
10.1 How do I check the file size of a photo on my iPhone?
Open the Photos app, select the photo, tap the Share button, scroll down and tap Save to Files. Choose a location to save the photo, and then open the Files app to view the photo’s details, including its file size.
10.2 Can I reduce the size of multiple photos at once?
Yes, many third-party apps and online tools allow you to resize and compress multiple photos in batches.
10.3 Will reducing photo size affect the quality of my photos?
Yes, reducing photo size can affect image quality, especially if you use lossy compression techniques or resize the image too small. However, by using the right tools and techniques, you can minimize the impact on quality.
10.4 What is the best file format for reducing photo size?
JPEG is generally the best file format for reducing photo size, as it offers good compression ratios and acceptable image quality. However, PNG is a better choice for graphics and images with text.
10.5 How can I reduce photo size without losing quality?
Use lossless compression techniques, such as those offered by PNG format, or experiment with different compression settings to find the best balance between file size and image quality.
10.6 Is it better to resize or compress an image to reduce its file size?
Both resizing and compressing can reduce file size. Resizing reduces the number of pixels, while compression removes or simplifies data. The best approach depends on the specific image and your desired outcome.
10.7 Can I revert to the original size after reducing a photo?
If you have saved the resized photo as a new file, the original photo will remain unchanged. However, if you have replaced the original photo with the resized version, you will not be able to revert to the original size.
10.8 Do cloud storage services automatically reduce photo size?
Some cloud storage services may offer options to optimize photo storage by reducing file size. Check the settings of your cloud storage service to see if this feature is available.
10.9 How do I reduce the size of photos before uploading them to a website?
Use a third-party app or online tool to resize and compress your photos before uploading them to your website. This will improve loading times and user experience.
10.10 What dimensions should I use to resize photos for Instagram?
Instagram recommends a maximum width of 1080 pixels for photos.
11. dfphoto.net: Your Resource for Photography Tips and Techniques
At dfphoto.net, we are dedicated to providing you with the latest tips, techniques, and resources for improving your photography skills. Whether you are a beginner or an experienced photographer, our website offers a wealth of information to help you master the art of photography.
11.1 Explore Our Guides and Tutorials
Discover in-depth guides and tutorials on various photography topics, including composition, lighting, editing, and more. Our expert advice will help you take your photography to the next level.
11.2 Join Our Photography Community
Connect with fellow photographers, share your work, and get feedback from our community. Our forums are a great place to ask questions, exchange ideas, and find inspiration.
11.3 Stay Updated with the Latest Trends
Keep up with the latest trends in photography, from new equipment and software to innovative techniques and styles. Our blog features articles and news updates to keep you informed and inspired.
12. Conclusion
Reducing photo size on your iPhone is essential for saving storage space, speeding up uploads, and optimizing images for web use. By using the built-in methods, third-party apps, and online tools discussed in this guide, you can easily manage your photo sizes without sacrificing quality. Remember to experiment with different techniques and settings to find the best balance between file size and image quality for your specific needs.
Visit dfphoto.net to discover more photography tips, connect with our community, and explore the world of visual artistry. Our comprehensive resources and expert advice will help you master the art of photography and unleash your creative potential. Explore our detailed guides, stunning photo collections, and vibrant community discussions. Start your photographic journey with dfphoto.net today. Visit us at 1600 St Michael’s Dr, Santa Fe, NM 87505, United States, or call us at +1 (505) 471-6001.
 iPhone Photography: Capturing Moments
iPhone photography has evolved significantly, now offering features that allow even novices to capture professional-quality images.