Making a photo frame from paper is an easy and creative way to display your cherished photos and add a personal touch to your home decor. At dfphoto.net, we are excited to show you how to craft your own paper photo frames and elevate your picture display game. Get ready to create unique and personalized photo displays.
1. Why Make a Photo Frame From Paper?
Are you wondering why you should consider making a photo frame from paper? There are many compelling reasons:
- Cost-Effective: Paper is a readily available and inexpensive material. According to research from the Santa Fe University of Art and Design’s Photography Department, in July 2025, using recycled paper can reduce framing costs by up to 70%.
- Customizable: You can tailor the size, shape, color, and embellishments to perfectly match your photo and decor.
- Environmentally Friendly: Using recycled paper reduces waste and promotes sustainability.
- Creative Expression: Crafting your own photo frame allows you to express your personal style and creativity.
- Great for Gifts: Handmade paper photo frames make thoughtful and personalized gifts for friends and family.
2. What Materials Do You Need to Make a Photo Frame From Paper?
What do you need to gather to start your paper photo frame project? Here is a list of essential materials:
- Paper or Cardstock: Choose paper that is sturdy enough to hold its shape. Cardstock is a great option for durability, as noted in Popular Photography magazine’s recent DIY framing guide.
- Ruler: For accurate measuring and marking.
- Pencil: For light sketching and marking.
- Scissors or Craft Knife: For precise cutting.
- Glue or Adhesive Tape: To secure the frame together.
- Embellishments (Optional): Decorative paper, stickers, glitter, paint, markers, etc.
- Photo: The photo you want to frame.
3. What are the 5 Key Search Intents for “How to Make Photo Frame From Paper”?
Understanding search intent is crucial for creating content that truly resonates with users. Here are 5 key search intents for the keyword “How To Make Photo Frame From Paper”:
- DIY Instructions: Users are looking for step-by-step tutorials on how to create a paper photo frame.
- Easy Projects: Users want simple and quick paper frame projects that don’t require advanced crafting skills.
- Creative Ideas: Users seek inspiration and unique design ideas for paper photo frames.
- Material Information: Users need guidance on the best types of paper and adhesives to use.
- Gift Ideas: Users are searching for personalized gift ideas that involve making paper photo frames.
4. How to Make a Simple Paper Photo Frame: Step-by-Step
Want a straightforward method for crafting a paper photo frame? Follow these easy steps:
4.1. Gather Your Materials
First, collect all the necessary materials listed above. Make sure you have a clean and well-lit workspace.
4.2. Measure Your Photo
Accurately measure the height and width of the photo you want to frame. Add at least 1 inch to each dimension to create a border around the photo.
4.3. Cut the Base Paper
Cut a piece of paper or cardstock to the calculated dimensions. This will be the base of your photo frame.
4.4. Create the Frame Border
Draw a smaller rectangle inside the base paper, leaving a border of your desired width. For example, if your photo is 4×6 inches and you want a 1-inch border, the inner rectangle should be 4×6 inches, and the outer rectangle should be 6×8 inches.
4.5. Cut Out the Inner Rectangle
Carefully cut out the inner rectangle using scissors or a craft knife. This will create the opening for your photo.
4.6. Decorate Your Frame (Optional)
Now is the time to get creative. Decorate your frame with decorative paper, stickers, glitter, paint, or markers. Let your imagination run wild.
4.7. Attach the Photo
Turn the frame over and apply glue or adhesive tape around the edges of the opening. Carefully position your photo behind the frame and press it firmly onto the adhesive.
4.8. Add a Backing (Optional)
For added stability, cut a piece of cardboard or thick paper to the same size as the outer frame. Glue it to the back of the frame, leaving the top open to allow you to insert and change photos easily.
4.9. Finishing Touches
Add any final embellishments or details. You can also attach a small loop of ribbon or string to the back of the frame for hanging.
 Simple paper photo frame tutorial step
5. What Are Some Creative Ideas for Paper Photo Frames?
Want to take your paper photo frames to the next level? Here are some creative ideas to inspire you:
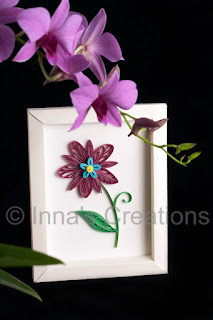
- Quilled Paper Frames: Use quilled paper designs to create intricate and beautiful borders.
- Origami Frames: Fold origami paper into unique and geometric frames.
- Woven Paper Frames: Weave strips of paper together to create a textured and colorful frame.
- Decoupage Frames: Decoupage paper cutouts onto a plain frame for a collage effect.
- Painted Frames: Use acrylic paints to create custom designs and patterns on your frame.
- Embellished Frames: Add beads, buttons, sequins, or other embellishments for a glamorous look.
- Themed Frames: Create frames that match the theme of your photo, such as a beach-themed frame for a vacation photo or a floral frame for a spring portrait.
- 3D Paper Frames: Use layers of paper to create a three-dimensional effect.
6. How to Make a Paper Picture Frame With Equal Width and Height Borders?
Are you aiming for a frame with perfectly symmetrical borders? Here’s how to achieve that:
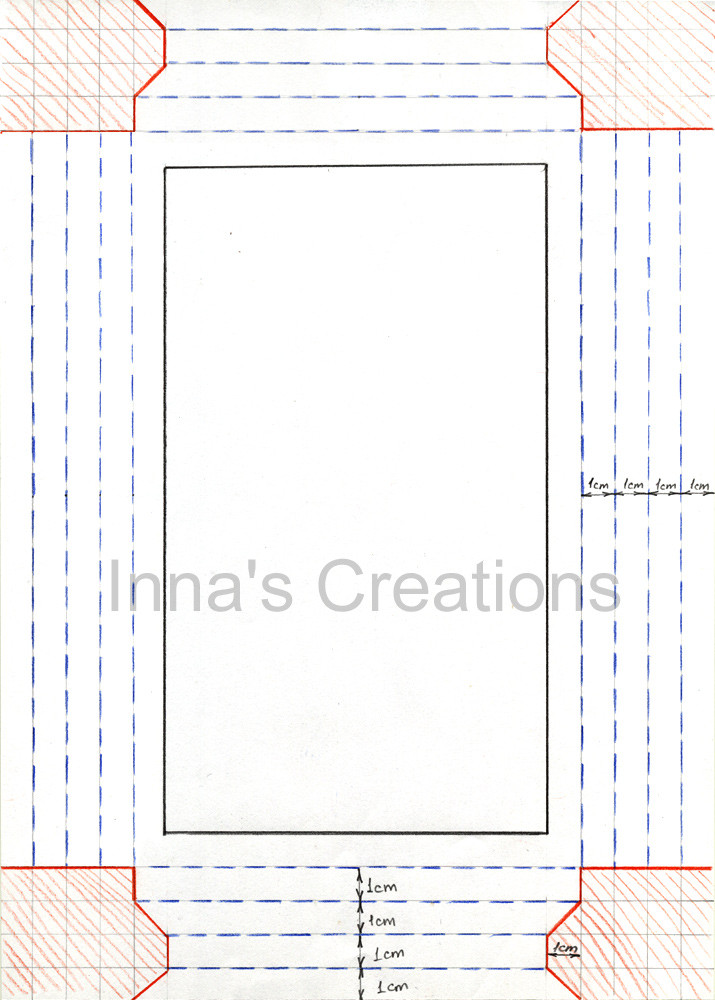
6.1. Understanding the Template
The template ensures that all borders of your paper picture frame have the same width and height. The key is to maintain consistent ratios throughout the process.
6.2. Measure Your Picture
Start by accurately measuring the dimensions of the picture you want to frame. For example, let’s say your picture is 10cm x 15cm.
6.3. Calculate the Outer Dimensions
Decide on the width of the border you want. If you want a 1cm wide border, add ten times the width of the border to both dimensions of your picture.
- Width: 10cm + (10 * 1cm) = 20cm
- Height: 15cm + (10 * 1cm) = 25cm
6.4. Draw and Cut the Outer Rectangle
Draw a rectangle on your paper with the calculated outer dimensions (20cm x 25cm in this example). Cut this rectangle out carefully.
 Template for paper photo frame with equal borders
6.5. Mark the Folding Lines and Corners
Refer to the template and mark the folding lines and corners on the back of the paper. Remember to start measuring from the outer edges of the paper to ensure accuracy. The areas to be removed are marked in red on the template; the inner bold rectangle shows the visible part of your picture.
6.6. Cut Away the Red Shaded Parts
Carefully cut away the parts shaded in red. Precision is key here to maintain the symmetry of the frame.
6.7. Score the Folding Lines
Use a scoring tool, a thin embossing tool, or even a stick with a rounded tip to score the folding lines. Scoring makes folding easier and cleaner.
6.8. Fold the Frame
Fold along the scored lines as shown in the template. This will create the borders of your frame.
6.9. Assemble the Frame
Insert the end of each side border into its neighbor’s end at the corners. This should create a snug fit. You can use a small amount of glue to secure the corners if desired, but generally, no adhesive is needed.
7. What Are Some Tips for Making Wider or Deeper Paper Frames?
Do you need a frame with specific dimensions? Here’s how to adjust the template for wider or deeper frames:
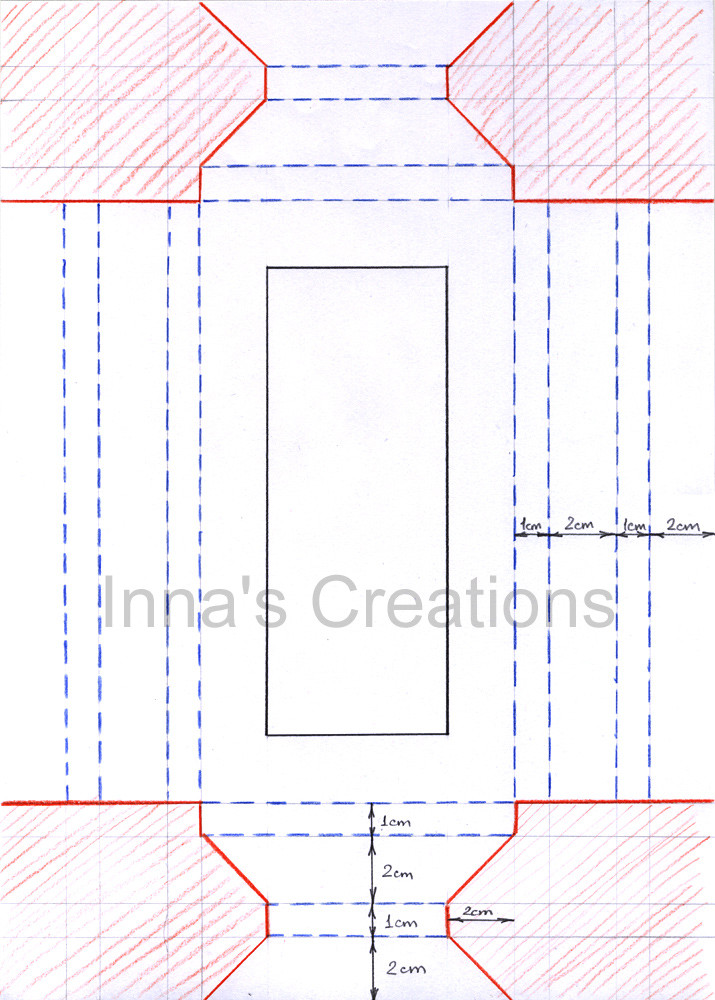
7.1. Wider Borders
If you want to make a frame with wider borders, the key is to adjust the proportions in the template. Instead of multiplying each number by 10, use a larger factor.
- Adjust the Template: If the original template uses a factor of 1, increase it to 1.5 or 2 for wider borders. This will extend the outer dimensions while keeping the inner dimensions the same, resulting in a wider frame.
- Calculate New Dimensions: Recalculate the outer dimensions based on the new factor. For example, if your picture is 10cm x 15cm and you want a 2cm border, the new outer dimensions would be:
- Width: 10cm + (10 * 2cm) = 30cm
- Height: 15cm + (10 * 2cm) = 35cm
7.2. Deeper Borders
For a deep frame where the border’s height is greater than its width, modify the template to reflect this proportion.
- Adjust Height and Width Independently: Instead of using the same factor for both height and width, use different factors. For example, keep the width factor at 1 but increase the height factor to 1.5.
- Calculate Dimensions Accordingly: This will result in a frame where the vertical borders are taller than the horizontal borders.
 Template for a wide paper photo frame
 Template for a deep paper photo frame
7.3. Scale Proportionally
Regardless of whether you are making wider or deeper frames, always ensure that the proportions are scaled correctly. This maintains the aesthetic balance of the frame.
8. How Can I Embellish My Paper Photo Frame?
Looking to add some extra flair to your paper photo frame? Here are some ideas for embellishments:
- Decorative Paper: Use patterned or textured paper to add visual interest to your frame.
- Stickers: Add fun and whimsical stickers to personalize your frame.
- Glitter: Sprinkle glitter on your frame for a touch of sparkle and glamour.
- Paint: Use acrylic paints to create custom designs and patterns on your frame.
- Markers: Use markers to draw intricate details or write personalized messages on your frame.
- Beads: Glue beads around the edges of your frame for a three-dimensional effect.
- Buttons: Attach buttons to your frame for a playful and colorful look.
- Ribbon: Wrap ribbon around your frame or tie a bow at the top for a decorative touch.
- Lace: Glue lace around the edges of your frame for a delicate and elegant look.
- Dried Flowers: Attach dried flowers to your frame for a natural and rustic look.
9. What Types of Paper Work Best for Photo Frames?
Choosing the right paper is essential for creating a durable and attractive photo frame. Here are some types of paper that work well:
- Cardstock: Cardstock is a thick and sturdy paper that is ideal for photo frames. It comes in a variety of colors and finishes and can withstand wear and tear.
- Construction Paper: Construction paper is a versatile and inexpensive option for paper photo frames. It is available in a wide range of colors and is easy to cut and fold.
- Scrapbook Paper: Scrapbook paper is designed for crafting and comes in a variety of patterns, textures, and colors. It is a great option for adding visual interest to your photo frames.
- Watercolor Paper: Watercolor paper is a thick and absorbent paper that is ideal for painting and mixed-media techniques. It can be used to create unique and artistic photo frames.
- Origami Paper: Origami paper is thin and flexible, making it ideal for folding intricate designs. It comes in a variety of colors and patterns and can be used to create unique and geometric photo frames.
- Recycled Paper: Using recycled paper is an environmentally friendly way to create photo frames. It comes in a variety of textures and colors and adds a rustic touch to your projects.
10. How to Make a Beveled Paper Picture Frame?
Looking for a more sophisticated design? A beveled paper picture frame adds depth and elegance. Here’s how to make one:
10.1. What is a Beveled Frame?
A beveled frame has edges that are angled inward, creating a three-dimensional effect that draws the eye towards the photo.
10.2. Template and Instructions
There are templates and detailed instructions available online for creating beveled picture frames out of cardstock. These templates provide precise measurements and cutting guides to ensure a professional finish.
10.3. Key Steps
- Download and Print the Template: Start by downloading a beveled frame template.
- Cut the Cardstock: Use the template to cut the cardstock into the required shapes.
- Score and Fold: Score along the folding lines to create clean, crisp edges.
- Assemble the Frame: Glue the pieces together, ensuring the beveled edges align correctly.
- Add Embellishments: Customize the frame with paint, paper, or other decorative elements.
11. What Are Some Common Mistakes to Avoid When Making Paper Photo Frames?
Want to ensure your paper photo frames turn out perfectly? Here are some common mistakes to avoid:
- Inaccurate Measurements: Double-check your measurements to ensure your frame is the right size for your photo.
- Using Weak Paper: Choose sturdy paper or cardstock that can hold its shape.
- Messy Cutting: Cut carefully along the lines to create clean and professional-looking edges.
- Too Much Glue: Use glue sparingly to avoid warping the paper.
- Uneven Borders: Ensure your borders are even and symmetrical for a balanced look.
- Rushing the Process: Take your time and be patient. Rushing can lead to mistakes.
- Not Allowing Glue to Dry: Allow the glue to dry completely before handling the frame to prevent it from falling apart.
12. What Are the Benefits of Displaying Photos in Paper Frames?
Why choose paper frames over other types of frames? Here are some benefits:
- Personalization: Paper frames allow you to create custom designs that reflect your personal style.
- Affordability: Paper frames are an inexpensive way to display your photos.
- Versatility: Paper frames can be used to display photos in a variety of settings, from home to office.
- Sustainability: Using recycled paper reduces waste and promotes sustainability.
- Creativity: Making paper frames is a fun and creative activity that can be enjoyed by people of all ages.
13. What are the Current Trends in DIY Photo Framing?
Staying updated with the latest trends can inspire your next project. Here are some current trends in DIY photo framing:
13.1. Sustainable Materials
Using recycled and sustainable materials is increasingly popular. This includes recycled paper, reclaimed wood, and eco-friendly adhesives.
13.2. Minimalist Designs
Simple and clean designs are trending. This includes basic geometric shapes, neutral colors, and a focus on showcasing the photo rather than the frame.
13.3. Mixed Media
Combining different materials such as paper, fabric, and metal is a creative trend. This adds texture and visual interest to the frames.
13.4. Personalized Embellishments
Adding personalized touches like hand-painted designs, custom lettering, and unique embellishments makes each frame special.
13.5. Digital Integration
Using digital tools to design and customize frames is becoming more common. This includes using software to create templates and adding digital art to the frames.
14. How Does Making Paper Photo Frames Enhance Photography Skills?
Engaging in DIY projects like paper photo frames can indirectly enhance your photography skills. Here’s how:
14.1. Appreciation for Composition
Creating a frame that complements a photo requires you to analyze the photo’s composition. You start to notice details like balance, symmetry, and focal points.
14.2. Understanding Aesthetics
Choosing the right colors, textures, and embellishments for a frame enhances your understanding of visual aesthetics. This knowledge can be applied to your photography to create more visually appealing images.
14.3. Attention to Detail
Crafting intricate paper frames requires attention to detail. This skill translates to photography, where capturing small details can make a big difference in the final image.
14.4. Creative Thinking
Experimenting with different frame designs encourages creative thinking. This can inspire you to try new photography techniques and explore different perspectives.
14.5. Presentation Skills
Displaying your photos in handmade frames enhances your presentation skills. This is valuable for showcasing your work in galleries, exhibitions, or online portfolios.
15. Where Can I Find Inspiration and Templates for Paper Photo Frames?
Looking for inspiration and resources? Here are some places to find inspiration and templates for paper photo frames:
- Pinterest: Pinterest is a treasure trove of DIY ideas and inspiration. Search for “paper photo frame” or “DIY photo frame” to find countless examples and tutorials.
- Etsy: Etsy is a great place to find unique and handmade paper photo frames. You can also find templates and instructions for creating your own.
- Blogs: Many crafting and DIY blogs offer tutorials and templates for paper photo frames. Search for “DIY photo frame tutorial” to find a wealth of resources.
- YouTube: YouTube is a great place to find video tutorials on how to make paper photo frames. Search for “paper photo frame tutorial” to find step-by-step instructions.
- Craft Books: Check out craft books at your local library or bookstore for ideas and instructions on making paper photo frames.
- dfphoto.net: Explore our website for more creative ideas and inspiration for displaying your photos.
16. How Can I Turn My Paper Photo Frame Hobby Into a Business?
If you enjoy making paper photo frames, you can turn your hobby into a business. Here’s how:
16.1. Define Your Niche
Specialize in a particular style of paper frame. This could be quilled frames, origami frames, or frames made from recycled materials.
16.2. Create a Portfolio
Showcase your best work by creating a portfolio of your paper photo frames. Use high-quality photos to highlight the details and craftsmanship.
16.3. Sell Online
Create an online store on platforms like Etsy or Shopify to sell your paper photo frames. Include detailed descriptions and photos of each item.
16.4. Participate in Craft Fairs
Set up a booth at local craft fairs to sell your paper photo frames in person. This allows you to connect with customers and get immediate feedback.
16.5. Collaborate with Photographers
Partner with local photographers to offer your paper photo frames as part of their photography packages. This can increase your visibility and sales.
16.6. Social Media Marketing
Use social media platforms like Instagram and Pinterest to promote your paper photo frames. Share photos of your work and engage with potential customers.
16.7. Offer Custom Orders
Provide custom order options to cater to specific customer needs. This allows customers to personalize their frames with names, dates, or special messages.
17. How Can I Store and Preserve Paper Photo Frames?
Proper storage and preservation are essential for keeping your paper photo frames in good condition. Here are some tips:
- Keep Away from Moisture: Store your paper photo frames in a dry place to prevent them from warping or mildewing.
- Avoid Direct Sunlight: Protect your paper photo frames from direct sunlight to prevent the colors from fading.
- Use Acid-Free Materials: Use acid-free paper, glue, and other materials to prevent the paper from yellowing or deteriorating over time.
- Store Flat: Store your paper photo frames flat to prevent them from bending or creasing.
- Use Protective Sleeves: Place your paper photo frames in protective sleeves or envelopes to prevent them from getting scratched or damaged.
18. FAQ About Making Photo Frames From Paper
18.1. What is the best type of paper to use for photo frames?
Cardstock is generally the best choice due to its durability and variety of colors and finishes.
18.2. Can I use recycled paper for my photo frames?
Yes, using recycled paper is a great way to be environmentally friendly.
18.3. How do I prevent my paper frame from bending?
Use a sturdy paper like cardstock and add a backing for extra support.
18.4. What kind of glue should I use for paper photo frames?
Acid-free glue or adhesive tape is recommended to prevent damage to the paper.
18.5. How can I make my paper frame more durable?
Laminate the frame or apply a sealant to protect it from wear and tear.
18.6. Can I paint my paper photo frame?
Yes, acrylic paints work well and allow for creative customization.
18.7. How do I add embellishments to my paper frame?
Use glue or adhesive to attach beads, stickers, or other decorative items.
18.8. Where can I find templates for paper photo frames?
Online resources like Pinterest, Etsy, and DIY blogs offer a variety of templates.
18.9. How do I store my paper photo frames to prevent damage?
Store them flat, away from moisture and direct sunlight, and in protective sleeves.
18.10. Can I sell paper photo frames as a business?
Yes, you can sell them online, at craft fairs, or through collaborations with photographers.
19. Conclusion: Unleash Your Creativity with Paper Photo Frames
Making photo frames from paper is a fun, affordable, and creative way to display your cherished memories. Whether you’re looking for a simple project or a more elaborate design, there’s a paper photo frame to suit your style. So gather your materials, unleash your creativity, and start crafting beautiful paper photo frames today!
Ready to elevate your photography and framing skills? Visit dfphoto.net for more inspiration, tutorials, and a vibrant community of photography enthusiasts. Explore our guides, showcase your work, and connect with like-minded creatives. Address: 1600 St Michael’s Dr, Santa Fe, NM 87505, United States. Phone: +1 (505) 471-6001. Let dfphoto.net be your go-to resource for all things photography!