Are you wondering how to create a compliant passport photo using your iPhone? At dfphoto.net, we’ll guide you through a simple yet effective process, ensuring your DIY passport photos meet official requirements for a successful application. With the right techniques, anyone can capture high-quality images, and our expert tips will help you achieve professional results without leaving your home. Let’s explore the intricacies of capturing passport-compliant images, focusing on lighting, composition, and editing, which are crucial to the image quality.
1. Understanding Passport Photo Requirements
Before diving into the how-to, it’s essential to understand the official passport photo requirements. According to the U.S. Department of State, a passport photo must adhere to specific guidelines regarding size, background, and facial expression. These requirements ensure the photo is suitable for identification purposes.
| Requirement | Description |
|---|---|
| Size | The photo must be 2×2 inches (51×51 mm). |
| Digital Dimensions | The photo must have a square aspect ratio of 600×600 pixels. |
| Head Size | The head size should be between 1 inch and 1 ⅜ inches (25 mm and 35 mm) from the bottom of the chin to the top of the head. |
| Background | The background must be plain white or off-white with no patterns or shadows. |
| Quality | The photo should be in color with proper lighting and focus, free from pixelation, glare, or shadows. |
| Edits | Altering the photo, including removing red-eye, blemishes, or changing skin tones, is prohibited. |
| Expression | The applicant must have their eyes open, mouth closed, and face the camera directly. A slight smile is acceptable. |
| Composition | The photo should include the head and upper shoulders, with adequate white space between the top of the head and the image’s edge. |
| Headgear | Head coverings are only allowed for religious or medical reasons. Glasses are generally not allowed unless a medical exception is provided. |
| Resolution | The photo should have a resolution of at least 300 DPI (dots per inch). |
| Recency | The photo must be taken within the last six months. |
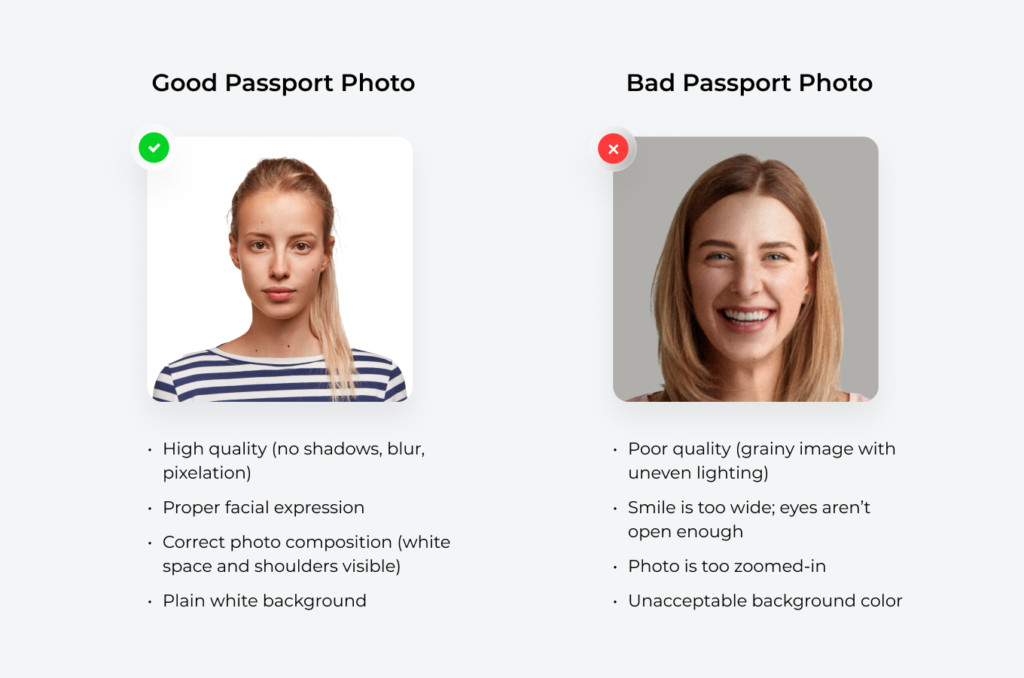 Comparison of acceptable and unacceptable passport photos highlighting differences in quality, facial expression, and background color.
For more detailed information, refer to the official guidelines on the U.S. Department of State website.
2. Configuring Your iPhone Camera for Optimal Results
To ensure your iPhone captures high-quality passport photos, adjusting your camera settings is crucial. These settings will help you achieve the necessary clarity, resolution, and color accuracy required for official compliance.
2.1. Adjusting Camera Settings
Here are the recommended settings for capturing passport photos on your iPhone:
- Go to Settings: Open the “Settings” app on your iPhone.
- Navigate to Camera: Scroll down and tap on “Camera”.
- Formats: Select “Formats” and choose “High Efficiency” to ensure the images are saved with the best quality while conserving storage space.
- Photo Mode: In the “Photo Capture” section, tap “Photo Mode” and select the highest resolution available to ensure maximum detail in your photos.
2.2. Composition Settings
Optimizing your composition settings will aid in aligning and framing your shot correctly:
- Grid: Activate the “Grid” option to help you align the subject and maintain a level shot.
- Level: Turn on the “Level” feature to ensure your camera is perfectly horizontal, preventing tilted photos.
- Mirror Front Camera: Deactivate the “Mirror Front Camera” option to avoid mirrored images when using the selfie camera, ensuring accurate representation.
2.3. Advanced iPhone 15 Settings
For users with an iPhone 15, professional photographer Dominic Bleijie suggests optimizing the aperture for enhanced photograph depth.
Apple’s iPhone 15 has an improved in-camera sensor, which can help you take high-quality headshots, good enough for passport photos. To enhance the photograph’s depth, set your iPhone’s aperture to f/4.0 and focus on the subject’s face. By doing this, it’ll have less shallow depth of field and thus look sharp with the face in focus.
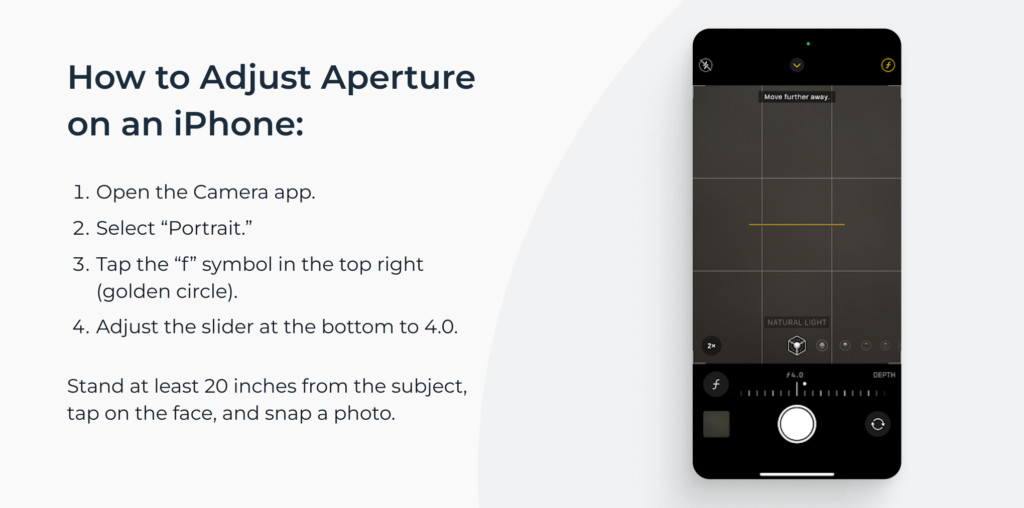 Adjusting iPhone’s camera settings for passport photos: Better aperture.
These settings will help you achieve professional-quality passport photos right from your iPhone.
3. Creating the Ideal Environment for Your Photo Shoot
The setting in which you take your passport photo plays a significant role in the outcome. Proper lighting and background are essential for a compliant and professional-looking photo.
3.1. Optimal Lighting Conditions
Lighting is one of the most critical factors in capturing a good passport photo. Natural light is generally the best option, as it provides even illumination without harsh shadows.
- Location: Position yourself near a window to take advantage of natural light. The window should be in front of you, not to the side, to avoid uneven lighting.
- Time of Day: The best time to take photos is during the day when the light is soft and diffused. Avoid direct sunlight, which can cause harsh shadows and overexposure.
- Artificial Lighting: If natural light is not available, use softbox lamps placed at a 30-degree angle on either side of the subject to ensure even lighting.
3.2. Background Considerations
The background of your passport photo must be plain white or off-white, free from any patterns, shadows, or objects.
- Using a White Wall: The easiest way to achieve a suitable background is to stand in front of a white wall. Ensure the wall is clean and free from any decorations or textures.
- DIY Background: If a white wall isn’t available, you can create a temporary background using a white sheet or poster board. Hang the sheet smoothly to avoid wrinkles and shadows.
- Avoiding Shadows: Ensure there are no shadows on the background. Maintain a distance from the wall to prevent shadows from your body.
3.3. Additional Tips for the Perfect Environment
- Test Shots: Take a few test shots to check the lighting and background before taking the final photo. Adjust your position or lighting as needed.
- Consistent Lighting: Ensure the lighting is consistent throughout the photo session to avoid variations in color and exposure.
- Minimize Reflections: Avoid taking photos near reflective surfaces that can cause glare.
By paying attention to these environmental factors, you can create the ideal setting for capturing a compliant and high-quality passport photo with your iPhone.
4. Preparing Yourself for the Passport Photo Session
Your appearance in a passport photo is crucial for compliance. Following specific guidelines for clothing, makeup, and accessories will help ensure your photo meets the official requirements and avoids rejection.
4.1. Clothing Guidelines
- Color: Wear darker-colored clothing to contrast with the required white or off-white background. This contrast helps to clearly define your silhouette.
- Patterns: Avoid clothing with patterns, as these can be distracting and may not meet the strict requirements. Solid colors are the best choice.
- Neckline: Choose a top with a modest neckline. Avoid thin-strapped tops, which may appear too revealing, and turtlenecks, which can be unflattering.
- White Clothing: While white clothing is generally not recommended because it can blend with the background, if you choose to wear a white shirt, pair it with a dark jacket to provide contrast.
4.2. Makeup Guidelines
- Keep it Minimal: Less is more when it comes to makeup for passport photos. Heavy makeup can alter your appearance and may lead to rejection.
- Avoid High-Coverage Products: Products like heavy foundation, contouring, and shimmers should be avoided as they can look unnatural under bright lighting.
- No Glosses: Avoid lip glosses and shimmery eyeshadows, as they can reflect light and create unwanted glare.
4.3. Accessories Guidelines
- Eyeglasses: Generally, eyeglasses are not allowed in passport photos. If you must wear them for medical reasons, provide a doctor’s note. Ensure there is no glare or reflection on the lenses.
- Head Coverings: Head coverings are only permitted for religious or medical reasons. If worn, they must not obscure your face in any way.
- Hair Accessories: Remove any hair accessories such as headbands, clips, or decorative items. If you have long bangs, use a small bobby pin to keep them off your forehead.
- Jewelry: Opt for minimal jewelry. Small stud earrings or a thin necklace are acceptable, but avoid sparkly or large pieces that can reflect light.
4.4. Hairstyle Guidelines
- Keep Hair Away from Face: Ensure that your hair does not cover your eyes, eyebrows, or face contour. Tuck your hair behind your ears or tie it back.
- Show Your Face: The main goal is to have a clear and unobstructed view of your face.
By following these guidelines, you can prepare yourself to take a passport photo that meets all the necessary requirements, increasing the likelihood of acceptance.
5. Capturing the Perfect Shot with Your iPhone
Taking the actual photo involves several key steps to ensure compliance and quality. Proper positioning, posture, and facial expression are essential for a successful passport photo.
5.1. Positioning and Posture
- Distance: Position yourself approximately 20 inches (50 cm) from the iPhone. This distance helps to capture the necessary head and shoulder area without distortion.
- Device Placement: Place your iPhone on a flat surface like a table or windowsill. Alternatively, ask someone to take the photo for you to ensure stability and proper framing.
- Shoulders: Straighten your shoulders and face the camera directly. Avoid tilting your head or body, as this can cause uneven lighting and may not meet the requirements.
- Eye Level: Ensure the camera lens is at eye level. Looking slightly above the lens can help to keep your eyes fully open and avoid shadows under your eyes.
5.2. Using the Grid for Alignment
- Vertical Alignment: Fit your head between the two vertical gridlines on your iPhone screen. This helps to center your face in the frame, ensuring it meets the positioning requirements.
- Horizontal Alignment: Look at the upper horizontal gridline. Your eyes should be either level with the line or slightly above it. This ensures that your eyes are correctly positioned in the frame.
5.3. Facial Expression
- Neutral Expression: Maintain a neutral facial expression with your mouth closed. A slight, natural smile without showing your teeth is acceptable.
- Eyes: Keep your eyes fully open and look directly at the camera lens. Avoid squinting or raising your eyebrows, as this can alter your appearance.
5.4. Taking Multiple Shots
- Take Several Photos: Take multiple photos to ensure you have a variety of options to choose from. Different lighting conditions and subtle changes in expression can affect the final result.
- Use a Timer: Set up the camera timer for 10 seconds when taking the photo yourself. This gives you enough time to pose and prepare for the shot.
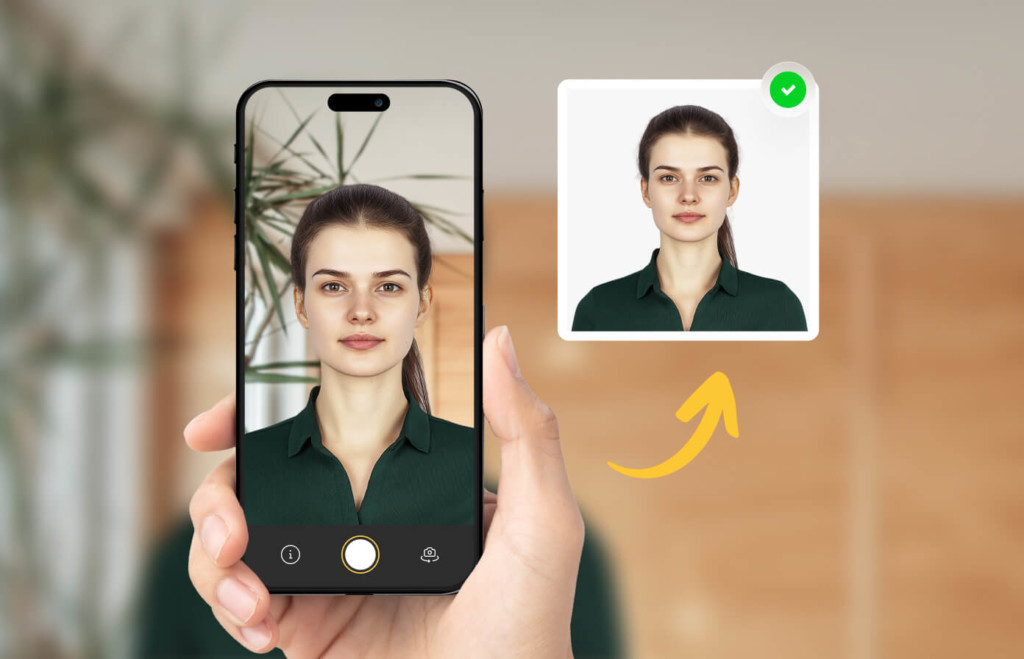 Visual showing how to take a passport photo with iPhone, featuring a person centered on screen and a final accepted image with proper background and alignment.
By following these steps, you can capture a high-quality passport photo with your iPhone that meets all the necessary requirements.
6. Editing Your iPhone Passport Photo for Compliance
After capturing the photo, editing is essential to ensure it meets all official passport photo requirements. This includes adjusting the background, resizing, and cropping the image to the correct specifications.
6.1. Basic Editing Steps
- Erase the Background: The background must be plain white or off-white. Use a background remover tool to ensure the background is uniform and free of shadows or patterns.
- Resize the Image: The passport photo must be 2×2 inches (51×51 mm). Use a photo resizer to adjust the image dimensions accordingly.
- Crop the Image: Crop the photo to ensure the head size meets the required measurements, which should be between 1 inch and 1 ⅜ inches (25 mm and 35 mm) from the bottom of the chin to the top of the head.
6.2. Using Free Software
- Free Background Remover: Use online tools or apps to remove and replace the background with a plain white one.
- Free Photo Cropper: Crop the image to the correct size and dimensions using a photo cropping tool.
6.3. The Advantages of Professional Apps
While free tools can perform basic editing, they may not guarantee compliance with all passport photo requirements. Professional apps like PhotoAiD® offer comprehensive services that ensure your photo meets all official guidelines.
- Comprehensive Service: These apps provide features such as automatic background removal, resizing, and cropping, specifically designed for passport photos.
- Human Expert Verification: Many professional apps include human expert verification, where trained professionals review the photo to ensure it meets all requirements before approval.
- Compliance Guarantee: Professional apps often offer a compliance guarantee, ensuring that your photo will be accepted or you will receive a refund.
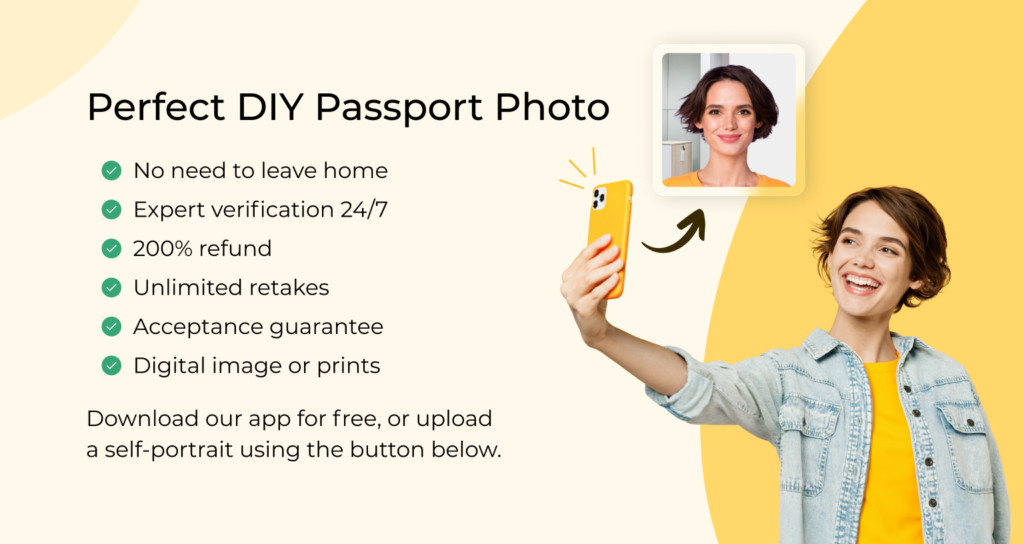
6.4. PhotoAiD®: A Comprehensive Solution
PhotoAiD® is a leading app for creating compliant ID photos, offering a range of features designed to simplify the process:
- AI-Powered Editing: The app uses advanced AI technology to automatically adjust the photo to meet passport photo requirements.
- Expert Verification: Human experts review each photo to ensure compliance with all official guidelines.
- 100% Compliance Guarantee: PhotoAiD® guarantees that your photo will be accepted, or you will receive a 200% refund.
![Benefits of taking passport photos with the PhotoAiD app for iOS.]](http://dfphoto.net/wp-content/uploads/2025/05/benefits-of-taking-passport-photos-with-photoaid-for-ios-1024×544.jpg){width=1024 height=544}
6.5. User Testimonials
Users have praised PhotoAiD® for its ease of use and reliability:
Quick and easy! Able to take and print passport photos in the comfort of my home. This is the 3rd time using (for various family members) and it works perfectly each time. – Tyra Ivy (US)
It was quick and easy to get the appropriate photo for my passport. I used the renew online option, which immediately accepted the photo. I finished the online passport renewal process in 10 minutes. – SteveHibshman (US)
By using professional apps like PhotoAiD®, you can ensure your iPhone passport photo meets all requirements, saving time and avoiding potential rejection.
7. Avoiding Common Mistakes in Passport Photos
Even with careful preparation, common mistakes can lead to passport photo rejection. PhotoAiD® analyzed over 10,000 photos to identify the most frequent errors and provide tips to avoid them.
7.1. Common Rejection Reasons
- Incorrect Positioning: Not showing the upper part of the torso, facing away from the camera, or tilting the head can lead to rejection.
- Poor Lighting: Shadows on the face, underexposure, or overexposure are common lighting issues that can cause rejection.
- Improper Facial Expression: Smiling widely, showing teeth, or squinting can violate the facial expression requirements.
- Low Quality: Blurry or grainy photos, often due to low resolution or camera shake, are frequently rejected.
- Appearance Issues: Wearing eyeglasses (without a medical note) or having hair covering the eyes can also lead to rejection.
7.2. Expert Tips to Avoid Mistakes
-
Mind Your Position:
- Ensure the upper part of your torso is visible in the frame.
- Face the camera directly and avoid tilting your head.
- The camera should be at eye level.
-
Choose Good Lighting Conditions:
- Ensure your face is evenly lit with no shadows.
- Use a light source directly in front of you.
- Take photos in daylight if possible.
-
Keep a Proper Facial Expression:
- Relax and maintain a neutral facial expression.
- Keep your mouth closed and avoid wide or toothy smiles.
- Ensure your eyes are fully open and leveled with the camera lens.
-
Secure High Quality:
- Stand still when taking the photo to avoid blur.
- Set the camera to the highest resolution.
- Manage the light source to avoid grainy photos.
-
Mind Your Appearance:
- Remove eyeglasses unless medically necessary with a doctor’s note.
- Ensure there is no glare or reflection in the lenses.
- Keep hair away from your eyes, eyebrows, and face contour.
By following these tips, you can avoid common mistakes and increase the likelihood of your passport photo being accepted.
8. Step-by-Step Guide: Making a Passport Photo on iPhone
Let’s recap the steps to make a passport photo on your iPhone:
- Understand the Requirements: Familiarize yourself with the official U.S. Department of State guidelines for passport photos.
- Adjust Camera Settings: Configure your iPhone’s camera settings for optimal quality and composition.
- Create the Ideal Environment: Set up a well-lit area with a plain white or off-white background.
- Prepare Yourself: Follow the guidelines for clothing, makeup, and accessories to ensure compliance.
- Take the Photo: Position yourself correctly, maintain a neutral expression, and capture multiple shots.
- Edit the Photo: Use editing software or a professional app like PhotoAiD® to adjust the background, resize, and crop the image.
| Step | Action |
|---|---|
| 1. Requirements | Understand size, background, and expression requirements. |
| 2. Camera Settings | Adjust for high efficiency, resolution, and disable mirroring. |
| 3. Environment | Use natural light, a white background, and avoid shadows. |
| 4. Preparation | Wear solid colors, minimal makeup, and remove glasses/accessories. |
| 5. Photo Capture | Position correctly, maintain a neutral expression, and use a timer. |
| 6. Editing | Remove background, resize, crop, and use professional apps. |
Following this step-by-step guide ensures your passport photo meets all the necessary criteria for acceptance.
9. The Benefits of Using dfphoto.net
At dfphoto.net, we provide a wealth of resources to help you master your photography skills. Whether you’re an amateur or a seasoned professional, our platform offers something for everyone.
9.1. Comprehensive Guides and Tutorials
Access detailed guides and tutorials on various photography techniques, including portrait photography, landscape photography, and more. Learn how to use different camera settings, lighting techniques, and composition rules to enhance your photos.
9.2. Inspiring Photo Galleries
Browse our extensive collection of stunning photographs from talented photographers around the world. Get inspired by diverse styles and perspectives, and discover new ideas for your own projects.
9.3. Expert Advice and Tips
Benefit from the insights and expertise of experienced photographers. Our articles cover a wide range of topics, from choosing the right equipment to mastering post-processing techniques.
9.4. Community Engagement
Connect with a vibrant community of photography enthusiasts. Share your work, get feedback, and participate in discussions to improve your skills and expand your network.
9.5. Latest Trends and Updates
Stay up-to-date with the latest trends and technologies in the photography industry. Our news section covers new equipment releases, software updates, and emerging trends, ensuring you’re always in the know.
By visiting dfphoto.net, you gain access to a comprehensive resource that supports your photography journey from start to finish. Whether you’re looking to improve your technical skills, find inspiration, or connect with other photographers, our platform has everything you need.
10. Frequently Asked Questions (FAQ)
Here are some frequently asked questions about taking passport photos with your iPhone:
10.1. Can you take your own passport photo?
Yes, you can take your own passport photo using a smartphone or digital camera, provided you follow all the official requirements.
10.2. Is there a free passport photo app for iPhone?
Many apps advertise as free, but they often lack essential features or a compliance guarantee. PhotoAiD® offers a comprehensive solution with AI-powered editing and expert verification.
10.3. How do I crop a photo to passport size on an iPhone?
You can use PhotoAiD®, a free photo cropper, or the official U.S. Department of State photo tool, but only PhotoAiD® offers a compliance guarantee.
10.4. How to take a passport-size photo from an iPhone?
Take a self-portrait following the requirements, upload it to PhotoAiD®, wait for AI cropping and manual verification, then download the digital photo or order prints.
10.5. Can you use your iPhone to take a passport photo?
Yes, the process is quick and easy. Follow our expert guide to learn how to take a passport photo at home with an iPhone.
10.6. How to take a passport photo with an iPhone for free?
Take a self-portrait, erase the background with a free remover, and resize with a photo cropper. However, remember that free tools don’t guarantee compliance.
10.7. How to take a digital passport photo with iPhone?
Use PhotoAiD® to click a compliant digital passport photo on your iPhone. Take a self-portrait, upload it to the app, and receive an expert-verified digital photo via email after payment.
Conclusion
Taking a passport photo with your iPhone is both possible and convenient. As long as you adhere to the U.S. Department of State’s requirements, you can secure a compliant picture from the comfort of your home. Remember to utilize the resources available at dfphoto.net for comprehensive guides, inspiring galleries, and expert advice. If you need further assistance or wish to explore more advanced techniques, don’t hesitate to contact us.
Address: 1600 St Michael’s Dr, Santa Fe, NM 87505, United States
Phone: +1 (505) 471-6001
Website: dfphoto.net
By following the steps outlined in this guide and leveraging the tools and knowledge at dfphoto.net, you can confidently create passport photos that meet all official requirements.
Call to Action
Ready to take stunning passport photos with your iPhone? Visit dfphoto.net today to discover more tutorials, explore inspiring galleries, and connect with a vibrant community of photographers in the USA. Enhance your skills, find inspiration, and start creating exceptional passport photos right now!

%7Bwidth=1024)