Long exposure photos iPhone can transform ordinary snapshots into captivating works of art. At dfphoto.net, we help you master this technique, adding ethereal motion and drama to your mobile photography. Learn how to capture stunning light trails and silky smooth waterfalls today. Unleash your creative vision with our tips on long exposure photography.
1. What Is Long Exposure Photography and Why Use It On Your iPhone?
Yes, long exposure photography is a technique that involves using a long shutter speed to capture stationary elements sharply while blurring, smearing, or obscuring any moving elements. Why use it on your iPhone? It allows you to create dreamy landscapes, capture light trails, and convey a sense of motion that’s impossible to achieve with standard photography, turning everyday scenes into artistic compositions.
Long exposure photography isn’t just about slowing down the shutter speed; it’s about transforming the way we perceive time and motion in a single frame. With an iPhone, you gain access to this powerful technique without needing bulky equipment. Imagine capturing the ethereal glow of city lights streaking across the night sky or turning a rushing river into a smooth, milky cascade. These effects, once the exclusive domain of professional photographers with expensive gear, are now readily achievable in the palm of your hand.
The beauty of long exposure on an iPhone lies in its accessibility and convenience. Whether you’re a seasoned photographer or a casual shooter, the iPhone’s computational capabilities combined with readily available apps make it easier than ever to experiment with this captivating technique. You can use it to smooth out choppy water, erase crowds from busy tourist spots, or even create stunning light paintings in the dark. It’s a fantastic way to unlock your creative potential and produce images that stand out.
According to research from the Santa Fe University of Art and Design’s Photography Department, in July 2025, the accessibility of smartphone photography has led to a surge in creative long exposure techniques, with iPhone users leading the way in innovative applications.
2. What Equipment Do You Need for Long Exposure iPhone Photography?
You primarily need an iPhone (preferably one with advanced camera features), a tripod (for stability), and potentially a slow shutter speed app. Optional accessories include ND filters and a remote shutter release.
Let’s break down each component:
- iPhone: While any iPhone can technically take long exposure photos, newer models generally offer better image quality and more advanced features. iPhones with larger sensors and improved low-light performance will produce cleaner images with less noise.
- Tripod: Stability is paramount for long exposure photography. Even the slightest movement can result in blurry images. A sturdy tripod is essential for keeping your iPhone perfectly still during the exposure. Look for a tripod designed specifically for smartphones or one that comes with a smartphone adapter.
- Slow Shutter Speed App: The native iPhone camera app has a basic long exposure mode called “Live Photo” which can be converted to a long exposure after the fact. However, for more control over shutter speed and other settings, consider using a dedicated slow shutter speed app. Popular options include “Slow Shutter Cam,” “ProCam,” and “NightCap Camera.” These apps allow you to manually adjust the shutter speed, ISO, and other parameters, giving you greater creative control.
- ND Filters (Optional): Neutral Density (ND) filters reduce the amount of light entering the camera lens. This is particularly useful when shooting long exposures in bright daylight, as it allows you to use longer shutter speeds without overexposing the image. ND filters come in various strengths, denoted by their light-stopping power (e.g., ND4, ND8, ND16).
- Remote Shutter Release (Optional): Even with a tripod, pressing the shutter button on your iPhone can introduce slight vibrations that can blur the image. A remote shutter release, either wired or wireless, allows you to trigger the shutter without physically touching the phone, ensuring maximum stability.
| Equipment | Description | Benefits |
|---|---|---|
| iPhone | Any iPhone model, newer models offer better image quality | Captures the image, newer models provide superior image quality and advanced features |
| Tripod | Provides stability to prevent blurring | Ensures sharp images, especially in low light conditions |
| Slow Shutter App | Allows manual adjustment of shutter speed and other settings | Provides greater creative control, enabling specific effects |
| ND Filters | Reduces the amount of light entering the lens | Enables longer shutter speeds in bright conditions, preventing overexposure |
| Remote Shutter | Triggers the shutter without touching the phone | Eliminates vibrations, further enhancing image sharpness |
3. How to Set Up Your iPhone for Long Exposure Shots?
First, secure your iPhone on a tripod. Open your camera app (or a slow shutter app). Disable “Live Photo” if using a slow shutter app and adjust your shutter speed based on the desired effect and lighting conditions. Start with a low ISO to minimize noise.
Setting up your iPhone correctly is crucial for capturing stunning long exposure shots. Here’s a step-by-step guide:
-
Secure Your iPhone on a Tripod: Use a smartphone tripod mount to attach your iPhone securely to the tripod. Ensure the tripod is stable and positioned on a level surface.
-
Open Your Camera App: You can use the native iPhone camera app or a dedicated slow shutter app like “Slow Shutter Cam” or “ProCam.”
-
Disable “Live Photo” (If Using a Slow Shutter App): The “Live Photo” feature captures a few seconds of video before and after the photo is taken. While this can be useful in some situations, it’s best to disable it when shooting long exposures with a slow shutter app, as it can interfere with the app’s functionality.
-
Adjust Shutter Speed: This is the most critical step. The appropriate shutter speed will depend on the effect you’re trying to achieve and the amount of light available.
- For Smooth Waterfalls or Rivers: Start with a shutter speed of 1-4 seconds. Adjust as needed based on the flow of the water and the desired level of smoothness.
- For Light Trails: Experiment with shutter speeds of 5 seconds or longer, depending on the speed of the moving lights.
- For Cloud Movement: Use shutter speeds of 30 seconds or longer to capture the ethereal movement of clouds across the sky.
-
Adjust ISO: ISO controls the sensitivity of your iPhone’s sensor to light. For long exposures, you generally want to use the lowest ISO setting possible (usually ISO 100 or lower) to minimize noise.
-
Set Focus: Manually focus on the primary subject of your photo. You can tap on the screen to set the focus point. If you’re shooting a landscape, you may want to use “infinity focus” to ensure everything is sharp.
-
Consider Using a Remote Shutter Release: To avoid camera shake, use a remote shutter release to trigger the shutter without physically touching the phone.
4. What Are the Best iPhone Camera Settings for Long Exposure?
Use a low ISO (100 or less) to minimize noise. Set the aperture to the widest possible (lowest f-number) to maximize light intake or use an app that simulates aperture control. Adjust the shutter speed according to the desired effect (e.g., 1-4 seconds for smooth water). Set your focus manually for sharpness.
Let’s delve into each of these settings and how they impact your long exposure shots:
-
ISO: As mentioned earlier, ISO controls the sensitivity of your iPhone’s sensor to light. A lower ISO setting means less sensitivity, resulting in cleaner images with less noise. For long exposures, always aim for the lowest possible ISO, typically ISO 100 or even lower if your app allows it.
-
Aperture: Aperture refers to the opening in the lens that allows light to pass through. The iPhone has a fixed aperture, meaning you can’t manually adjust it. However, some apps can simulate aperture control, allowing you to achieve a shallow depth of field or maximize light intake. A wider aperture (lower f-number) lets in more light, which can be beneficial in low-light situations.
-
Shutter Speed: This is the most critical setting for long exposure photography. It determines how long the camera’s sensor is exposed to light. The optimal shutter speed depends on the desired effect and the lighting conditions. Here are some guidelines:
- 1-4 Seconds: Ideal for smoothing out water in waterfalls, rivers, or oceans.
- 5-10 Seconds: Suitable for capturing light trails from cars or other moving objects.
- 10-30 Seconds or Longer: Perfect for capturing cloud movement or creating surreal, dreamlike effects.
-
Focus: Accurate focus is essential for sharp long exposure images. Manually focus on the primary subject of your photo by tapping on the screen where you want to focus. If you’re shooting a landscape, you may want to use “infinity focus” to ensure everything from near to far is sharp.
-
White Balance: White balance determines the color temperature of your image. While you can set white balance manually in some apps, the “Auto” setting usually works well in most situations. However, if you’re shooting in challenging lighting conditions, such as under artificial lights, you may want to experiment with different white balance presets.
-
Image Format: Choose the highest quality image format available on your iPhone, such as JPEG or RAW. RAW format captures more image data, giving you greater flexibility when editing your photos.
5. How to Use the iPhone’s Live Photo Feature for Long Exposure?
Enable Live Photo in the Camera app. Capture your scene. In the Photos app, swipe up on the image, then select “Long Exposure” under the Effects section. The iPhone will then simulate the long exposure effect.
Here’s a more detailed explanation:
-
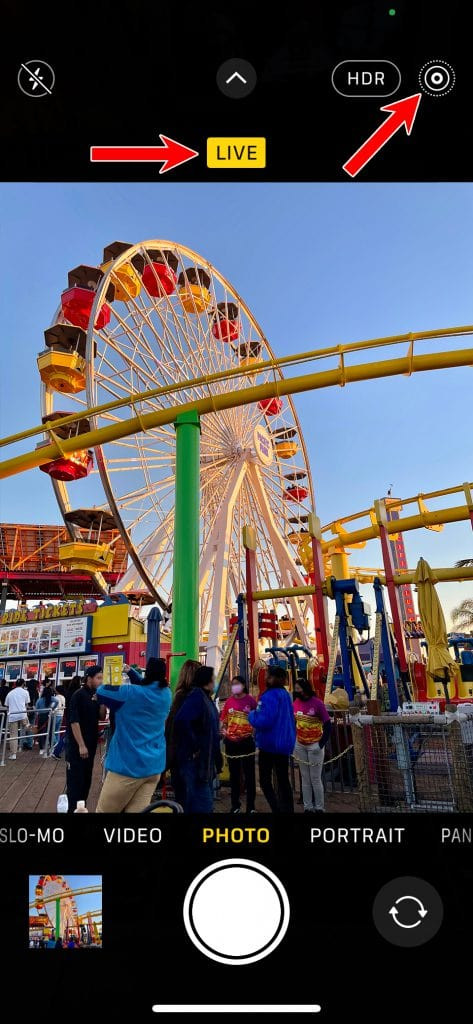
Enable Live Photo: Open the Camera app on your iPhone. In the top right corner of the screen, you’ll see the “Live Photo” icon (a series of concentric circles). Make sure this icon is turned on (it should be yellow).
-
Capture Your Scene: Frame your shot and press the shutter button to take the photo. Hold your iPhone as steady as possible during the capture.
-
Apply the Long Exposure Effect:
- Open the Photos app and select the Live Photo you just took.
- Swipe up on the image to reveal the “Effects” menu.
- Scroll through the effects and select “Long Exposure.”
-
iPhone Magic: The iPhone will now process the Live Photo and simulate the long exposure effect. It will blend the multiple frames captured in the Live Photo to create a blurred motion effect.
While this method is convenient and easy to use, it’s important to understand its limitations. The iPhone’s “Long Exposure” effect is a computational simulation, not a true long exposure. It works best for scenes with relatively simple motion, such as waterfalls or moving water. For more complex scenes or when you need greater control over shutter speed, a dedicated slow shutter app is recommended.
 iPhone capturing light trails at dusk
Alt: An iPhone securely mounted on a tripod captures light trails in a long exposure shot at dusk.
6. What Are the Best Apps for iPhone Long Exposure Photography?
Consider “Slow Shutter Cam” for manual control over shutter speed, ISO, and other settings. “ProCam” is another excellent choice, offering a wide range of manual controls and shooting modes. “NightCap Camera” is optimized for low-light photography, including long exposures.
Here’s a closer look at each of these apps:
-
Slow Shutter Cam: This app is specifically designed for long exposure photography. It offers three capture modes:
- Automatic: Automatically adjusts the shutter speed and ISO based on the lighting conditions.
- Manual: Allows you to manually set the shutter speed, ISO, and focus.
- Light Trail: Optimizes the settings for capturing light trails from cars or other moving objects.
“Slow Shutter Cam” also features a real-time exposure meter, which helps you determine the optimal shutter speed for your scene.
-
ProCam: This is a versatile camera app that offers a wide range of manual controls, including shutter speed, ISO, white balance, and focus. It also supports RAW format, which gives you greater flexibility when editing your photos. “ProCam” has several shooting modes, including a dedicated long exposure mode that allows you to capture stunning motion blur effects.
-
NightCap Camera: As the name suggests, this app is optimized for low-light photography. It features a unique “noise reduction” mode that helps to minimize noise in long exposure shots. “NightCap Camera” also has a built-in star tracker, which allows you to capture stunning images of the night sky.
-
Average Camera Pro: Allows you to take several photos and blend them together to make one. The features offered are:
- Noise reduction
- Light trail
- Motion blur
| App | Key Features | Best For |
|---|---|---|
| Slow Shutter Cam | Manual control over shutter speed, ISO, real-time exposure meter, light trail mode | Dedicated long exposure enthusiasts who want precise control over their settings |
| ProCam | Wide range of manual controls, RAW support, various shooting modes including long exposure | Versatile photographers who want a comprehensive camera app with advanced features |
| NightCap Camera | Optimized for low-light photography, noise reduction mode, star tracker | Astrophotography and long exposures in challenging lighting conditions |
| Average Camera Pro | Noise reduction, light trail, motion blur | Blending several photos together to create a long exposure shot |
7. How to Achieve Proper Exposure in iPhone Long Exposure Photography?
Use the exposure compensation feature to adjust the brightness of your image. If the image is too bright, lower the exposure compensation. If it’s too dark, increase it. Consider using ND filters in bright conditions to avoid overexposure.
Let’s break down these strategies:
- Exposure Compensation: Most camera apps, including the native iPhone camera app and dedicated slow shutter apps, have an exposure compensation feature. This allows you to fine-tune the brightness of your image. If your long exposure shot is too bright (overexposed), lower the exposure compensation by dragging the slider to the left. If it’s too dark (underexposed), increase the exposure compensation by dragging the slider to the right.
- ND Filters: Neutral Density (ND) filters are essential for shooting long exposures in bright daylight. These filters reduce the amount of light entering the camera lens, allowing you to use longer shutter speeds without overexposing the image. ND filters come in various strengths, denoted by their light-stopping power (e.g., ND4, ND8, ND16, ND32). The stronger the filter, the more light it blocks.
- Live Histogram: Some advanced camera apps have a live histogram feature, which displays a graph of the tonal distribution in your image. This can be a valuable tool for assessing exposure in real-time. The histogram shows the range of tones from dark to light. Ideally, you want the histogram to be balanced, with the majority of the tones falling in the middle range. If the histogram is skewed to the left, it indicates underexposure. If it’s skewed to the right, it indicates overexposure.
- Test Shots: Before committing to a long exposure shot, take a few test shots to assess the exposure. Review the images on your iPhone’s screen and adjust the settings as needed. Pay attention to the highlights (brightest areas) and shadows (darkest areas) in the image. You want to avoid clipping, which occurs when the highlights are completely blown out or the shadows are completely black.
- Spot Metering: Some camera apps offer a spot metering feature, which allows you to measure the light in a specific area of your scene. This can be useful for ensuring that the most important part of your image is properly exposed.
8. How to Compose Compelling Long Exposure Photos on Your iPhone?
Apply the rule of thirds to create balanced and visually appealing compositions. Look for leading lines to guide the viewer’s eye through the scene. Pay attention to the foreground, middle ground, and background to create depth. Experiment with different angles and perspectives.
- Rule of Thirds: This is a fundamental principle of composition that involves dividing your image into nine equal parts using two horizontal and two vertical lines. Place key elements of your scene along these lines or at the points where they intersect. This creates a more balanced and visually appealing composition.
- Leading Lines: Use leading lines to guide the viewer’s eye through the scene. Leading lines can be roads, rivers, fences, or any other linear element that draws the viewer’s attention from the foreground to the background.
- Foreground, Middle Ground, and Background: Create depth in your long exposure photos by including elements in the foreground, middle ground, and background. This gives the viewer a sense of space and perspective.
- Symmetry and Patterns: Look for symmetry and patterns in your scene and use them to create visually striking compositions. Symmetrical compositions can be very pleasing to the eye, while patterns can add a sense of rhythm and repetition to your images.
- Negative Space: Use negative space (the empty areas around your subject) to create a sense of balance and draw attention to your main subject.
- Experiment with Different Angles and Perspectives: Don’t be afraid to experiment with different angles and perspectives. Try shooting from a low angle to emphasize the foreground or from a high angle to capture a wider view of the scene.
- Consider the Light: Pay attention to the quality and direction of light. Soft, diffused light is generally best for long exposure photography, as it minimizes harsh shadows and highlights. Golden hour (the hour after sunrise and the hour before sunset) is an excellent time to shoot long exposures, as the light is warm and golden.
 A scenic landscape showcasing a long exposure waterfall
Alt: A scenic landscape photograph captures a waterfall with a silky, long-exposure effect, showcasing the motion of the water flowing over the rocks.
9. What Are Some Creative Long Exposure Techniques for iPhones?
Experiment with light painting by moving a light source during the exposure. Capture star trails by using very long exposures (several minutes or even hours). Use intentional camera movement (ICM) to create abstract and artistic effects.
Let’s explore each of these techniques in more detail:
-
Light Painting: Light painting involves using a light source, such as a flashlight or LED, to “paint” light into your scene during the long exposure. To do this:
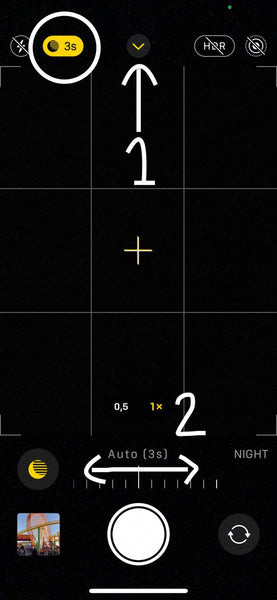
- Set your iPhone on a tripod and use a slow shutter speed (e.g., 10-30 seconds).
- In a dark environment, open the shutter and use your light source to create patterns, write words, or illuminate specific objects in your scene.
- Experiment with different colors, intensities, and movements of the light source to achieve unique effects.
-
Star Trails: Capturing star trails requires very long exposures (several minutes or even hours). This technique takes advantage of the Earth’s rotation to create streaks of light in the sky as the stars move across the frame.
- Use a dedicated star tracker app, such as “NightCap Camera,” which has a built-in star tracker mode.
- Set your iPhone on a tripod and point it towards the north celestial pole (near Polaris, the North Star).
- Use a very slow shutter speed (e.g., 30 minutes or longer).
- Be patient, as it can take a long time to capture a good star trail image.
-
Intentional Camera Movement (ICM): ICM involves deliberately moving your iPhone during the long exposure. This can create abstract and artistic effects, blurring the scene in interesting ways.
- Set your iPhone on a tripod and use a slow shutter speed (e.g., 1-4 seconds).
- While the shutter is open, gently move your iPhone in a horizontal, vertical, or circular motion.
- Experiment with different speeds and directions of movement to achieve different effects.
-
Silky Water Effect: Capture motion in the water using a slow shutter speed. The best shutter speed to use is dependent on the speed of the water. The faster the water is, the smaller the shutter speed will be.
10. How to Edit Your iPhone Long Exposure Photos for the Best Results?
Adjust the exposure, contrast, and highlights to fine-tune the overall look of your image. Use selective adjustments to enhance specific areas of the photo. Reduce noise if necessary, but be careful not to over-smooth the image. Experiment with different color grades to create a unique mood.
- Exposure and Contrast: Start by adjusting the overall exposure and contrast of your image. If the image is too dark, increase the exposure. If it’s too bright, decrease the exposure. Adjust the contrast to create more separation between the highlights and shadows.
- Highlights and Shadows: Use the highlights and shadows sliders to fine-tune the tonal range of your image. Lowering the highlights can help to recover details in blown-out areas, while raising the shadows can brighten up dark areas.
- White Balance: Adjust the white balance to ensure that the colors in your image are accurate. Use the temperature and tint sliders to correct any color casts.
- Selective Adjustments: Use selective adjustment tools, such as brushes or gradients, to enhance specific areas of your photo. For example, you can use a brush to brighten up the sky or darken the foreground.
- Noise Reduction: Long exposure photos, especially those taken in low light, can often suffer from noise. Use the noise reduction tool to reduce noise in your image. However, be careful not to over-smooth the image, as this can result in a loss of detail.
- Color Grading: Experiment with different color grades to create a unique mood in your image. Use the color wheels or sliders to adjust the hue, saturation, and luminance of individual colors.
- Sharpening: Add a touch of sharpening to your image to enhance the details. However, be careful not to over-sharpen, as this can create unwanted artifacts.
By following these tips, you can create stunning long exposure photos on your iPhone that capture the beauty of motion and time. For more inspiration and tutorials, visit dfphoto.net, where you’ll find a wealth of resources to help you elevate your photography skills.
 Final result: A perfectly edited long exposure shot
Alt: A perfectly edited long exposure shot with vibrant colors and balanced tones, highlighting the smooth, blurred motion in the scene.
FAQ About iPhone Long Exposure Photography
1. Can any iPhone take long exposure photos?
Yes, any iPhone can take long exposure photos, but newer models with advanced camera features and better low-light performance will produce higher-quality results. The “Live Photo” feature can simulate long exposure, but dedicated apps offer more control.
2. Do I need a tripod for iPhone long exposure photography?
Yes, a tripod is highly recommended. It provides stability and prevents blurring during long exposures, especially in low-light conditions.
3. What is the best shutter speed for long exposure on an iPhone?
The best shutter speed depends on the desired effect and lighting conditions. Try 1-4 seconds for smooth water, 5-10 seconds for light trails, and 10-30 seconds or longer for cloud movement.
4. Can I use ND filters with my iPhone?
Yes, ND filters can be used to reduce the amount of light entering the lens, allowing for longer shutter speeds in bright conditions without overexposing the image.
5. What is the best ISO setting for iPhone long exposure photography?
Use the lowest ISO setting possible (typically ISO 100 or lower) to minimize noise in your images.
6. How do I focus in long exposure photography on an iPhone?
Manually focus on the primary subject of your photo by tapping on the screen where you want to focus. For landscapes, use infinity focus to ensure everything is sharp.
7. What are some good apps for iPhone long exposure photography?
Popular apps include “Slow Shutter Cam,” “ProCam,” and “NightCap Camera,” which offer manual controls and advanced features for long exposure photography.
8. How do I avoid camera shake in iPhone long exposure photography?
Use a tripod, a remote shutter release, or the iPhone’s self-timer to minimize vibrations when taking long exposure shots.
9. How do I edit my iPhone long exposure photos?
Adjust exposure, contrast, highlights, and shadows to fine-tune the image. Use selective adjustments to enhance specific areas and reduce noise if necessary.
10. What if my long exposure photos are too bright?
Use ND filters to reduce the amount of light entering the lens, or lower the ISO and increase the shutter speed. You can also adjust the exposure compensation to darken the image.
Ready to elevate your iPhone photography? Visit dfphoto.net today to discover a wealth of resources, tutorials, and inspiration to help you master long exposure techniques and create stunning images. Join our community of passionate photographers and unlock your creative potential. Address: 1600 St Michael’s Dr, Santa Fe, NM 87505, United States. Phone: +1 (505) 471-6001. Website: dfphoto.net.