Transform your photos into stunning line art using Procreate with this ultimate guide, brought to you by dfphoto.net. This method offers a creative way to reimagine your photography, blending artistic expression with digital precision, providing a straightforward solution for converting images into line art. Dive into this process and discover how you can achieve unique artistic effects, opening new avenues for creative exploration and innovative visual storytelling. Learn photo editing, graphic design, and visual arts techniques.
1. What Is Line Art And Why Create It From Photos?
Line art is artwork composed exclusively of distinct straight or curved lines placed against a plain background, without gradations in shade (darkness) or color to represent two-dimensional or three-dimensional objects. Line art uses lines to create outlines and suggest form, offering a clean, minimalist aesthetic that’s both striking and versatile. Creating line art from photos transforms realistic images into stylized artistic representations, making it ideal for illustrations, graphic design, and unique personal projects.
Line art is a powerful and versatile artistic technique with various applications. Here are just a few:
- Illustrations: Line art is widely used in illustrations for books, magazines, and online content, providing a clean and straightforward visual style.
- Graphic Design: It’s a popular choice in graphic design for logos, icons, and other branding materials, offering a minimalist and modern aesthetic.
- Coloring Books: The clear outlines of line art make it perfect for coloring books, appealing to both children and adults.
- Tattoos: Many tattoo designs start as line art, providing a foundation for intricate and meaningful body art.
- Architectural Drawings: Architects use line art to create detailed and precise representations of buildings and structures.
2. What Are The User Search Intent For “How To Make Line Art From A Photo?”
Understanding user search intent is crucial for creating content that resonates with your audience. For the keyword “How To Make Line Art From A Photo,” here are five key user search intents:
- Tutorial: Users are seeking a step-by-step guide on converting a photo into line art.
- Software Options: They want to know which software or apps are best for creating line art from photos.
- Techniques: Users are interested in learning different techniques and methods for achieving the desired line art effect.
- Inspiration: They’re looking for examples of line art created from photos to inspire their own projects.
- Efficiency: Users want to find the quickest and easiest way to transform a photo into line art.
3. Which Software Is Best For Creating Line Art?
Several software options cater to creating line art from photos, each with unique strengths. Adobe Photoshop, known for its extensive features, provides precise control for achieving detailed line art. Adobe Illustrator excels in creating scalable vector graphics, ideal for logos and designs that require resizing without losing quality. For those seeking user-friendly interfaces, CorelDRAW offers intuitive tools and a wide array of effects, while Procreate, with its iPad-based platform, stands out with its portability and natural drawing experience using the Apple Pencil. The best software depends on your specific needs, skill level, and desired outcome.
| Software | Strengths | Ideal For |
|---|---|---|
| Adobe Photoshop | Extensive features, precise control, and powerful editing capabilities | Detailed line art, complex projects, and professional graphic design |
| Adobe Illustrator | Scalable vector graphics, precise drawing tools, and seamless integration with other Adobe products | Logos, icons, illustrations, and designs that require resizing without losing quality |
| CorelDRAW | User-friendly interface, intuitive tools, and a wide array of effects | Beginners, intermediate users, and those seeking a balance between power and ease of use |
| Procreate | iPad-based platform, natural drawing experience with Apple Pencil, and portability | Artists who prefer drawing on the go, digital painting, and creating line art with a hand-drawn feel |
| GIMP | Open-source, free to use, and offers a wide range of features and customization options | Users on a budget, those who prefer open-source software, and those who need a versatile image editing tool |
4. What You Need To Know About Procreate?
Procreate is a leading digital illustration app designed for the iPad, renowned for its intuitive interface and powerful features tailored for creative professionals and hobbyists alike. It offers a vast array of brushes, blending modes, and layer options, providing artists with extensive control over their artwork. Its portability and seamless integration with the Apple Pencil make it a favorite among digital artists for creating detailed illustrations, sketches, and line art on the go.
5. What Are The Key Features of Procreate?
Procreate is packed with features that make it a favorite among digital artists. Key features include:
- Intuitive Interface: Procreate’s user-friendly design makes it easy for both beginners and professionals to navigate and create.
- Extensive Brush Library: With hundreds of customizable brushes, artists can achieve a wide range of effects and styles.
- Layer System: Procreate’s robust layer system allows for complex compositions and non-destructive editing.
- Blending Modes: Experiment with various blending modes to create unique color combinations and effects.
- Apple Pencil Support: Seamless integration with the Apple Pencil provides a natural and responsive drawing experience.
- Animation Assist: Create simple animations and GIFs with ease using Procreate’s animation tools.
- Time-Lapse Recording: Automatically record your creative process and share time-lapse videos of your artwork.
- Color Harmony Tools: Procreate offers tools to help you select and create harmonious color palettes.
6. What Equipment Do You Need To Make Line Art On Procreate?
To create line art on Procreate, you’ll need the following equipment:
- iPad: Procreate is exclusively available for iPad, so you’ll need an iPad that supports the app.
- Apple Pencil: While you can use Procreate with your finger, the Apple Pencil provides a more precise and natural drawing experience.
- Procreate App: Purchase and download the Procreate app from the App Store.
7. Step-By-Step Guide: How to Make Line Art from a Photo in Procreate
Creating line art from a photo in Procreate involves a series of steps that utilize the app’s features to transform a realistic image into a stylized, line-based artwork. This process allows for creative exploration and offers a unique way to reimagine your photographs. Here’s a detailed guide on how to achieve this effect:
7.1. Step 1: Import Your Image
Start by importing the photo you want to convert into line art into Procreate. Open Procreate and create a new canvas with the desired dimensions. To import your image, tap the “Actions” icon (wrench icon) in the top left corner, select “Add,” and then choose “Insert a photo.” Navigate to your photo library, select the image, and it will be placed on your canvas. Rename this layer as Photo.
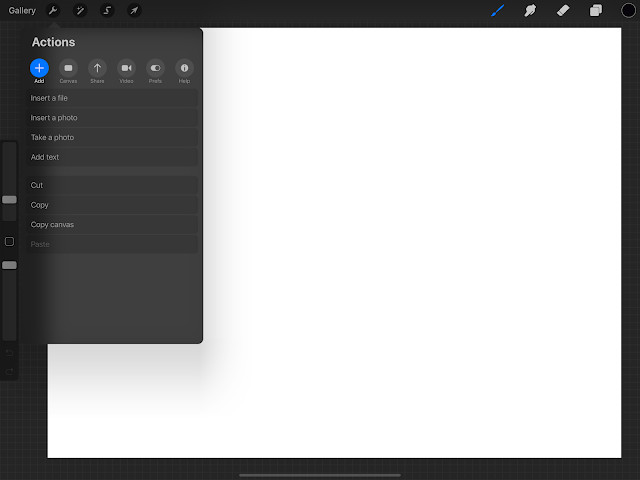 Importing a photo into Procreate for line art conversion, highlighting the "Add" menu and "Insert a Photo" option in the actions panel
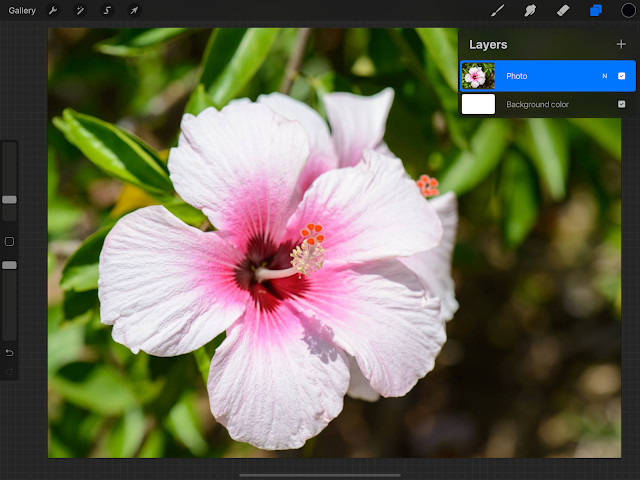
7.2. Step 2: Duplicate The Photo Layer
Duplicate the original photo layer to preserve the original image and work non-destructively. In the Layers panel, swipe left on the “Photo” layer and tap “Duplicate.” Rename the duplicated layer to Inverted.
 Duplicating the "Photo" layer in Procreate, illustrating the swipe-left gesture and "Duplicate" option in the layers panel
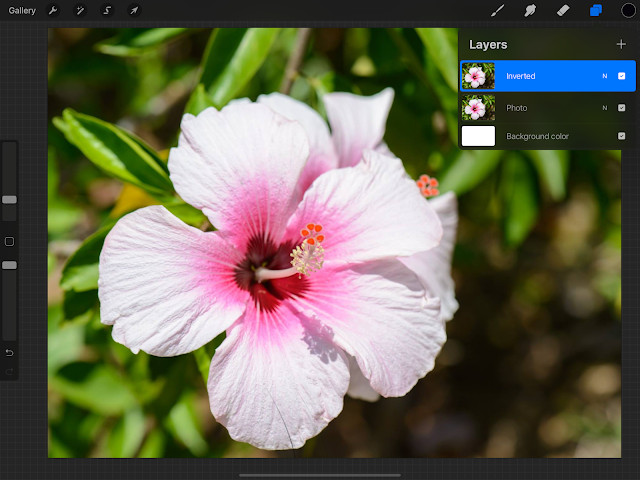
7.3. Step 3: Invert The Colors
Invert the colors of the “Inverted” layer. This will help create the line art effect by emphasizing the edges and contrast in the image. To invert the colors, tap the “Adjustments” icon (magic wand icon), select “Curves,” and then reverse the slope of the curve. Adjust the curve to tweak the end result.
 Inverting the colors of the duplicated layer using the "Curves" adjustment in Procreate, showing the adjustment panel and curve manipulation
7.4. Step 4: Duplicate The “Inverted” Layer
Duplicate the “Inverted” layer again. This will be used to create a grayscale version of the image, which will further enhance the line art effect. Swipe left on the “Inverted” layer and tap “Duplicate.” Rename the duplicated layer to Grayscale.
 Duplicating the "Inverted" layer in Procreate, illustrating the swipe-left gesture and "Duplicate" option in the layers panel
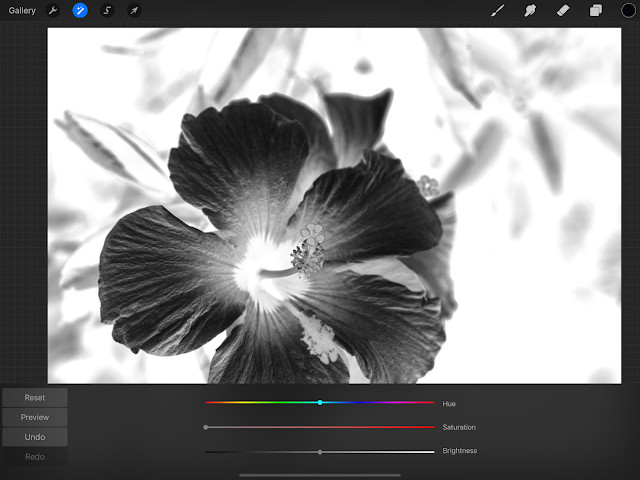
7.5. Step 5: Desaturate The “Grayscale” Layer
Remove the color from the “Grayscale” layer to create a monochrome image. This will help simplify the image and focus on the lines and edges. To desaturate the layer, tap the “Adjustments” icon, select “Hue, Saturation, Brightness,” and slide the “Saturation” scale all the way to the left.
 Desaturating the "Grayscale" layer in Procreate, showing the adjustment panel and the saturation slider set to zero
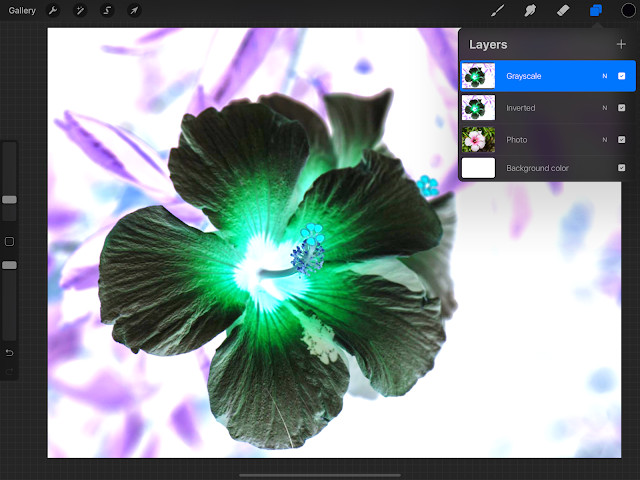
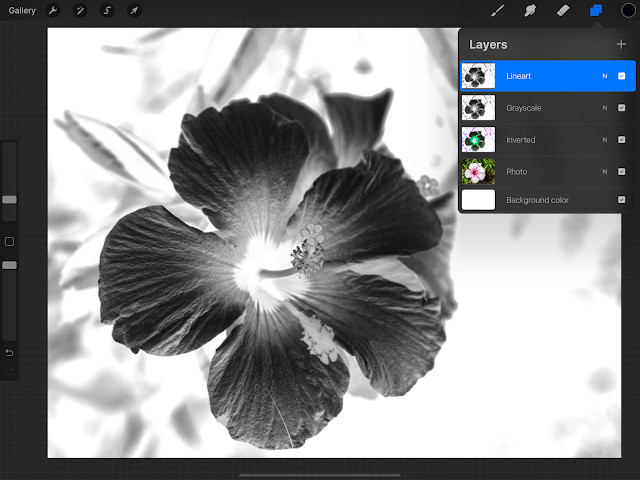
7.6. Step 6: Duplicate The “Grayscale” Layer Again
Duplicate the “Grayscale” layer once more. This final layer will be used to create the actual line art effect. Swipe left on the “Grayscale” layer and tap “Duplicate.” Rename this layer to Lineart.
 Duplicating the "Grayscale" layer in Procreate, illustrating the swipe-left gesture and "Duplicate" option in the layers panel
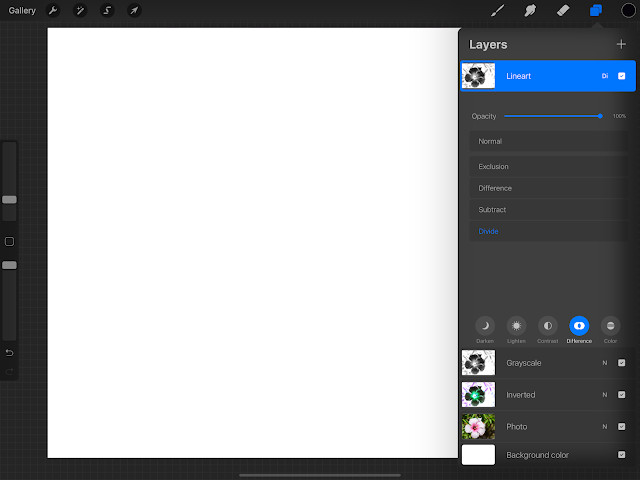
7.7. Step 7: Change The Blend Mode Of The “Lineart” Layer
Change the blend mode of the “Lineart” layer to “Difference” and then “Divide”. This blend mode will invert the colors and create a stark contrast, which is essential for the line art effect. In the Layers panel, tap the “N” on the “Lineart” layer to open the blend mode menu. Select “Difference” and then “Divide”. This will make the layer entirely white.
 Changing the blend mode of the "Lineart" layer in Procreate, highlighting the "N" icon and the blend mode menu with "Difference" and "Divide" selected
7.8. Step 8: Apply Gaussian Blur
Apply a Gaussian Blur to the “Lineart” layer to create the final line art effect. This will soften the edges and create a more refined look. With the “Lineart” layer selected, tap the “Adjustments” icon and select “Gaussian Blur.” Slide the slider until you achieve the desired level of line art detail.
 Applying Gaussian Blur to the "Lineart" layer in Procreate, showing the adjustment panel and the blur slider
7.9. Step 9: Refine Your Line Art
Now that you’ve created the basic line art effect, you can refine it further. Use the Eraser tool to remove any unwanted lines or areas. You can also adjust the opacity of the “Lineart” layer to control the intensity of the lines.
7.10. Step 10: Experiment With Different Settings
Experiment with different settings to achieve unique line art effects. Adjust the “Curves” on the “Inverted” layer to control the contrast and brightness. Try different blend modes for the “Lineart” layer to see how they affect the final result.
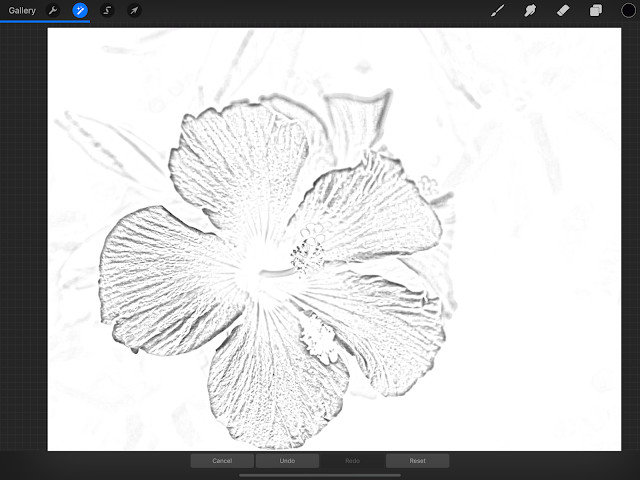 Illustrating the Gaussian Blur adjustment in Procreate, showing the slider and the resulting line art effect on the image
8. What Are The Tips And Tricks For Better Line Art?
Creating stunning line art from photos involves mastering techniques and understanding how to optimize your process. Here are some tips and tricks to elevate your line art skills:
- Use High-Resolution Photos: Start with high-resolution images to capture more detail and ensure a cleaner line art conversion.
- Adjust Contrast and Brightness: Before converting, adjust the contrast and brightness of your photo to highlight the edges and lines you want to emphasize.
- Experiment with Blend Modes: Try different blend modes in your software to achieve unique line art effects. “Multiply,” “Divide,” and “Overlay” can produce interesting results.
- Use Adjustment Layers: Utilize adjustment layers to tweak the colors, contrast, and brightness of your line art without permanently altering the original image.
- Create Custom Brushes: Design custom brushes with varying thicknesses and textures to add depth and character to your line art.
- Vary Line Weight: Varying the thickness of your lines can add depth and dimension to your line art. Use thicker lines for outlines and thinner lines for details.
- Add Shading: Incorporate shading with stippling or cross-hatching to create depth and volume in your line art.
- Use References: Keep reference images handy to ensure accuracy and consistency in your line art.
- Practice Regularly: The more you practice, the better you’ll become at creating line art from photos. Experiment with different techniques and styles to find what works best for you.
- Explore Different Software: Try different software options to find the one that suits your workflow and preferences.
9. What Are The Common Mistakes To Avoid When Creating Line Art?
Creating line art can be a rewarding artistic endeavor, but it’s easy to fall into common pitfalls that can hinder your results. Here are some mistakes to avoid:
- Overcomplicating Details: Avoid adding too many unnecessary details, which can clutter your line art and make it look messy.
- Ignoring Proportions: Pay attention to the proportions of your subject to ensure accuracy and realism.
- Using Inconsistent Line Weight: Maintain consistent line weight throughout your line art, unless you’re intentionally varying it for effect.
- Not Refining Lines: Take the time to refine your lines and remove any stray marks or imperfections.
- Failing to Plan: Before you start, plan your composition and decide which elements you want to emphasize.
- Using Low-Resolution Images: Starting with low-resolution images can result in pixelated and blurry line art.
- Not Experimenting: Don’t be afraid to experiment with different techniques and styles to find what works best for you.
- Rushing the Process: Take your time and focus on creating clean, precise lines.
- Ignoring Feedback: Be open to feedback from others and use it to improve your line art skills.
- Not Saving Your Work: Regularly save your work to avoid losing progress in case of a software crash or other issues.
10. How Can Dfphoto.Net Help You Improve Your Photography Skills?
At dfphoto.net, we’re dedicated to helping you elevate your photography and digital art skills through comprehensive resources and expert guidance. Whether you’re an amateur enthusiast or a seasoned professional, our website offers a wide array of tutorials, tips, and inspiration to fuel your creative journey. Explore our articles on various photography techniques, from mastering exposure to perfecting composition, and discover how to use software like Procreate to transform your photos into stunning line art.
dfphoto.net is your go-to resource for mastering photography and digital art. Here’s how we can help you:
- In-Depth Tutorials: Access detailed, step-by-step tutorials on various photography techniques and digital art methods.
- Expert Tips: Learn from seasoned photographers and artists through our expert tips and advice.
- Software Guides: Master software like Procreate, Photoshop, and Lightroom with our comprehensive guides.
- Creative Inspiration: Discover inspiring artwork and photography to spark your imagination.
- Community Support: Connect with a vibrant community of fellow photographers and artists to share ideas and get feedback.
Visit dfphoto.net today and take your photography and digital art skills to the next level. For inquiries, you can reach us at 1600 St Michael’s Dr, Santa Fe, NM 87505, United States, or call +1 (505) 471-6001.
11. What Are The 5 Frequently Asked Questions About Making Line Art From Photos?
11.1. Can I Create Line Art From Any Photo?
Yes, you can create line art from any photo, but images with clear subjects and good contrast tend to yield better results.
11.2. What Is The Best Software For Making Line Art?
Software like Adobe Photoshop, Adobe Illustrator, CorelDRAW, and Procreate are excellent choices, each offering unique features and capabilities.
11.3. How Can I Improve The Quality Of My Line Art?
Start with high-resolution photos, adjust contrast and brightness, and experiment with different techniques to refine your line art.
11.4. Do I Need An Apple Pencil To Use Procreate Effectively?
While you can use Procreate with your finger, the Apple Pencil provides a more precise and natural drawing experience, enhancing your control and detail.
11.5. What Are Some Common Mistakes To Avoid When Creating Line Art?
Avoid overcomplicating details, ignoring proportions, and using inconsistent line weight to achieve a cleaner and more professional result.