Are you looking to showcase your favorite photos or art pieces in a grand way without breaking the bank? Making a large photo frame is an achievable DIY project. On dfphoto.net, we offer comprehensive guides and creative ideas to help you craft stunning, oversized frames that perfectly complement your images. This article will guide you through the process of building your own large picture frame, ensuring a personalized and budget-friendly display solution. Let’s dive into photo presentation, visual arts, and home décor!
Table of Contents
- Why Make Your Own Large Photo Frame?
- What Materials Will I Need to Make a Large Photo Frame?
- What Tools Are Essential for Building a Large Photo Frame?
- How Do I Plan and Design My Large Photo Frame?
- How to Cut the Wood for Your DIY Photo Frame?
- How to Assemble The Frame?
- What is the Best Way to Finish the Frame?
- How to Mount Your Photo in the Frame?
- How to Add Hanging Hardware?
- What Are Some Creative Ideas for Customizing Your Large Photo Frame?
- Where Can You Display Your Large Photo Frame?
- How Much Will It Cost to Make a Large Photo Frame?
- How Do I Maintain and Clean My Large Photo Frame?
- How To Choose the Right Type of Wood for Your Frame?
- What Are Some Common Mistakes to Avoid When Making a Large Photo Frame?
- How Can I Incorporate Lighting Into My Large Photo Frame?
- How Can I Protect My Large Photo Frame From Damage?
- Are There Any Safety Tips for Working with Wood and Tools?
- How Do I Choose the Right Matting for My Large Photo Frame?
- FAQ Section
1. Why Make Your Own Large Photo Frame?
Making your own large photo frame offers numerous advantages:
- Cost Savings: Purchasing a large frame can be expensive. DIY frames are significantly cheaper.
- Customization: You have complete control over the size, style, and finish to match your décor.
- Personal Satisfaction: Creating something with your own hands is rewarding and fun.
- Unique Design: You can incorporate unique elements that aren’t available in store-bought frames.
- Perfect Fit: Ensure the frame perfectly fits your specific artwork or photo dimensions.
2. What Materials Will I Need to Make a Large Photo Frame?
Here’s a list of essential materials. The specifics will depend on your design, but this covers the basics:
- Wood: Choose your preferred type (pine, oak, etc.) based on budget and desired look.
- Plywood or Foam Board: For backing to support the photo.
- Lattice Molding: Adds a decorative edge to the frame.
- Glass or Acrylic Sheet: To protect your photo (optional).
- Corner Braces: To reinforce the frame’s corners.
- Wood Glue: For strong, lasting joints.
- Nails or Screws: To secure the frame pieces together.
- Spackling or Wood Putty: To fill nail holes for a smooth finish.
- Paint, Stain, or Varnish: For finishing the frame.
- Hanging Hardware: D-rings, wire, or sawtooth hangers.
- Double-Sided Tape: To mount the photo to the backing.
- Mat Board: If you want a mat around your photo (optional).
3. What Tools Are Essential for Building a Large Photo Frame?
Having the right tools makes the job easier and ensures a professional finish:
- Miter Saw: For accurate angle cuts.
- Circular Saw: For cutting larger pieces of wood.
- Nail Gun: To quickly assemble the frame (optional, but highly recommended).
- Drill: For pilot holes and screwing in corner braces.
- Measuring Tape: For precise measurements.
- Pencil: For marking cut lines.
- Clamps: To hold pieces together while the glue dries.
- Sandpaper: For smoothing rough edges.
- Safety Glasses: To protect your eyes.
- Dust Mask: To avoid inhaling sawdust.
- Paintbrushes or Spray Gun: For applying the finish.
4. How Do I Plan and Design My Large Photo Frame?
Planning and designing are crucial steps. Here’s how to approach it:
- Measure Your Artwork: Accurately measure the height and width of the photo or artwork you intend to frame.
- Determine Frame Size: Decide how wide you want the frame to be. A wider frame can make a bigger impact.
- Sketch a Design: Draw a rough sketch of what you want the frame to look like. Consider the style and finish.
- Calculate Wood Lengths: Based on your measurements, calculate the lengths of wood you’ll need for each side of the frame. Remember to account for mitered corners.
- Choose a Style: Consider different styles such as rustic, modern, or ornate, depending on your taste and the artwork.
- Decide on Matting: If you want a mat, factor in its width when calculating the overall frame size.
5. How to Cut the Wood for Your DIY Photo Frame?
Accurate cuts are essential for a professional-looking frame:
- Measure and Mark: Use a measuring tape and pencil to mark the wood according to your calculated lengths.
- Set the Miter Saw: Adjust the miter saw to a 45-degree angle for the corners.
- Cut the Wood: Carefully cut each piece of wood along the marked lines. Ensure the angled cuts are precise for seamless corners.
- Sand the Edges: Use sandpaper to smooth any rough edges or splinters.
 Cutting wood pieces for DIY frame
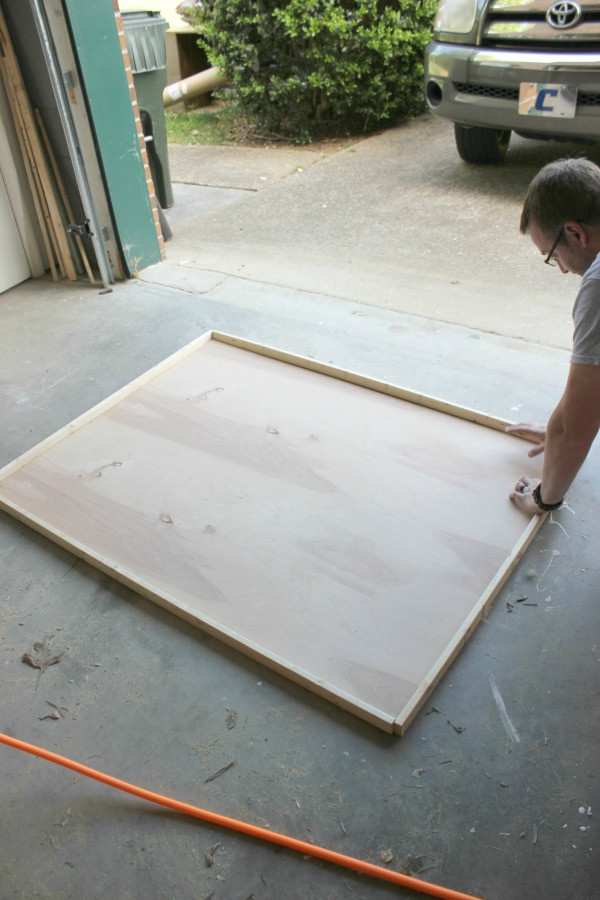
6. How to Assemble The Frame?
Assembly is where your frame starts to take shape:
- Apply Wood Glue: Apply wood glue to the mitered ends of each piece.
- Join the Corners: Carefully join the corners, ensuring they align perfectly.
- Clamp the Frame: Use clamps to hold the corners together while the glue dries. This ensures a strong bond.
- Nail or Screw the Corners: For added strength, use a nail gun or drill pilot holes and screw the corners together.
- Add Corner Braces: Attach corner braces to the inside of each corner for extra reinforcement.
7. What is the Best Way to Finish the Frame?
The finish enhances the look of your frame:
- Fill Nail Holes: Use spackling or wood putty to fill any nail holes or imperfections. Let it dry completely, then sand smooth.
- Sand the Frame: Lightly sand the entire frame to ensure a smooth surface for the finish.
- Prime the Frame: Apply a primer to the frame. This helps the paint or stain adhere better and provides a more uniform finish.
- Paint or Stain: Choose your desired paint or stain. Apply in thin, even coats, allowing each coat to dry before applying the next. For a more detailed look, consider a decorative paint finish.
- Apply a Sealant: Finish with a sealant or varnish to protect the frame and enhance its durability.
8. How to Mount Your Photo in the Frame?
Mounting the photo securely is crucial:
- Prepare the Backing: Cut a piece of plywood or foam board to the size of the inside of your frame.
- Attach the Photo: Use double-sided tape to attach your photo to the backing board. Ensure it’s centered and straight.
- Insert into Frame: Carefully insert the mounted photo into the frame from the back.
- Secure the Backing: Use flexible tabs or small nails to secure the backing board in place.
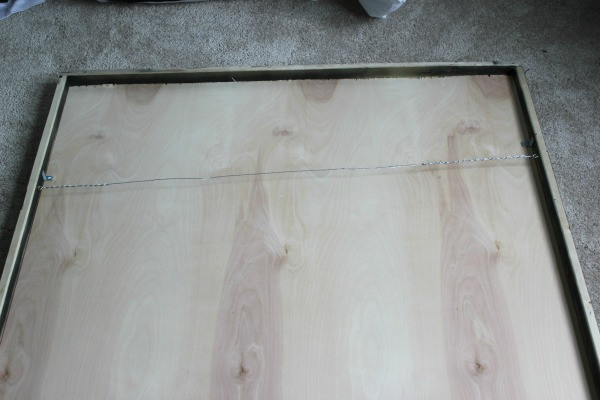
9. How to Add Hanging Hardware?
Proper hanging hardware ensures your frame stays securely on the wall:
- Measure and Mark: Measure and mark where you want to place the hanging hardware on the back of the frame.
- Install D-Rings or Sawtooth Hangers: Attach D-rings or sawtooth hangers to the marked spots.
- Attach Hanging Wire: If using D-rings, thread hanging wire through them, ensuring it’s taut and securely fastened.
- Test the Hardware: Before hanging, test the hardware to ensure it can support the weight of the frame and photo.
 Attaching hanging hardware
10. What Are Some Creative Ideas for Customizing Your Large Photo Frame?
Customization allows you to create a truly unique piece:
- Rustic Wood Frame: Use reclaimed wood for a weathered look.
- Painted Frame: Choose a bold color to make the frame stand out.
- Distressed Finish: Sand edges and apply a crackle finish for a vintage feel.
- Mosaic Frame: Glue small tiles or glass pieces onto the frame for a mosaic effect.
- Fabric-Wrapped Frame: Wrap the frame in fabric for a soft, textured look.
- Add Embellishments: Glue on shells, beads, or other decorative items.
11. Where Can You Display Your Large Photo Frame?
Consider the best location to showcase your frame:
- Living Room: Above a sofa or fireplace.
- Bedroom: Above a bed or dresser.
- Hallway: As a focal point.
- Dining Room: As part of a gallery wall.
- Home Office: To add personality and inspiration.
12. How Much Will It Cost to Make a Large Photo Frame?
The cost varies depending on materials, but here’s a rough estimate:
- Wood: $15 – $40
- Plywood/Foam Board: $5 – $15
- Lattice Molding: $5 – $10
- Hardware: $5 – $10
- Finishing Supplies: $10 – $20
Total Estimated Cost: $40 – $95
13. How Do I Maintain and Clean My Large Photo Frame?
Proper care ensures your frame lasts:
- Dust Regularly: Use a soft cloth to dust the frame regularly.
- Avoid Direct Sunlight: Prolonged exposure to sunlight can fade the photo and damage the frame.
- Clean Glass or Acrylic: Use a glass cleaner and a soft cloth to clean the glass or acrylic sheet.
- Handle with Care: When moving the frame, handle it with care to avoid scratches or damage.
14. How To Choose the Right Type of Wood for Your Frame?
The type of wood affects the frame’s look and durability:
- Pine: Affordable and easy to work with, but softer than other woods.
- Oak: Strong and durable with a beautiful grain pattern.
- Maple: Smooth and dense, ideal for painted finishes.
- Poplar: Lightweight and takes paint well, often used for painted frames.
- Reclaimed Wood: Adds character and a rustic look, but may require more preparation.
15. What Are Some Common Mistakes to Avoid When Making a Large Photo Frame?
Avoiding these mistakes ensures a successful project:
- Inaccurate Measurements: Double-check all measurements before cutting.
- Poor Corner Joints: Ensure corners are tight and secure.
- Uneven Finish: Apply paint or stain in thin, even coats.
- Insufficient Support: Use adequate backing and corner braces for large frames.
- Inadequate Hanging Hardware: Choose hardware that can support the weight of the frame.
16. How Can I Incorporate Lighting Into My Large Photo Frame?
Adding lighting can enhance the presentation of your photo:
- Backlighting: Install LED strip lights behind the photo to create a soft glow.
- Spotlights: Use small spotlights to highlight the photo from above.
- Integrated Lighting: Build lights into the frame itself for a seamless look.
17. How Can I Protect My Large Photo Frame From Damage?
Protecting your frame ensures it lasts for years:
- UV-Protective Glass: Use UV-protective glass to prevent fading.
- Protective Coatings: Apply a sealant or varnish to protect the frame from moisture and scratches.
- Proper Storage: If storing the frame, wrap it in protective material to prevent damage.
18. Are There Any Safety Tips for Working with Wood and Tools?
Safety should always be a priority:
- Wear Safety Glasses: Protect your eyes from flying debris.
- Use a Dust Mask: Avoid inhaling sawdust.
- Read Tool Manuals: Familiarize yourself with the proper use of each tool.
- Work in a Well-Ventilated Area: When working with paints, stains, or adhesives.
- Unplug Tools: When changing blades or making adjustments.
- Keep Work Area Clean: To prevent accidents.
19. How Do I Choose the Right Matting for My Large Photo Frame?
Matting enhances the look of your photo and provides a visual border:
- Consider the Color: Choose a mat color that complements the photo and the frame.
- Determine the Width: A wider mat can make a bigger impact.
- Use Acid-Free Mat Board: To prevent damage to your photo over time.
- Cut the Mat Accurately: Use a mat cutter for precise cuts.
20. FAQ Section
Here are some frequently asked questions about making large photo frames:
- What is the best wood for a large frame?
- Oak and maple are excellent choices for their strength and durability.
- How do I prevent the frame from warping?
- Use kiln-dried wood and apply a sealant to protect against moisture.
- Can I make a frame without a miter saw?
- Yes, you can use a hand saw and miter box, but it requires more precision.
- How do I hang a very large frame safely?
- Use heavy-duty hanging hardware and install it into wall studs.
- What type of finish is best for a rustic frame?
- A stain with a matte finish works well for a rustic look.
- How do I attach the photo to the backing board?
- Double-sided tape is a simple and effective method.
- Can I use acrylic instead of glass?
- Yes, acrylic is lighter and less prone to shattering.
- How do I clean a wooden frame?
- Use a soft cloth to dust the frame regularly.
- What if my frame is too big for my space?
- Consider making a smaller frame or creating a gallery wall with multiple smaller frames.
- Where can I find inspiration for frame designs?
- Websites like dfphoto.net offer a wealth of ideas and tutorials.
Crafting your own large photo frame is a rewarding experience that allows you to showcase your cherished memories and artistic creations in a personalized and stylish way. With careful planning, the right tools, and a little creativity, you can create a stunning piece that enhances your home décor.
Visit dfphoto.net for more inspiration, tutorials, and resources to help you on your photography and framing journey. Share your creations with our community and discover new ideas to elevate your visual arts projects. Check out our guides on photo editing and printing, and find the perfect way to present your work.
Ready to start your DIY framing project? Explore dfphoto.net today and unleash your creativity!