Want to give your iPhone photos that classic film aesthetic? This guide from dfphoto.net will show you how to transform your digital images into timeless pieces of art using simple techniques and readily available tools. Discover how to add grain, adjust colors, and play with lighting to achieve the perfect film look.
1. What Makes Film Photography Special?
Film photography has a unique charm that many digital photographers admire. According to research from the Santa Fe University of Art and Design’s Photography Department, film’s appeal stems from its organic imperfections and nostalgic quality. These photos often evoke a sense of history and timelessness, setting them apart from the crisp, clean look of modern digital images.
1.1 Why Recreate the Film Look on an iPhone?
Recreating the film look on an iPhone offers a blend of convenience and artistry. With an iPhone, you can capture images anytime, anywhere, and then transform them into film-like photographs. This approach provides a creative outlet without the cost and complexities of traditional film photography.
1.2 What are the Challenges of Recreating the Film Look?
While iPhones offer incredible image quality, digitally replicating the nuances of film can be challenging. Digital images tend to be too sharp, lack character, and may have overly accurate colors. Overcoming these challenges requires understanding how to mimic film’s distinctive qualities using editing techniques.
2. What are the Key Elements of the Film Look?
Understanding the key elements of film photography is essential for recreating its look on an iPhone. These elements include grain, color temperature, contrast, and dynamic range. By carefully adjusting these settings, you can give your iPhone photos a convincing film aesthetic.
2.1 Grain: The Signature of Film
Grain is a defining characteristic of film photography. It adds texture and a tactile feel to images, contributing to their vintage look. Digital photos are often too clean, so adding grain can introduce the desired imperfection.
2.2 Color Temperature: Warmth and Nostalgia
Film photos often have a warmer color temperature, contributing to their nostalgic feel. This warmth can be achieved by adjusting the white balance in your editing app, making the colors appear more inviting and less clinical.
2.3 Contrast: Softening the Edges
Film typically has a lower contrast range than digital images. This softness can be replicated by reducing the contrast and lifting the shadows in your iPhone photos.
2.4 Dynamic Range: Capturing the Details
Film handles highlights and shadows differently than digital sensors. Adjusting the dynamic range to preserve details in both bright and dark areas is crucial for a realistic film look.
3. What Apps Can I Use to Achieve the Film Look on My iPhone?
Several apps are available for iPhone that can help you achieve the film look. These apps range from basic photo editors to more specialized tools designed to emulate film stocks. The following table list out some apps for iPhone:
| App Name | Description | Key Features | Price |
|---|---|---|---|
| VSCO | Popular for its film-like presets and editing tools. | Wide range of film presets, advanced editing tools, community features. | Free/Paid |
| Lightroom Mobile | Adobe’s mobile version offers detailed adjustments and preset support. | Comprehensive editing tools, color grading, preset syncing. | Free/Subscription |
| RNI Films | Designed specifically for emulating film stocks. | Authentic film simulations, grain adjustments, vintage effects. | Free/Paid |
| Darkroom | Powerful editor with non-destructive editing and batch processing. | Advanced color controls, curve adjustments, RAW support. | Free/Paid |
| Huji Cam | Simulates the look of disposable cameras. | Random light leaks, date stamps, simple interface. | Free |
3.1 VSCO: A Versatile Choice
VSCO is a favorite among mobile photographers for its extensive collection of film-inspired presets. It also offers a robust set of editing tools, making it easy to fine-tune your images and achieve the perfect film look.
3.2 Lightroom Mobile: Professional-Grade Editing
Lightroom Mobile provides a professional-grade editing experience on your iPhone. With its detailed adjustment controls and preset support, you can precisely replicate the nuances of film photography.
3.3 RNI Films: Authentic Film Simulations
RNI Films specializes in authentic film simulations. It offers a wide range of film stocks, allowing you to match the look of classic films like Kodak Portra or Fujifilm Provia.
4. How Do I Edit My iPhone Photos to Look Like Film Using Lightroom Mobile?
Lightroom Mobile is an excellent tool for achieving the film look due to its precise controls and flexibility. By following a step-by-step process, you can transform your digital iPhone photos into vintage-inspired masterpieces.
4.1 Step 1: Adjust the Lighting
Start by adjusting the lighting to mimic the characteristics of film. Film photos often appear more exposed, with softer highlights and deeper shadows.
- Exposure: Increase the exposure slightly to brighten the image.
- Contrast: Reduce the contrast to soften the overall look.
- Highlights: Lower the highlights to recover details in bright areas.
- Shadows: Lift the shadows to reveal details in dark areas.
- Whites: Adjust the whites to control the brightest parts of the image.
- Blacks: Lower the blacks slightly to retain some dimension.
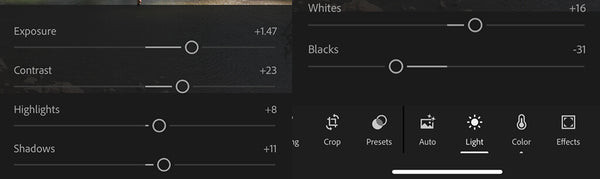 Lightroom Mobile Lighting Adjustment
4.2 Step 2: Add Grain
Grain is crucial for achieving the film look. It adds texture and imperfection, setting it apart from the clean look of digital images.
- Grain: Add grain to your photo. The amount of grain depends on your preference, but a little goes a long way. Start with a small amount and increase it until you achieve the desired effect.
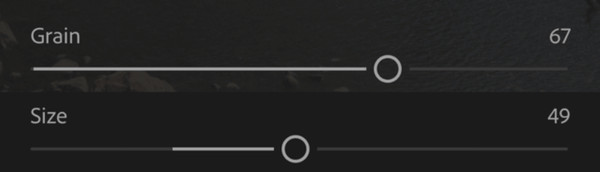 Lightroom Mobile Grain Adjustment
4.3 Step 3: Adjust the Color
Adjusting the color is key to replicating the warmth and nostalgia of film.
- Temperature: Increase the temperature to add warmth to the image.
- Tint: Add a touch of purple to balance the warmth and prevent the image from becoming too orange.
- Vibrance: Increase the vibrance to boost the colors without over saturating the image.
- Saturation: Adjust the saturation to fine-tune the color intensity.
4.4 Step 4: Fine-Tune Individual Colors
For more advanced color adjustments, use the color mix panel to adjust individual colors.
- Hue: Adjust the hue to change the shade of specific colors.
- Saturation: Adjust the saturation to control the intensity of specific colors.
- Luminance: Adjust the luminance to control the brightness of specific colors.
4.5 Step 5: Color Grading
Color grading allows you to add specific color tones to the shadows, mid-tones, and highlights, further enhancing the film look.
- Shadows: Add a warm tone to the shadows to mimic the look of aged film.
- Mid-tones: Add a subtle color to the mid-tones to enhance the overall mood.
- Highlights: Add a warm tone to the highlights to create a cohesive look.
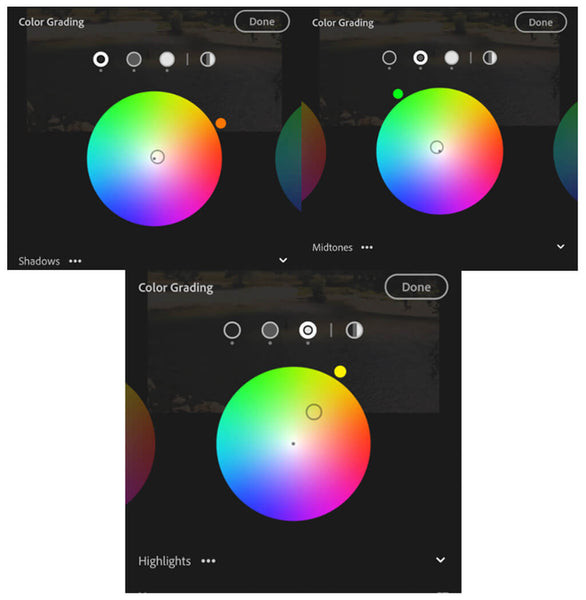 Lightroom Mobile Color Grading Adjustment
4.6 Step 6: Vignetting (Optional)
Adding a vignette can draw attention to the center of the image and enhance the vintage feel.
- Amount: Add a slight negative value to darken the corners of the image.
- Midpoint: Adjust the midpoint to control the size of the vignette.
- Roundness: Adjust the roundness to control the shape of the vignette.
- Feather: Increase the feather to soften the edges of the vignette.
5. How Can I Use Presets to Achieve the Film Look Quickly?
Presets are pre-made collections of editing settings that can be applied to your photos with a single tap. They offer a quick and easy way to achieve the film look without manually adjusting each setting.
5.1 What are the Benefits of Using Presets?
Using presets saves time and ensures consistency across multiple photos. They are also a great way to experiment with different film looks and find the styles that you like best.
5.2 Where Can I Find Film-Inspired Presets?
Many websites and apps offer film-inspired presets for Lightroom Mobile and other photo editing tools. Some popular sources include:
- VSCO: Offers a variety of film-like presets as part of its membership.
- Etsy: Features numerous independent creators selling custom presets.
- Adobe Exchange: Provides free and paid presets for Lightroom users.
- dfphoto.net: Check out dfphoto.net for a curated selection of film-inspired presets.
5.3 How Do I Install and Use Presets in Lightroom Mobile?
Installing and using presets in Lightroom Mobile is a straightforward process.
- Download the Preset: Download the preset file (usually in .dng or .xmp format) to your iPhone.
- Import into Lightroom Mobile: Open Lightroom Mobile and import the preset file as if it were a photo.
- Create Preset: Open the imported photo and tap the three dots in the upper right corner. Select “Create Preset.”
- Name and Save: Give the preset a name and choose a group to save it in.
- Apply the Preset: Open the photo you want to edit and tap the “Presets” button at the bottom of the screen. Select your newly installed preset and tap to apply it.
6. What Are Some Common Mistakes to Avoid When Recreating the Film Look?
While recreating the film look can be fun, it’s important to avoid common mistakes that can make your photos look artificial or over-edited.
6.1 Overdoing the Grain
Adding too much grain can make your photos look noisy and distracting. It’s best to start with a small amount and gradually increase it until you achieve the desired effect.
6.2 Excessive Color Grading
Overdoing the color grading can result in unnatural and unrealistic colors. Subtle adjustments are usually more effective in creating a convincing film look.
6.3 Ignoring the Subject Matter
Not all photos are suitable for the film look. Consider the subject matter and the overall mood of the image before applying film-inspired edits.
6.4 Over-Sharpening
Film photos are generally softer than digital images. Avoid over-sharpening your photos, as this can detract from the film aesthetic.
7. What Are Some Tips for Capturing Photos That Look Good with Film Edits?
Capturing photos with the film look in mind can make the editing process easier and more effective.
7.1 Shoot in Natural Light
Natural light is ideal for capturing photos that look good with film edits. It creates soft, flattering light that complements the vintage aesthetic.
7.2 Focus on Composition
Pay attention to composition to create visually appealing images. Use leading lines, the rule of thirds, and other compositional techniques to enhance your photos.
7.3 Capture Authentic Moments
Film photography is often associated with capturing authentic moments. Focus on capturing genuine emotions and candid interactions to create compelling images.
7.4 Experiment with Different Perspectives
Try shooting from different angles and perspectives to add visual interest to your photos. Low angles, high angles, and close-ups can all create unique and engaging images.
8. How Do Different Film Stocks Influence the Final Look?
Different film stocks have unique characteristics that influence the final look of your photos. Understanding these differences can help you choose the right film stock to emulate for your images.
8.1 Kodak Portra: Portrait Perfection
Kodak Portra is known for its smooth skin tones and natural colors, making it a favorite for portrait photography.
8.2 Fujifilm Provia: Vibrant and Punchy
Fujifilm Provia offers vibrant colors and high contrast, making it ideal for landscape and travel photography.
8.3 Ilford HP5: Classic Black and White
Ilford HP5 is a classic black and white film known for its fine grain and wide tonal range, perfect for timeless monochrome images.
8.4 Lomography Color Negative: Dreamy and Surreal
Lomography Color Negative films often produce dreamy and surreal images with unique color shifts and light leaks.
9. What are the Ethical Considerations When Emulating Film Photography?
When emulating film photography, it’s important to be mindful of ethical considerations.
9.1 Authenticity vs. Imitation
While recreating the film look can be a fun and creative exercise, it’s important to be transparent about your editing techniques. Avoid misrepresenting your photos as genuine film images if they are not.
9.2 Respect for Original Film Photographers
Acknowledge and respect the work of original film photographers. Credit them when appropriate and avoid appropriating their styles without giving due recognition.
9.3 Avoiding Misleading Representations
Ensure that your edits do not misrepresent the subject matter or deceive viewers. Use your editing skills responsibly and ethically.
10. What Are Some Alternatives to Lightroom Mobile for Film-Like Edits?
While Lightroom Mobile is a powerful tool, several alternatives can help you achieve film-like edits on your iPhone.
10.1 VSCO: The Preset Paradise
VSCO offers a wide range of film-inspired presets and a user-friendly interface, making it a great choice for beginners.
10.2 RNI Films: The Film Stock Specialist
RNI Films specializes in authentic film simulations, providing a wide selection of film stocks to emulate.
10.3 Darkroom: The Advanced Editor
Darkroom offers advanced editing tools and non-destructive editing, making it a powerful alternative to Lightroom Mobile.
FAQ: Frequently Asked Questions About Achieving The Film Look
1. Can I achieve the film look using only my iPhone’s built-in camera app?
While the iPhone’s built-in camera app offers basic adjustments, it’s best to use a dedicated editing app like VSCO or Lightroom Mobile for more precise control.
2. How much grain should I add to my photos?
The amount of grain depends on your personal preference. Start with a small amount and gradually increase it until you achieve the desired effect.
3. What color temperature is best for the film look?
A warmer color temperature is generally best for the film look, as it adds a nostalgic feel to the images.
4. Can I use the same editing settings for all my photos?
Every photo is different, so it’s best to adjust the editing settings to suit each individual image.
5. Are presets worth using?
Presets can save time and ensure consistency, but it’s important to fine-tune them to suit each individual photo.
6. What are some common film stocks to emulate?
Some popular film stocks to emulate include Kodak Portra, Fujifilm Provia, and Ilford HP5.
7. How can I make my photos look more authentic?
Focus on capturing genuine moments and using subtle editing techniques to create a realistic film look.
8. Is it ethical to emulate film photography?
Yes, as long as you are transparent about your editing techniques and respect the work of original film photographers.
9. What if I don’t have access to paid apps?
Many free apps offer basic editing tools that can help you achieve the film look.
10. Where can I find inspiration for film-like edits?
Look at the work of classic film photographers and experiment with different editing techniques to find your own style.
Ready to transform your iPhone photos into timeless film masterpieces? Visit dfphoto.net for more in-depth tutorials, preset recommendations, and a vibrant community of photographers eager to share their tips and tricks. Don’t just take photos, create art that tells a story.
Address: 1600 St Michael’s Dr, Santa Fe, NM 87505, United States
Phone: +1 (505) 471-6001
Website: dfphoto.net