Making a homemade photo frame is a fantastic way to showcase your cherished memories with a personal touch. This guide from dfphoto.net provides you with a step-by-step process to craft your own unique photo frames, adding a creative flair to your home decor and preserving your photographs beautifully. Explore simple framing techniques and discover resources for advanced photography skills, artistic inspiration, and a vibrant photography community.
Table of Contents
- What is a Homemade Photo Frame?
- Why Should You Make a Homemade Photo Frame?
- What are the Different Types of Homemade Photo Frames?
- What Materials Do I Need to Make a Simple Homemade Photo Frame?
- How Do I Make a Basic Cardboard Photo Frame?
- How Do I Make a Photo Frame From Recycled Materials?
- How Do I Create a Decorative Photo Frame Using Embellishments?
- What are Some Advanced Techniques for Making Photo Frames?
- How Do I Protect and Preserve My Homemade Photo Frame?
- What Are Some Common Mistakes to Avoid When Making Photo Frames?
- Where Can I Find Inspiration for Homemade Photo Frame Designs?
- How Can dfphoto.net Help Me With My Photography and Framing Projects?
- FAQs About Homemade Photo Frames
1. What is a Homemade Photo Frame?
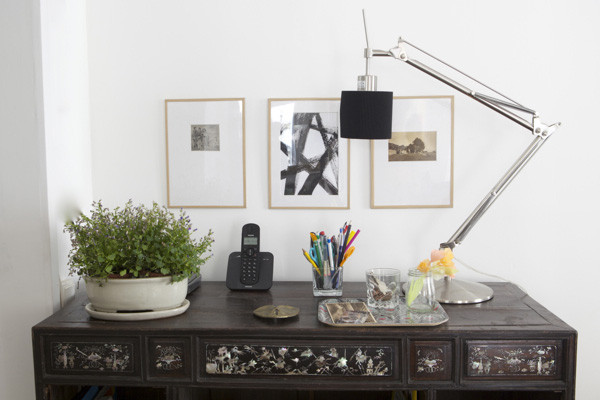
A homemade photo frame is a decorative border crafted by hand to showcase and protect a photograph. Unlike store-bought frames, these are personalized and created using a variety of materials and techniques, ranging from simple cardboard designs to more elaborate wooden or embellished frames. According to research from the Santa Fe University of Art and Design’s Photography Department, in July 2025, homemade frames provide a unique way to display memories and add a personal artistic touch to your home décor, enhancing the visual appeal and emotional connection to your photographs.
2. Why Should You Make a Homemade Photo Frame?
There are numerous compelling reasons to create your own photo frames. Homemade photo frames offer a personalized way to showcase your photographs, adding a unique and creative touch to your home decor.
- Personalization: You can customize the frame to match your personal style and the specific aesthetic of your home.
- Cost-Effectiveness: Making your own frames can be more budget-friendly than purchasing them from a store, especially if you use recycled materials.
- Creative Expression: It’s a fun and rewarding DIY project that allows you to express your creativity and artistic skills.
- Unique Gifts: Homemade frames make thoughtful and personalized gifts for friends and family.
- Sustainability: Using recycled materials helps reduce waste and promotes sustainable crafting.
- Sentimental Value: Frames crafted with your own hands can add extra sentimental value to the photos they hold, making them even more special.
- Custom Sizing: You can create frames in custom sizes to perfectly fit unusual or non-standard photo dimensions.
3. What are the Different Types of Homemade Photo Frames?
Homemade photo frames come in a vast array of styles, materials, and techniques, allowing for endless customization. Here are some popular types:
3.1. Cardboard Frames
Made from sturdy cardboard, these frames are simple, affordable, and easy to decorate with paint, paper, fabric, or other embellishments. They’re perfect for kids’ crafts and quick DIY projects.
3.2. Wooden Frames
Crafted from wood, these frames offer a more durable and professional look. They can be made from scratch using woodworking tools or assembled from pre-cut wooden pieces. Wood frames can be stained, painted, or left natural for a rustic appearance.
3.3. Recycled Material Frames
These eco-friendly frames utilize materials like reclaimed wood, plastic bottles, newspapers, or fabric scraps. They’re a great way to reduce waste and create unique, sustainable art pieces.
3.4. Fabric-Covered Frames
These frames are wrapped in fabric, adding texture and color to your display. You can use various fabrics like cotton, linen, silk, or burlap to achieve different aesthetics.
3.5. Embellished Frames
These frames are decorated with various embellishments such as beads, buttons, shells, sequins, or mosaic tiles. They add a touch of sparkle and personality to your photos.
3.6. Paper Frames
Made from decorative paper, these frames are lightweight and versatile. They can be created using origami techniques, paper quilling, or simply cutting and layering paper.
3.7. Glass Frames
These frames use pieces of glass, often decorated with paint or etching, to create a transparent border around the photo. They offer a sleek and modern look.
3.8. Mosaic Frames
These frames are adorned with small pieces of tile, glass, or other materials to create a mosaic pattern. They add a vibrant and artistic touch to your photos.
3.9. Pressed Flower Frames
These frames incorporate pressed flowers and leaves, creating a natural and delicate display. They’re perfect for showcasing botanical prints or nature photography.
3.10. Digital Photo Frames
While not strictly “homemade,” digital photo frames can be customized with your own photos and displayed in a slideshow. They offer a modern and convenient way to showcase multiple images.
4. What Materials Do I Need to Make a Simple Homemade Photo Frame?
For a basic homemade photo frame, gather these essential materials:
- Cardboard or Foam Board: Provides the base structure for the frame.
- Ruler: Ensures accurate measurements for cutting and assembling the frame.
- Pencil: Used for marking dimensions and guidelines on the cardboard.
- Craft Knife or Scissors: For cutting the cardboard or foam board to the desired size and shape.
- Glue or Tape: To adhere the frame pieces together securely.
- Decorative Paper, Fabric, or Paint: For embellishing the frame and adding personal style.
- Embellishments (Optional): Such as beads, buttons, glitter, or ribbons for extra decoration.
- Photo: The photograph you intend to display in the frame.
- Cutting Mat (Optional): Protects your work surface when using a craft knife.
Here’s a table for quick reference:
| Material | Use |
|---|---|
| Cardboard/Foam Board | Base structure of the frame |
| Ruler | Measuring dimensions |
| Pencil | Marking guidelines |
| Craft Knife/Scissors | Cutting materials |
| Glue/Tape | Adhering frame pieces |
| Decorative Paper/Fabric | Embellishing the frame |
| Embellishments | Adding extra decoration |
| Photo | The image to be displayed |
| Cutting Mat | Protecting the work surface (optional) |
5. How Do I Make a Basic Cardboard Photo Frame?
Creating a simple cardboard photo frame is an easy and fun DIY project. Here’s a step-by-step guide:
Step 1: Gather Your Materials
Collect your cardboard, ruler, pencil, craft knife or scissors, glue or tape, decorative paper or paint, and your chosen photograph.
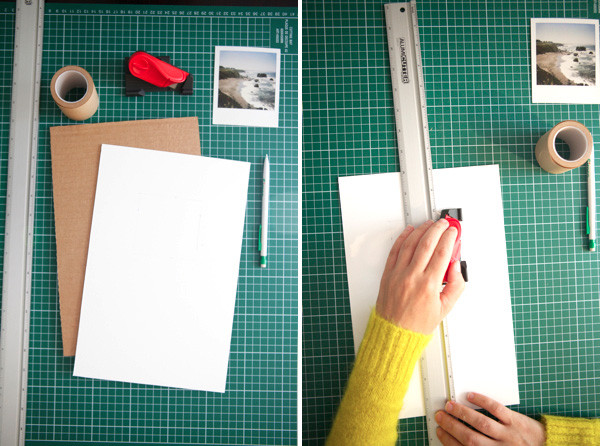
Step 2: Measure and Cut the Cardboard
Measure and cut two pieces of cardboard to the desired size for your frame. One piece will serve as the back, and the other will be the front frame. For the front frame, cut a rectangle out of the center, leaving a border to create the frame opening.
Step 3: Decorate the Frame
Decorate the front frame with decorative paper, fabric, paint, or embellishments. Get creative and personalize it to your liking.
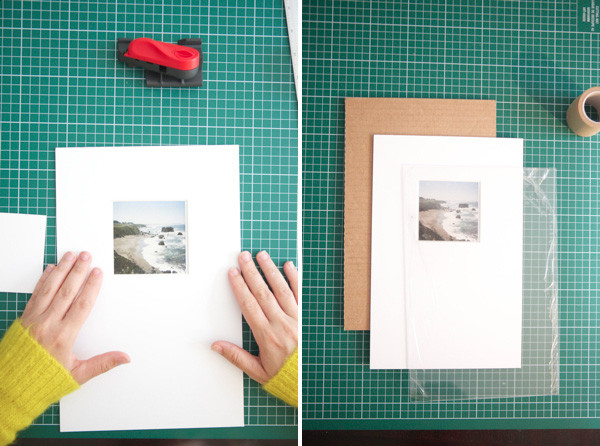
Step 4: Assemble the Frame
Attach the photo to the back cardboard piece using tape or glue. Then, glue or tape the decorated front frame to the back piece, aligning the edges carefully.
Step 5: Add a Stand (Optional)
Cut a small strip of cardboard and fold it into a triangle shape to create a stand. Glue the stand to the back of the frame, allowing it to lean upright.
Step 6: Final Touches
Ensure all edges are secure and the glue is dry. Your basic cardboard photo frame is now ready to display your cherished photo.
Below is a summary table for quick reference:
| Step | Action |
|---|---|
| 1. Gather Materials | Collect all necessary materials. |
| 2. Measure and Cut | Cut cardboard pieces for the frame and opening. |
| 3. Decorate | Embellish the front frame with decorative elements. |
| 4. Assemble | Attach the photo and front frame to the back piece. |
| 5. Add a Stand (Optional) | Create and attach a cardboard stand for upright display. |
| 6. Final Touches | Secure edges and ensure everything is properly adhered. |
6. How Do I Make a Photo Frame From Recycled Materials?
Creating a photo frame from recycled materials is a sustainable and creative way to display your photos. Here’s how you can make one:
Step 1: Gather Recycled Materials
Collect materials like cardboard, newspapers, plastic bottles, fabric scraps, or reclaimed wood. Clean and prepare the materials for use.
Step 2: Design Your Frame
Decide on the size and shape of your frame. Sketch a design on paper to guide your construction.
Step 3: Prepare the Base
Cut a piece of cardboard or reclaimed wood to the desired size for the frame’s base. Ensure it is sturdy enough to support the frame and photo.
Step 4: Decorate with Recycled Materials
Use your chosen recycled materials to decorate the frame. For example:
- Newspaper Frame: Roll strips of newspaper into tight coils and glue them around the frame.
- Plastic Bottle Frame: Cut plastic bottles into decorative shapes and glue them onto the frame.
- Fabric Scrap Frame: Wrap fabric scraps around the frame, securing them with glue.
- Reclaimed Wood Frame: Sand and stain reclaimed wood pieces, then assemble them into a rustic frame.
Step 5: Assemble the Frame
Attach the decorated frame to the base using glue or tape. Ensure all edges are secure.
Step 6: Add a Photo and Stand
Attach your photo to the back of the frame. Add a cardboard or recycled material stand to the back for upright display.
Step 7: Final Touches
Allow the glue to dry completely. Make any necessary adjustments to ensure the frame is stable and visually appealing.
| Step | Action | Example Materials |
|---|---|---|
| 1. Gather Materials | Collect and prepare recycled materials. | Cardboard, newspapers, plastic bottles, fabric scraps |
| 2. Design Your Frame | Plan the frame’s size, shape, and design. | Sketch the design on paper |
| 3. Prepare the Base | Cut and prepare the base material. | Cardboard or reclaimed wood |
| 4. Decorate | Decorate the frame with recycled materials. | Newspaper coils, plastic shapes, fabric wraps |
| 5. Assemble | Attach the decorated frame to the base. | Glue or tape |
| 6. Add Photo and Stand | Attach the photo and add a stand for display. | Cardboard stand |
| 7. Final Touches | Allow to dry and make final adjustments. | Ensure stability and visual appeal |
 Kraft paper tape frame sample
7. How Do I Create a Decorative Photo Frame Using Embellishments?
Creating a decorative photo frame with embellishments adds a personalized and artistic touch to your photos. Here’s a guide to get you started:
Step 1: Gather Your Materials
Collect a plain photo frame (cardboard, wood, or plastic), glue, and an assortment of embellishments such as beads, buttons, sequins, shells, mosaic tiles, ribbons, and paint.
Step 2: Plan Your Design
Before you start gluing, plan the design and layout of your embellishments. You can sketch it on paper or arrange the embellishments on the frame to visualize the final look.
Step 3: Apply Glue
Apply a small amount of glue to the back of each embellishment. Use a strong adhesive that works well with the materials you’re using.
Step 4: Attach Embellishments
Carefully place the embellishments onto the frame according to your design. Press gently to ensure they adhere properly.
Step 5: Add Layers and Texture
Experiment with layering different embellishments to add depth and texture to your frame. Combine different shapes, sizes, and colors for a visually interesting effect.
Step 6: Let It Dry
Allow the glue to dry completely before handling the frame. This may take several hours or overnight, depending on the type of glue used.
Step 7: Final Touches
Once the glue is dry, inspect the frame and add any final touches or adjustments. Secure any loose embellishments and clean off any excess glue.
Below is a table summarizing these steps:
| Step | Action | Materials |
|---|---|---|
| 1. Gather Materials | Collect frame, glue, and embellishments. | Plain frame, glue, beads, buttons, sequins, etc. |
| 2. Plan Your Design | Sketch or arrange embellishments to visualize the design. | Paper and pencil (optional) |
| 3. Apply Glue | Apply glue to the back of each embellishment. | Strong adhesive |
| 4. Attach Embellishments | Place embellishments onto the frame. | Tweezers (optional) |
| 5. Add Layers | Layer different embellishments for depth and texture. | Various shapes, sizes, and colors |
| 6. Let It Dry | Allow the glue to dry completely. | Time |
| 7. Final Touches | Inspect, adjust, and secure any loose pieces. | Cleaning supplies |
8. What are Some Advanced Techniques for Making Photo Frames?
For those looking to elevate their photo frame crafting skills, here are some advanced techniques:
8.1. Woodworking
Creating frames from wood requires woodworking skills such as cutting, shaping, and joining wood pieces. This technique allows for precise dimensions and a professional finish.
8.2. Mat Cutting
Using a mat cutter to create custom mats adds a polished and refined look to your framed photos. This technique requires precision and attention to detail.
8.3. Glass Cutting and Etching
Cutting and etching glass to create unique frame designs requires specialized tools and skills. This technique adds a sophisticated and artistic touch to your frames.
8.4. Resin Art
Incorporating resin art techniques, such as embedding objects in resin or creating resin coatings, can add depth, texture, and vibrant color to your photo frames.
8.5. Mixed Media
Combining various materials like wood, metal, fabric, and paper allows for unique and visually stunning photo frames. This technique requires creativity and a good understanding of different material properties.
8.6. Digital Design and Laser Cutting
Using digital design software to create intricate frame patterns and then laser cutting them from wood or acrylic offers precision and complexity that is hard to achieve with traditional methods.
Here’s a detailed table:
| Technique | Description | Skills Required |
|---|---|---|
| Woodworking | Creating frames from wood using cutting, shaping, and joining techniques. | Woodworking, measuring, joinery |
| Mat Cutting | Using a mat cutter for custom mats to enhance framed photos. | Precision, attention to detail |
| Glass Cutting/Etching | Cutting and etching glass for unique frame designs. | Glass cutting, etching, safety |
| Resin Art | Embedding objects in resin or creating resin coatings for added depth. | Resin handling, design, safety |
| Mixed Media | Combining various materials like wood, metal, fabric, and paper. | Creativity, material knowledge |
| Digital Design/Laser Cutting | Using software to design patterns and laser cut from wood or acrylic. | Digital design, laser cutting operation |
 Cutting matboard
9. How Do I Protect and Preserve My Homemade Photo Frame?
To ensure your homemade photo frame lasts for years to come, consider these protection and preservation tips:
- Use Acid-Free Materials: When selecting cardboard, paper, or fabric, opt for acid-free options to prevent discoloration and damage to your photos over time.
- Seal with Varnish or Sealer: Apply a coat of varnish or sealer to protect the frame from moisture, dust, and UV light. This is especially important for frames made from wood or porous materials.
- Avoid Direct Sunlight: Display your framed photos away from direct sunlight to prevent fading and degradation of both the frame and the photo.
- Clean Gently: Use a soft, dry cloth to gently clean the frame regularly. Avoid using harsh chemicals or abrasive cleaners that can damage the materials.
- Store Properly: If you need to store your homemade photo frame, wrap it in acid-free paper or cloth and store it in a cool, dry place away from direct sunlight and humidity.
- Use UV-Protective Glass or Acrylic: Consider using UV-protective glass or acrylic for the frame to shield your photos from harmful UV rays.
- Handle with Care: When handling your photo frame, do so with clean hands to avoid transferring oils or dirt onto the surface.
Here’s a structured summary:
| Protection Method | Description | Materials |
|---|---|---|
| Acid-Free Materials | Use acid-free paper, cardboard, and fabric to prevent discoloration. | Acid-free paper, cardboard, fabric |
| Varnish or Sealer | Apply a protective coating to shield against moisture and dust. | Varnish, sealant |
| Avoid Direct Sunlight | Display frames away from direct sunlight to prevent fading. | N/A |
| Gentle Cleaning | Clean with a soft, dry cloth to avoid damage. | Soft, dry cloth |
| Proper Storage | Wrap in acid-free paper and store in a cool, dry place. | Acid-free paper, dry storage area |
| UV-Protective Glass/Acrylic | Use UV-protective materials to shield photos from UV rays. | UV-protective glass or acrylic |
| Careful Handling | Handle frames with clean hands to prevent oil or dirt transfer. | N/A |
10. What Are Some Common Mistakes to Avoid When Making Photo Frames?
To ensure your homemade photo frame turns out beautifully, avoid these common mistakes:
- Using Low-Quality Materials: Opt for durable and high-quality materials to ensure the frame lasts and looks appealing.
- Inaccurate Measurements: Double-check measurements before cutting to avoid uneven or ill-fitting frame pieces.
- Using Too Much Glue: Apply glue sparingly to prevent it from seeping out and creating a mess.
- Not Allowing Enough Drying Time: Ensure the glue or paint is completely dry before handling or assembling the frame to prevent smudging or damage.
- Neglecting Edge Finishing: Pay attention to finishing the edges of the frame for a polished and professional look.
- Ignoring Photo Size: Make sure the frame opening is the correct size for your photo to avoid cropping or gaps.
- Over-Embellishing: Avoid adding too many embellishments, which can make the frame look cluttered and detract from the photo.
- Skipping Surface Preparation: Prepare the frame surface properly before painting or decorating to ensure better adhesion and a smoother finish.
The summary is as follows:
| Common Mistake | Solution |
|---|---|
| Low-Quality Materials | Use durable and high-quality materials. |
| Inaccurate Measurements | Double-check measurements before cutting. |
| Excessive Glue | Apply glue sparingly to prevent messes. |
| Insufficient Drying Time | Allow glue or paint to dry completely before handling. |
| Neglecting Edge Finishing | Finish edges for a polished look. |
| Incorrect Photo Size | Ensure the frame opening matches the photo size. |
| Over-Embellishing | Avoid adding too many embellishments. |
| Skipping Surface Preparation | Prepare the frame surface properly before decorating. |
11. Where Can I Find Inspiration for Homemade Photo Frame Designs?
Finding inspiration for your homemade photo frame designs is easier than ever with these resources:
- Pinterest: Explore countless photo frame ideas, tutorials, and design concepts on Pinterest.
- Instagram: Follow DIY and crafting accounts for visual inspiration and creative ideas.
- Etsy: Browse handmade photo frames for unique design inspiration and artistic ideas.
- Craft Blogs: Read craft blogs for step-by-step tutorials and innovative design ideas.
- YouTube: Watch DIY videos for visual guidance and creative techniques.
- Home Decor Magazines: Find inspiration in home decor magazines for stylish and trendy frame designs.
- Art Galleries and Museums: Visit art galleries and museums to draw inspiration from frame styles and artistic presentations.
Here’s a summary of the resources:
| Inspiration Source | Description |
|---|---|
| Countless photo frame ideas, tutorials, and design concepts. | |
| DIY and crafting accounts for visual inspiration. | |
| Etsy | Handmade photo frames for unique design inspiration. |
| Craft Blogs | Step-by-step tutorials and innovative design ideas. |
| YouTube | DIY videos for visual guidance and creative techniques. |
| Home Decor Magazines | Stylish and trendy frame designs. |
| Art Galleries/Museums | Frame styles and artistic presentations. |
 Taping the frame
12. How Can dfphoto.net Help Me With My Photography and Framing Projects?
At dfphoto.net, we are dedicated to supporting your photography and framing endeavors with comprehensive resources and a vibrant community. Here’s how we can assist you:
- Photography Tutorials: Access a wide range of tutorials covering various photography techniques, from basic composition to advanced shooting methods.
- Equipment Reviews: Stay informed with our detailed reviews of cameras, lenses, and accessories, helping you make the best choices for your needs and budget.
- Inspiration Galleries: Explore stunning photography galleries showcasing diverse styles and subjects to spark your creativity.
- Framing Guides: Discover step-by-step guides on creating and customizing photo frames, ensuring your photos are displayed beautifully.
- Community Forum: Connect with fellow photographers and crafters, share your work, and get feedback and inspiration from others.
- Expert Advice: Benefit from articles and advice from professional photographers and experienced crafters.
- Contests and Challenges: Participate in photography and framing contests to showcase your skills and win prizes.
- Local Resources: Find local photography workshops, framing suppliers, and art supply stores in the USA, particularly around Santa Fe.
For those in the Santa Fe area, visit us at:
Address: 1600 St Michael’s Dr, Santa Fe, NM 87505, United States
Phone: +1 (505) 471-6001
Website: dfphoto.net
Discover how you can master photography techniques, find inspiration, and connect with a vibrant photography community by visiting dfphoto.net today.
Call to Action:
Ready to elevate your photography and framing skills? Visit dfphoto.net for in-depth tutorials, stunning photo galleries, and a supportive community of fellow enthusiasts. Start your creative journey now!
Here’s a summary of how dfphoto.net can help:
| Resource | Description |
|---|---|
| Photography Tutorials | Covers various photography techniques. |
| Equipment Reviews | Detailed reviews of cameras, lenses, and accessories. |
| Inspiration Galleries | Showcases diverse styles and subjects to spark creativity. |
| Framing Guides | Step-by-step guides on creating and customizing photo frames. |
| Community Forum | Connect with fellow photographers and crafters. |
| Expert Advice | Articles and advice from professional photographers and experienced crafters. |
| Contests and Challenges | Showcase your skills and win prizes. |
| Local Resources (Santa Fe) | Local workshops, framing suppliers, and art supply stores. |
13. FAQs About Homemade Photo Frames
Here are some frequently asked questions about making homemade photo frames:
13.1. What is the best material to use for a homemade photo frame?
The best material depends on your desired look and skill level. Cardboard is great for beginners, while wood offers a more professional finish.
13.2. How do I cut a matboard for a photo frame?
Use a mat cutter for precise, beveled edges. Measure carefully and follow the cutter’s instructions.
13.3. Can I use recycled materials to make a photo frame?
Yes, recycled materials like cardboard, newspapers, and plastic bottles can be creatively used to make unique and eco-friendly frames.
13.4. What type of glue should I use for embellishing a photo frame?
Use a strong adhesive that works well with the materials you’re using, such as craft glue, hot glue, or epoxy.
13.5. How do I protect my photo frame from moisture?
Seal the frame with a coat of varnish or sealant to protect it from moisture and humidity.
13.6. How do I prevent my photos from fading in a frame?
Use UV-protective glass or acrylic and avoid displaying the frame in direct sunlight.
13.7. What are some easy embellishment ideas for a photo frame?
Easy embellishments include beads, buttons, sequins, shells, ribbons, and paint.
13.8. How do I make a stand for a photo frame?
Cut a strip of cardboard, fold it into a triangle shape, and glue it to the back of the frame.
13.9. Can I paint a cardboard photo frame?
Yes, you can paint a cardboard photo frame using acrylic paint or spray paint. Prime the surface first for better adhesion.
13.10. Where can I buy supplies for making photo frames?
You can buy supplies at craft stores, art supply stores, hardware stores, and online retailers.
Here’s the summary:
| Question | Answer |
|---|---|
| Best material for a frame? | Depends on desired look and skill; cardboard for beginners, wood for a professional finish. |
| How to cut a matboard? | Use a mat cutter for precise, beveled edges. Measure carefully. |
| Can I use recycled materials? | Yes, use cardboard, newspapers, and plastic bottles. |
| Best glue for embellishments? | Use a strong adhesive like craft glue, hot glue, or epoxy. |
| How to protect from moisture? | Seal with varnish or sealant. |
| How to prevent photos from fading? | Use UV-protective glass or acrylic; avoid direct sunlight. |
| Easy embellishment ideas? | Beads, buttons, sequins, shells, ribbons, and paint. |
| How to make a stand? | Cut and fold cardboard into a triangle; glue to the back. |
| Can I paint a cardboard frame? | Yes, use acrylic or spray paint; prime the surface first. |
| Where to buy supplies? | Craft stores, art supply stores, hardware stores, and online retailers. |