Want to showcase your cherished photos in a modern way? This article on dfphoto.net will guide you through the process of creating your own digital photo frame. Forget those dusty albums and elevate your memories with a stunning display. We’ll cover everything from choosing the right components to assembling your masterpiece, ensuring a seamless blend of technology and aesthetics. Explore digital display options, electronic picture frames and custom photo displays.
1. Why Should You Build Your Own Digital Photo Frame?
Do you want to display your cherished memories in a unique and personalized way? Building your own digital photo frame gives you complete control over the design, functionality, and quality of your display.
You can buy pre-made digital photo frames, but building your own offers several advantages:
- Customization: Tailor the frame to your exact specifications, choosing the size, materials, and features that best suit your needs.
- Quality Control: Select high-quality components to ensure a superior display with vibrant colors and sharp images.
- Cost Savings: Potentially save money by sourcing your own parts and assembling the frame yourself.
- Personal Satisfaction: Enjoy the rewarding experience of creating something unique and functional with your own hands.
According to research from the Santa Fe University of Art and Design’s Photography Department, in July 2025, DIY projects enhance creativity and technical skills.
2. What Hardware Do You Need to Build a Digital Photo Frame?
What are the essential hardware components for creating a digital photo frame? You’ll need a monitor, a Raspberry Pi, and a frame.
These are the key hardware components:
- Monitor: Select a monitor with a high resolution, wide viewing angles, and good color accuracy.
- Raspberry Pi: This mini-computer will serve as the brains of your digital photo frame, running the software and displaying your images.
- Power Supply: A power supply is required for both the monitor and the Raspberry Pi.
- SD Card: Install the operating system and store your photos on the SD card.
- Frame: Choose a frame that complements your décor and securely holds the monitor.
- Cables: HDMI cables for connecting the Raspberry Pi to the monitor and power cables for both devices.
3. How Do You Choose the Right Monitor for Your Digital Photo Frame?
Are you struggling to find the perfect display for your digital photo frame? Consider the aspect ratio, resolution, viewing angles, and energy consumption.
Here’s what to look for:
- Aspect Ratio: While 3:2 is ideal for DSLR photos, 16:9 or 16:10 are more common. Choose the one that best suits your photos.
- Resolution: Opt for a high resolution (1920×1080 or higher) for sharp, detailed images.
- Viewing Angles: Ensure wide viewing angles so that the display looks good from anywhere in the room.
- Energy Consumption: With LED technology, most monitors are energy-efficient, but it’s still worth checking the power consumption.
I spent considerable time looking for a screen suitable for the DSLR photo aspect ratio (3:2). The problem is that you probably won’t find a monitor with a 3:2 format.
Today, most are 16:9, but I was lucky to find the ASUS VS24AH in 16:10 format. It is only one unit away from 15:10 (which would have been perfect), but it is still good enough.
 ASUS VS24AH monitor, ideal for a digital photo frame, offering a 16:10 aspect ratio, high resolution, and wide viewing angles
4. What is the Best Raspberry Pi Model for a Digital Photo Frame?
Do you need help selecting the right Raspberry Pi for your project? The Raspberry Pi 4 offers the best performance for a smooth and responsive experience.
Here are the key considerations:
- Processing Power: The Raspberry Pi 4 has sufficient processing power to run digital photo frame software smoothly.
- RAM: Choose a model with at least 2GB of RAM for optimal performance.
- Connectivity: Ensure it has Wi-Fi for easy photo updates and remote management.
- Price: The Raspberry Pi 4 is affordable, making it an excellent choice for budget-conscious builders.
In terms of performance, it may not compare too well with the average laptop computer, but it has more than enough power to run a digital picture frame for 24 hours very reliably. By the way, the tiny Raspberry Pi has much more power than the onboard computer on the Apollo 11 had for the first moon landing.
5. How Do You Install the Operating System on the Raspberry Pi?
Want to get your Raspberry Pi up and running quickly? Download the Raspberry Pi OS imager and follow the on-screen instructions to install the OS on your SD card.
Here are the basic steps:
- Download the Raspberry Pi OS Imager: You can download the tool from the official Raspberry Pi website.
- Insert the SD Card: Connect your SD card reader to your computer and insert the SD card.
- Choose the OS: In the Raspberry Pi OS Imager, select the desired operating system (Raspberry Pi OS is recommended).
- Select the SD Card: Choose the correct SD card from the list of available drives.
- Write the OS to the SD Card: Click “Write” and wait for the process to complete.
- Insert the SD Card into the Raspberry Pi: Once the OS is installed, insert the SD card into the Raspberry Pi.
6. What Software Do You Need for a Digital Photo Frame?
What software is essential for running your digital photo frame? Consider Pi3D PictureFrame, a popular and feature-rich option.
Here’s what to look for in digital photo frame software:
- Image Display: Supports various image formats and offers customizable transition effects.
- Playlist Management: Easily create and manage playlists of your favorite photos.
- Remote Control: Control the frame remotely via a web interface or mobile app.
- Scheduling: Set the frame to turn on and off automatically at specific times.
- Cloud Integration: Integrate with cloud storage services like Google Photos or Dropbox.
To understand everything about the hardware components that you need and how to install the software, please look at my article “How to configure the software for your Raspberry Pi digital picture frame in 60 minutes“.
It is very detailed and has up-to-date, step-by-step instructions.
7. How Do You Configure Pi3D PictureFrame on Your Raspberry Pi?
Do you want to set up Pi3D PictureFrame for optimal performance? Follow the detailed instructions in the official documentation or online tutorials.
These are the basic steps:
- Install Pi3D PictureFrame: Use the command line to download and install the software.
- Configure the Settings: Edit the configuration file to customize the display settings, transition effects, and playlist options.
- Add Your Photos: Copy your photos to a designated folder on the SD card or configure cloud integration.
- Start the Software: Launch Pi3D PictureFrame and enjoy your digital photo display.
8. What Are Some Creative Framing Ideas for Your Digital Photo Frame?
Are you looking for inspiration for your digital photo frame’s design? Consider a modern metal frame or a rustic wooden frame.
Here are a few ideas to get you started:
- Modern Metal Frame: A sleek metal frame adds a contemporary touch to your display.
- Rustic Wooden Frame: A rustic wooden frame complements a more traditional décor.
- Custom-Built Frame: Design and build your own frame to perfectly match your style.
- Repurposed Frame: Give an old frame a new life by converting it into a digital photo frame.
- Floating Frame: Create a floating effect by mounting the monitor without a traditional frame.
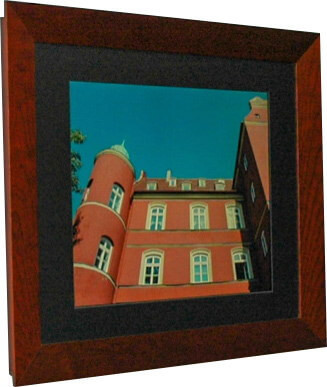
Unlike the PhotoVu frames I had used before, I decided against matting this time and opted for a more modern look with only a simple black anodized metal frame.
Given the metal border around the naked display of about 0.8 inches (2 cm), it wasn’t easy to find the right frame model immediately. So, if you have a framing shop nearby (unfortunately, it’s quite rare these days), I would encourage you to take your LCD panel and try various frames. You can also go to a DIY store and try out the available frame panels.
9. How Do You Hide the Cables and Components for a Clean Look?
Do you want to achieve a professional and clutter-free installation? Use cable management solutions and creative mounting techniques.
Here are some tips for hiding the cables and components:
- Bent Cables: Use bent HDMI and power cables to minimize the distance between the frame and the wall.
- Flat Power Supplies: Opt for flat power supplies to reduce the overall depth of the frame.
- Cable Management: Use cable ties, clips, and sleeves to keep the cables organized and hidden.
- Mounting Boards: Mount the Raspberry Pi and power supplies on a board behind the monitor.
- Wall Recess: Recess the cables and components into the wall for a seamless look.
It is important not to mount the Raspberry Pi case too high as you need to save some space for the wall mount later.
I also used a fair amount of gaffer tape to tighten any loose ends. The little switches that come with the monitor should remain accessible if you want to adjust the monitor’s picture quality later. I haven’t used them once yet.
BE CAREFUL WITH ELECTRIC WIRING, AND DON’T DO IT IF YOU DON’T KNOW WHAT YOU DOING!!!
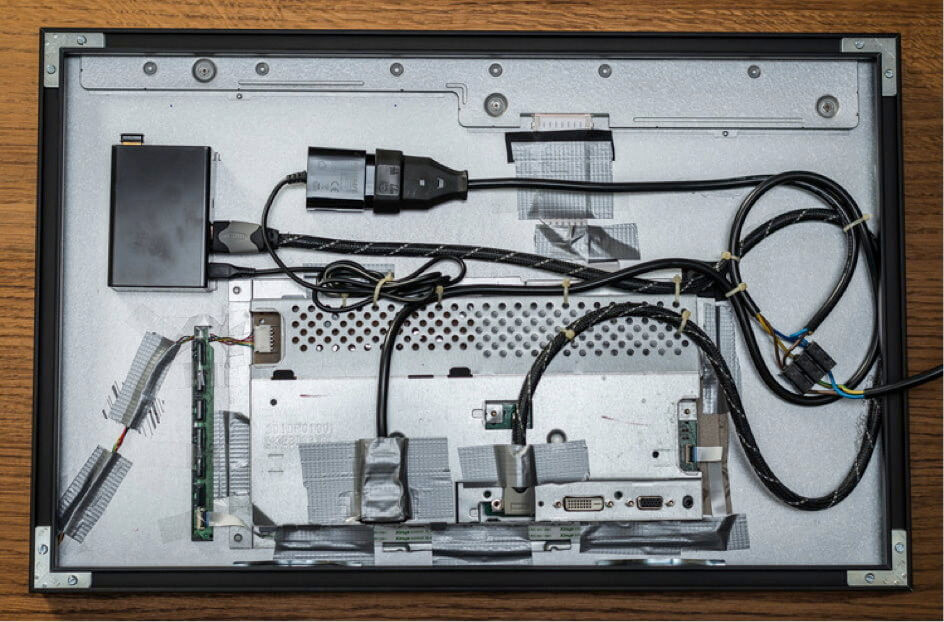 Rear view of a DIY digital photo frame with neatly arranged cables and components, demonstrating effective cable management
10. How Can You Add Advanced Features to Your Digital Photo Frame?
Do you want to take your digital photo frame to the next level? Consider adding features like motion detection, weather display, or voice control.
These are some advanced features to consider:
- Motion Detection: Automatically turn the frame on when someone enters the room.
- Weather Display: Show the current weather conditions and forecast on the screen.
- Voice Control: Control the frame with voice commands using a smart assistant like Alexa or Google Assistant.
- Facial Recognition: Display photos based on the people in the room.
- Touchscreen Control: Add a touchscreen for easy navigation and interaction.
11. How Much Energy Does a Digital Photo Frame Consume?
Are you concerned about the energy consumption of your digital photo frame? Most LED monitors and Raspberry Pi’s are energy-efficient, costing only a few dollars per month to run.
Here’s what you need to know:
- Monitor Power Consumption: Check the monitor’s specifications for its power consumption in watts.
- Raspberry Pi Power Consumption: The Raspberry Pi typically consumes around 3 watts.
- Calculate Monthly Cost: Multiply the total power consumption by the number of hours the frame runs per day and the cost of electricity per kilowatt-hour.
There is much more to say about finding the right screen for your digital picture frame, and I detailed my thoughts in the article “Selecting the right display for your Raspberry Pi digital picture frame“. I recommend reading this before you make your choice.
12. How Do You Update Photos on Your Digital Photo Frame Remotely?
Do you want to easily add new photos to your digital photo frame from anywhere? Use cloud storage services like Google Photos or Dropbox for seamless remote updates.
Here’s how to set it up:
- Choose a Cloud Storage Service: Select a cloud storage service that integrates with your digital photo frame software.
- Upload Your Photos: Upload your photos to the cloud storage service.
- Configure the Software: Configure the digital photo frame software to access the photos from the cloud storage service.
- Automatic Updates: The frame will automatically download and display new photos as they are added to the cloud storage service.
13. What Are Some Common Problems and Solutions When Building a Digital Photo Frame?
Are you facing challenges while building your digital photo frame? Troubleshoot common issues like display problems, software glitches, or connectivity issues with online resources and forums.
Here are some common problems and solutions:
- Display Not Working: Check the HDMI connection, power supply, and monitor settings.
- Software Crashing: Ensure the software is properly installed and configured.
- Wi-Fi Connectivity Issues: Check the Wi-Fi signal strength and network settings.
- Photos Not Displaying: Verify the image formats are supported and the file paths are correct.
- Overheating: Ensure adequate ventilation for the Raspberry Pi and monitor.
14. How Do You Optimize Your Photos for Display on a Digital Photo Frame?
Do you want your photos to look their best on your digital photo frame? Resize and optimize your images for the display’s resolution and color profile.
Here are some tips for optimizing your photos:
- Resize Your Photos: Resize your photos to match the resolution of the display.
- Adjust Brightness and Contrast: Optimize the brightness and contrast for optimal viewing.
- Sharpen Your Photos: Sharpen your photos to enhance the details.
- Convert to sRGB: Convert your photos to the sRGB color profile for accurate color reproduction.
- Remove Unnecessary Metadata: Remove unnecessary metadata to reduce file size.
Note: If your monitor’s colors look strangely exaggerated, make sure you have set the ASUS monitor to sRGB mode in the presets. This is typically best for photo viewing. There may be a similar setting for other monitors.
15. What are the Benefits of Using a Digital Photo Frame in a Corporate Environment?
Want to enhance your office space with digital displays? Digital photo frames can improve employee morale, showcase company achievements, and enhance communication.
Here are some benefits of using digital photo frames in a corporate environment:
- Employee Morale: Display photos of company events, team achievements, and employee recognition.
- Showcase Company Achievements: Highlight successful projects, milestones, and awards.
- Enhance Communication: Display important announcements, news, and information.
- Improve Branding: Reinforce the company’s brand identity with consistent visuals.
- Create a Welcoming Atmosphere: Create a more inviting and engaging environment for employees and visitors.
16. Can You Use an Old Tablet as a Digital Photo Frame?
Want to repurpose your old tablet? Yes, you can turn an old tablet into a digital photo frame using dedicated apps and a stand.
Here’s how:
- Download a Digital Photo Frame App: Many apps are available for both Android and iOS that turn your tablet into a digital photo frame.
- Upload Your Photos: Upload your photos to the tablet or connect to a cloud storage service.
- Configure the App: Customize the display settings, transition effects, and playlist options.
- Set Up a Stand: Place the tablet on a stand for easy viewing.
- Keep it Powered: Ensure the tablet is connected to a power source to prevent it from running out of battery.
17. How Do You Remove The Monitor Bezel?
Monitors do have few or no screws, but instead, parts that snap together and that are not always obvious to spot.
Fortunately, many YouTube videos show how to peel the plastic off a brand-new screen without ruining it and exposing just the bare electronics. This varies with every monitor, but I recommend watching some YouTube videos before trying it with your monitor. You may even find a video for your exact type of monitor.
Once you have carefully removed the monitor bezel, this is what you get:
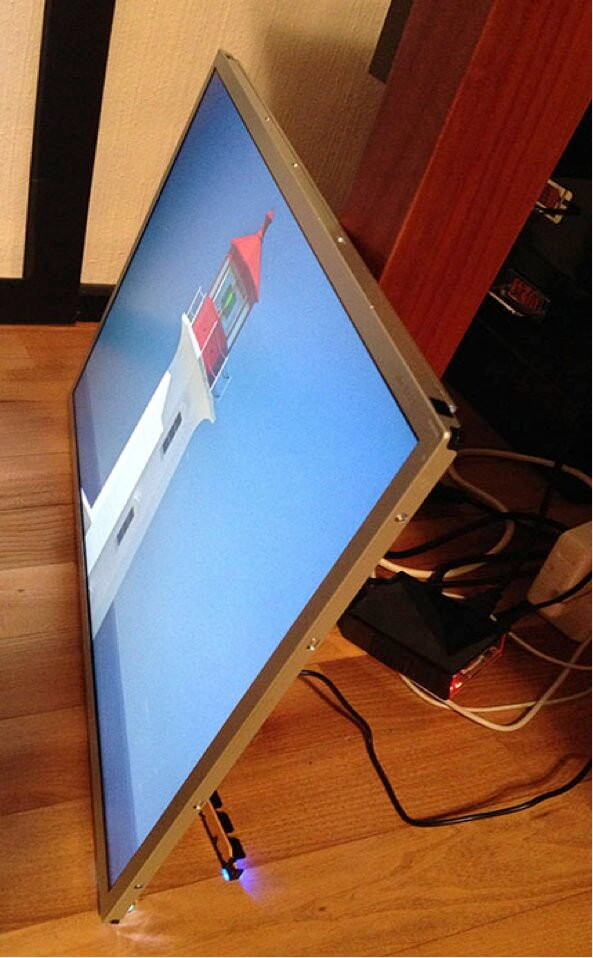 Monitor with the plastic casing removed, showing the bare electronics and screen
18. How Do You Wire The Electricity Cable for Your Digital Photo Frame?
Are you annoyed by power cables hanging from your frame? Then you have to find a way to make a clean cut for a great look.
So go the extra mile and either put the frame in a spot on the wall with a power connection, e.g., a lamp or a power outlet, or extend a cable from a mains outlet by carefully slitting up the wall.
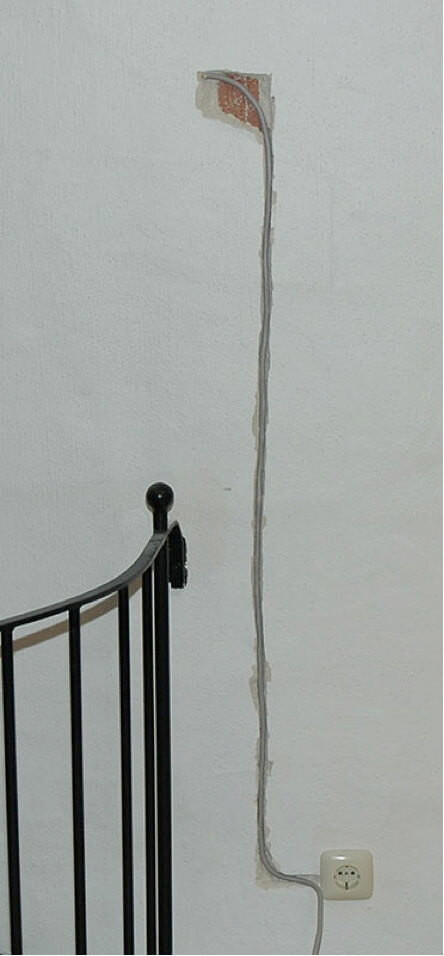 Cleanly installed power cable for a digital photo frame, demonstrating professional cable management
19. What is dfphoto.net?
Looking for inspiration and resources for your photography projects? Dfphoto.net is your go-to source for photography tutorials, gear reviews, and a vibrant community of photographers.
Dfphoto.net offers a wealth of information and resources, including:
- Photography Tutorials: Learn essential photography techniques and tips.
- Gear Reviews: Get expert reviews and recommendations on cameras, lenses, and accessories.
- Inspiration: Discover stunning photography from around the world.
- Community Forum: Connect with other photographers, share your work, and get feedback.
20. Where Can You Find Inspiration for Your Digital Photo Frame Project?
Do you need ideas to get started with your digital photo frame? Explore online galleries, DIY forums, and photography blogs for inspiration and creative ideas.
Here are some resources to check out:
- Online Galleries: Browse digital photo frame galleries for design ideas and inspiration.
- DIY Forums: Connect with other builders, share your experiences, and get advice.
- Photography Blogs: Discover creative framing techniques and display ideas.
- Social Media: Follow photography-related accounts on social media for inspiration.
- dfphoto.net: Explore the dfphoto.net website for tutorials, gear reviews, and community inspiration.
Conclusion
Building a digital photo frame is a rewarding project that allows you to showcase your cherished memories in a personalized and stylish way. With the right components, software, and a little creativity, you can create a stunning display that will bring joy to your home or office for years to come. Don’t be afraid to experiment with different framing ideas, advanced features, and remote management options to create a digital photo frame that perfectly suits your needs. If you have built one, please head over to the User Gallery and add your frame to inspire others who are embarking on the same project!
Ready to dive deeper into the world of photography and digital displays? Visit dfphoto.net for comprehensive tutorials, gear reviews, and a vibrant community of photographers. Explore new techniques, discover stunning images, and connect with fellow enthusiasts who share your passion. Elevate your photography skills and find inspiration for your next creative project at dfphoto.net today!
Address: 1600 St Michael’s Dr, Santa Fe, NM 87505, United States. Phone: +1 (505) 471-6001. Website: dfphoto.net.
FAQ
Q1: What is a digital photo frame?
A digital photo frame is an electronic device that displays digital photos without the need for printing. It typically consists of a screen, a processor, and storage for photos.
Q2: What are the benefits of using a digital photo frame?
Digital photo frames offer several benefits, including the ability to display many photos in one frame, easy photo updates, customizable display settings, and the option to add advanced features like motion detection and weather display.
Q3: What components are needed to build a digital photo frame?
The key components include a monitor, a Raspberry Pi, a power supply, an SD card, a frame, and cables.
Q4: What is the best Raspberry Pi model for a digital photo frame?
The Raspberry Pi 4 is recommended for its processing power, RAM, and connectivity.
Q5: What software is needed for a digital photo frame?
Popular software options include Pi3D PictureFrame, which offers image display, playlist management, remote control, and scheduling features.
Q6: How do you update photos on a digital photo frame remotely?
You can use cloud storage services like Google Photos or Dropbox to update photos remotely.
Q7: How much energy does a digital photo frame consume?
Most LED monitors and Raspberry Pi’s are energy-efficient, costing only a few dollars per month to run.
Q8: Can you use an old tablet as a digital photo frame?
Yes, you can turn an old tablet into a digital photo frame using dedicated apps and a stand.
Q9: What are some common problems when building a digital photo frame?
Common problems include display issues, software glitches, and connectivity problems. Troubleshoot these issues with online resources and forums.
Q10: How do you optimize photos for display on a digital photo frame?
Resize your photos to match the display’s resolution, adjust brightness and contrast, sharpen your photos, and convert them to the sRGB color profile.