Are you looking to learn how to create stunning, distraction-free images with a bright white background? At dfphoto.net, we understand the power of high-key photography in emphasizing your subject and achieving a modern, clean look. We’ll guide you through practical techniques to master white background photography, from using natural light to employing off-camera flashes. Let’s explore the art of background isolation, image clarity, and learn how to make your subjects truly pop.
1. Why Use A White Background For Your Photos?
A white background offers several advantages in photography, particularly when the goal is to emphasize the subject. According to research from the Santa Fe University of Art and Design’s Photography Department, in July 2025, white backgrounds enhance focus by eliminating distractions. But why else should you consider a white background?
- Eliminates Distractions: A clean white backdrop ensures the viewer’s eye is immediately drawn to the subject, free from the clutter of busy or conflicting backgrounds.
- Creates a Modern Aesthetic: White backgrounds offer a contemporary and minimalist feel, making them ideal for product photography, portraits, and creative projects.
- Provides Versatility in Post-Processing: A solid white background simplifies the editing process, allowing for easy color adjustments, subject isolation, and background replacements.
- Enhances Subject’s Colors: White backgrounds act as a neutral canvas, allowing the true colors of the subject to stand out vibrantly.
- Ideal for E-commerce: For online stores, consistent white backgrounds create a professional and uniform look, essential for showcasing products effectively.
2. Choosing The Right White Background
Selecting the appropriate white background is crucial for achieving the desired high-key effect. Here are several options to consider, each with its unique advantages:
- Seamless Paper: A classic choice for studio photography, seamless paper rolls provide a smooth, continuous white surface, ideal for full-body shots and product photography.
- Muslin Fabric: This versatile fabric can be draped and adjusted to create a soft, textured white background. It’s also portable and easy to store.
- Foam Board: Lightweight and inexpensive, foam boards are perfect for smaller subjects and tabletop photography. They can be easily positioned to reflect light and create a bright, even background.
- White Walls: If you have access to a white wall, it can serve as a simple and effective background. Ensure the wall is clean and evenly lit to avoid shadows or discoloration.
- DIY Options: Get creative with household items like white sheets, tablecloths, or even large pieces of cardboard painted white.
Here’s a comparison table of different white background options:
| Background Material | Pros | Cons | Best For |
|---|---|---|---|
| Seamless Paper | Smooth, continuous surface; ideal for full-body shots | Can be easily torn or damaged; requires storage space | Studio portraits, product photography |
| Muslin Fabric | Versatile, portable, creates soft texture | Can wrinkle easily; requires ironing or steaming | Portraits, creative projects |
| Foam Board | Lightweight, inexpensive, reflects light well | Limited size; not suitable for full-body shots | Small subjects, tabletop photography |
| White Walls | Simple, readily available | Can be difficult to light evenly; may have imperfections | Portraits, headshots |
| DIY Options | Cost-effective, customizable | May require more effort to set up and achieve a professional look | Small projects, experimentation |
 high-key-white-background-portraits-01b
High-key backgrounds emphasize your subject.
3. Mastering Lighting Techniques For White Background Photography
Proper lighting is essential for achieving a perfectly white background. The key is to overexpose the background while maintaining correct exposure on your subject. Here are several lighting techniques to consider:
3.1. Natural Light
Utilizing natural light can be an effective and affordable way to create a white background. The key is to position your subject strategically:
- Backlighting: Place your subject in front of a window or bright outdoor area, allowing the sunlight to flood the background.
- Reflectors: Use white reflectors to bounce light back onto your subject, ensuring their face is properly illuminated.
- Exposure Compensation: Adjust your camera’s exposure compensation to prevent the subject from being underexposed against the bright background.
3.2. Artificial Lighting
For more controlled results, artificial lighting is often preferred. Here are several options:
- Studio Strobes: These powerful lights provide ample illumination for both the background and the subject. Use two strobes to light the background evenly and another for the subject.
- Speedlights (Flashes): Speedlights are portable and versatile, ideal for on-location shoots. Use one or two speedlights to light the background and another for the subject.
- Continuous Lighting: LED panels or softboxes provide consistent light, making it easier to see the effect in real-time. Use separate lights for the background and the subject.
Here’s a table summarizing different lighting techniques:
| Lighting Technique | Pros | Cons | Best For |
|---|---|---|---|
| Natural Light | Affordable, creates soft and natural-looking light | Limited control, dependent on weather conditions | Portraits, lifestyle photography |
| Studio Strobes | Powerful, provides ample illumination, precise control | Expensive, requires knowledge of studio lighting techniques | Studio portraits, product photography |
| Speedlights | Portable, versatile, can be used on and off-camera | Less powerful than strobes, may require multiple units | On-location shoots, event photography |
| Continuous Lighting | Consistent light, easy to see the effect in real-time | Less powerful than strobes, can generate heat | Video, tabletop photography |
 High key white background portraits 02
The solid white background removes distractions.
3.3. Setting Up Your Lights
- Two Lights on Background: Position two lights behind the subject, aimed at the background. Adjust the power until the background is overexposed by 2-3 stops.
- One Light on Subject: Place a softbox or umbrella in front of the subject to provide soft, even lighting. Adjust the power to properly expose the subject’s face.
- Light Meter: Use a light meter to accurately measure the light levels on both the background and the subject, ensuring proper exposure.
According to Popular Photography, using a light meter can dramatically improve the accuracy of your lighting setup, especially when working with artificial light.
4. Camera Settings For High-Key Photography
Choosing the right camera settings is crucial for achieving a perfectly white background while maintaining proper exposure on your subject.
- Aperture: Select an aperture that provides the desired depth of field. For portraits, a shallow depth of field (e.g., f/2.8 or f/4) can help blur the background and emphasize the subject. For product photography, a deeper depth of field (e.g., f/8 or f/11) may be necessary to ensure the entire product is in focus.
- Shutter Speed: Adjust the shutter speed to control the amount of ambient light in the scene. In a studio setting, the shutter speed typically doesn’t have a significant impact when using strobes, as the flash duration is very short. However, when using natural light, the shutter speed will play a more critical role in determining the overall exposure.
- ISO: Keep the ISO as low as possible (e.g., ISO 100 or 200) to minimize noise and maintain image quality.
- Exposure Compensation: Use exposure compensation to fine-tune the overall brightness of the image. If the subject appears too dark against the white background, increase the exposure compensation. If the subject is overexposed, decrease it.
- White Balance: Set the white balance to match the lighting conditions. If using strobes, set the white balance to “Flash.” If using natural light, choose the appropriate setting (e.g., “Daylight” or “Cloudy”) or use a custom white balance for the most accurate colors.
Here’s a table summarizing recommended camera settings:
| Setting | Recommendation |
|---|---|
| Aperture | f/2.8 – f/4 (for portraits); f/8 – f/11 (for product photography) |
| Shutter Speed | Adjust to control ambient light; typically 1/125th – 1/200th of a second when using strobes |
| ISO | As low as possible (e.g., ISO 100 or 200) |
| Exposure Compensation | Adjust to fine-tune brightness; typically +1 to +2 stops for high-key effect |
| White Balance | “Flash” (for strobes); “Daylight” or “Cloudy” (for natural light); or use a custom white balance for the most accurate colors |
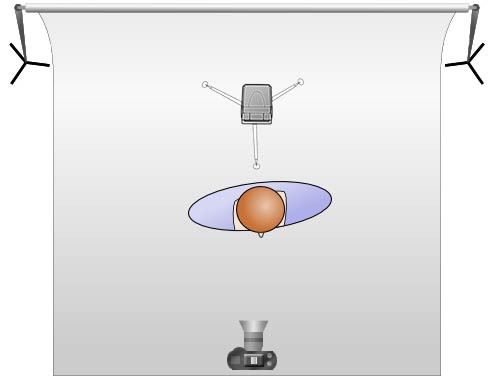
 If you don’t light your background, it will be grey
If you don’t light your background, it will be grey.
5. Post-Processing Techniques For Perfecting White Backgrounds
Even with the best lighting and camera settings, post-processing is often necessary to achieve a flawless white background. Here are several techniques you can use in Adobe Photoshop or other editing software:
- Levels Adjustment: Use the Levels adjustment layer to brighten the highlights and midtones, making the background appear whiter. Be careful not to overexpose the subject.
- Curves Adjustment: Similar to Levels, the Curves adjustment layer allows for precise control over the tonal range of the image. Use it to brighten the background while maintaining contrast in the subject.
- White Balance Adjustment: Fine-tune the white balance to ensure the white background is neutral and free from color casts.
- Spot Healing Brush: Use the Spot Healing Brush to remove any blemishes, dust spots, or imperfections from the background.
- Clipping Mask: Create a clipping mask to isolate the subject and make adjustments to the background without affecting the subject’s exposure or color.
5.1. Step-by-Step Guide to Post-Processing in Photoshop
- Open Image: Open your image in Adobe Photoshop.
- Levels Adjustment Layer: Create a new Levels adjustment layer.
- Adjust Highlights: Drag the white input slider to the left to brighten the highlights, making the background appear whiter.
- Adjust Midtones: Adjust the gray input slider to fine-tune the midtones, ensuring the subject is properly exposed.
- Curves Adjustment Layer (Optional): Create a new Curves adjustment layer for more precise control.
- Adjust Curve: Click on the curve and drag it upwards to brighten the image, focusing on the background.
- Spot Healing Brush: Select the Spot Healing Brush tool and remove any imperfections from the background.
- White Balance Adjustment: If necessary, adjust the white balance using the Camera Raw filter or a White Balance adjustment layer.
- Save Image: Save your image in the desired format (e.g., JPEG or PNG).
Here’s a table summarizing post-processing techniques:
| Technique | Purpose | Software |
|---|---|---|
| Levels Adjustment | Brighten highlights and midtones, making background whiter | Adobe Photoshop |
| Curves Adjustment | Precise control over tonal range, brighten background while maintaining contrast | Adobe Photoshop |
| White Balance | Ensure white background is neutral and free from color casts | Adobe Photoshop |
| Spot Healing Brush | Remove blemishes, dust spots, and imperfections from background | Adobe Photoshop |
| Clipping Mask | Isolate subject and make adjustments to background without affecting subject | Adobe Photoshop |
 High key white background portraits 04
Use sunlight for a bright background.
6. Avoiding Common Mistakes
Creating a perfect white background can be challenging, and it’s easy to make mistakes. Here are some common pitfalls to avoid:
- Uneven Lighting: Ensure the background is evenly lit to avoid shadows or discoloration. Use multiple lights or reflectors to achieve even illumination.
- Overexposing the Subject: While it’s important to overexpose the background, be careful not to overexpose the subject. Use a light meter or histogram to ensure proper exposure.
- Color Casts: Watch out for color casts on the white background. Adjust the white balance to ensure the background is neutral and free from unwanted colors.
- Wrinkles and Imperfections: Make sure the background is clean and free from wrinkles, creases, or imperfections. Use a seamless paper roll or iron/steam the fabric background.
- Harsh Shadows: Avoid harsh shadows on the subject or background. Use softboxes or umbrellas to diffuse the light and create a softer, more flattering look.
According to a study by the American Society of Media Photographers, uneven lighting and harsh shadows are the most common mistakes in high-key photography.
Here’s a table summarizing common mistakes and how to avoid them:
| Mistake | Solution |
|---|---|
| Uneven Lighting | Use multiple lights or reflectors to achieve even illumination |
| Overexposing Subject | Use a light meter or histogram to ensure proper exposure |
| Color Casts | Adjust white balance to ensure background is neutral |
| Wrinkles/Imperfections | Use seamless paper or iron/steam fabric background |
| Harsh Shadows | Use softboxes or umbrellas to diffuse the light |
7. Creative Applications Of White Background Photography
Once you’ve mastered the techniques for creating a white background, you can explore various creative applications:
- Product Photography: Showcase products with clean, professional images that highlight their features.
- Portraits: Create timeless and elegant portraits that emphasize the subject’s personality.
- Headshots: Produce professional headshots for business cards, websites, and social media profiles.
- Food Photography: Capture stunning food photos with a clean and appetizing look.
- Creative Projects: Experiment with different lighting techniques, props, and poses to create unique and artistic images.
 High key white background portraits 05
Place a flash behind your subject to light the background.
8. White Background Photography In Different Genres
White background photography isn’t confined to a single genre; its versatility shines across various photographic styles.
8.1. Product Photography
In product photography, a white background provides a clean, distraction-free setting that highlights the product’s features. E-commerce businesses often use this technique to ensure consistency and professionalism in their online stores.
8.2. Portrait Photography
For portraits, a white background can create a modern and minimalist look, putting all the focus on the subject’s face and expression. It’s especially effective for headshots and high-key portraits.
8.3. Fashion Photography
White backgrounds are also used in fashion photography to showcase clothing and accessories without distractions. This allows the viewer to appreciate the design and details of the garments.
8.4. Food Photography
In food photography, a white background can make the colors and textures of the dishes stand out. It’s often used in cookbooks and food blogs to present food in an appealing and appetizing way.
8.5. Fine Art Photography
Some fine art photographers use white backgrounds to create abstract and conceptual images. By isolating the subject against a white background, they can draw attention to its shape, form, and texture.
| Genre | Application |
|---|---|
| Product Photography | Clean, distraction-free setting to highlight product features; consistency and professionalism for e-commerce. |
| Portrait Photography | Modern, minimalist look focusing on the subject’s face and expression; effective for headshots and high-key portraits. |
| Fashion Photography | Showcases clothing and accessories without distractions; allows appreciation of garment design and details. |
| Food Photography | Makes colors and textures of dishes stand out; used in cookbooks and food blogs for appealing presentation. |
| Fine Art Photography | Creates abstract and conceptual images; draws attention to subject’s shape, form, and texture through isolation. |
9. Essential Equipment For White Background Photography
To achieve professional-quality white background photos, having the right equipment is essential. Here’s a list of key items:
- Camera: A DSLR or mirrorless camera with manual controls is recommended for maximum flexibility.
- Lens: Choose a lens that suits your subject and shooting style. A prime lens (e.g., 50mm or 85mm) is great for portraits, while a zoom lens can be versatile for product photography.
- White Background: Select a seamless paper roll, muslin fabric, or foam board based on your needs and budget.
- Lights: Invest in studio strobes, speedlights, or continuous lights to illuminate the background and subject.
- Light Stands: Use light stands to position your lights at the desired height and angle.
- Softboxes/Umbrellas: These modifiers diffuse the light, creating a softer and more flattering look.
- Reflectors: Reflectors bounce light back onto the subject, filling in shadows and creating a more even exposure.
- Light Meter: A light meter helps you accurately measure the light levels on the background and subject, ensuring proper exposure.
- Tripod: A tripod provides stability and allows you to use slower shutter speeds without introducing camera shake.
- Editing Software: Adobe Photoshop or other editing software is essential for post-processing and perfecting your white background photos.
Here’s a detailed equipment checklist for white background photography:
| Equipment | Description | Recommendation |
|---|---|---|
| Camera | DSLR or mirrorless camera with manual controls | Canon EOS 5D Mark IV, Sony Alpha a7 III, Nikon D850 |
| Lens | Prime lens or zoom lens | Canon EF 50mm f/1.8, Sony FE 85mm f/1.8, Nikon AF-S 24-70mm f/2.8 |
| White Background | Seamless paper roll, muslin fabric, or foam board | Savage Seamless Paper, Westcott X-Drop Backdrop, Neewer Foam Board |
| Lights | Studio strobes, speedlights, or continuous lights | Godox SK400II Studio Strobe, Yongnuo YN560 IV Speedlight, Neewer LED Softbox Lighting Kit |
| Light Stands | Adjustable stands for positioning lights | Manfrotto 5001B Light Stand, Neewer Heavy Duty Light Stand |
| Softboxes | Diffuse light for a softer look | Godox 80cm Softbox, Neewer 24×24 Softbox |
| Umbrellas | Diffuse light for a wider spread | Westcott 45″ Optical White Satin Umbrella, Fotodiox 33″ Silver Umbrella |
| Reflectors | Bounce light back onto the subject | Neewer 5-in-1 Reflector, Westcott Econo Reflector |
| Light Meter | Measures light levels for accurate exposure | Sekonic L-308DC Light Meter, Kenko KFM-1100 Light Meter |
| Tripod | Provides stability and reduces camera shake | Manfrotto MT055XPRO3 Tripod, Benro TMA37AL Tripod |
| Editing Software | Post-processing and perfecting photos | Adobe Photoshop, Adobe Lightroom, Capture One |
10. How To Make Background Photo White: Step-by-Step Guide
Creating a white background involves several key steps.
- Set up the Background: Position your white background material behind the subject. Ensure it’s clean and free from wrinkles or imperfections.
- Position the Lights: Place two lights behind the subject, aimed at the background. Adjust the power until the background is overexposed by 2-3 stops.
- Light the Subject: Place a softbox or umbrella in front of the subject to provide soft, even lighting. Adjust the power to properly expose the subject’s face.
- Adjust Camera Settings: Set your camera to manual mode and adjust the aperture, shutter speed, and ISO to achieve the desired exposure.
- Take the Shot: Take a test shot and review the results. Adjust the lighting and camera settings as needed until you achieve a perfectly white background and properly exposed subject.
- Post-Process: Use Adobe Photoshop or other editing software to fine-tune the white balance, remove any imperfections, and enhance the overall look of the image.
| Step | Action | Notes |
|---|---|---|
| 1. Set up Background | Position white background material behind subject | Ensure cleanliness and freedom from wrinkles/imperfections |
| 2. Position Lights | Place two lights behind subject aimed at background | Adjust power until background is overexposed by 2-3 stops |
| 3. Light the Subject | Place softbox/umbrella in front of subject for soft, even lighting | Adjust power to properly expose subject’s face |
| 4. Adjust Camera Settings | Set camera to manual mode, adjust aperture, shutter speed, and ISO | Achieve desired exposure |
| 5. Take the Shot | Take a test shot and review results | Adjust lighting and camera settings as needed for perfectly white background and properly exposed subject |
| 6. Post-Process | Use Adobe Photoshop/other editing software to fine-tune white balance, remove imperfections | Enhance overall image look |
Frequently Asked Questions (FAQ)
-
What is high-key photography?
High-key photography is a style of photography that uses bright, even lighting to create a predominantly white or light-toned image. It is often used to create a cheerful, optimistic, and airy feel.
-
What equipment do I need for white background photography?
You will need a camera, lens, white background material (e.g., seamless paper or muslin fabric), lights (studio strobes, speedlights, or continuous lights), light stands, softboxes or umbrellas, and editing software.
-
How do I light a white background?
Use two lights behind the subject, aimed at the background. Adjust the power until the background is overexposed by 2-3 stops.
-
How do I expose the subject correctly against a white background?
Place a softbox or umbrella in front of the subject to provide soft, even lighting. Adjust the power to properly expose the subject’s face. Use a light meter or histogram to ensure proper exposure.
-
What camera settings should I use for white background photography?
Set your camera to manual mode and adjust the aperture, shutter speed, and ISO to achieve the desired exposure. Use a low ISO (e.g., ISO 100 or 200) to minimize noise.
-
How do I avoid shadows on the white background?
Ensure the background is evenly lit by using multiple lights or reflectors. Position the lights at a 45-degree angle to the background to minimize shadows.
-
How do I remove imperfections from the white background in post-processing?
Use the Spot Healing Brush tool in Adobe Photoshop to remove any blemishes, dust spots, or imperfections from the background.
-
How do I ensure the white background is neutral and free from color casts?
Adjust the white balance in your camera or in post-processing to ensure the white background is neutral and free from unwanted colors.
-
Can I use natural light for white background photography?
Yes, you can use natural light, but it can be more challenging to control. Position your subject in front of a window or bright outdoor area, and use reflectors to bounce light back onto the subject.
-
What are some creative applications of white background photography?
White background photography can be used for product photography, portraits, headshots, food photography, and creative projects.
Conclusion
Mastering how to make a background photo white opens up a world of creative possibilities. By understanding the principles of lighting, camera settings, and post-processing, you can create stunning images that emphasize your subject and convey a sense of professionalism and sophistication. Whether you’re shooting portraits, products, or creative projects, the techniques outlined in this guide will help you achieve a flawless white background every time.
Ready to take your photography skills to the next level? Visit dfphoto.net today to explore more tutorials, inspiration, and connect with a vibrant community of photographers. Discover our comprehensive guides on various photography techniques, browse our stunning collection of images, and join discussions with fellow photography enthusiasts. Our address is 1600 St Michael’s Dr, Santa Fe, NM 87505, United States and you can call us at +1 (505) 471-6001. Start your photographic journey with dfphoto.net and unlock your creative potential today!