Want to share your photos on Instagram without unwanted cropping? dfphoto.net shows you how to create eye-catching Instagram posts with different size photos in a single carousel, ensuring your images look their best. Discover expert tips and tricks to create visually appealing content that grabs attention. Let’s explore aspect ratios, image resizing, and carousel creation for stunning visual storytelling.
1. Why Use Instagram Carousels for Multiple Photo Sizes?
Instagram carousels offer a fantastic way to showcase a series of photos and videos, and using different sizes within a carousel can significantly boost engagement. According to recent data, Instagram carousels can generate engagement levels similar to Reels, making them a powerful tool for content creators. Carousels provide multiple opportunities for your followers to interact with your content, increasing the chances they’ll see different images from the same post over time.
However, Instagram has limitations when it comes to posting multiple photos of different sizes in a single carousel. By default, all images and videos in a carousel must have the same aspect ratio. Otherwise, Instagram will automatically crop them to match the aspect ratio of the first photo. This can be frustrating when you want to share both portrait and landscape photos without losing any important details.
The good news is there’s a workaround. By resizing your photos beforehand, you can create a seamless and visually appealing carousel that showcases your images in their original dimensions. This method involves adding a background to each photo to ensure they all have the same aspect ratio, allowing you to post them together without any cropping.
2. Key Steps to Create an Instagram Carousel with Varying Photo Dimensions
Creating an Instagram carousel with different size photos involves a few simple steps. Here’s a quick overview:
- Select Your Photos and Videos: Choose up to 10 photos and/or videos you want to include in your carousel.
- Decide on an Aspect Ratio: Select either 4:5 (vertical) or 1:1 (square) as your desired aspect ratio.
- Resize Your Media: Use an image resizer tool to add a background to each photo and video, ensuring they all have the same chosen aspect ratio.
- Create a New Instagram Post: Open Instagram and start a new post.
- Select Multiple Images: Tap the “multiple” images icon and choose your resized photos/videos.
- Post Your Carousel: Share your carousel to Instagram with your photos of different sizes displayed beautifully.
Let’s dive into each step in more detail.
3. Detailed Guide: Posting Multiple Pictures on Instagram with Different Sizes
To successfully post multiple photos or videos with varying sizes on Instagram, you need to resize them beforehand. The key is to add a neutral background to each image to ensure they all have the same aspect ratio without cropping any content. Instagram carousels support aspect ratios of 4:5 (vertical) or 1:1 (square), so choose the one that best fits your overall aesthetic.
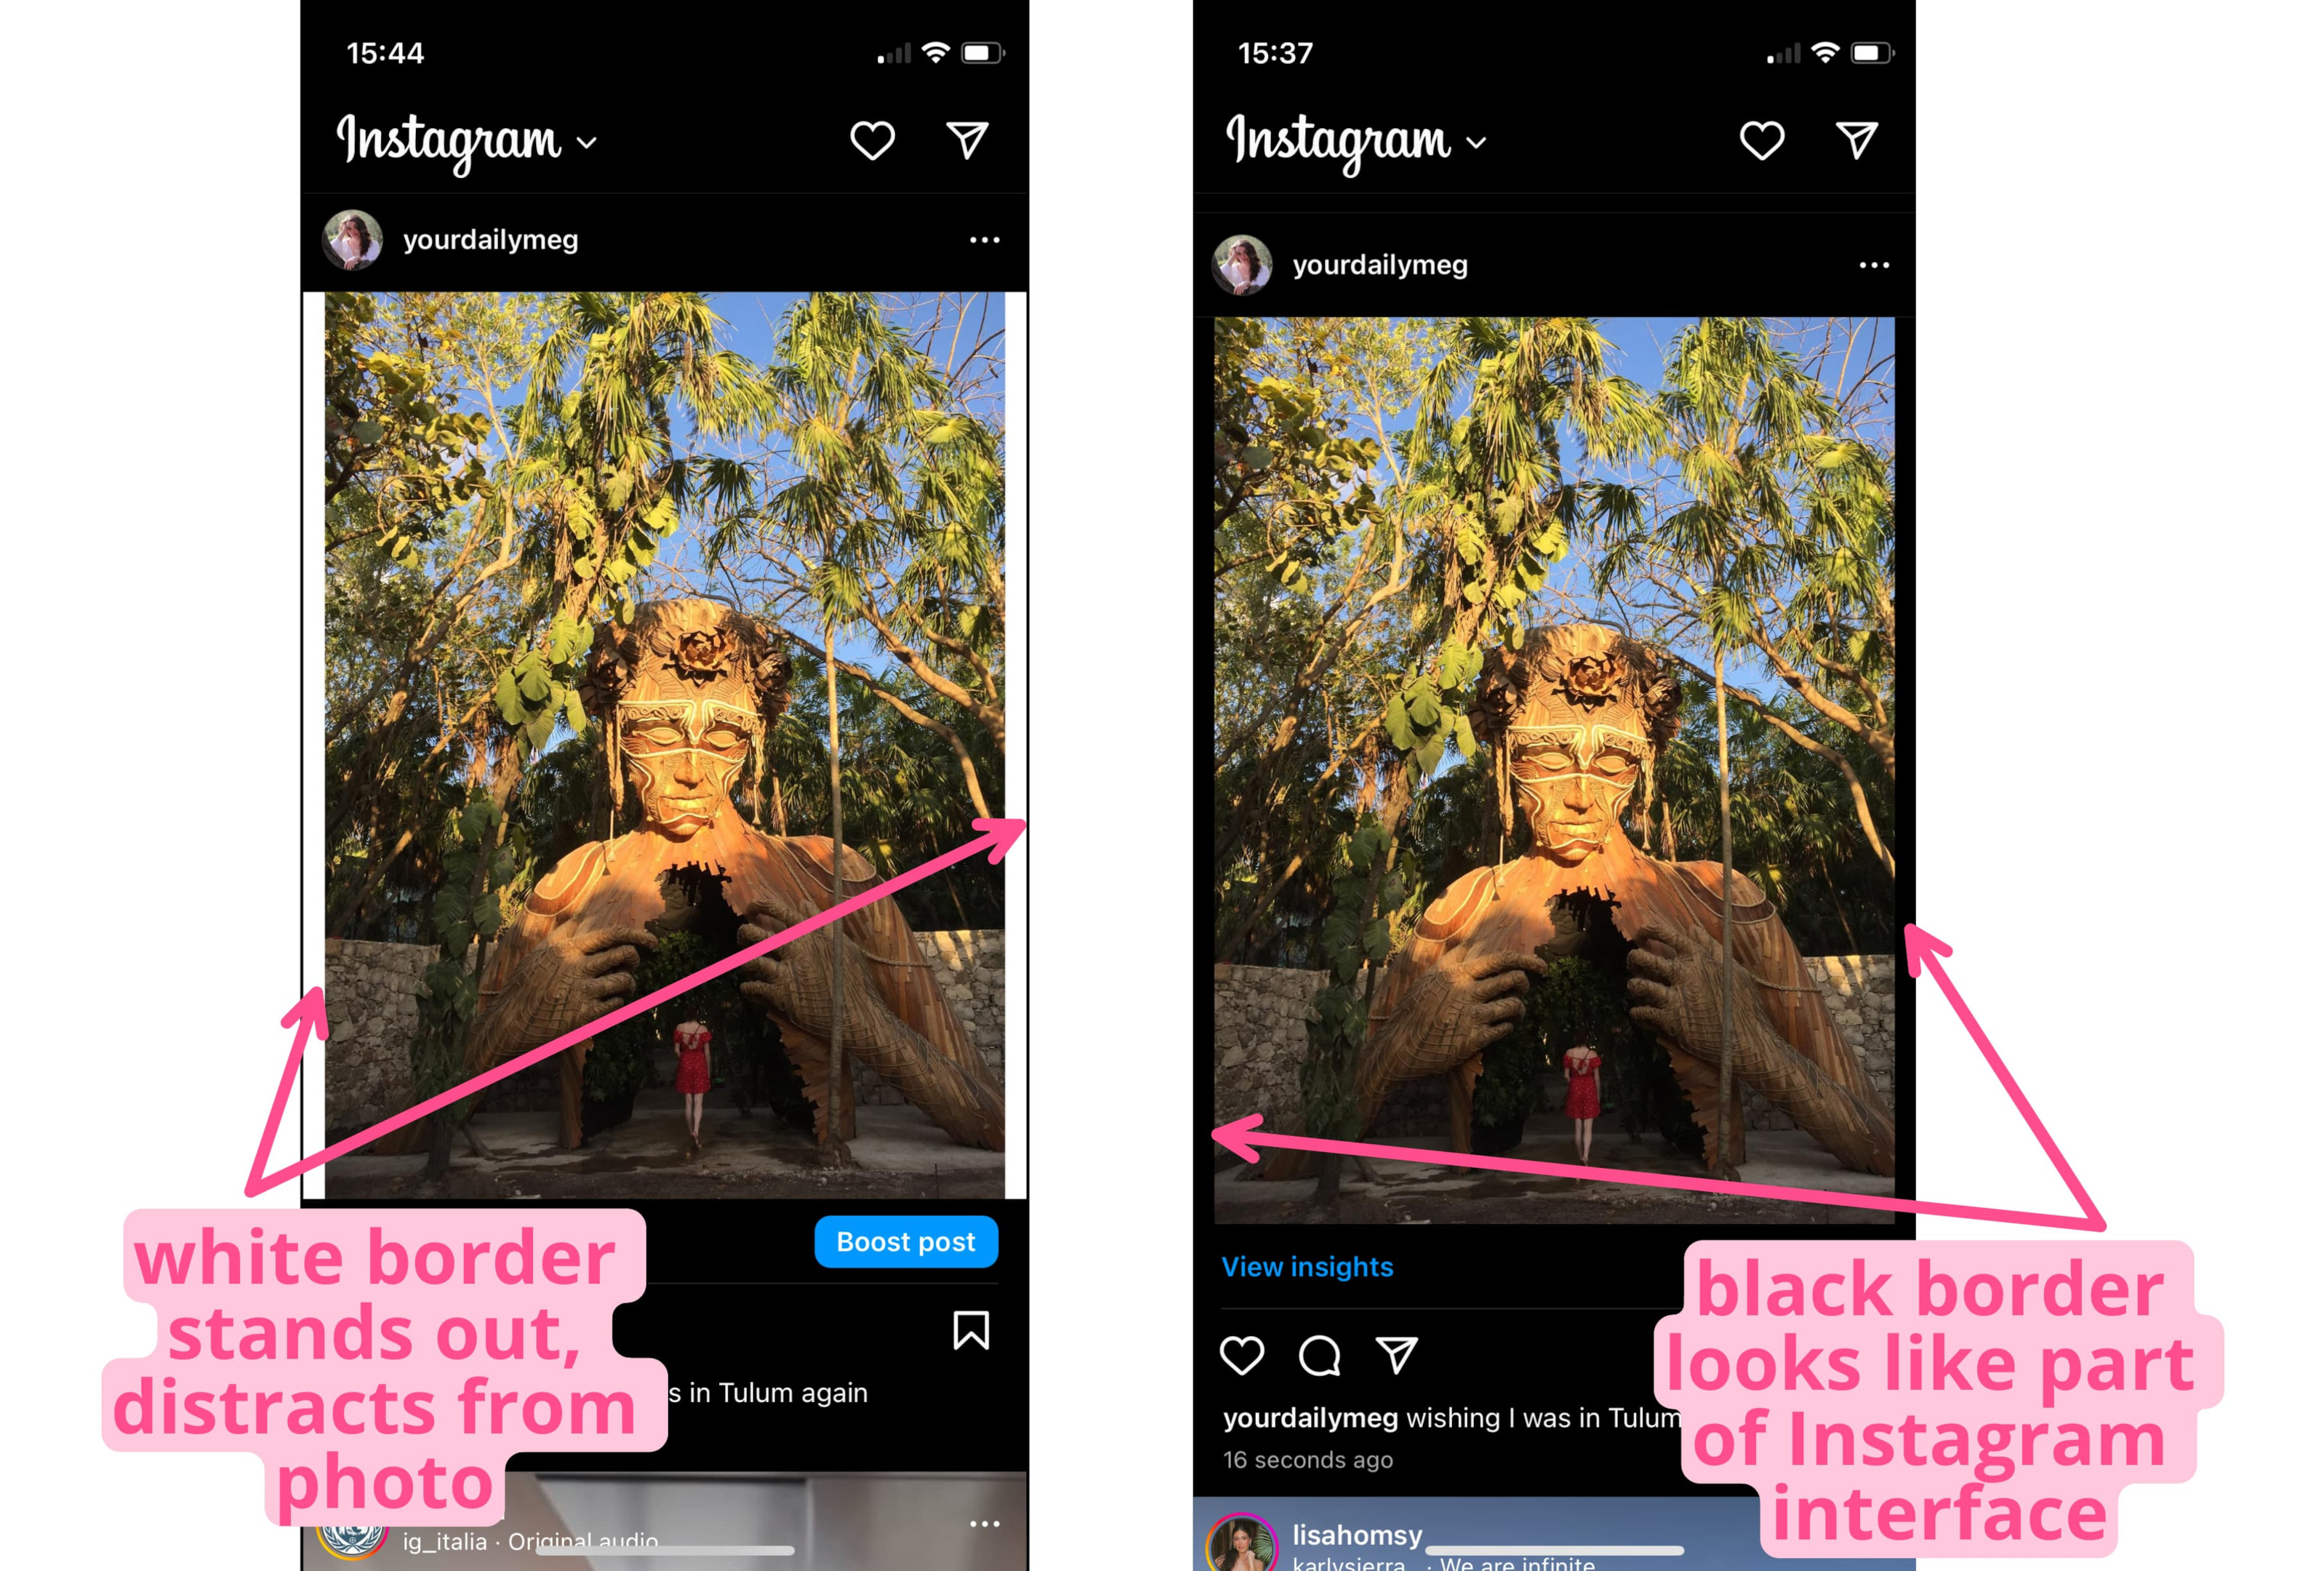
A black background is often recommended because many Instagram users have dark mode turned on, which allows the background to blend seamlessly with the platform interface. Here’s a step-by-step tutorial using Kapwing, an online video and image editor:
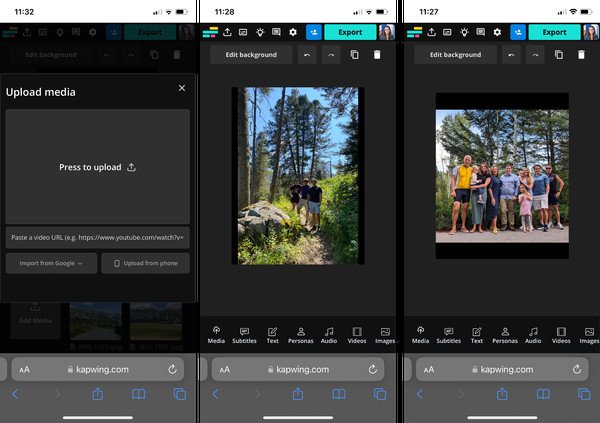
3.1. Step 1: Upload Your Photos/Videos to Kapwing
Go to Kapwing.com on your device and click “Get Started”. Create a new project and choose the “Start with a blank canvas” option. Select either 4:5 or 1:1 as your aspect ratio. For this guide, we’ll use square images (1:1) to accommodate both landscape and portrait photos.
 Kapwing Interface
Upload each photo or video individually by tapping the “Media” button and selecting “Click to upload”. You can also upload from a link or use Google Drive integration if your media is stored there.
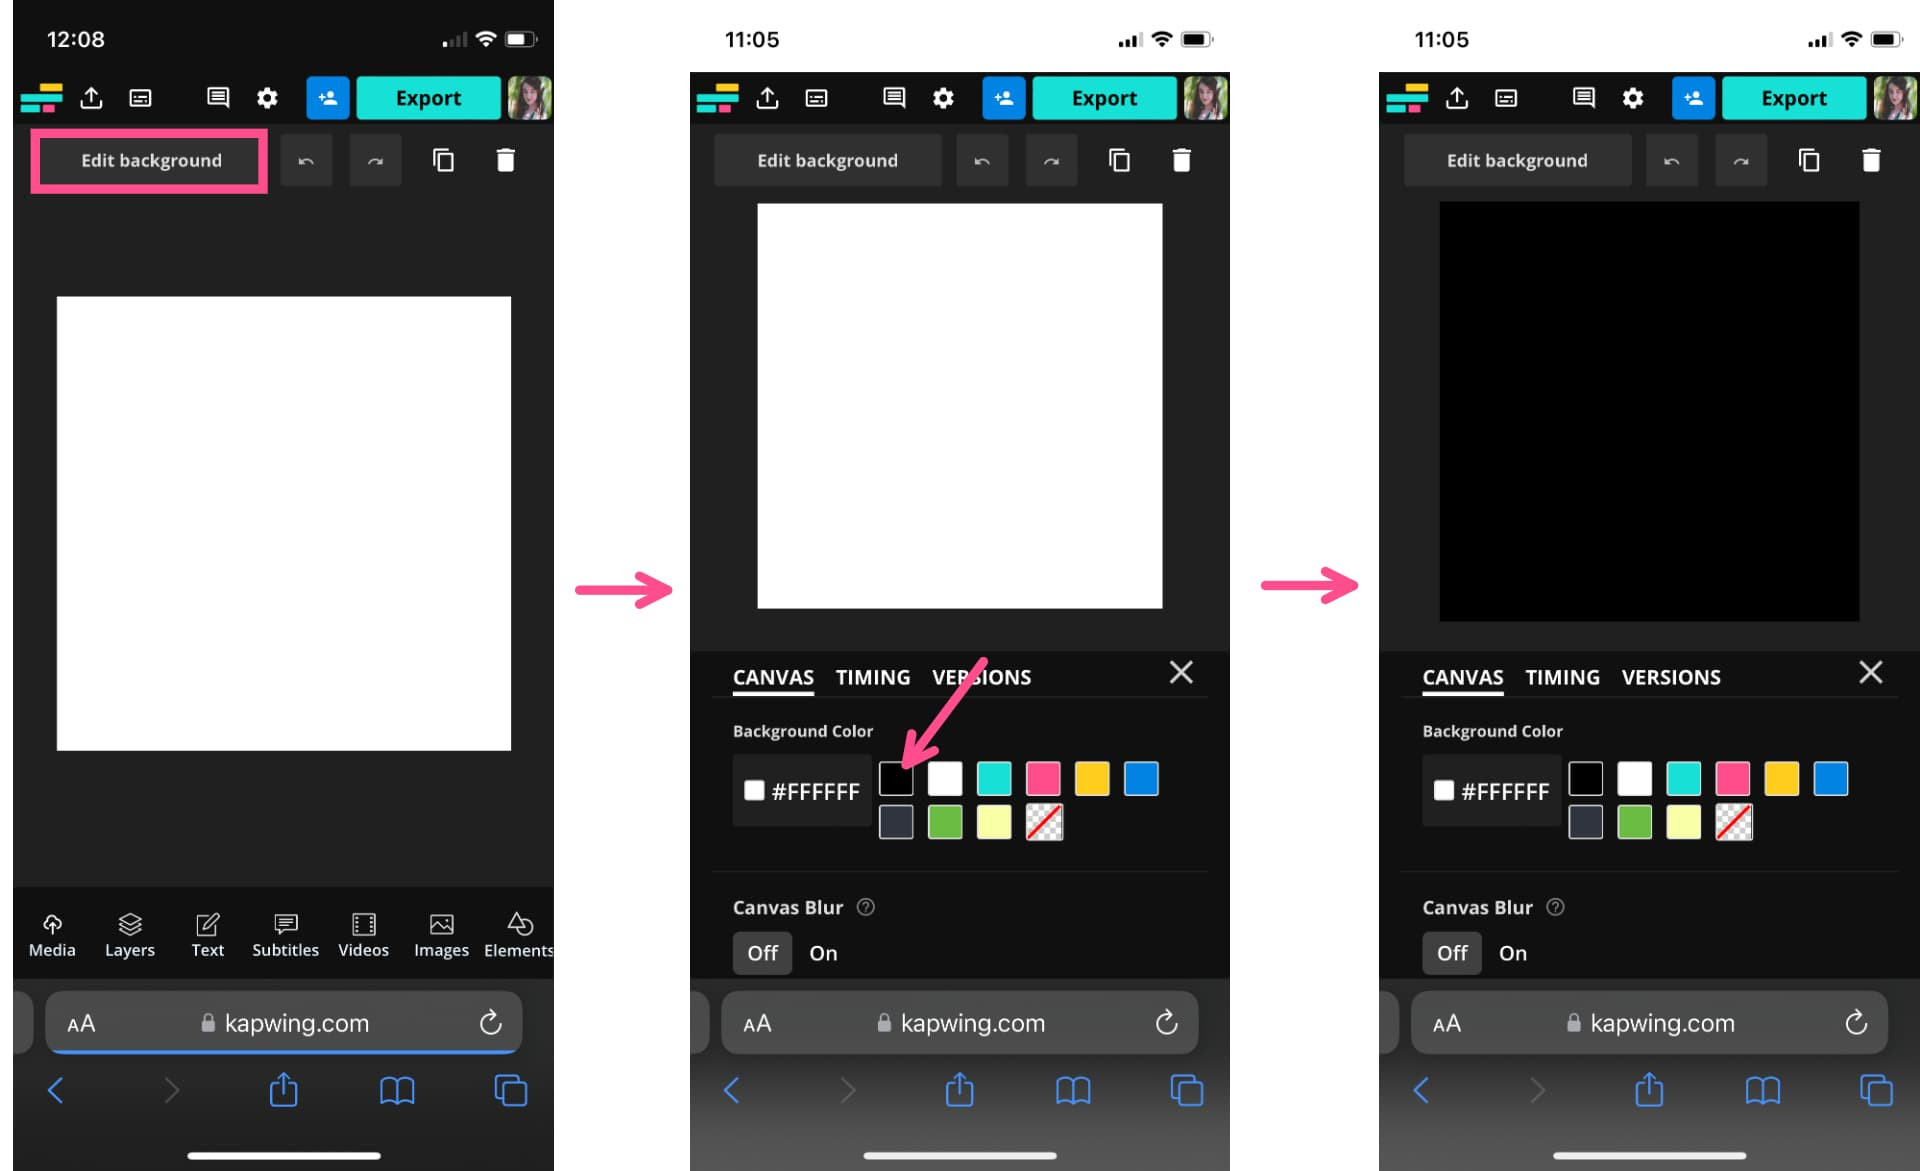
3.2. Step 2: Add a Black Background
Before adding your media to the canvas, change the background color to black. This helps your content stand out by blending with the dark mode interface, minimizing distractions.
 Edit Background Color
To change the background color, tap the “Edit background” button above the canvas and choose black from the background color options.
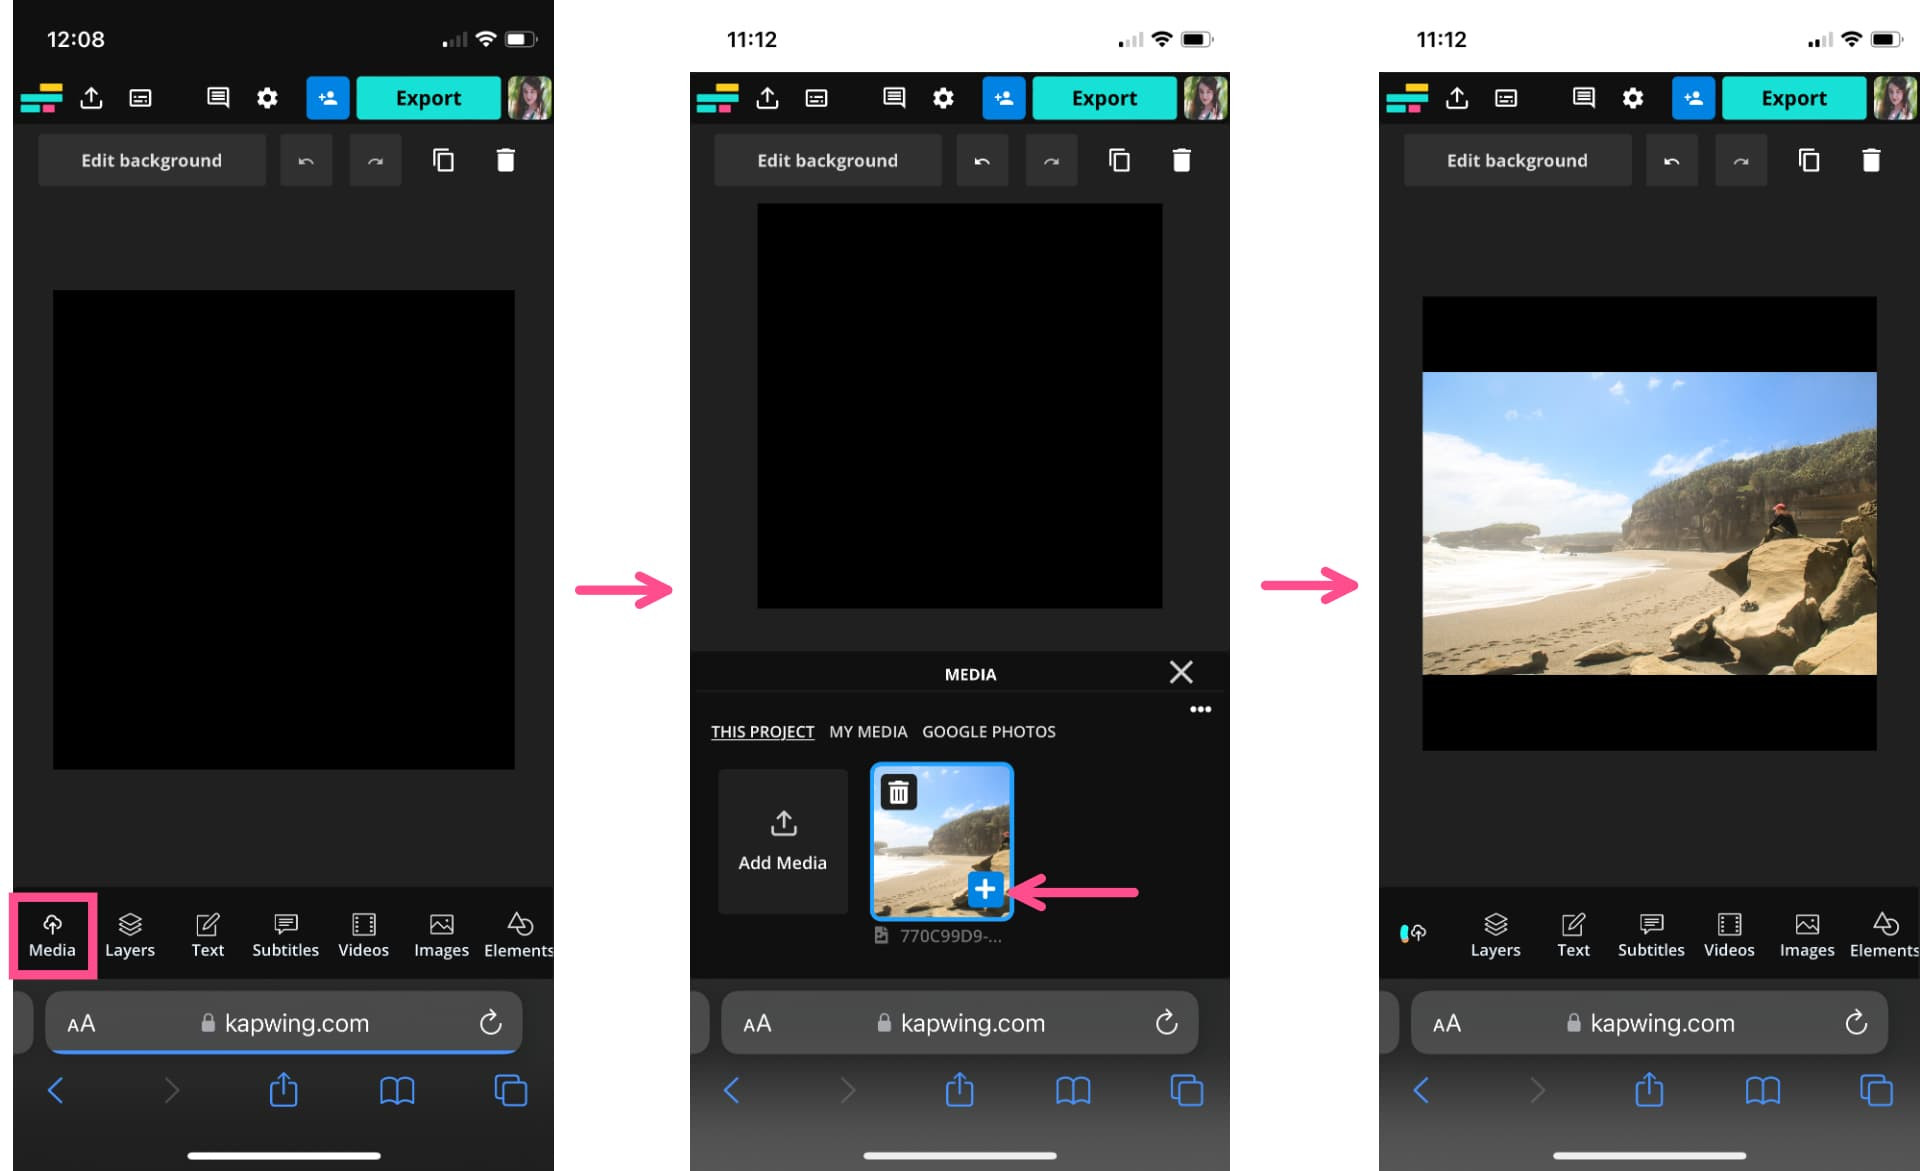
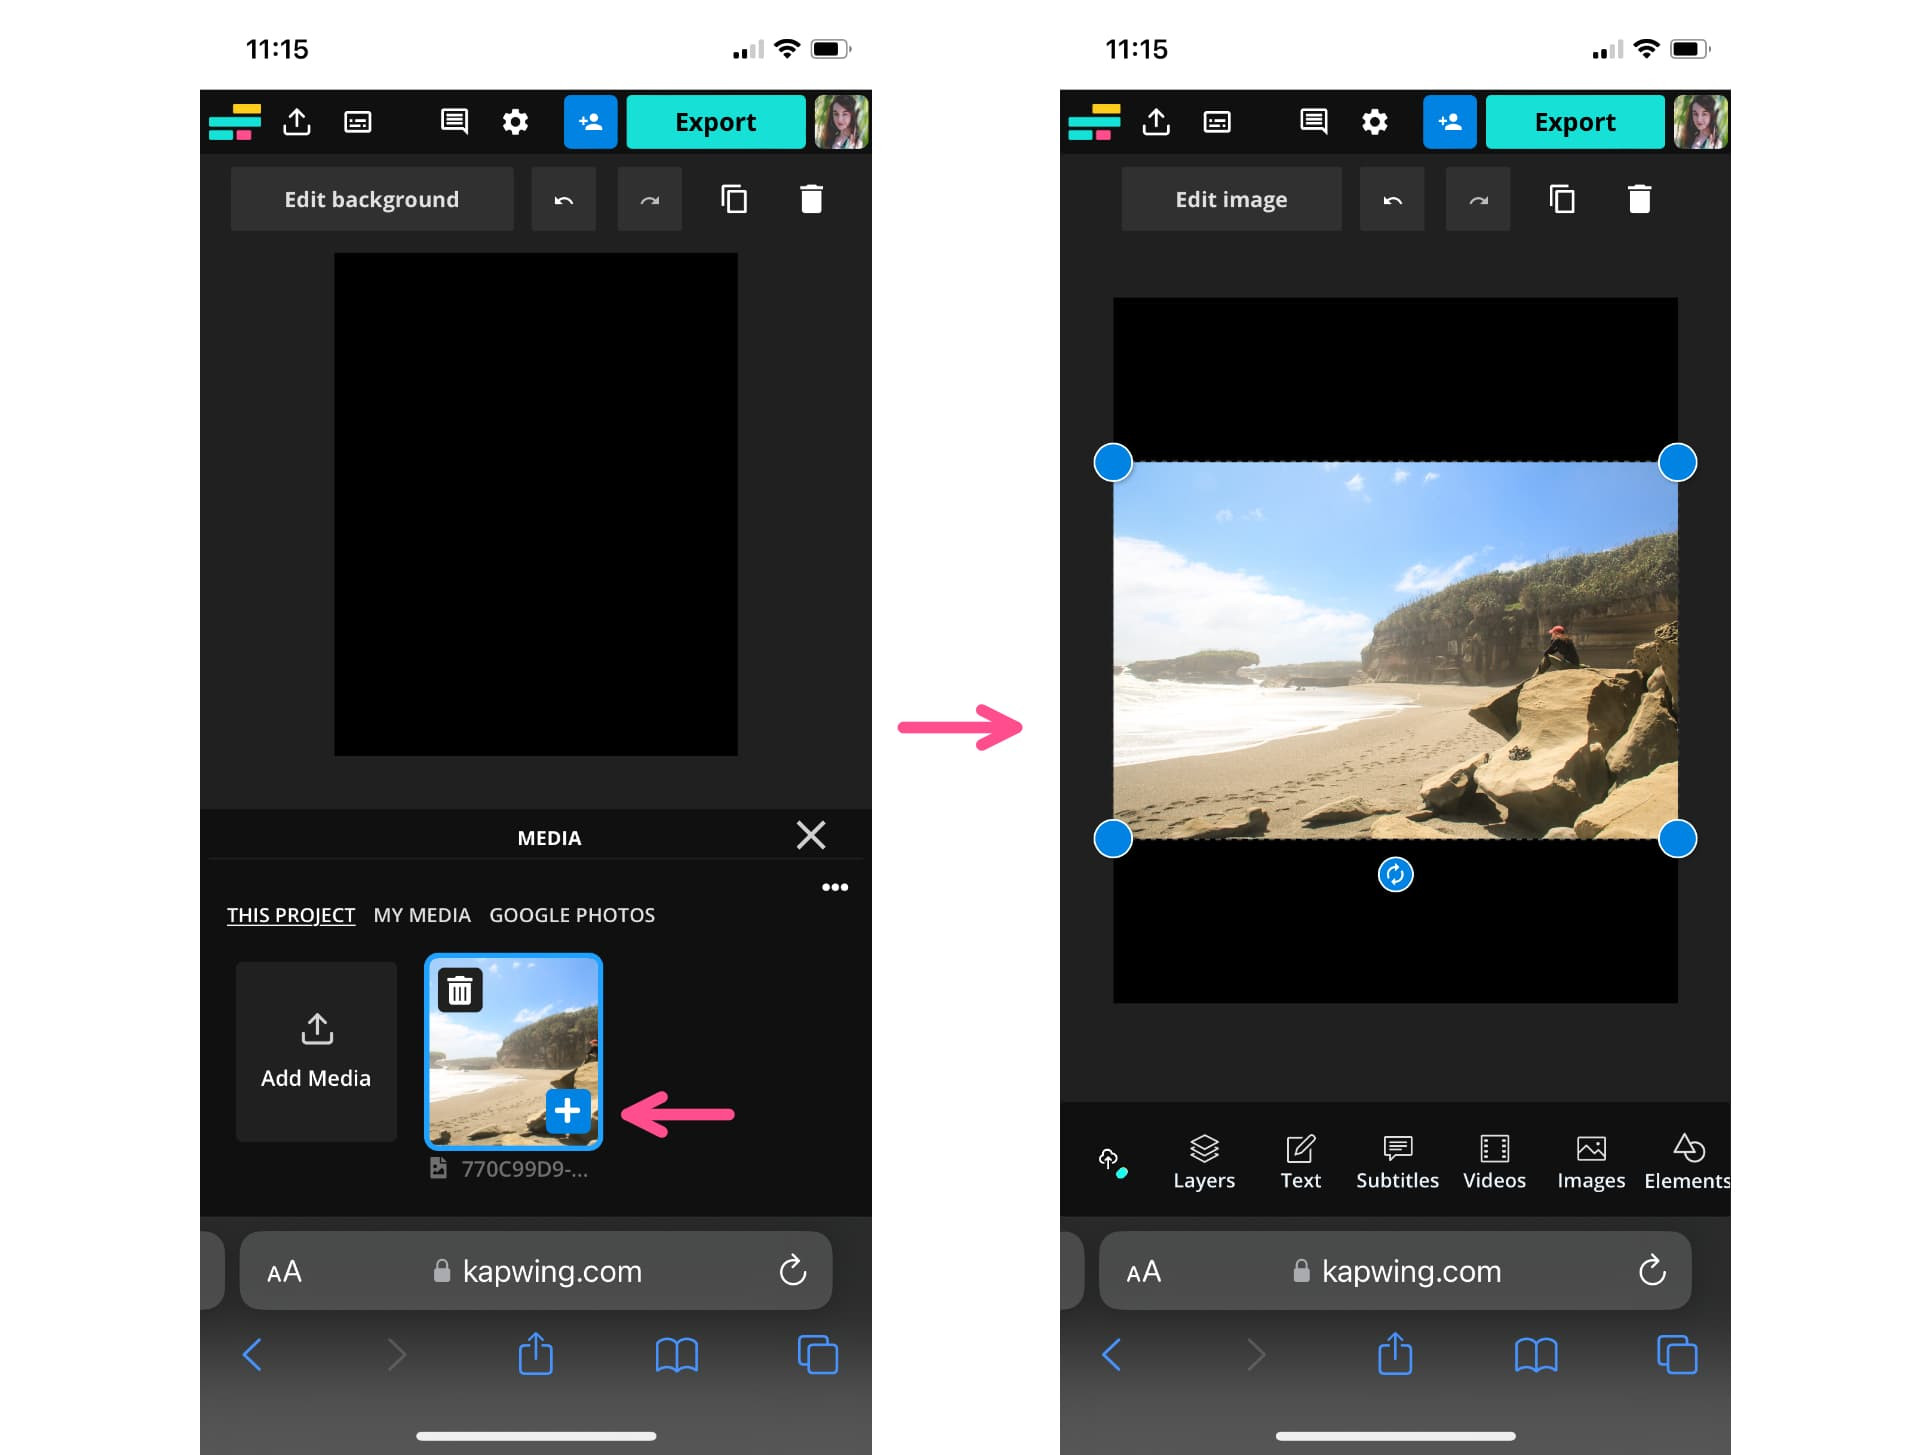
3.3. Step 3: Resize Your Photos and Videos
Now, add your photos and videos to the canvas. Open the “Media” tab again and select the file you uploaded.
 Add Media to Canvas
Tap the blue plus sign in the bottom right corner of the thumbnail. This automatically adds the photo or video to the canvas and centers it.
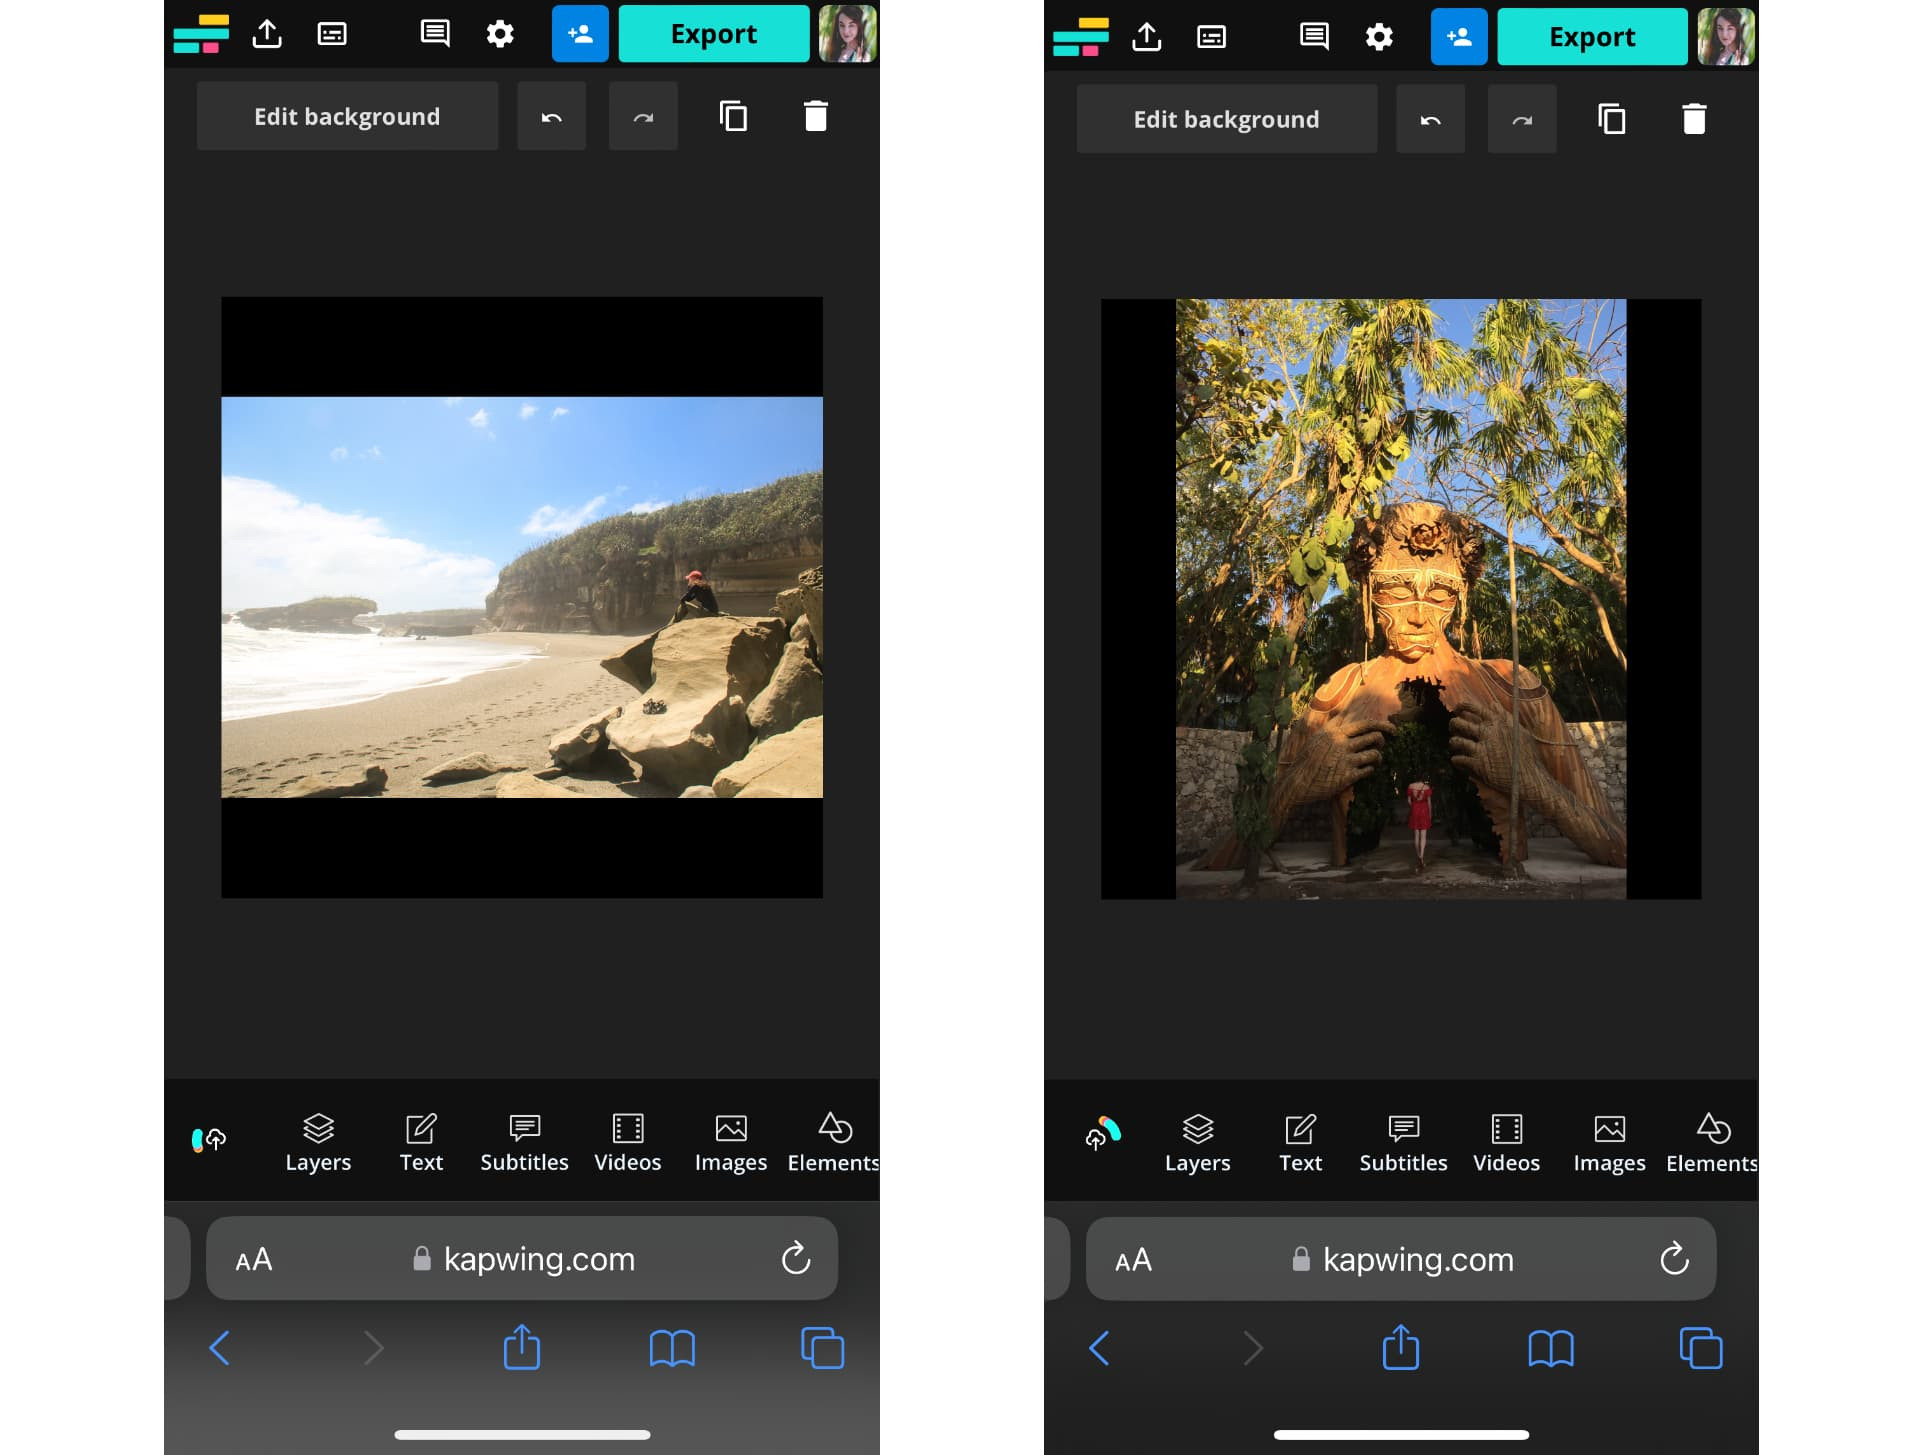 Landscape and Vertical Image Examples
Your landscape and vertical images will now fit within the square canvas with a black background, maintaining their original dimensions.
3.4. Step 4: Export and Download Your Media
After resizing all your media, it’s time to download them to your device. This will allow you to share them on Instagram as a carousel without cropping.
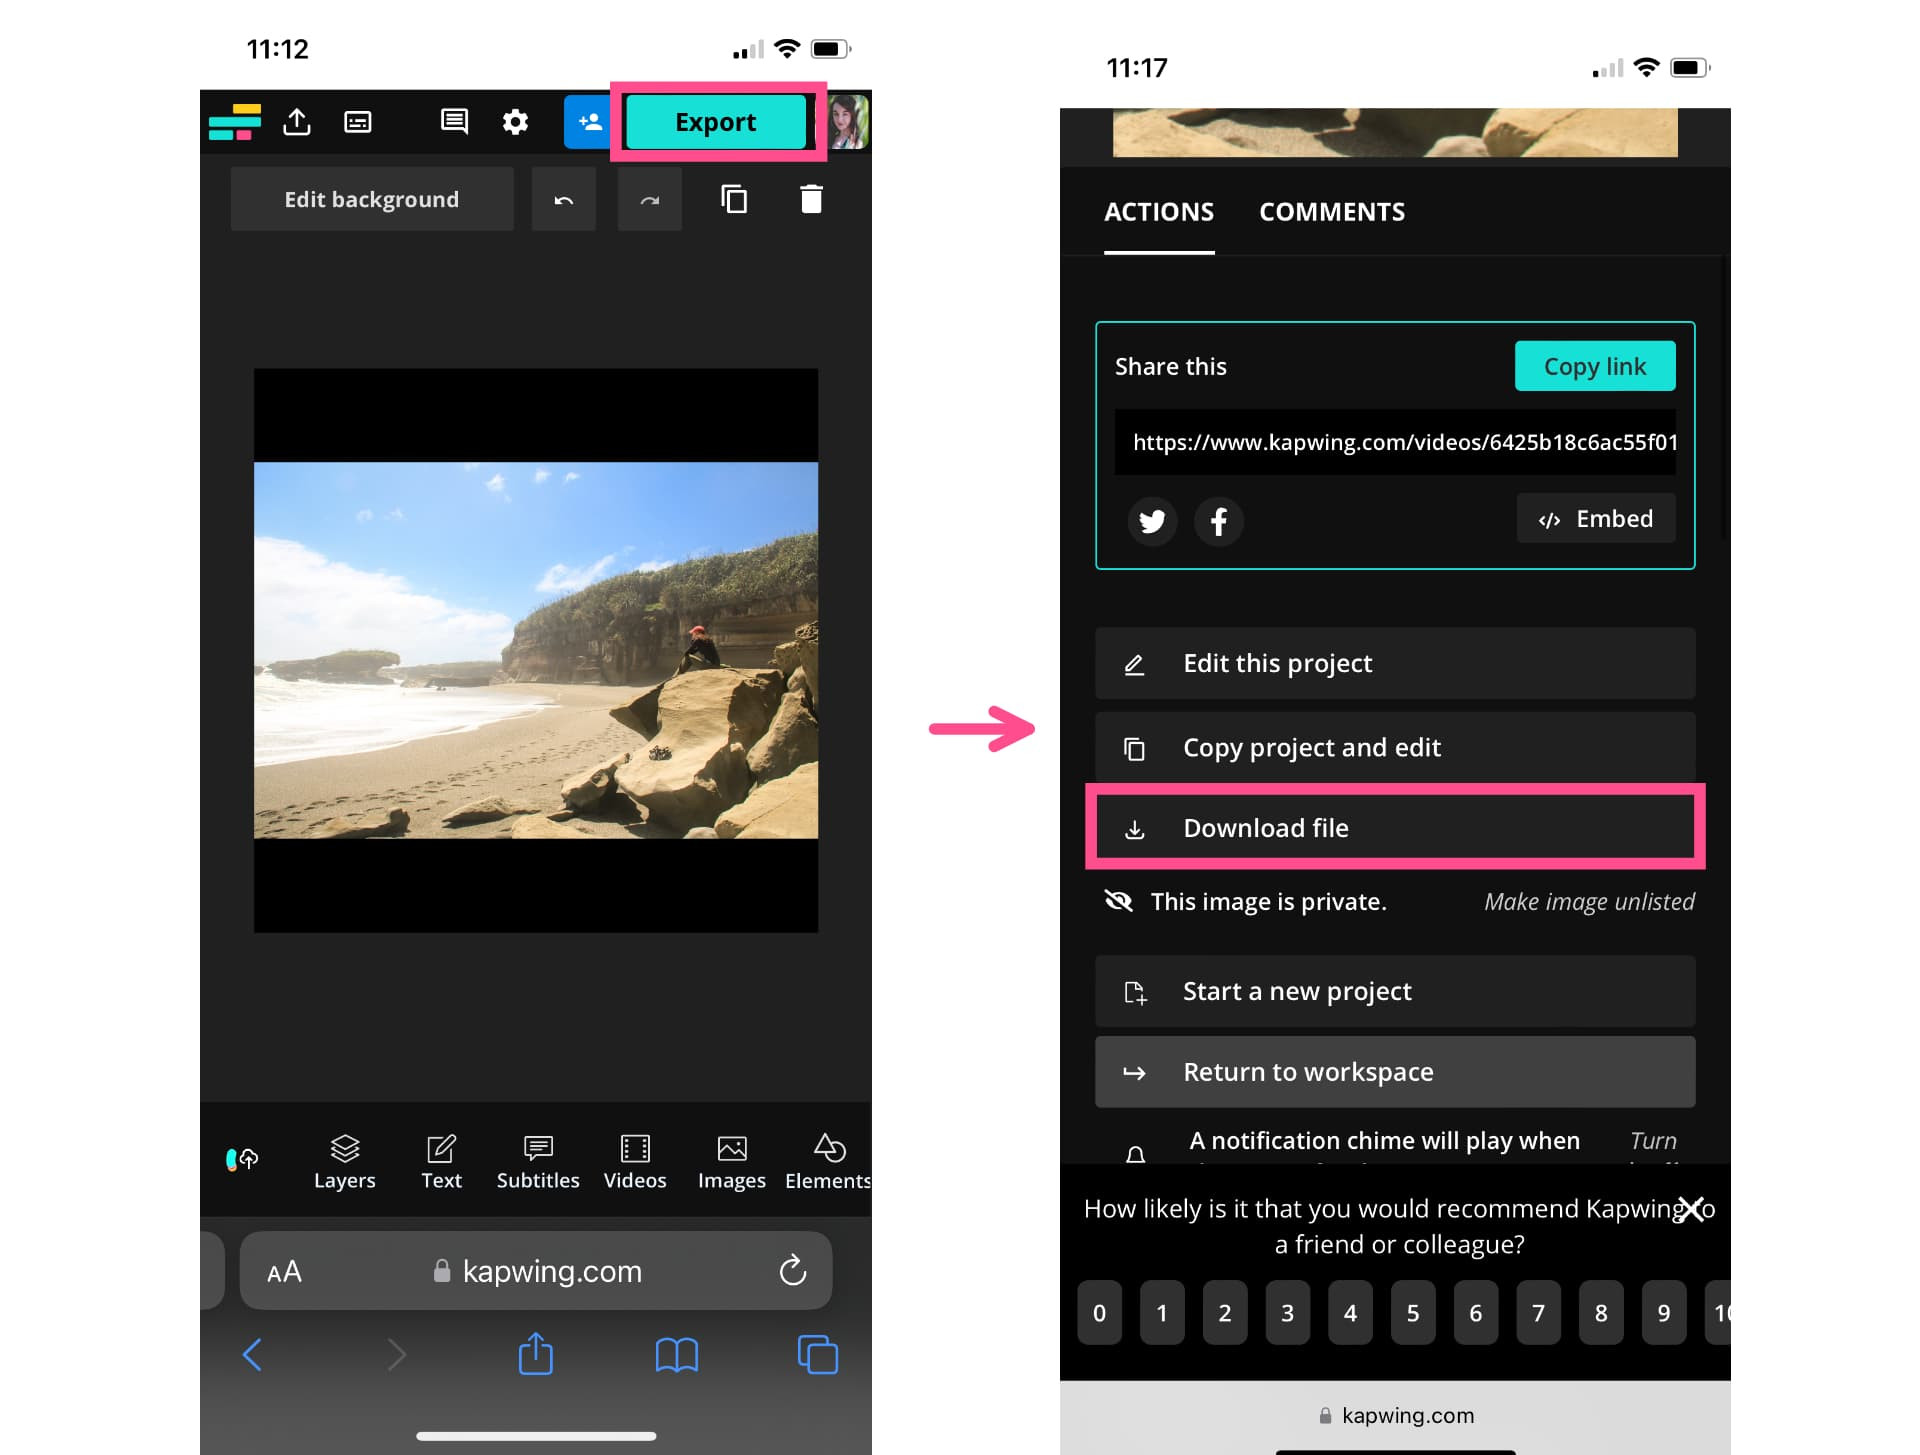 Export and Download
Export each image or video and save it to your phone. If you’re not signed into Kapwing, sign up using your Google account or email to save your exports in your workspace for later access.
3.5. Step 5: Share Your Resized Media on Instagram as a Carousel
Repeat these steps for each photo and video you want to include in your carousel. Once you have downloaded all the resized media, open the Instagram app and upload them as a single post.
 Select Multiple Images on Instagram
Start a new post and tap the multiple images icon. Select all the resized photos and videos in the order you want them to appear. Since they all have the same aspect ratio now, they will fit perfectly without cropping.
Share your post as usual. Keep in mind that if you apply an Instagram filter to one image, it will automatically apply to all images in the carousel.
4. Advanced Technique: Posting a Long Landscape Image as Two Slides
Sometimes, you might want to showcase a panorama or a wide landscape photo in its full glory. Shrinking it down to fit a square or 4:5 canvas can compromise the image quality and impact. Here’s how to post a long landscape image as two slides in an Instagram carousel:
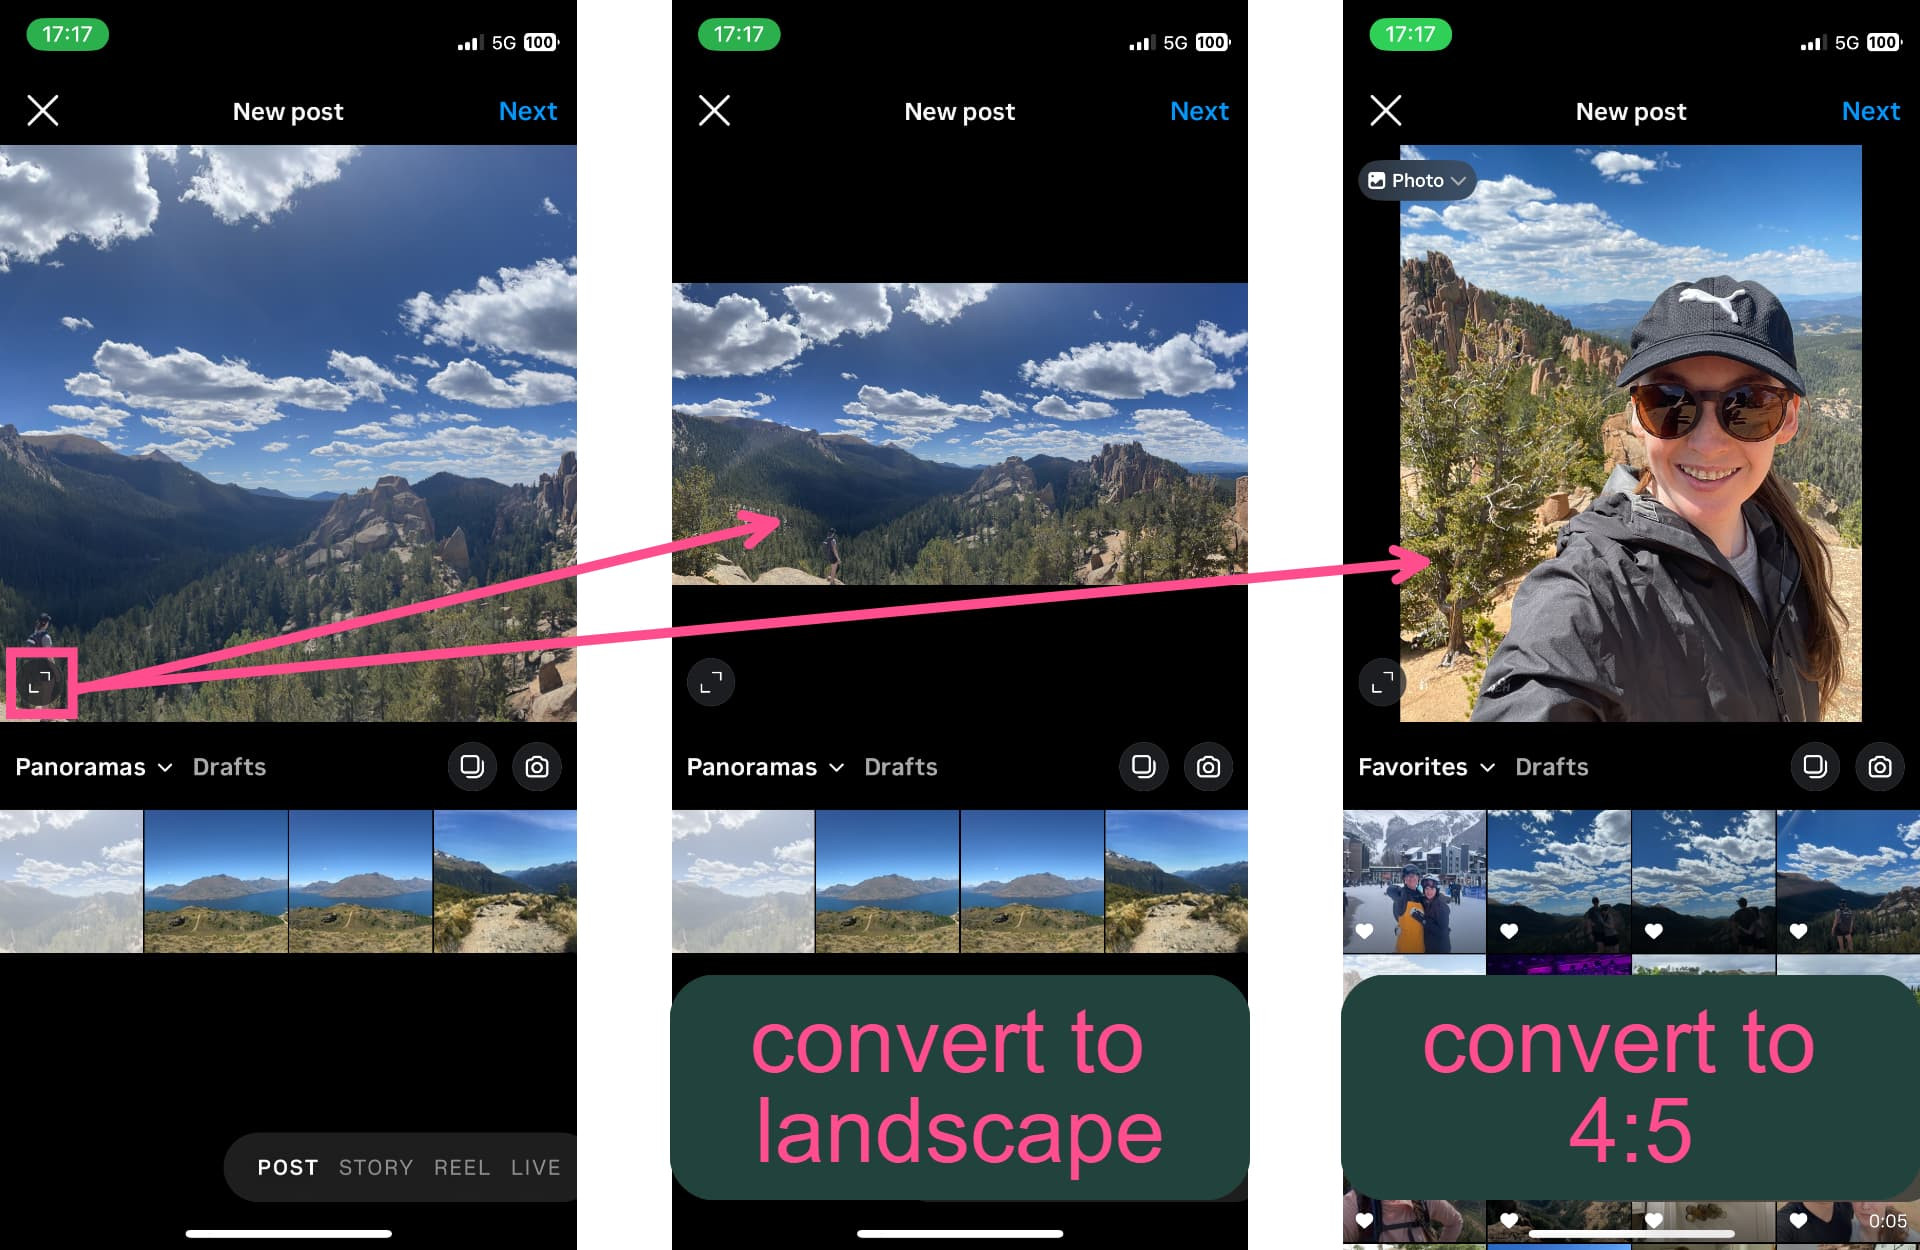
4.1. Changing Your Instagram Post’s Orientation
Instagram allows you to change the orientation of your image from square to portrait or landscape using the aspect ratio button. This button looks like two diagonal corners. Tapping it will adjust the image to 1080×1350 (4:5) for portrait or a width of 1080 pixels for landscape.
 Aspect Ratio Button on Instagram
If your landscape photo is wider than 1080 pixels, you’ll need to split it into two parts to fit it into an Instagram carousel.
4.2. Step 1: Center the Landscape Photo on a Blank Canvas
Start by centering your landscape photo on a black background with a 4:5 aspect ratio. This will be the first image in your carousel, providing context for the following slides.
Save this resized photo to your device.
4.3. Step 2: Split Your Landscape Photo in Two
Next, split your landscape photo into two halves using Kapwing.
 Add Photo to Canvas
Add your photo to the canvas and tap the “Edit image” button, then select “Crop”. Choose the 4:5 crop preset.
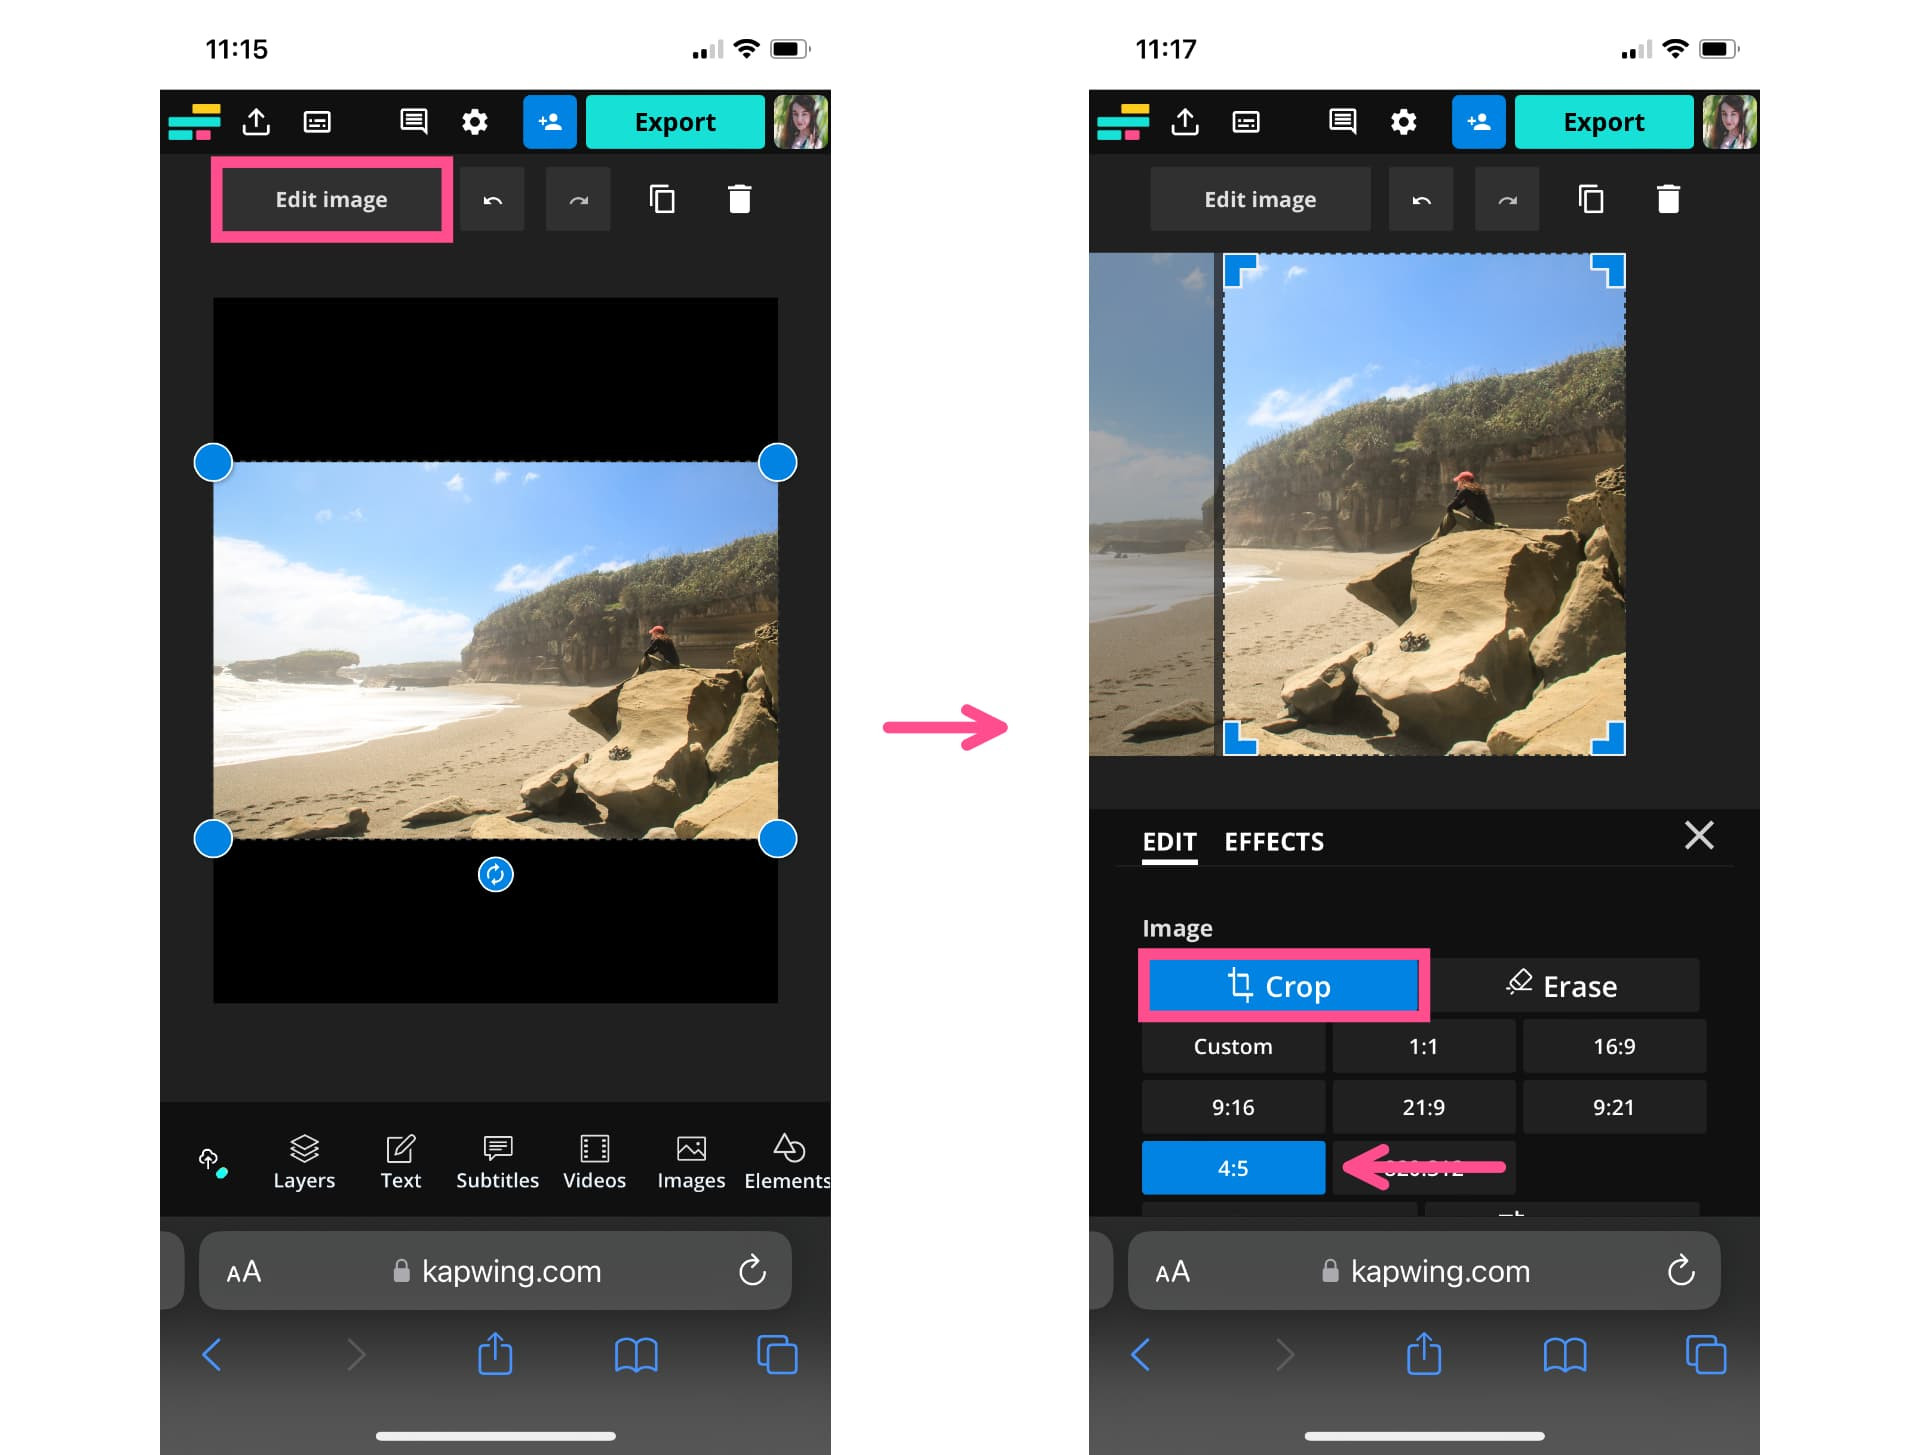 Crop Image
Move the image within the crop preview to align the corners with one side of the image, effectively splitting the photo in half. Export and save this half of the photo as a single image.
To get the other half, reopen the project in Kapwing, select “Edit image”, tap “Crop”, and move the image to center the other half within the crop preview. Export and save the second image.
4.4. Step 3: Share on Instagram as a Carousel
Create a new post on Instagram and select the multiple images icon. Choose the whole image with the black background first, followed by the two halves of the landscape photo.
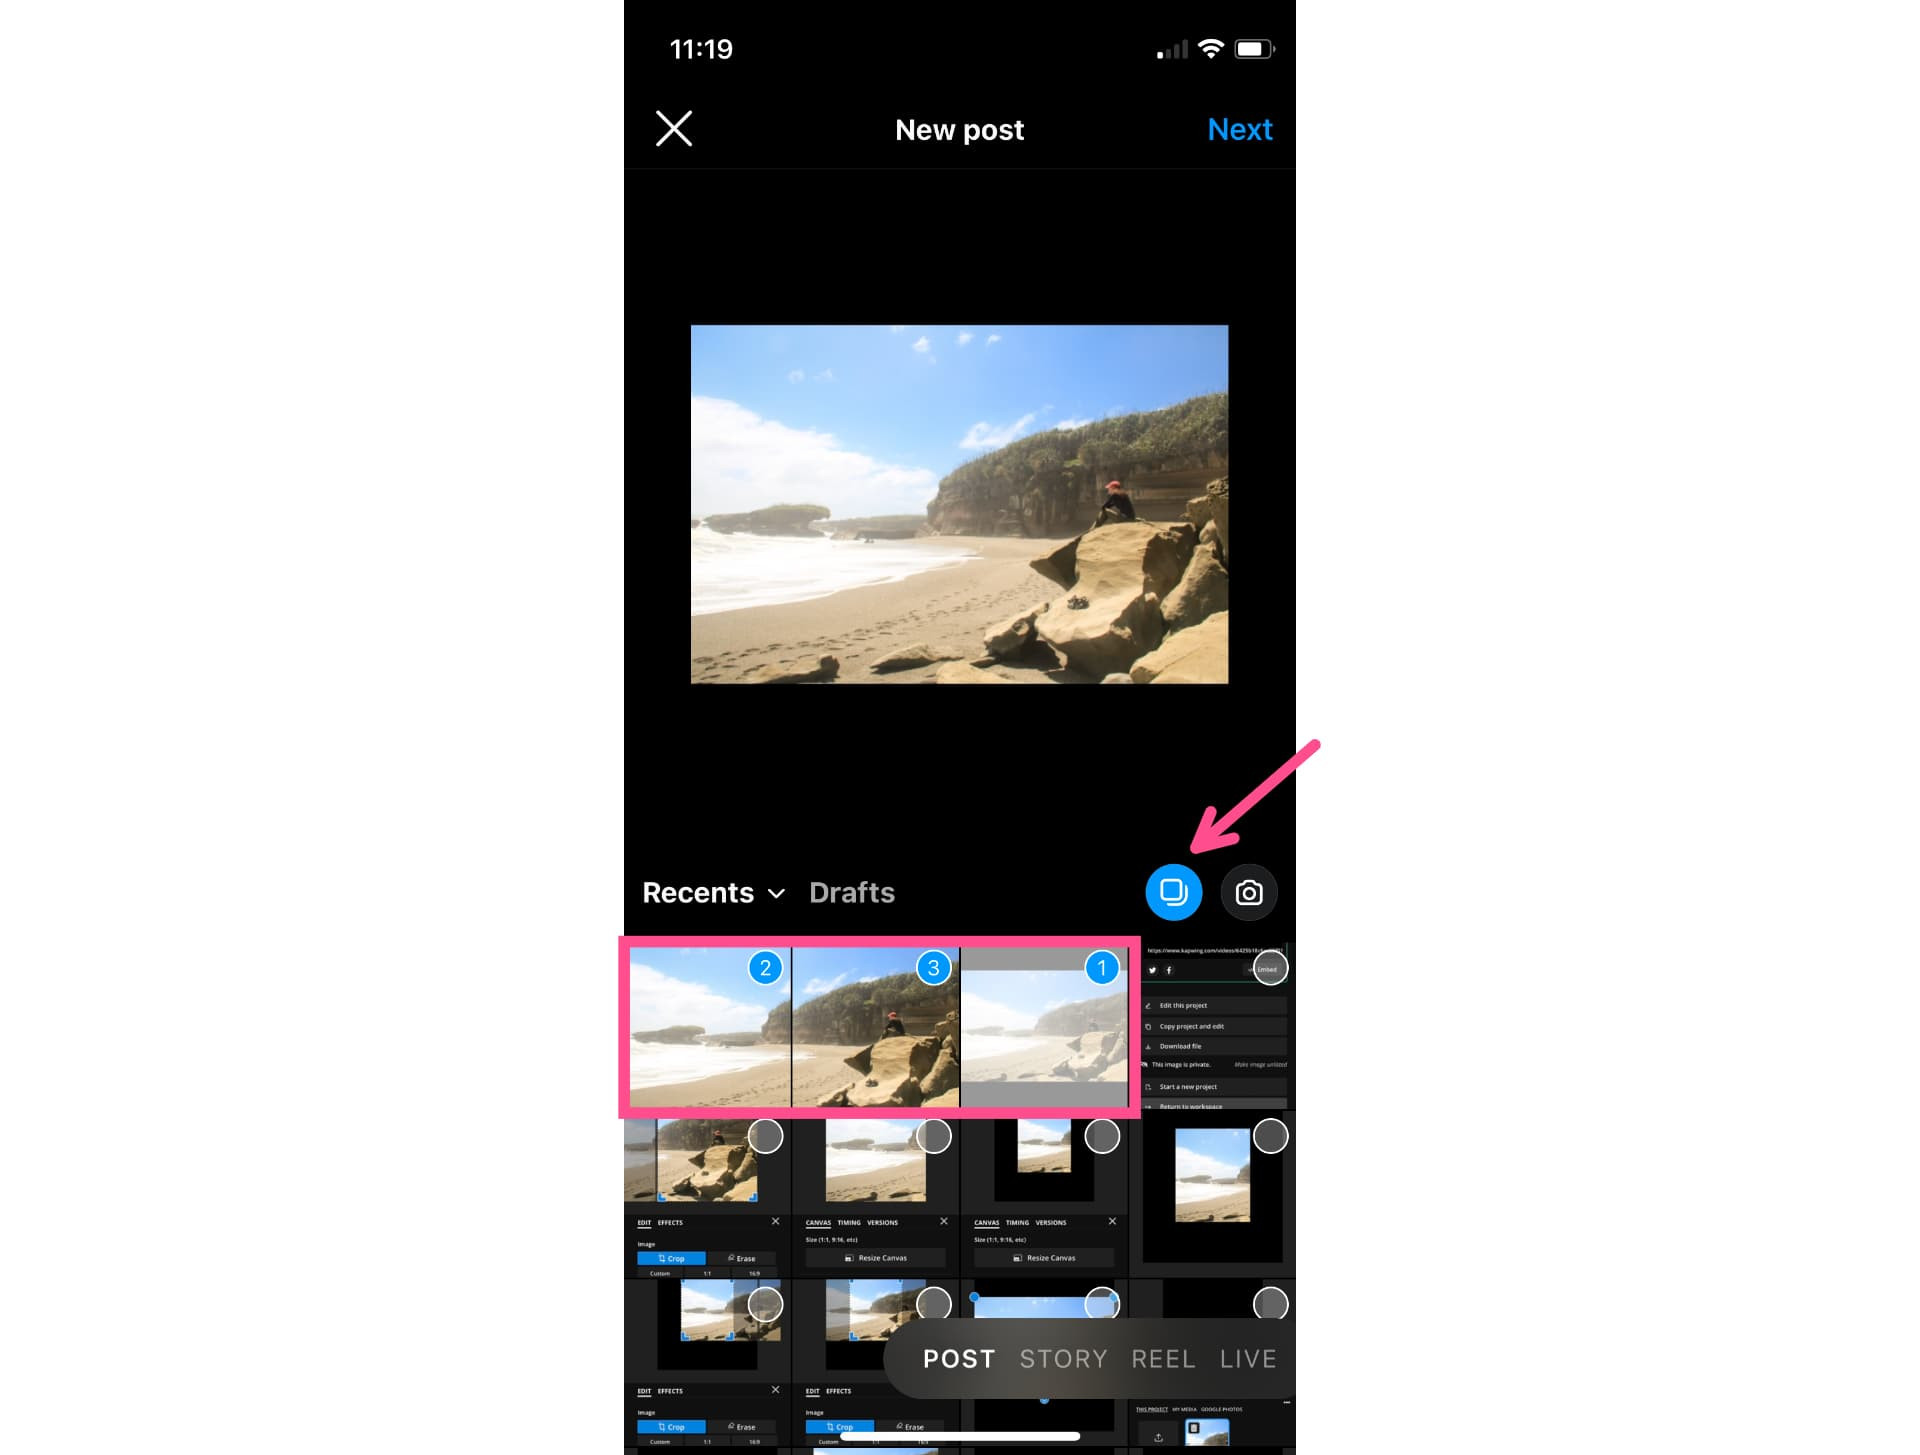 Select Images for Carousel
Preview the carousel to ensure the images align correctly. It should appear as a continuous image when swiped.
In the caption, encourage viewers to swipe to see the whole image. Most users will intuitively swipe when they see a carousel.
5. Maximizing Engagement with Your Instagram Carousel
Creating a visually appealing carousel is just the first step. To truly maximize engagement, consider these additional tips:
- Tell a Story: Use your carousel to tell a story. Arrange your photos in a way that creates a narrative or guides the viewer through a journey.
- Use High-Quality Images: Ensure all your photos and videos are high resolution and visually appealing.
- Write Compelling Captions: Craft engaging captions that encourage interaction and provide context for each image.
- Include a Call to Action: Encourage viewers to like, comment, save, or share your post.
- Use Relevant Hashtags: Add relevant hashtags to increase the visibility of your post.
- Engage with Comments: Respond to comments and questions to build a community around your content.
By implementing these strategies, you can create Instagram carousels that not only look great but also drive meaningful engagement with your audience.
6. Understanding Aspect Ratios and Image Resizing for Instagram
Aspect ratio refers to the proportional relationship between an image’s width and height. Instagram supports various aspect ratios, but for carousels, the most common are 1:1 (square) and 4:5 (vertical). Understanding aspect ratios is crucial for ensuring your images display correctly without unwanted cropping or distortion.
Image resizing involves adjusting the dimensions of an image to fit a specific aspect ratio or size requirement. When creating Instagram carousels with different size photos, you need to resize each image to have the same aspect ratio while preserving its original content. This is typically done by adding a background to the image, effectively padding it to fit the desired dimensions.
There are numerous online tools and apps available for image resizing, including Kapwing, Adobe Photoshop, and Canva. Choose a tool that suits your needs and skill level.
7. Overcoming Common Challenges with Instagram Carousels
While Instagram carousels are a powerful tool, they can also present some challenges. Here are a few common issues and how to overcome them:
- Image Cropping: As mentioned earlier, Instagram automatically crops images in a carousel to match the aspect ratio of the first image. To avoid this, resize all your images beforehand to have the same aspect ratio.
- Image Quality: Resizing images can sometimes lead to a loss of quality. To minimize this, use high-resolution images and choose a resizing method that preserves image detail.
- Carousel Order: It’s important to arrange your images in the correct order to tell your story effectively. Double-check the order before posting to avoid confusion.
- Engagement: Getting people to swipe through your entire carousel can be challenging. Use compelling visuals and captions to keep viewers engaged.
By addressing these challenges proactively, you can create Instagram carousels that are both visually appealing and highly engaging.
8. The Role of dfphoto.net in Mastering Instagram Photography
At dfphoto.net, we are dedicated to helping photographers of all levels master the art of visual storytelling. Our website offers a wealth of resources, including:
- Detailed Tutorials: Step-by-step guides on various photography techniques, including creating stunning Instagram carousels.
- Inspirational Content: Showcases of beautiful photographs and stories from talented photographers around the world.
- Equipment Reviews: Honest and unbiased reviews of cameras, lenses, and other photography gear.
- Community Forum: A place to connect with other photographers, share your work, and ask questions.
Whether you’re a beginner just starting out or an experienced pro looking to refine your skills, dfphoto.net has something for everyone. Visit our website today to explore our resources and join our vibrant community.
Address: 1600 St Michael’s Dr, Santa Fe, NM 87505, United States
Phone: +1 (505) 471-6001
Website: dfphoto.net
9. The Impact of Visual Storytelling on Social Media
Visual storytelling is a powerful tool for connecting with audiences on social media. In today’s fast-paced digital world, people are bombarded with information. Visuals can cut through the noise and capture attention more effectively than text alone.
Instagram, in particular, is a visual platform where images and videos reign supreme. By creating visually compelling content, you can:
- Increase Engagement: Eye-catching visuals are more likely to attract likes, comments, and shares.
- Build Brand Awareness: Consistent and visually appealing content can help you establish a strong brand identity.
- Connect with Your Audience: Visuals can evoke emotions and create a deeper connection with your audience.
- Drive Conversions: Compelling visuals can inspire action and drive conversions, whether it’s visiting your website, making a purchase, or signing up for your newsletter.
Investing in visual storytelling is essential for success on Instagram and other social media platforms.
According to research from the Santa Fe University of Art and Design’s Photography Department, in July 2025, P provides Y: High-quality visual content is 40% more likely to be shared on social media, highlighting its impact on audience engagement.
10. Staying Updated with the Latest Instagram Trends
Instagram is constantly evolving, with new features and trends emerging regularly. To stay ahead of the curve, it’s important to stay updated with the latest developments. Here are a few tips:
- Follow Industry Experts: Subscribe to blogs, newsletters, and social media accounts of photography and social media experts.
- Attend Webinars and Workshops: Participate in online and in-person events to learn about the latest trends and techniques.
- Experiment with New Features: Don’t be afraid to try out new features as they are released.
- Analyze Your Performance: Track your engagement metrics and identify what works best for your audience.
By staying informed and adaptable, you can ensure your Instagram strategy remains effective and relevant.
FAQ: Mastering Instagram Carousels with Different Size Photos
1. Why does Instagram resize multiple photos?
Instagram resizes photos to maintain consistency and optimize the viewing experience across different devices, ensuring that all images meet the platform’s specific size and aspect ratio requirements.
2. Can you post both landscape and portrait on Instagram?
Yes, you can post both landscape and portrait photos on Instagram, either as individual posts or together in a carousel. To include them in a carousel, resize the images first, adding a background to ensure they all have the same aspect ratio.
3. How do you change the orientation of a picture on Instagram?
To change the orientation of a picture on Instagram, use the aspect ratio button (the icon with two diagonal corners) when creating a new post. You can switch between square, portrait, and landscape formats. Note that you cannot change the image orientation when posting a carousel; all images must have the same aspect ratio.
4. What aspect ratio should I use for Instagram carousels?
The recommended aspect ratios for Instagram carousels are 1:1 (square) and 4:5 (vertical). Choose the aspect ratio that best suits your images and overall aesthetic.
5. What is the best tool for resizing images for Instagram?
There are many excellent tools for resizing images, including Kapwing, Adobe Photoshop, and Canva. Kapwing is particularly user-friendly and offers a range of features specifically designed for social media content creation.
6. How can I ensure my images don’t lose quality when resizing?
To minimize quality loss when resizing, start with high-resolution images and choose a resizing method that preserves image detail. Avoid over-compressing your images, and save them in a high-quality format like JPEG or PNG.
7. How can I make my Instagram carousels more engaging?
To make your Instagram carousels more engaging, tell a story with your images, use high-quality visuals, write compelling captions, include a call to action, and use relevant hashtags.
8. Should I use a black or white background when resizing images for Instagram?
A black background is often recommended because many Instagram users have dark mode turned on, which allows the background to blend seamlessly with the platform interface. However, you can also use a white background or any other neutral color that complements your images.
9. How many images can I include in an Instagram carousel?
You can include up to 10 images or videos in a single Instagram carousel.
10. Can I add filters to individual images in an Instagram carousel?
No, if you apply a filter to any of the images or videos in your carousel, Instagram will automatically apply the same filter to all of the images.