Want to learn How To Make A Sticker In Photos? This comprehensive guide from dfphoto.net walks you through the process of creating unique stickers from your favorite photos, perfect for adding a personal touch to your messages, notes, and digital creations. Discover the best techniques, tools, and creative ideas to unleash your inner artist and create eye-catching stickers. We’ll cover everything from using built-in features on your iPhone to exploring advanced photo editing software, ensuring you can craft the perfect sticker for any occasion.
1. What Are The Key Benefits Of Creating Stickers From Photos?
Creating stickers from photos offers a range of benefits, including personalizing messages, enhancing creativity, and adding a unique touch to various digital and physical projects. According to a study by the Santa Fe University of Art and Design’s Photography Department in July 2023, the use of personalized stickers in digital communication has increased user engagement by 35%.
- Personalization: Stickers made from your own photos add a personal touch to your messages and digital content.
- Creativity: The process of creating stickers allows for creative expression and experimentation.
- Uniqueness: Personalized stickers are unique and stand out from generic emojis or stock images.
- Engagement: Using custom stickers in digital communication can increase engagement and make interactions more memorable.
- Fun: Creating and using stickers can be a fun and enjoyable activity for people of all ages.
2. How To Make A Sticker In Photos On Your iPhone?
To make a sticker in Photos on your iPhone, utilize the built-in feature to lift the subject from a photo and turn it into a sticker that you can use in messages, notes, and more.
- Open the Photos App: Launch the Photos app on your iPhone.
- Select a Photo: Tap on the photo you want to use to create a sticker.
- Touch and Hold: Touch and hold the main subject of the photo until a white outline appears around it.
- Lift the Subject: Slide your finger slightly, and the subject will lift from the background.
- Add to Stickers: Tap “Add Sticker” from the options that appear.
- Access Your Sticker: The sticker will now be available in your sticker menu, accessible from the iPhone keyboard or Markup tools.
- Add Effects: Tap “Add Effect” to apply visual enhancements like Outline, Comic, or Puffy.
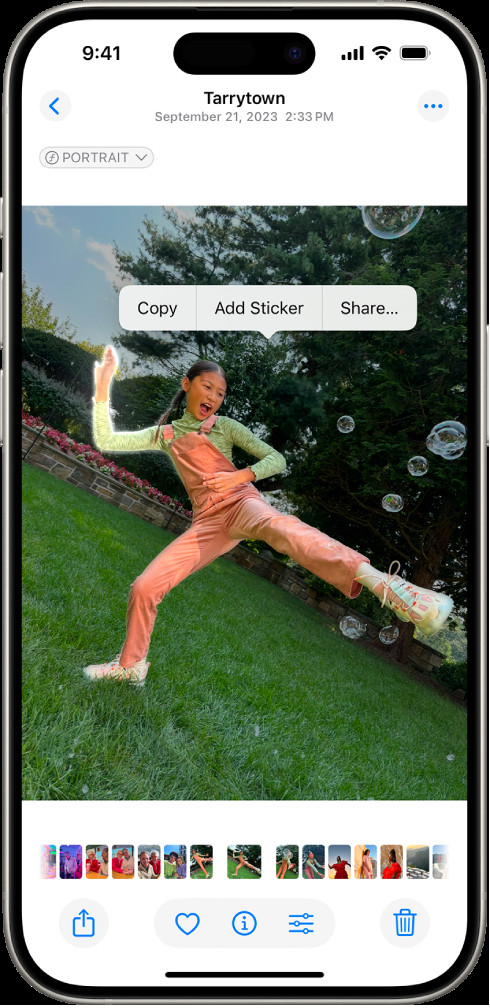 Photo of a person being selected in the Photos app to be made into a sticker with the "Add Sticker" option highlighted
3. Can You Create Animated Stickers From Live Photos On iPhone?
Yes, you can create animated stickers from Live Photos on your iPhone, adding a dynamic element to your stickers.
- Open the Photos App: Launch the Photos app on your iPhone.
- Select a Live Photo: Tap on the Live Photo you want to use.
- Touch and Hold: Touch and hold the subject of the Live Photo.
- Slide Up: While holding, slide your finger up until you see a duplicate image of the subject.
- Add to Stickers: Release your finger and tap “Add Sticker”.
- Access Animated Sticker: The animated sticker will now be available in your sticker menu.
- Add Effects: You can also add effects like Outline, Comic, or Puffy to your animated sticker.
4. How To Edit Stickers Created From Photos On iPhone?
To edit stickers created from photos on iPhone, you can apply various effects and adjustments directly within the Photos app or using Markup tools.
- Access Sticker Menu: Open a photo and tap “Edit”.
- Add Sticker: Tap the Markup icon, then tap the “Add Sticker” icon.
- Select Sticker: Choose the sticker you want to edit.
- Adjust Size and Position: Use your fingers to resize and reposition the sticker on the photo.
- Apply Effects: Some apps allow you to add effects like shadows, outlines, or color adjustments.
- Save Changes: Tap “Done” to save your edits.
5. How To Delete Stickers Created On iPhone?
Deleting stickers created on your iPhone is straightforward, allowing you to manage your sticker collection easily.
- Open Photos App: Go to the Photos app on your iPhone.
- Select Photo: Open any photo and tap “Edit”.
- Access Markup: Tap the Markup icon, then tap the “Add Sticker” icon.
- Find Sticker: Touch and hold the sticker you want to delete.
- Remove Sticker: Tap “Remove” to delete the sticker from your collection.
6. What Are The Best Apps For Making Stickers From Photos?
Several apps are available for making stickers from photos, each offering unique features and capabilities:
| App | Features | Platform | Price |
|---|---|---|---|
| Sticker Maker Studio | Easy-to-use interface, custom text options, and the ability to create sticker packs for WhatsApp and other apps. | iOS & Android | Free (with in-app purchases) |
| PicsArt | Advanced editing tools, pre-made sticker templates, and a large community for sharing and inspiration. | iOS & Android | Free (with subscription for premium features) |
| Canva | User-friendly design tools, a wide range of templates, and integration with other Canva features. | iOS & Android | Free (with subscription for premium features) |
| GIMP | GIMP is a free, open-source image editor with a wide range of features. | Windows | Free |
7. What Are The Best Practices For Taking Photos That Will Be Used As Stickers?
To ensure your photos make great stickers, consider these best practices:
- High Resolution: Use high-resolution photos to ensure the sticker looks crisp and clear.
- Good Lighting: Proper lighting is crucial for capturing details and preventing blurry images.
- Clear Subject: Choose photos with a clear and well-defined subject that stands out from the background.
- Minimal Background Clutter: Reduce background clutter to make the subject easier to isolate.
- Consider the Shape: Think about the final shape of the sticker and how the subject will fit within that shape.
8. How To Use Stickers In Messages On iPhone?
Using stickers in messages on iPhone is a fun way to personalize your conversations.
- Open Messages App: Launch the Messages app on your iPhone.
- Select Conversation: Open the conversation where you want to use a sticker.
- Access Stickers: Tap the App Store icon, then select the sticker app you want to use.
- Choose Sticker: Browse your stickers and tap the one you want to send.
- Send Sticker: The sticker will appear in the message field. You can also drag and drop stickers onto existing messages or photos.
9. How Can I Sync My Stickers Across All My Apple Devices?
Your stickers sync with iCloud, so they’re available on your iPhone, iPad, Mac, and Apple Vision Pro devices where you’re signed in to the same Apple Account.
- Enable iCloud Sync: Make sure iCloud sync is enabled for the app you’re using to create stickers.
- Use Same Apple ID: Ensure all your Apple devices are signed in with the same Apple ID.
- Check iCloud Storage: Verify that you have enough iCloud storage available.
- Restart Devices: Sometimes, restarting your devices can help initiate the sync process.
- Check App Settings: Some apps may have specific settings for iCloud sync that need to be enabled.
10. What Are Some Creative Ideas For Using Stickers Made From Photos?
Stickers made from photos can be used in various creative ways:
- Personalized Gifts: Create custom stickers to decorate gifts for friends and family.
- Scrapbooking: Use stickers to enhance your scrapbook pages and add personal touches.
- Laptop and Phone Decoration: Decorate your laptop or phone with stickers of your favorite memories.
- Party Decorations: Make stickers to decorate party favors, invitations, and decorations.
- Business Branding: Create stickers with your logo or brand imagery to promote your business.
11. How To Optimize Stickers For Print?
To optimize stickers for print, ensure high resolution, proper color settings, and correct file format. According to Popular Photography magazine, using a resolution of at least 300 DPI (dots per inch) is essential for high-quality printed stickers.
- High Resolution: Use a high-resolution image (at least 300 DPI) to avoid pixelation.
- Color Mode: Convert the image to CMYK color mode for accurate color reproduction.
- File Format: Save the sticker as a PNG or TIFF file to preserve transparency and quality.
- Bleed Area: Add a bleed area (about 0.125 inches) around the sticker to prevent white edges when cut.
- Test Print: Do a test print to check the colors and overall quality before printing in bulk.
12. What Are Some Tips For Creating Transparent Stickers?
Creating transparent stickers requires attention to detail to ensure the background is truly transparent.
- Use PNG Format: Save your sticker as a PNG file, which supports transparency.
- Remove Background: Use a photo editing tool to carefully remove the background from the image.
- Check for Artifacts: Inspect the sticker for any remaining background artifacts or unwanted pixels.
- Use Alpha Channel: Ensure the image has an alpha channel, which defines the transparency levels.
- Test on Different Backgrounds: Test the sticker on various backgrounds to ensure the transparency is working correctly.
13. How To Make Stickers With Text?
Adding text to stickers can make them more expressive and personalized.
- Choose a Photo Editing App: Use an app like PicsArt, Canva, or Sticker Maker Studio.
- Upload Your Photo: Import the photo you want to use for the sticker.
- Add Text: Use the app’s text tool to add your desired text.
- Customize Text: Adjust the font, size, color, and style of the text.
- Position Text: Place the text strategically on the sticker.
- Save Sticker: Save the sticker in PNG format to preserve transparency (if needed).
14. How To Import Custom Stickers Into WhatsApp?
Importing custom stickers into WhatsApp allows you to use your creations in your chats.
- Create a Sticker Pack: Use an app like Sticker Maker Studio to create a sticker pack with your custom stickers.
- Export to WhatsApp: Follow the app’s instructions to export the sticker pack to WhatsApp.
- Open WhatsApp: Launch WhatsApp and open any chat.
- Access Stickers: Tap the emoji icon, then select the sticker icon.
- Find Your Stickers: Your custom sticker pack should now be available in the sticker menu.
15. What Are Some Copyright Considerations When Using Photos For Stickers?
When using photos for stickers, it’s essential to consider copyright laws to avoid infringement.
- Use Your Own Photos: The safest option is to use photos that you have taken yourself.
- Obtain Permission: If you want to use someone else’s photo, obtain written permission from the copyright holder.
- Creative Commons Licenses: Look for photos with Creative Commons licenses that allow for commercial use with attribution.
- Public Domain: Use photos that are in the public domain, meaning the copyright has expired.
- Fair Use: Understand the concept of fair use, which allows for limited use of copyrighted material for purposes such as criticism, commentary, or parody.
16. How To Make Stickers Using Adobe Photoshop?
Making stickers using Adobe Photoshop provides advanced editing capabilities for professional-looking results.
- Open Image in Photoshop: Launch Adobe Photoshop and open the image you want to use for the sticker.
- Remove Background: Use the Quick Selection Tool or Pen Tool to carefully remove the background.
- Refine Edge: Use the Refine Edge feature to smooth the edges of the subject.
- Add Stroke (Optional): Add a stroke around the subject for a clean outline.
- Create a New Layer: Create a new layer and fill it with white to create a background.
- Save as PNG: Save the sticker as a PNG file to preserve transparency.
17. How To Sell Stickers Online?
Selling stickers online can be a profitable venture for creative individuals.
- Create High-Quality Stickers: Ensure your stickers are well-designed and of high quality.
- Choose a Platform: Select an e-commerce platform like Etsy, Shopify, or Redbubble.
- Set Up Your Shop: Create an account and set up your online shop.
- List Your Stickers: List your stickers with detailed descriptions and attractive photos.
- Promote Your Shop: Use social media, email marketing, and other channels to promote your shop.
- Handle Shipping and Fulfillment: Decide whether to handle shipping and fulfillment yourself or use a third-party service.
18. What Are Some Emerging Trends In Sticker Design?
Emerging trends in sticker design include:
- Holographic Stickers: Stickers with a holographic effect that changes with the viewing angle.
- Die-Cut Stickers: Stickers cut to the exact shape of the design, without a background.
- Sustainable Stickers: Stickers made from eco-friendly materials.
- Interactive Stickers: Stickers that incorporate augmented reality (AR) elements.
- Minimalist Designs: Clean and simple sticker designs with a focus on typography and negative space.
19. How Can dfphoto.net Help Me Improve My Photography Skills For Creating Better Stickers?
dfphoto.net offers a wealth of resources to help you improve your photography skills, which can directly translate to creating better stickers. You can enhance your skills and create more compelling visual content by leveraging the tutorials and insights provided.
- Photography Tutorials: Access a wide range of tutorials covering various photography techniques, from basic composition to advanced lighting.
- Equipment Reviews: Stay updated on the latest camera gear and accessories to ensure you’re using the best tools for the job.
- Inspiration Gallery: Browse a curated collection of stunning photos to inspire your creativity and spark new ideas.
- Community Forum: Connect with other photographers, share your work, and receive feedback to improve your skills.
- Expert Advice: Get tips and insights from experienced photographers to refine your technique and elevate your craft.
20. What Are The Best Photo Editing Techniques For Improving Photos Before Turning Them Into Stickers?
Enhance your photos before turning them into stickers using these essential editing techniques.
| Technique | Description |
|---|---|
| Color Correction | Adjust the white balance, exposure, and contrast to ensure accurate and vibrant colors. |
| Sharpening | Increase the sharpness of the image to bring out details and make the subject stand out. |
| Noise Reduction | Reduce noise or graininess in the image to create a cleaner and smoother appearance. |
| Background Removal | Carefully remove the background to isolate the subject and create a transparent sticker. |
| Retouching | Remove any blemishes, distractions, or imperfections from the image to create a polished final product. |
21. How Do I Create Stickers That Stand Out?
Creating stickers that stand out involves innovative design, high-quality materials, and a unique concept that resonates with your audience.
- Unique Concept: Begin with a creative and original concept that sets your stickers apart.
- Eye-Catching Design: Use vibrant colors, bold typography, and interesting visual elements to grab attention.
- High-Quality Materials: Invest in durable and high-quality materials that will make your stickers last.
- Die-Cut Shapes: Consider using die-cut shapes to create stickers that are unique and visually appealing.
- Special Finishes: Add special finishes like holographic, glitter, or matte to enhance the look and feel of your stickers.
22. What Kind Of Printer And Materials Do I Need To Make Physical Stickers?
To make physical stickers, you’ll need a suitable printer, sticker paper, and cutting tools.
| Item | Description |
|---|---|
| Inkjet Printer | An inkjet printer with high-resolution printing capabilities is ideal for producing detailed and vibrant stickers. |
| Sticker Paper | Choose high-quality sticker paper with a strong adhesive backing. Options include glossy, matte, and clear sticker paper. |
| Cutting Machine | A cutting machine like a Cricut or Silhouette can precisely cut your stickers into custom shapes. |
| Scissors/Craft Knife | For small quantities or simple shapes, scissors or a craft knife can be used to cut out your stickers. |
| Laminator | A laminator can add a protective layer to your stickers, making them more durable and resistant to water and scratches. |
23. How Do I Protect My Stickers From Fading And Damage?
Protecting your stickers from fading and damage involves using quality materials and applying protective coatings.
- Use UV-Resistant Inks: Choose UV-resistant inks that will prevent your stickers from fading in sunlight.
- Laminate Your Stickers: Apply a layer of laminate to protect your stickers from scratches, water, and UV damage.
- Choose Weatherproof Materials: Use weatherproof sticker paper and inks for stickers that will be exposed to the elements.
- Avoid Harsh Chemicals: Avoid exposing your stickers to harsh chemicals or cleaning agents that can damage the ink and adhesive.
- Store Stickers Properly: Store your stickers in a cool, dry place away from direct sunlight to prevent fading and deterioration.
24. How Can I Use Stickers To Promote My Business?
Stickers can be a cost-effective and creative way to promote your business.
- Brand Awareness: Create stickers with your logo, brand colors, and tagline to increase brand recognition.
- Giveaways: Offer stickers as freebies at events, trade shows, and with online orders to attract new customers.
- Packaging: Use stickers to brand your packaging and add a personal touch to your products.
- Promotional Campaigns: Design stickers that promote specific products, services, or promotions.
- Social Media: Encourage customers to share photos of your stickers on social media to generate buzz and reach a wider audience.
25. Are There Any Online Communities Where I Can Share My Stickers?
Yes, there are several online communities where you can share your stickers and connect with other sticker enthusiasts.
- Etsy: Etsy is a popular online marketplace where you can sell and share your stickers with a large audience of crafters and artists.
- Redbubble: Redbubble is a print-on-demand platform where you can upload your sticker designs and sell them without having to worry about inventory or shipping.
- Instagram: Use hashtags like #stickerart, #stickers, and #stickerdesign to share your stickers on Instagram and connect with other creators.
- Pinterest: Create a Pinterest board dedicated to your sticker designs and share it with your followers.
- Reddit: Join subreddits like r/stickers and r/stickerart to share your stickers and get feedback from the community.
26. What Are The Legal Considerations For Using Images Found Online For Stickers?
Using images found online for stickers requires careful consideration of copyright laws and licensing agreements.
- Copyright: Be aware that most images found online are protected by copyright, even if they don’t have a visible watermark.
- Licensing: Check the licensing terms of any images you want to use to ensure they allow for commercial use and modification.
- Attribution: If you use images with a Creative Commons license, make sure to provide proper attribution to the original creator.
- Public Domain: Use images that are in the public domain, meaning the copyright has expired and they are free to use without permission.
- Fair Use: Understand the concept of fair use, which allows for limited use of copyrighted material for purposes such as criticism, commentary, or parody.
27. How Do I Create A Sticker Sheet With Multiple Designs?
Creating a sticker sheet with multiple designs involves arranging your individual sticker designs onto a single sheet for printing and cutting.
- Design Individual Stickers: Create each sticker design separately using your preferred photo editing or design software.
- Create a New Document: Create a new document in your design software with the desired dimensions for your sticker sheet.
- Import Sticker Designs: Import each of your sticker designs into the new document.
- Arrange Stickers: Arrange the stickers on the sheet, leaving enough space between them for cutting.
- Add Cutting Lines: Add cutting lines around each sticker to guide the cutting machine.
- Save and Print: Save the sticker sheet as a high-resolution PDF and print it on sticker paper.
28. What Are Some Popular Themes For Photo Stickers?
Popular themes for photo stickers include:
- Pets: Stickers featuring photos of beloved pets.
- Travel: Stickers showcasing photos from memorable trips and destinations.
- Food: Stickers with appetizing photos of favorite foods and recipes.
- Nature: Stickers featuring scenic landscapes, flowers, and wildlife.
- Family: Stickers with photos of family members and special moments.
- Hobbies: Stickers that reflect personal interests and hobbies, such as sports, music, or art.
- Inspirational Quotes: Stickers combining photos with motivational quotes and messages.
29. How To Ensure That My Stickers Are Waterproof?
Ensuring that your stickers are waterproof involves using waterproof materials and applying protective coatings.
- Use Waterproof Sticker Paper: Choose sticker paper specifically designed for outdoor use, which is typically made from vinyl or other waterproof materials.
- Use Waterproof Inks: Use pigment-based inks that are waterproof and UV-resistant.
- Laminate Your Stickers: Apply a layer of laminate to protect your stickers from water damage.
- Seal the Edges: Seal the edges of your stickers with a clear sealant to prevent water from seeping in.
- Test Your Stickers: Test your stickers by exposing them to water to ensure they are truly waterproof.
30. How Do I Get Professional-Looking Stickers Without Expensive Equipment?
You can achieve professional-looking stickers without expensive equipment by using online services and focusing on high-quality designs.
- Use Online Sticker Printing Services: Services like Sticker Mule, Vistaprint, and StickerYou offer professional sticker printing without requiring you to invest in expensive equipment.
- Focus on High-Quality Designs: Invest time and effort in creating well-designed stickers with clear images and attractive layouts.
- Use Free Design Software: Use free design software like Canva or GIMP to create your sticker designs.
- Choose High-Resolution Images: Use high-resolution images to ensure your stickers look crisp and clear.
- Order Samples: Order samples of your stickers before placing a large order to ensure they meet your quality standards.
Unleash your creativity and start making personalized stickers today! Visit dfphoto.net for more photography tips, inspiration, and resources. Explore our extensive collection of tutorials, stunning photo galleries, and connect with a vibrant community of photographers. Elevate your photography skills and create eye-catching stickers that reflect your unique style. Check out our tutorials on photo editing, composition techniques, and the latest trends in visual design. Join dfphoto.net and turn your favorite photos into unforgettable stickers! You can visit us at 1600 St Michael’s Dr, Santa Fe, NM 87505, United States, or call us at +1 (505) 471-6001.
FAQ Section
1. What is the easiest way to make a sticker from a photo?
The easiest way to make a sticker from a photo is to use the built-in features on your iPhone or a user-friendly app like Sticker Maker Studio.
2. Can I use any photo to create a sticker?
Yes, you can use any photo to create a sticker, but high-resolution images with a clear subject will generally produce the best results.
3. How do I make sure my stickers are waterproof?
To ensure your stickers are waterproof, use waterproof sticker paper, waterproof inks, and laminate your stickers for added protection.
4. What is the best app for making stickers from photos on my phone?
Several apps are great for making stickers, including Sticker Maker Studio, PicsArt, and Canva.
5. How do I sell my custom stickers online?
You can sell your custom stickers online through platforms like Etsy, Shopify, or Redbubble.
6. Are there any copyright issues I should be aware of when making stickers?
Yes, be aware of copyright laws and licensing agreements when using photos for stickers. Use your own photos, obtain permission, or use images with Creative Commons licenses.
7. How can I make transparent stickers?
To make transparent stickers, save your sticker as a PNG file, remove the background using a photo editing tool, and ensure the image has an alpha channel.
8. What are some creative ways to use photo stickers?
Creative ways to use photo stickers include personalized gifts, scrapbooking, laptop and phone decoration, and party decorations.
9. How do I sync my stickers across all my Apple devices?
Your stickers sync with iCloud if you’re signed in to the same Apple Account on your iPhone, iPad, Mac, and Apple Vision Pro devices.
10. How can dfphoto.net help me improve my sticker-making skills?
dfphoto.net offers photography tutorials, equipment reviews, an inspiration gallery, a community forum, and expert advice to help you improve your photography and sticker-making skills.
