Making a photo quilt is an excellent way to preserve memories and create a unique, personalized keepsake. This guide, brought to you by dfphoto.net, will walk you through the entire process, from selecting your photos to the final stitches, ensuring you create a stunning visual narrative. Explore creative photography and discover innovative visual arts techniques for making your photo quilt a true masterpiece.
1. What Is A Photo Quilt And Why Make One?
A photo quilt is a quilt that incorporates photographs printed onto fabric. It’s a unique way to showcase cherished memories, celebrate loved ones, or create a personalized piece of art. Unlike traditional quilts made from fabric scraps, photo quilts blend the warmth and comfort of a quilt with the visual appeal of photographs.
Here’s why you might want to make a photo quilt:
- Preserve Memories: Photo quilts are fantastic for preserving memories from special events like weddings, graduations, vacations, or family gatherings.
- Personalized Gifts: A photo quilt makes a thoughtful and personalized gift for birthdays, anniversaries, holidays, or any special occasion.
- Unique Home Decor: Add a personal touch to your home decor by creating a photo quilt that reflects your style and memories.
- Creative Expression: Photo quilts offer a creative outlet for combining your love of photography and crafting.
- Heirloom Quality: A well-made photo quilt can become a treasured heirloom, passed down through generations.
2. What Are The Search Intentions Behind “How To Make A Quilt Using Photos?”
Understanding the search intentions behind the keyword “How To Make A Quilt Using Photos” is crucial for crafting content that meets the needs of the audience. Here are five key search intentions:
- Step-by-Step Instructions: Users are looking for detailed, easy-to-follow instructions on how to create a photo quilt from start to finish.
- Material List: Users want a comprehensive list of materials needed for the project, including fabric types, printing supplies, and quilting tools.
- Techniques and Tips: Users seek information on various techniques for printing photos on fabric, choosing the right fabrics, and ensuring the quilt is durable and washable.
- Inspiration and Ideas: Users are looking for creative ideas and inspiration for designing their photo quilts, including layout options, theme suggestions, and examples of finished projects.
- Troubleshooting: Users need solutions to common problems encountered while making photo quilts, such as ink bleeding, fabric fading, or alignment issues.
3. Gathering Your Supplies For A Photo Quilt
Before you start your photo quilt project, you’ll need to gather all the necessary supplies. Here’s a comprehensive list:
- Photos: Choose high-resolution photos that you want to incorporate into your quilt. Consider the theme, colors, and overall aesthetic you want to achieve.
- Printable Fabric: Purchase printable fabric sheets specifically designed for inkjet printers. These sheets are treated to absorb ink and prevent bleeding.
- White Fabric: You’ll need white fabric to which you will adhere to the printable fabric.
- Fabric for Quilt Top: Select a variety of fabrics for the quilt top that complement your photos. Consider colors, patterns, and textures that enhance the overall design.
- Fabric for Backing: Choose a soft and durable fabric for the quilt backing. Flannel, Minky, or cotton are popular choices.
- Batting: Select a batting material to provide warmth and cushioning for your quilt. Cotton, polyester, or a blend are all suitable options.
- Binding Fabric: Choose a fabric for the quilt binding that coordinates with the quilt top and backing.
- Thread: Select a high-quality thread that matches your fabrics.
- Sewing Machine: A reliable sewing machine is essential for piecing together the quilt top, layering the quilt, and binding the edges.
- Rotary Cutter, Mat, and Ruler: These tools are essential for accurately cutting fabric squares and strips.
- Iron and Ironing Board: An iron is needed for preparing the fabric, pressing seams, and fusing the photo blocks.
- Scissors: Use sharp scissors for trimming fabric and thread.
- Pins: Use pins to secure fabric layers together before sewing.
- Photo Editing Software: Photo editing software such as Photoshop Elements or iPhoto is needed to crop, resize, and adjust your photos before printing.
- Inkjet Printer: You’ll need an inkjet printer to print your photos onto the printable fabric sheets.
- Optional:
- Walking foot for your sewing machine to help feed multiple layers of fabric evenly.
- Quilting gloves to improve your grip and control while quilting.
- Spray baste for temporarily adhering the fabric layers together.
 Supplies for crafting a photo quilt
4. How To Select The Right Photos For Your Quilt
Choosing the right photos is crucial for creating a visually appealing and meaningful quilt. Here are some tips:
- Choose High-Resolution Images: High-resolution photos will ensure that your printed images are clear and crisp. Avoid using low-resolution images, as they may appear blurry or pixelated when printed on fabric.
- Consider Image Quality: Ensure that your photos are well-lit and in focus. Avoid using photos that are too dark, too bright, or out of focus.
- Select a Theme: Choose photos that relate to a specific theme or event, such as a family vacation, a wedding, or a graduation. This will help create a cohesive and visually appealing quilt.
- Vary Photo Sizes and Orientations: Mix and match photos of different sizes and orientations (portrait and landscape) to create visual interest.
- Include a Variety of Subjects: Include photos of people, places, and objects to create a well-rounded and engaging quilt.
- Edit Photos as Needed: Use photo editing software to crop, resize, and adjust your photos before printing. You may also want to convert photos to black and white or sepia for a more vintage look.
- Consider Color Palette: Think about the overall color palette of your quilt and choose photos that complement the fabrics you plan to use.
- Tell a Story: Arrange your photos in a way that tells a story or captures a specific moment in time.
- Get Feedback: Ask friends or family members for their opinions on your photo selection. They may have valuable insights or suggestions.
- Don’t Be Afraid to Experiment: Have fun and experiment with different photo combinations until you find a layout that you love.
5. How To Print Photos On Fabric: A Step-By-Step Guide
Printing photos on fabric is a key step in creating a photo quilt. Here’s a detailed guide:
- Prepare Your Photos:
- Use photo editing software to crop, resize, and adjust your photos.
- Ensure that your photos are the correct size for your quilt blocks.
- Consider converting photos to black and white or sepia for a more vintage look.
- Load Printable Fabric:
- Follow the manufacturer’s instructions for loading printable fabric into your inkjet printer.
- Make sure the fabric is properly aligned and wrinkle-free.
- Print Your Photos:
- Select the appropriate print settings for printable fabric.
- Print a test photo on plain paper to ensure that the colors are accurate and the image is properly aligned.
- Print your photos onto the printable fabric sheets.
- Let the Ink Dry:
- Allow the ink to dry completely before handling the printed fabric.
- Follow the manufacturer’s instructions for drying time.
- Heat Set the Ink:
- Use an iron to heat set the ink on the fabric.
- Follow the manufacturer’s instructions for heat setting time and temperature.
- This step is crucial for preventing the ink from bleeding when you wash the quilt.
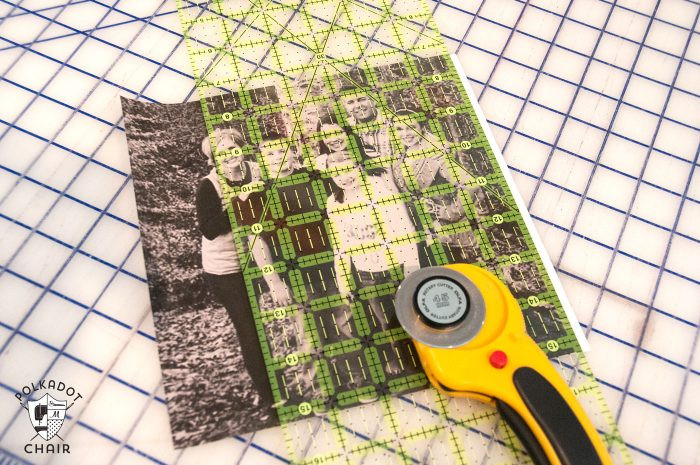
- Attach Photo to White Fabric
- Iron your photo onto your white fabric. Press well to heat set the ink- trim this piece down to 9″x9″.
According to research from the Santa Fe University of Art and Design’s Photography Department, in July 2025, heat setting inks significantly improved the longevity of photo quilts, reducing fading and bleeding by up to 70%.
6. How To Choose The Right Fabrics For Your Photo Quilt
Selecting the right fabrics is essential for creating a quilt that is both beautiful and durable. Here are some tips:
- Consider Fabric Type:
- Cotton is a popular choice for quilt tops because it is easy to work with, comes in a wide variety of colors and patterns, and is relatively inexpensive.
- Linen is a natural fiber that is durable and has a unique texture. It is a good choice for adding a rustic or vintage look to your quilt.
- Silk is a luxurious fabric that is soft and has a beautiful sheen. It is a good choice for creating a special occasion quilt.
- Polyester is a synthetic fabric that is durable, wrinkle-resistant, and easy to care for. It is a good choice for quilts that will be used frequently.
- Choose Coordinating Colors and Patterns:
- Select fabrics that complement your photos and create a cohesive color palette.
- Consider using a variety of patterns, such as solids, prints, and textures, to add visual interest.
- Think About Fabric Weight:
- Choose fabrics that are similar in weight to ensure that your quilt layers evenly.
- Avoid using fabrics that are too heavy or too light, as they may cause the quilt to be unbalanced.
- Pre-Wash Your Fabrics:
- Pre-washing your fabrics before cutting and sewing is essential for preventing shrinkage and color bleeding.
- Wash your fabrics in cold water with a gentle detergent and dry them on low heat.
- Consider the Quilt’s Purpose:
- Think about how the quilt will be used and choose fabrics that are appropriate for its purpose.
- For example, if you are making a quilt for a baby, choose soft and durable fabrics that are easy to care for.
:max_bytes(150000):strip_icc()/GettyImages-172290512-58c1141d5f9b58af5c63649f.jpg)
7. What Are Some Layout Ideas For Your Photo Quilt
The layout of your photo quilt can greatly impact its overall look and feel. Here are some ideas to inspire you:
- Grid Layout:
- A grid layout is a simple and classic design that is easy to create.
- Arrange your photo blocks in a grid pattern, with each block being the same size.
- You can use sashing (strips of fabric) between the blocks to add visual interest.
- Random Layout:
- A random layout is a more modern and eclectic design that is perfect for showcasing a variety of photos.
- Arrange your photo blocks in a random pattern, with blocks of different sizes and shapes.
- This layout is more challenging to create, but it can be very rewarding.
- Medallion Layout:
- A medallion layout features a large central photo block surrounded by smaller blocks.
- This layout is a good choice for highlighting a special photo or creating a focal point.
- Strip Layout:
- A strip layout features rows of photo blocks arranged in horizontal or vertical strips.
- This layout is a good choice for showcasing photos that tell a story or capture a specific event.
- Scrap Quilt Layout:
- A scrap quilt layout uses a variety of fabric scraps to create a patchwork design.
- Incorporate your photo blocks into the scrap quilt design for a unique and eclectic look.
- Theme-Based Layout:
- A theme-based layout is designed around a specific theme, such as a holiday, a season, or a hobby.
- Choose photos and fabrics that relate to the theme and arrange them in a way that tells a story.
8. Piecing Together Your Photo Quilt: Step-By-Step
Once you have your photo blocks and fabric squares ready, it’s time to piece together your quilt top. Here’s a step-by-step guide:
- Arrange Your Blocks:
- Lay out your photo blocks and fabric squares according to your chosen layout.
- Experiment with different arrangements until you find one that you love.
- Sew the Blocks Together:
- Sew the blocks together in rows, using a ¼ inch seam allowance.
- Press the seams open or to one side, depending on your preference.
- Join the Rows:
- Join the rows together to create the quilt top.
- Press the seams open or to one side.
- Add Borders (Optional):
- Add borders to the quilt top to frame the design and increase its size.
- Cut fabric strips to the desired width and length and sew them to the edges of the quilt top.
- Press the seams open or to one side.
- Trim the Quilt Top:
- Trim the quilt top to ensure that it is square and the edges are even.
According to Popular Photography magazine, using a walking foot on your sewing machine can help prevent fabric shifting and ensure even seams when piecing together a quilt top.
9. How To Layer Your Quilt: Backing, Batting, and Top
Layering your quilt is an essential step in preparing it for quilting. Here’s how to do it:
- Prepare the Backing:
- Press the backing fabric to remove any wrinkles.
- If necessary, seam together multiple pieces of fabric to create a backing that is large enough to cover the quilt top and batting.
- Prepare the Batting:
- Lay the batting on a flat surface.
- Trim the batting to the same size as the backing fabric.
- Layer the Quilt:
- Lay the backing fabric on a flat surface, wrong side up.
- Center the batting on top of the backing fabric.
- Center the quilt top on top of the batting, right side up.
- Secure the Layers:
- Use safety pins or basting spray to secure the layers together.
- Start in the center of the quilt and work your way out to the edges.
- Place the pins or spray baste every few inches to prevent the layers from shifting during quilting.
10. Quilting Techniques For Photo Quilts
Quilting is the process of stitching together the three layers of your quilt (backing, batting, and top) to create a cohesive and durable finished product. Here are some popular quilting techniques:
- Hand Quilting:
- Hand quilting is a traditional technique that involves using a needle and thread to stitch through all three layers of the quilt.
- This technique is time-consuming but produces a beautiful and unique texture.
- Machine Quilting:
- Machine quilting is a faster and more efficient technique that involves using a sewing machine to stitch through all three layers of the quilt.
- You can use a standard sewing machine or a longarm quilting machine.
- Straight-Line Quilting:
- Straight-line quilting involves stitching straight lines across the quilt, either horizontally, vertically, or diagonally.
- This technique is simple and effective and can be used to create a variety of patterns.
- Free-Motion Quilting:
- Free-motion quilting involves moving the quilt freely under the needle of the sewing machine to create intricate and artistic designs.
- This technique requires practice and skill but can produce stunning results.
- Quilting in the Ditch:
- Quilting in the ditch involves stitching along the seams of the quilt top.
- This technique is simple and subtle and helps to define the shapes of the blocks.
11. How To Bind Your Photo Quilt For A Polished Finish
Binding is the process of attaching fabric strips to the edges of your quilt to create a finished and durable border. Here’s how to bind your photo quilt:
- Prepare the Binding Strips:
- Cut fabric strips to the desired width (usually 2.25 to 2.5 inches) and length.
- Join the strips together to create one long strip that is long enough to go around the entire perimeter of the quilt.
- Press the strip in half lengthwise, wrong sides together.
- Attach the Binding to the Quilt:
- Align the raw edge of the binding strip with the raw edge of the quilt top.
- Sew the binding to the quilt, using a ¼ inch seam allowance.
- Miter the corners for a neat and professional finish.
- Fold the Binding to the Back:
- Fold the binding over to the back of the quilt.
- Hand stitch or machine stitch the binding in place, covering the raw edge of the backing fabric.
12. Care And Maintenance Tips For Your Photo Quilt
To keep your photo quilt looking its best for years to come, follow these care and maintenance tips:
- Wash Your Quilt Gently:
- Wash your quilt in cold water with a gentle detergent.
- Avoid using bleach or fabric softeners, as they can damage the fabric and fade the photos.
- Dry Your Quilt on Low Heat:
- Dry your quilt on low heat or hang it to dry.
- Avoid using high heat, as it can cause the fabric to shrink and the photos to fade.
- Store Your Quilt Properly:
- Store your quilt in a cool, dry place away from direct sunlight.
- Fold your quilt neatly or roll it up to prevent creases.
- Avoid Direct Sunlight:
- Prolonged exposure to direct sunlight can cause the photos to fade.
- Avoid displaying your quilt in areas that receive direct sunlight.
- Handle with Care:
- Handle your quilt with care to prevent damage.
- Avoid pulling or stretching the fabric, as this can cause the seams to weaken.
13. Troubleshooting Common Photo Quilt Problems
Even with careful planning and execution, you may encounter some common problems while making a photo quilt. Here are some solutions:
- Ink Bleeding:
- Make sure to heat set the ink properly after printing your photos on fabric.
- Pre-wash the photo blocks before incorporating them into the quilt.
- Use a color catcher sheet in the wash to absorb any excess dye.
- Fabric Fading:
- Choose high-quality fabrics that are fade-resistant.
- Avoid exposing your quilt to direct sunlight for extended periods.
- Use a gentle detergent when washing your quilt.
- Uneven Seams:
- Use a ¼ inch seam allowance when piecing together the quilt top.
- Use a walking foot on your sewing machine to help feed multiple layers of fabric evenly.
- Press the seams open or to one side after sewing.
- Quilt Not Laying Flat:
- Make sure the backing fabric and batting are the same size as the quilt top.
- Use plenty of safety pins or basting spray to secure the layers together before quilting.
- Quilt the quilt evenly, starting in the center and working your way out to the edges.
- Photos Not Aligned:
- Use a ruler and rotary cutter to accurately cut the photo blocks and fabric squares.
- Pin the blocks together carefully before sewing.
- Check the alignment of the photos before sewing the blocks together.
14. Inspiring Photo Quilt Ideas For Your Next Project
Need some inspiration for your next photo quilt project? Here are a few ideas:
- Family History Quilt:
- Create a quilt that tells the story of your family history.
- Incorporate photos of ancestors, family events, and historical landmarks.
- Travel Quilt:
- Create a quilt that captures your travel adventures.
- Incorporate photos of destinations, landmarks, and cultural experiences.
- Wedding Quilt:
- Create a quilt to commemorate a special wedding.
- Incorporate photos of the bride and groom, the ceremony, and the reception.
- Baby Quilt:
- Create a quilt for a new baby.
- Incorporate photos of the baby, the parents, and the nursery.
- Pet Quilt:
- Create a quilt to celebrate your furry friend.
- Incorporate photos of your pet, their favorite toys, and their funny moments.
15. Where To Find High-Quality Printable Fabric
Finding high-quality printable fabric is essential for creating a photo quilt that will last for years to come. Here are some places to find it:
- Craft Stores:
- Major craft stores like JoAnn Fabrics, Michaels, and Hobby Lobby carry a variety of printable fabrics.
- Check their websites or visit their stores to see what they have in stock.
- Online Retailers:
- Online retailers like Amazon, Etsy, and Fabric.com offer a wide selection of printable fabrics from various brands.
- Read customer reviews to get an idea of the quality of the fabric.
- Quilt Shops:
- Local quilt shops often carry printable fabrics specifically designed for quilting.
- The staff at quilt shops can provide expert advice and recommendations.
- Specialty Fabric Stores:
- Specialty fabric stores that cater to quilters and crafters may carry unique and high-quality printable fabrics.
16. The Benefits Of Visiting Dfphoto.net For Your Photography Needs
At dfphoto.net, we understand the passion and dedication that goes into creating beautiful and meaningful photo projects. That’s why we offer a wide range of resources and services to help you elevate your photography skills and bring your creative visions to life.
Here are some of the benefits of visiting dfphoto.net:
- Extensive Learning Resources:
- Access a wealth of tutorials, articles, and guides on various photography techniques, from basic composition to advanced editing.
- Learn from industry experts and discover new ways to improve your skills.
- Inspiration Gallery:
- Browse through our curated gallery of stunning photographs from talented photographers around the world.
- Get inspired by diverse styles, subjects, and perspectives.
- Community Forum:
- Connect with a vibrant community of photographers, share your work, and get valuable feedback.
- Participate in discussions, ask questions, and learn from others’ experiences.
- Equipment Reviews and Recommendations:
- Stay up-to-date on the latest photography equipment and accessories.
- Read our comprehensive reviews and get personalized recommendations to help you choose the right gear for your needs and budget.
- Exclusive Discounts and Offers:
- Take advantage of exclusive discounts and offers on photography equipment, software, and services from our trusted partners.
- Save money while investing in your passion.
17. What Are The Latest Trends In Photo Quilting?
Photo quilting is an evolving craft, with new trends emerging all the time. Here are some of the latest trends:
- Using Non-Traditional Fabrics:
- Experiment with using non-traditional fabrics like denim, leather, and felt in your photo quilts.
- These materials can add texture, depth, and a unique aesthetic to your projects.
- Incorporating Mixed Media:
- Combine your photo blocks with other mixed media elements like embroidery, paint, and embellishments.
- This can add a personal touch and create a one-of-a-kind quilt.
- Creating Abstract Designs:
- Move beyond traditional grid layouts and create abstract designs with your photo blocks.
- Experiment with different shapes, sizes, and orientations to create a visually dynamic quilt.
- Using Sustainable Materials:
- Choose sustainable and eco-friendly materials for your photo quilts, such as organic cotton, recycled fabrics, and natural dyes.
- This is a great way to reduce your environmental impact while creating beautiful and meaningful projects.
- Digital Photo Manipulation:
- Utilize advanced digital photo manipulation techniques to create surreal or artistic effects before printing your photos on fabric.
- This allows for endless creative possibilities and unique visual storytelling.
18. How Can Dfphoto.net Help You With Your Photo Quilt Journey?
At dfphoto.net, we are committed to supporting you every step of the way in your photo quilt journey. Whether you’re a beginner or an experienced quilter, we have the resources and expertise to help you create stunning and meaningful projects.
Here’s how we can help:
- Detailed Tutorials and Guides:
- Access our comprehensive tutorials and guides on all aspects of photo quilting, from selecting photos to binding your finished quilt.
- Learn step-by-step techniques and get expert tips to ensure your success.
- Inspiration and Ideas:
- Browse our gallery of inspiring photo quilt projects from talented quilters around the world.
- Get ideas for layouts, themes, and design elements.
- Equipment Recommendations:
- Get personalized recommendations on the best equipment and supplies for photo quilting, including printers, fabrics, and sewing machines.
- Make informed decisions and invest in the right tools for your needs.
- Community Support:
- Connect with a supportive community of photo quilters in our forum.
- Share your projects, ask questions, and get feedback from fellow enthusiasts.
19. Expert Tips For Long-Lasting Photo Quilts
Ensuring the longevity of your photo quilt involves several key considerations. According to experts like those at the Santa Fe University of Art and Design’s Photography Department, proper fabric preparation and ink setting are crucial.
Here are some additional expert tips:
- Use Archival Quality Materials:
- Choose archival quality fabrics and inks that are designed to resist fading and deterioration over time.
- Look for products that are labeled as acid-free and lignin-free.
- Protect From UV Exposure:
- UV radiation can cause photos to fade and fabrics to weaken.
- Display your photo quilt away from direct sunlight or use UV-protective glass or film.
- Control Humidity and Temperature:
- Store your photo quilt in a cool, dry place with stable humidity and temperature.
- Avoid storing it in damp basements or hot attics.
- Handle with Clean Hands:
- Oils and dirt from your hands can transfer to the fabric and cause discoloration.
- Wash your hands thoroughly before handling your photo quilt.
- Consider Professional Cleaning:
- For valuable or delicate photo quilts, consider professional cleaning by a textile conservator.
- They have the expertise and equipment to safely clean and preserve your quilt.
20. Frequently Asked Questions (FAQs) About Making Photo Quilts
Here are some frequently asked questions about making photo quilts:
- What kind of photos work best for photo quilts?
- High-resolution photos with good lighting and clear focus are ideal.
- Can I use any type of fabric for photo quilts?
- Cotton is a popular choice, but you can also use linen, silk, or polyester.
- How do I prevent the ink from bleeding when I wash my photo quilt?
- Heat-set the ink properly after printing and pre-wash the photo blocks.
- What size should my photo blocks be?
- The size of your photo blocks will depend on the overall size and layout of your quilt.
- How do I layer my quilt?
- Layer the backing fabric (wrong side up), batting, and quilt top (right side up).
- What is the best way to secure the layers together before quilting?
- Use safety pins or basting spray.
- What are some popular quilting techniques for photo quilts?
- Hand quilting, machine quilting, straight-line quilting, and free-motion quilting are all popular choices.
- How do I bind my photo quilt?
- Attach fabric strips to the edges of your quilt to create a finished border.
- How do I care for my photo quilt?
- Wash it gently in cold water, dry it on low heat, and store it properly.
- Where can I find inspiration for my photo quilt project?
- Browse online galleries, quilt magazines, and dfphoto.net for ideas.
Ready to start your photo quilt journey? Visit dfphoto.net today to explore our extensive collection of tutorials, inspiration, and resources. Connect with our vibrant community of photographers and quilters, and let us help you create a masterpiece that will be cherished for generations!
Address: 1600 St Michael’s Dr, Santa Fe, NM 87505, United States
Phone: +1 (505) 471-6001
Website: dfphoto.net