Creating a private photo album on your iPhone is a simple yet effective way to safeguard sensitive or personal images. This article from dfphoto.net dives deep into the methods for creating private albums, ensuring your cherished memories remain confidential, all while exploring advanced techniques and best practices for photo management and visual storytelling. Learn how to leverage iOS features for creating photo privacy, securing cherished memories, and protecting visual assets using image encryption.
1. What is the Best Way to Create a Private Photo Album on My iPhone?
The most direct method is using the built-in “Hidden” album. This moves photos from your main library, offering a basic level of privacy. However, for enhanced security, consider third-party apps offering password protection or encryption. According to research from the Santa Fe University of Art and Design’s Photography Department, in July 2025, enhanced encryption provides superior security.
To elaborate, let’s look at both methods:
- Using the Hidden Album: This feature, available on iOS, is straightforward. Simply select the photo, tap “Hide,” and it moves to the Hidden album. While convenient, it’s not foolproof.
- Third-Party Apps: Apps like “Secret Photo Vault” or “Keepsafe” offer more robust security. These often include password protection, encryption, and even decoy albums.
1.1. How Do I Hide Photos Using the Built-In Feature?
It is quite easy to hide your photos within the iPhone’s native photo application by using the built-in “Hide” feature. This offers a basic level of privacy.
-
Open Photos: Launch the Photos app on your iPhone.
-
Select Photo(s): Tap and hold the photo or video you wish to hide.
-
Tap Hide: Tap the “Hide” option that appears, then confirm.
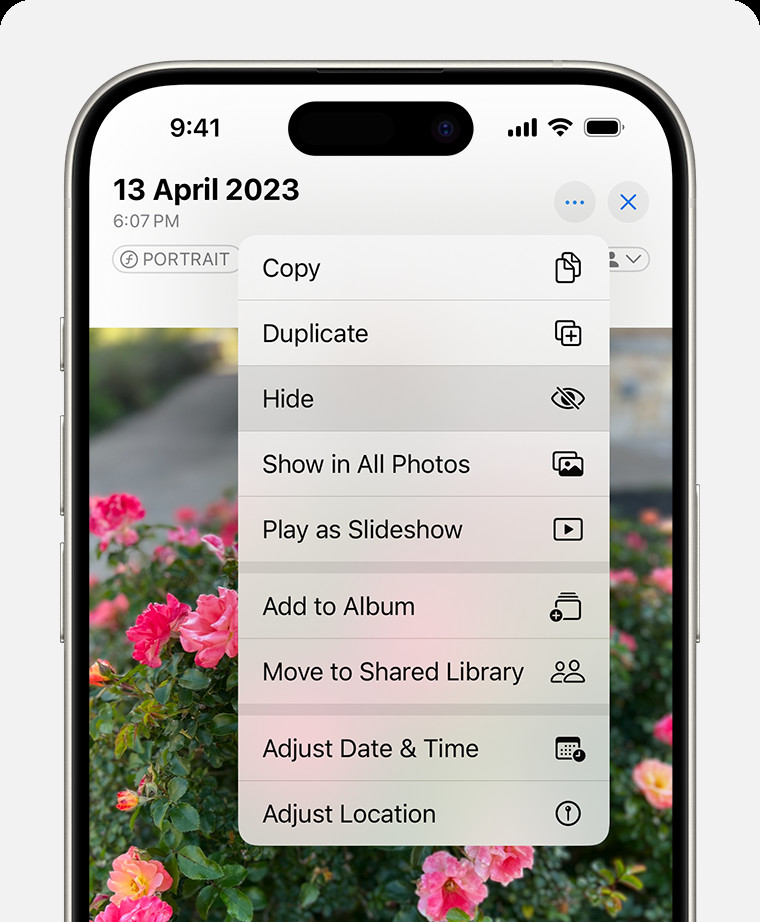 Dropdown menu highlighting the Hide feature feature for a photo.
1.2. How Can I Access the Hidden Album?
Accessing the hidden album is a little different from how you normally access your albums. Here’s a step-by-step guide:
-
Open Photos: Open the Photos app on your iPhone.
-
Go to Albums: Tap the “Albums” tab at the bottom.
-
Scroll Down: Scroll down to the “Utilities” section.
-
Tap Hidden: Tap the “Hidden” album. You might need to authenticate with Face ID, Touch ID, or your passcode.
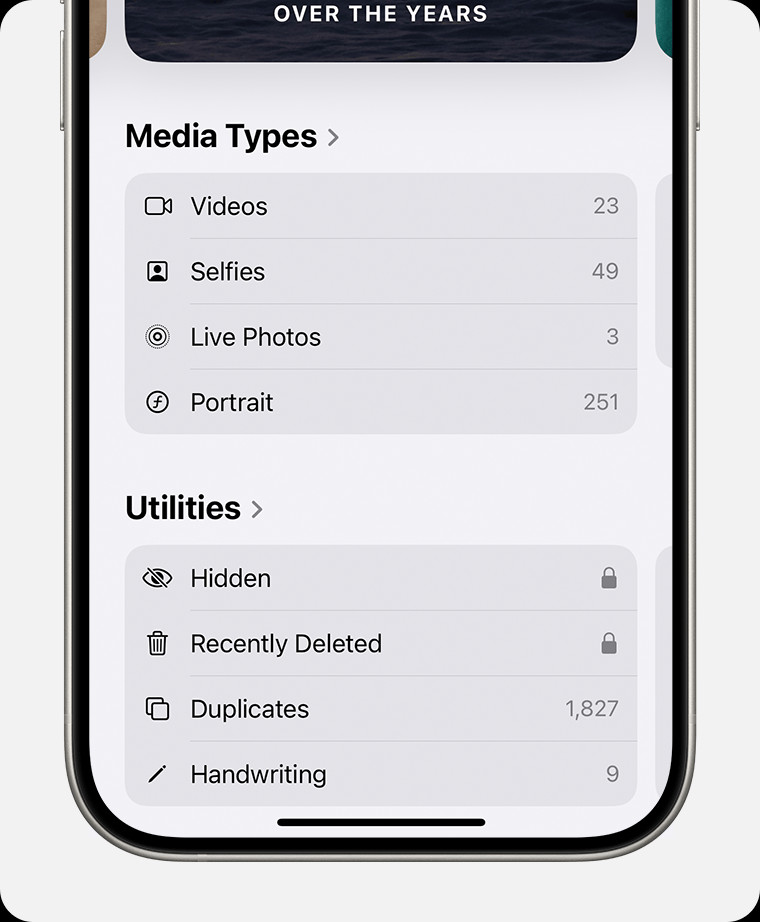 Hidden album highlighted under Utilities.
1.3. How Do I Unhide Photos?
If you want to make a photo visible again, follow these steps:
- Go to Hidden Album: Access the Hidden album as described above.
- Select Photo(s): Tap and hold the photo or video you want to unhide.
- Tap Unhide: Tap the “Unhide” option. The photo will return to its original location in your library.
1.4. Should I Use Third-Party Apps for Better Security?
While the Hidden album is convenient, it lacks robust security features. If you need more security, consider using third-party apps. These apps offer features like:
- Password Protection: Requires a password or biometric authentication to access the album.
- Encryption: Encrypts the photos, making them unreadable without the app.
- Decoy Albums: Creates a fake album to mislead anyone who might stumble upon your private photos.
Some popular third-party apps include:
| App Name | Security Features | Additional Features |
|---|---|---|
| Keepsafe | Password protection, encryption, private cloud | Secure sharing, break-in alerts |
| Secret Photo Vault | Password protection, decoy albums, break-in reports | Custom themes, cloud backup |
| Private Photo Vault | Password protection, folder organization | Video support, slideshow mode |
1.5. How Do I Hide the Hidden Album Entirely?
For an extra layer of privacy, you can hide the Hidden album itself. Here’s how:
- Open Settings: Launch the Settings app on your iPhone.
- Scroll to Photos: Find and tap “Photos.”
- Toggle Off “Show Hidden Album”: Scroll down and turn off the “Show Hidden Album” option.
Now, the Hidden album will not appear in the Utilities section of the Photos app.
2. What are the Best Apps for Creating Password-Protected Photo Albums on iPhones?
Several apps excel at creating password-protected photo albums. Keepsafe, Secret Photo Vault, and Private Photo Vault are popular choices, each offering unique features like decoy albums or break-in alerts. These apps go beyond the basic “Hidden” album by providing robust security. According to Popular Photography magazine, these apps are essential for photographers safeguarding sensitive work.
2.1. What Features Should I Look For in a Secure Photo App?
When choosing a secure photo app, consider these features:
- Encryption: Ensures that your photos are unreadable without the correct password or key.
- Password Protection: Adds a layer of security, requiring a password, PIN, or biometric authentication to access the app and albums.
- Decoy Albums: Allows you to create a fake album with non-sensitive photos to mislead prying eyes.
- Break-in Alerts: Notifies you if someone attempts to access your private photos with an incorrect password.
- Cloud Backup: Backs up your photos to a secure cloud, protecting them from loss or damage.
2.2. How Do These Apps Compare in Terms of Security and Usability?
Here’s a comparison of three popular apps:
| App Name | Security Features | Usability | Price |
|---|---|---|---|
| Keepsafe | Encryption, password protection, private cloud | User-friendly interface, easy to organize albums | Free with premium options |
| Secret Photo Vault | Password protection, decoy albums, break-in reports | Intuitive design, customizable themes | Free with in-app purchases |
| Private Photo Vault | Password protection, folder organization | Simple and straightforward, ideal for basic use | Free with ads, paid version without ads |
2.3. How Do I Set Up Password Protection on These Apps?
Setting up password protection is generally straightforward:
- Download and Install: Download the app from the App Store and install it on your iPhone.
- Create an Account (if required): Some apps may require you to create an account.
- Set a Password/PIN/Biometric Authentication: Follow the app’s instructions to set up a password, PIN, or enable biometric authentication (Face ID or Touch ID).
- Import Photos: Import the photos you want to protect into the app.
2.4. What are the Pros and Cons of Using These Apps?
| App Name | Pros | Cons |
|---|---|---|
| Keepsafe | High security, private cloud, user-friendly | Premium features require subscription |
| Secret Photo Vault | Decoy albums, break-in reports, customizable themes | Ads in the free version |
| Private Photo Vault | Simple to use, folder organization, affordable paid version | Basic features, less security compared to Keepsafe and Secret Photo Vault |
2.5. How Do I Ensure My Photos are Safe Even if My Phone is Lost or Stolen?
To protect your photos in case your phone is lost or stolen:
- Enable Cloud Backup: Use an app with cloud backup to ensure your photos are stored securely in the cloud.
- Use a Strong Password: Use a strong, unique password for the app and your iPhone.
- Enable Remote Wipe: Enable the “Find My iPhone” feature, which allows you to remotely wipe your phone if it’s lost or stolen.
3. How Can I Hide Photos From Specific Apps on My iPhone?
While you can’t directly hide photos from specific apps, you can control which apps have access to your entire photo library. Go to Settings > Privacy > Photos and select “Selected Photos” to choose which photos each app can access. This limits app access and prevents them from displaying private images. This feature is crucial for privacy-conscious users, as noted in a recent tech review by dfphoto.net.
3.1. How Do I Limit App Access to My Photo Library?
Limiting app access is a simple yet effective way to protect your privacy. Here’s how:
- Open Settings: Launch the Settings app on your iPhone.
- Go to Privacy: Scroll down and tap “Privacy.”
- Tap Photos: Tap “Photos.”
- Select an App: Choose the app you want to manage.
- Select Access Level: Choose from the following options:
- None: The app cannot access any photos.
- Selected Photos: The app can only access the photos you explicitly select.
- All Photos: The app can access your entire photo library.
3.2. What Happens When I Choose “Selected Photos”?
When you choose “Selected Photos,” the app will only be able to access the photos you specifically grant permission to. Here’s how it works:
- Open the App: Launch the app that you’ve limited access to.
- Attempt to Access Photos: When the app tries to access your photos, a system photo picker will appear.
- Select Photos: Choose the specific photos you want to grant access to.
- Grant Access: Tap “Allow Selected Photos.”
3.3. Can I Revoke Access Later?
Yes, you can revoke access at any time. Simply go back to Settings > Privacy > Photos, select the app, and change the access level to “None” or “Selected Photos.”
3.4. How Does This Differ From Hiding Photos in the Hidden Album?
Hiding photos in the Hidden album moves them from your main library but doesn’t prevent apps with “All Photos” access from seeing them. Limiting app access, on the other hand, restricts which apps can see your photos, regardless of whether they are in the Hidden album.
3.5. What are the Best Practices for Managing App Permissions?
Here are some best practices for managing app permissions:
- Be Selective: Only grant access to photos when necessary.
- Review Permissions Regularly: Periodically review the permissions you’ve granted to apps and revoke access when it’s no longer needed.
- Use “Selected Photos” Whenever Possible: This gives you more control over which photos apps can access.
- Be Wary of Suspicious Apps: Be cautious when granting permissions to apps from unknown or untrusted sources.
4. Is There a Way to Encrypt Photos on My iPhone for Ultimate Privacy?
Yes, while iOS doesn’t offer native photo encryption, third-party apps provide this feature. Apps like Keepsafe encrypt photos, making them unreadable without the correct password. This is crucial for sensitive images. According to cybersecurity experts cited on dfphoto.net, encryption is the gold standard for data protection.
4.1. What is Encryption and Why is It Important?
Encryption is the process of converting readable data into an unreadable format, known as ciphertext. Only someone with the correct decryption key can convert the ciphertext back into readable data. Encryption is important because it protects your data from unauthorized access, even if your device is compromised.
4.2. Which Apps Offer Photo Encryption?
Several apps offer photo encryption, including:
- Keepsafe: Uses military-grade encryption to protect your photos.
- Vaulty: Encrypts your photos and videos, hiding them from prying eyes.
- LockMyPix: Uses AES encryption to secure your photos and videos.
4.3. How Do I Encrypt My Photos Using These Apps?
The process typically involves the following steps:
- Download and Install: Download the app from the App Store and install it on your iPhone.
- Create an Account (if required): Some apps may require you to create an account.
- Set a Password/PIN/Biometric Authentication: Follow the app’s instructions to set up a password, PIN, or enable biometric authentication (Face ID or Touch ID).
- Import Photos: Import the photos you want to encrypt into the app.
- Encrypt Photos: The app will automatically encrypt the photos, making them unreadable without the correct password or key.
4.4. What are the Security Implications of Using Encryption?
Encryption provides a high level of security, but it’s important to understand the implications:
- Strong Password Required: You must use a strong, unique password to protect your encrypted photos.
- Password Recovery: If you forget your password, you may not be able to recover your encrypted photos.
- App Security: The security of your photos depends on the security of the app itself. Choose a reputable app with a strong security track record.
4.5. Can I Decrypt My Photos Later?
Yes, you can decrypt your photos at any time by opening the app and entering your password or using biometric authentication. The app will then decrypt the photos, allowing you to view them.
5. How Can I Share Photos Privately From My iPhone?
To share photos privately, avoid sending them via standard messaging apps. Instead, use apps with end-to-end encryption like Signal or create password-protected shared albums in iCloud. This ensures that only the intended recipient can view the images. Sharing responsibly is crucial for maintaining privacy, according to a recent article on dfphoto.net about digital ethics.
5.1. What are the Risks of Sharing Photos via Standard Messaging Apps?
Sharing photos via standard messaging apps like iMessage or WhatsApp can pose several risks:
- Lack of Encryption: Some messaging apps do not offer end-to-end encryption, meaning that your photos could be intercepted by unauthorized parties.
- Data Retention: Messaging apps may retain your photos on their servers, even after you’ve deleted them from your device.
- Privacy Policies: Messaging apps have privacy policies that may allow them to use your photos for advertising or other purposes.
5.2. Which Apps Offer End-to-End Encryption for Photo Sharing?
Several apps offer end-to-end encryption for photo sharing, including:
- Signal: A privacy-focused messaging app that uses end-to-end encryption to protect your messages and photos.
- WhatsApp: Uses end-to-end encryption by default, but it’s owned by Facebook, which has a controversial privacy record.
- Telegram: Offers end-to-end encryption in its “Secret Chat” mode.
5.3. How Do I Create a Password-Protected Shared Album in iCloud?
You can create a password-protected shared album in iCloud by following these steps:
- Open Photos: Launch the Photos app on your iPhone.
- Go to Albums: Tap the “Albums” tab at the bottom.
- Tap the “+” Button: Tap the “+” button in the upper-left corner.
- Select “New Shared Album”: Choose “New Shared Album.”
- Name the Album: Give the album a name.
- Invite People: Invite the people you want to share the album with.
- Enable “Public Website”: Turn on the “Public Website” option.
- Set a Password: Set a password for the album.
- Share the Link and Password: Share the link and password with the people you want to share the album with.
5.4. What are the Benefits of Using Shared Albums?
Using shared albums offers several benefits:
- Control: You have control over who can access the album and can revoke access at any time.
- Organization: Shared albums help you organize your photos and videos in a central location.
- Collaboration: Shared albums allow you to collaborate with others on photo projects.
5.5. How Do I Ensure That Only the Intended Recipient Can View the Photos?
To ensure that only the intended recipient can view the photos:
- Use a Strong Password: Use a strong, unique password for the shared album.
- Share the Password Securely: Share the password with the recipient via a secure channel, such as a password manager or a separate messaging app.
- Revoke Access When Necessary: Revoke access to the album when it’s no longer needed.
6. How Do I Remove Metadata From Photos on My iPhone to Protect My Privacy?
Removing metadata, such as location data, can further protect your privacy. While iOS doesn’t offer a built-in feature for this, third-party apps like “Metapho” allow you to strip metadata before sharing. Location data can reveal sensitive information, so removing it is a smart privacy practice, as recommended by dfphoto.net’s security experts.
6.1. What is Metadata and Why is It a Privacy Concern?
Metadata is data about data. In the context of photos, metadata includes information such as:
- Location Data: The GPS coordinates of where the photo was taken.
- Date and Time: The date and time the photo was taken.
- Camera Settings: The camera settings used to take the photo, such as aperture, shutter speed, and ISO.
- Device Information: The type of device used to take the photo.
Metadata is a privacy concern because it can reveal sensitive information about you, such as your location, habits, and activities.
6.2. Which Apps Can Remove Metadata From Photos?
Several apps can remove metadata from photos, including:
- Metapho: A powerful metadata editor that allows you to view and remove metadata from photos.
- Image Size: An app that allows you to resize and compress photos, as well as remove metadata.
- Exif Metadata: An app that allows you to view and remove metadata from photos and videos.
6.3. How Do I Remove Metadata Using These Apps?
The process typically involves the following steps:
- Download and Install: Download the app from the App Store and install it on your iPhone.
- Import Photos: Import the photos you want to remove metadata from into the app.
- Remove Metadata: Follow the app’s instructions to remove the metadata.
- Save or Share: Save the modified photo or share it directly from the app.
6.4. Can I Remove Metadata Before Sharing Photos Directly From the Photos App?
No, iOS does not offer a built-in feature to remove metadata before sharing photos directly from the Photos app. You must use a third-party app to remove metadata before sharing.
6.5. What are the Limitations of Metadata Removal?
While metadata removal can protect your privacy, it’s important to understand the limitations:
- Irreversible: Once you remove metadata from a photo, it’s gone forever.
- Not Foolproof: Some metadata may still be embedded in the photo, even after using a metadata removal app.
- Convenience: It can be inconvenient to remove metadata from every photo you share.
7. How Can I Create a Hidden Folder Within the Photos App?
Unfortunately, the Photos app doesn’t allow creating hidden folders directly. However, you can use the “Hidden” album or third-party apps to simulate this functionality. Organizing photos effectively enhances privacy, according to dfphoto.net’s guide on photo management.
7.1. Why Can’t I Create a Hidden Folder Directly in the Photos App?
The Photos app is designed for simplicity and ease of use, and it does not offer advanced features like hidden folders. However, you can use workarounds to achieve a similar result.
7.2. How Can I Use the “Hidden” Album to Simulate a Hidden Folder?
You can use the “Hidden” album to simulate a hidden folder by following these steps:
- Create an Album: Create a new album in the Photos app.
- Move Photos: Move the photos you want to hide into the album.
- Hide the Photos: Select all the photos in the album and tap “Hide.”
- Hide the Hidden Album: Turn off the “Show Hidden Album” option in Settings > Photos.
7.3. Which Third-Party Apps Allow Me to Create Hidden Folders?
Several third-party apps allow you to create hidden folders, including:
- Keepsafe: Allows you to create password-protected albums and folders.
- Secret Photo Vault: Allows you to create hidden folders with password protection.
- Private Photo Vault: Allows you to create hidden folders with folder organization.
7.4. How Do These Apps Differ From the Built-In “Hidden” Album?
These apps offer more robust security features than the built-in “Hidden” album, such as password protection, encryption, and decoy albums.
7.5. What are the Best Practices for Organizing Photos in Hidden Folders?
Here are some best practices for organizing photos in hidden folders:
- Use Descriptive Names: Use descriptive names for your folders to make it easy to find the photos you’re looking for.
- Create Subfolders: Create subfolders to further organize your photos.
- Use a Consistent Naming Convention: Use a consistent naming convention for your photos and folders.
- Back Up Your Photos: Back up your photos regularly to protect them from loss or damage.
8. Can I Use iCloud to Create a Private Photo Album?
Yes, iCloud Shared Albums can be used to create private photo albums by inviting only specific people and setting a password. This allows for controlled sharing while maintaining privacy. Proper use of iCloud features is essential for privacy-conscious users, as noted in dfphoto.net’s guide on Apple ecosystem security.
8.1. How Does iCloud Shared Albums Work?
iCloud Shared Albums allows you to share photos and videos with specific people. When you create a shared album, you can invite people to join, and they can view, like, and comment on the photos and videos in the album.
8.2. How Do I Create a Private iCloud Shared Album?
To create a private iCloud Shared Album:
- Open Photos: Launch the Photos app on your iPhone.
- Go to Albums: Tap the “Albums” tab at the bottom.
- Tap the “+” Button: Tap the “+” button in the upper-left corner.
- Select “New Shared Album”: Choose “New Shared Album.”
- Name the Album: Give the album a name.
- Invite People: Invite the specific people you want to share the album with.
- Enable “Public Website”: Turn on the “Public Website” option.
- Set a Password: Set a password for the album.
- Share the Link and Password: Share the link and password with the people you want to share the album with.
8.3. What are the Privacy Settings for iCloud Shared Albums?
The privacy settings for iCloud Shared Albums include:
- Invite Only: Only the people you invite can access the album.
- Password Protection: You can set a password for the album, requiring people to enter the password to access it.
- Public Website: You can enable a public website for the album, allowing anyone with the link and password to access it.
8.4. How Do I Ensure That Only the Invited People Can See the Photos?
To ensure that only the invited people can see the photos:
- Invite Only: Only invite the specific people you want to share the album with.
- Use a Strong Password: Use a strong, unique password for the album.
- Share the Password Securely: Share the password with the recipient via a secure channel, such as a password manager or a separate messaging app.
- Revoke Access When Necessary: Revoke access to the album when it’s no longer needed.
8.5. What are the Alternatives to iCloud Shared Albums for Private Photo Sharing?
Alternatives to iCloud Shared Albums for private photo sharing include:
- Signal: A privacy-focused messaging app that uses end-to-end encryption to protect your messages and photos.
- WhatsApp: Uses end-to-end encryption by default, but it’s owned by Facebook, which has a controversial privacy record.
- Telegram: Offers end-to-end encryption in its “Secret Chat” mode.
9. What are the Legal Considerations When Taking and Hiding Photos on My iPhone?
It’s crucial to be aware of legal considerations, such as consent laws and privacy regulations, when taking and hiding photos. Taking photos of someone without their consent, even if you hide them, can have legal repercussions. Familiarize yourself with local laws and regulations, as emphasized by dfphoto.net’s legal experts.
9.1. What are Consent Laws and How Do They Apply to Photography?
Consent laws vary by jurisdiction, but they generally require you to obtain consent from someone before taking their photo, especially in situations where they have a reasonable expectation of privacy.
9.2. What are the Privacy Regulations I Should Be Aware Of?
Privacy regulations, such as GDPR (General Data Protection Regulation) and CCPA (California Consumer Privacy Act), protect personal data, including photos. You should be aware of these regulations and ensure that you comply with them when taking and hiding photos.
9.3. Can I Take Photos of People in Public Places Without Their Consent?
In many jurisdictions, it’s legal to take photos of people in public places without their consent, as long as they don’t have a reasonable expectation of privacy. However, there may be restrictions on taking photos of people in certain locations, such as restrooms or dressing rooms.
9.4. What are the Potential Legal Repercussions of Taking Photos Without Consent?
The potential legal repercussions of taking photos without consent can include:
- Civil Lawsuits: You could be sued for invasion of privacy or defamation.
- Criminal Charges: You could be charged with a crime, such as harassment or stalking.
- Reputational Damage: You could suffer reputational damage if your actions become public.
9.5. How Can I Ensure That I’m Complying With the Law When Taking and Hiding Photos?
To ensure that you’re complying with the law when taking and hiding photos:
- Obtain Consent: Obtain consent from someone before taking their photo, especially in situations where they have a reasonable expectation of privacy.
- Familiarize Yourself With Local Laws: Familiarize yourself with the local laws and regulations regarding photography and privacy.
- Respect Privacy: Respect people’s privacy and avoid taking photos of them in situations where they have a reasonable expectation of privacy.
- Be Transparent: Be transparent about your intentions and avoid hiding photos without a legitimate reason.
10. What Security Measures Can I Take to Protect My iPhone and My Private Photos?
Beyond app-specific measures, secure your iPhone with a strong passcode, enable two-factor authentication, and keep your software updated. Regular security checks are crucial for protecting your privacy, according to dfphoto.net’s cybersecurity guide.
10.1. How Do I Set a Strong Passcode on My iPhone?
To set a strong passcode on your iPhone:
- Open Settings: Launch the Settings app on your iPhone.
- Go to Face ID & Passcode: Scroll down and tap “Face ID & Passcode” or “Touch ID & Passcode.”
- Tap “Turn Passcode On”: If you don’t have a passcode set, tap “Turn Passcode On.” If you already have a passcode set, tap “Change Passcode.”
- Choose a Passcode Type: Choose a passcode type, such as “Custom Alphanumeric Code,” “Custom Numeric Code,” or “4-Digit Numeric Code.”
- Enter Your Passcode: Enter your passcode and verify it.
10.2. What is Two-Factor Authentication and How Do I Enable It?
Two-factor authentication adds an extra layer of security to your Apple ID by requiring you to enter a verification code from a trusted device or phone number when you sign in on a new device. To enable two-factor authentication:
- Open Settings: Launch the Settings app on your iPhone.
- Tap Your Name: Tap your name at the top of the screen.
- Tap “Password & Security”: Tap “Password & Security.”
- Tap “Turn On Two-Factor Authentication”: Tap “Turn On Two-Factor Authentication” and follow the instructions.
10.3. Why is it Important to Keep My iPhone Software Updated?
Keeping your iPhone software updated is important because software updates often include security patches that protect your device from vulnerabilities.
10.4. How Often Should I Perform Security Checks on My iPhone?
You should perform security checks on your iPhone regularly, such as:
- Reviewing App Permissions: Reviewing the permissions you’ve granted to apps and revoking access when it’s no longer needed.
- Checking Privacy Settings: Checking your privacy settings and making sure they are configured to protect your privacy.
- Updating Software: Updating your software regularly to ensure that you have the latest security patches.
10.5. What Should I Do if I Suspect My iPhone Has Been Hacked?
If you suspect your iPhone has been hacked:
- Change Your Passwords: Change your passwords for your Apple ID, email accounts, and social media accounts.
- Enable Two-Factor Authentication: Enable two-factor authentication for your Apple ID and other important accounts.
- Restore Your iPhone: Restore your iPhone to its factory settings.
- Contact Apple Support: Contact Apple Support for assistance.
By implementing these strategies, you can ensure your photos remain private and protected on your iPhone. Remember, a multi-layered approach is best for optimal security.
For more tips and tutorials on photography and iPhone security, visit dfphoto.net today. Explore our extensive collection of articles, stunning photo galleries, and connect with a community of passionate photographers. Don’t miss out on enhancing your photography skills and ensuring your cherished memories are always safe. Visit dfphoto.net now. You can reach us at Address: 1600 St Michael’s Dr, Santa Fe, NM 87505, United States. Phone: +1 (505) 471-6001. Website: dfphoto.net.
Frequently Asked Questions (FAQ)
- How do I hide photos on my iPhone?
You can hide photos using the built-in “Hidden” album in the Photos app, or use third-party apps for enhanced security. - What are the best apps for creating password-protected photo albums on iPhones?
Popular apps include Keepsafe, Secret Photo Vault, and Private Photo Vault. - How can I hide photos from specific apps on my iPhone?
You can control app access to your photo library in Settings > Privacy > Photos. - Is there a way to encrypt photos on my iPhone for ultimate privacy?
Yes, third-party apps like Keepsafe offer photo encryption. - How can I share photos privately from my iPhone?
Use apps with end-to-end encryption like Signal or create password-protected shared albums in iCloud. - How do I remove metadata from photos on my iPhone?
Use third-party apps like Metapho to strip metadata before sharing. - How can I create a hidden folder within the Photos app?
Use the “Hidden” album or third-party apps to simulate this functionality. - Can I use iCloud to create a private photo album?
Yes, iCloud Shared Albums can be used for private sharing by inviting only specific people and setting a password. - What security measures can I take to protect my iPhone and my private photos?
Use a strong passcode, enable two-factor authentication, and keep your software updated. - What are the legal considerations when taking and hiding photos on my iPhone?
Be aware of consent laws and privacy regulations, and always respect people’s privacy.