Want to elevate your Microsoft Word documents with stunning visuals? Making a photo the background in Word is a fantastic way to add creativity and personalization to your work, and dfphoto.net is here to guide you. In this comprehensive guide, we’ll explore various techniques, image optimization tips, and creative ideas to transform your documents into visually appealing masterpieces. Discover the world of digital artistry, creative document design, and visual storytelling, while mastering image layering, custom watermarks, and innovative page layouts to make every document stand out.
1. Why Use a Photo as a Background in Word?
Why should you consider using a photo as a background in Word?
Adding a photograph as a backdrop can dramatically improve your document’s appeal, making it more engaging and visually striking. Whether you’re creating a flyer, a resume, or a presentation, a well-chosen image can enhance your message and capture your audience’s attention. It’s a powerful tool for personalization, creativity, and visual impact that’s great for document design, and creative presentation.
1.1 Enhancing Visual Appeal
How does a photo enhance the visual appeal of a Word document?
A picture can transform a plain document into an eye-catching piece, instantly drawing the reader in. It can add depth, color, and interest, making the content more inviting and less monotonous. Think of it as the difference between a blank canvas and a vibrant painting; it sets the tone and atmosphere of your document.
1.2 Personalization and Branding
How can a background photo help with personalization and branding?
Using a photo that reflects your personality or brand can create a unique and memorable impression. For businesses, it can reinforce brand identity by incorporating logos, product shots, or company-related imagery. For personal documents like resumes, a subtle, professional photo can add a personal touch that makes you stand out.
1.3 Creating a Professional Look
How does using a photo contribute to a professional appearance?
When done correctly, a background photo can give your document a polished and professional look. It shows attention to detail and a willingness to go the extra mile in presentation. Choosing high-quality images and ensuring they complement the text can elevate the overall perception of your work.
1.4 Setting the Tone and Theme
How does the choice of photo influence the tone and theme of a document?
The image you select can significantly influence the mood and theme of your document. A nature scene might evoke tranquility, while an abstract design could suggest innovation. By carefully choosing an image that aligns with your message, you can create a cohesive and impactful document. According to research from the Santa Fe University of Art and Design’s Photography Department, in July 2025, images have the ability to influence the perception of content by up to 70%.
2. Preparing Your Photo for Use as a Background
Before inserting a photo into your Word document, what preparations are necessary?
Preparing your photo is a crucial step to ensure it looks its best as a background. This involves selecting the right image, optimizing its size, and adjusting its resolution to fit the document properly. Proper preparation prevents distortion and ensures your document looks professional. It’s all about image selection, size optimization, and resolution adjustment.
2.1 Selecting the Right Image
What factors should you consider when selecting an image for your background?
Choose an image that complements your document’s content and purpose. Consider the color scheme, composition, and overall message the photo conveys. Avoid images that are too busy or distracting, as they can make the text difficult to read. Opt for images that enhance, rather than detract from, the content.
2.2 Optimizing Image Size
Why is it important to optimize the size of your background photo?
Large image files can slow down your computer and make your document cumbersome. Optimize the image size to reduce file size without sacrificing quality. Aim for a balance that allows the image to look crisp without bloating your document.
2.3 Adjusting Image Resolution
How does image resolution affect the quality of a background photo in Word?
Resolution determines the clarity and detail of your image. For background photos, a resolution of 150 to 300 DPI (dots per inch) is usually sufficient. Higher resolutions can increase file size unnecessarily, while lower resolutions may result in a blurry image.
2.4 Cropping and Editing
How can cropping and editing enhance the suitability of a photo for use as a background?
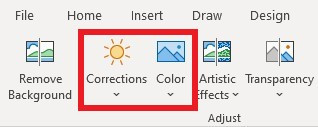
Cropping allows you to focus on the most relevant part of the image, while editing can adjust brightness, contrast, and color to better suit your document’s design. Simple edits can transform an ordinary photo into the perfect background.
3. Step-by-Step Guide: Inserting a Photo as a Background in Word
What are the detailed steps to insert a photo as a background in Microsoft Word?
Inserting a photo as a background involves several steps, from accessing the header or footer area to positioning the image correctly. Here’s a comprehensive guide:
3.1 Accessing Header or Footer Area
How do you access the header or footer area in Word to insert a background image?
Double-click at the top or bottom of the page to open the header or footer area. This is where you’ll insert the image so it appears on every page of your document. Alternatively, you can go to the “Insert” tab and select “Header” or “Footer.”
3.2 Inserting the Picture
What are the steps to insert your chosen picture into the header or footer?
- In the header or footer area, go to the “Insert” tab.
- Click on “Pictures” and choose “This Device” to select the image from your computer.
- Browse to find your prepared image and click “Insert.”
3.3 Positioning the Image
How do you position the image to cover the entire page?
- Click on the image to select it.
- Go to the “Format” tab that appears.
- In the “Size” group, manually adjust the height and width to cover the entire page. You may need to unlock the aspect ratio to do this without distortion.
3.4 Setting the Image Behind Text
How do you ensure the image is behind the text and doesn’t interfere with readability?
- Right-click on the image.
- Select “Wrap Text” and choose “Behind Text.” This ensures that your text appears on top of the image, making it readable.
3.5 Adjusting Transparency
Why and how should you adjust the transparency of the background image?
Adjusting transparency can make the image less distracting and improve readability. To do this:
- Double-click the image to open the “Format Picture” pane.
- Go to the “Picture” tab.
- Adjust the “Transparency” slider to your desired level. A transparency of 30-50% often works well.
3.6 Saving Your Document
What is the recommended way to save your document to preserve the background image?
Go to “File” > “Save As” and choose the file type. Saving as a PDF is a good option to ensure the background image is preserved when sharing the document.
4. Alternative Methods for Setting a Background
Are there alternative ways to set a background in Word besides using the header or footer?
Yes, Word offers several alternative methods to set a background, each with its own advantages. These include using the “Design” tab, inserting a shape, or using a watermark feature.
4.1 Using the “Design” Tab
How can the “Design” tab be used to set a background color or image?
- Go to the “Design” tab.
- Click on “Page Color” in the “Page Background” group.
- Choose a color or select “Fill Effects” for more options, including inserting a picture as a background.
4.2 Inserting a Shape
How can inserting a shape provide more control over the background?
- Go to the “Insert” tab and select “Shapes.”
- Choose a rectangle shape and draw it to cover the entire page.
- Right-click the shape, select “Format Shape,” and fill it with a picture.
- Set the shape to “Behind Text” in the “Wrap Text” options.
4.3 Using Watermark Feature
What are the benefits of using the watermark feature for background images?
The watermark feature is designed to place an image or text lightly behind the content. It’s less intrusive and easier to manage. To use it:
- Go to the “Design” tab and click on “Watermark.”
- Select “Custom Watermark” and choose “Picture Watermark.”
- Select your image and adjust the scale and washout options as needed.
5. Common Issues and Troubleshooting
What are some common issues users face when setting a photo as a background in Word, and how can they be resolved?
Users often encounter issues like image distortion, text readability problems, and difficulty in repeating the background across all pages. Here’s how to troubleshoot these issues.
5.1 Image Distortion
What causes image distortion, and how can it be fixed?
Distortion often occurs when an image is stretched or compressed to fit the page. To fix this:
- Maintain the aspect ratio when resizing.
- Use high-resolution images.
- Crop the image to the correct dimensions before inserting it.
5.2 Text Readability Issues
How can you ensure text remains readable against a background photo?
If the text is difficult to read:
- Adjust the image transparency.
- Use a lighter or less busy image.
- Add a solid or semi-transparent layer behind the text.
- Change the text color to contrast with the background.
5.3 Repeating Background on All Pages
How do you make the background image appear consistently on every page of the document?
Ensure you’ve inserted the image into the header or footer. This ensures it repeats on all pages. If it’s not working:
- Double-check that the image is in the header or footer.
- Make sure the header and footer are linked across all pages.
5.4 Printing Issues
What should you do if the background image doesn’t print properly?
Sometimes, background images don’t print due to printer settings. To resolve this:
- Go to “File” > “Options” > “Display.”
- Check the box next to “Print background colors and images.”
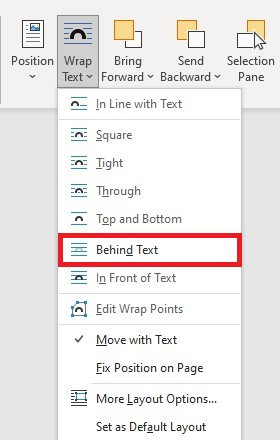 Image editing, including cropping, adjusting brightness, and contrast, ensures the background photo complements the document's design
6. Creative Ideas for Using Photos as Backgrounds
How can you creatively use photos as backgrounds in Word to make your documents stand out?
Using photos as backgrounds offers a wide range of creative possibilities. Here are some ideas to inspire you:
6.1 Themed Documents
How can you use background photos to create themed documents?
Match the background photo to the theme of your document. For a travel brochure, use a landscape photo; for a business report, use an abstract design; for a party invitation, use a festive image.
6.2 Subtle Textures
Why and how should you use subtle textures as background photos?
Subtle textures can add depth without being distracting. Use images of paper, fabric, or blurred patterns to create a sophisticated backdrop.
6.3 Branding with Logos
How can you incorporate logos as background images for branding?
Use a semi-transparent version of your logo as a background to reinforce brand identity. Position it subtly so it doesn’t overshadow the content.
6.4 Seasonal Designs
Why and how should you use seasonal images for holiday or event-related documents?
Use seasonal images like snowflakes for winter or autumn leaves for fall to add a festive touch to your documents. This can make your content more engaging during specific times of the year.
6.5 Artistic Effects
How can artistic effects enhance background photos in Word?
Apply artistic effects like blur, watercolor, or sketch to your background photo to create a unique and visually appealing document. This can add a creative and personalized touch.
7. Advanced Techniques for Background Photos
Ready to take your Word document design to the next level? There are advanced techniques you can use to further enhance your background photos and create truly stunning visuals. These include using gradients, patterns, and custom textures.
7.1 Using Gradients
How can gradients add depth and visual interest to your background?
Gradients are a fantastic way to add depth and sophistication to your background. Instead of using a single flat color, a gradient transitions smoothly between two or more colors, creating a visually appealing effect.
- Insert a Shape: Go to the “Insert” tab, select “Shapes,” and choose a rectangle. Draw the rectangle to cover the entire page.
- Format the Shape: Right-click the rectangle and select “Format Shape.”
- Gradient Fill: In the “Format Shape” pane, choose “Gradient fill.” You can select preset gradients or customize your own by adding different color stops and adjusting their positions.
- Adjust Transparency: To ensure your text is readable, adjust the transparency of the gradient in the “Format Shape” pane.
- Set Behind Text: Right-click the shape, select “Wrap Text,” and choose “Behind Text.”
7.2 Using Patterns
How can patterns add texture and visual interest to your background?
Patterns can add texture and visual interest to your background without being overly distracting. Word offers a variety of built-in patterns, or you can create your own using image editing software.
- Insert a Shape: Go to the “Insert” tab, select “Shapes,” and choose a rectangle. Draw the rectangle to cover the entire page.
- Format the Shape: Right-click the rectangle and select “Format Shape.”
- Pattern Fill: In the “Format Shape” pane, choose “Pattern fill.” Select a pattern from the available options or customize your own by changing the foreground and background colors.
- Adjust Transparency: Adjust the transparency to ensure your text remains readable.
- Set Behind Text: Right-click the shape, select “Wrap Text,” and choose “Behind Text.”
7.3 Creating Custom Textures
How can you create custom textures to use as background photos in Word?
Creating custom textures involves using image editing software to design unique backgrounds that you can then insert into your Word document. This allows for a high level of personalization and creativity.
- Create a Texture: Use software like Adobe Photoshop or GIMP to create your custom texture. You can use filters, brushes, and layers to achieve the desired effect.
- Save the Texture: Save the texture as a high-resolution image file (e.g., JPEG or PNG).
- Insert the Texture: In Word, go to the “Insert” tab, select “Pictures,” and choose “This Device.” Select the texture image you created.
- Position and Resize: Position the image to cover the entire page and resize as needed.
- Set Behind Text: Right-click the image, select “Wrap Text,” and choose “Behind Text.”
- Adjust Transparency: Adjust the transparency to ensure your text remains readable.
 Customization includes artistic effects for unique and personalized designs, with advanced techniques like gradients and patterns adding depth
8. Best Practices for Readability
What are the best practices to ensure your text remains readable when using a photo as a background?
Readability is paramount. A beautiful background is useless if the text is difficult to read. Follow these best practices to ensure your content remains clear and accessible.
8.1 Contrast
How important is contrast between text and background, and how can it be optimized?
Ensure there’s sufficient contrast between the text and background. Dark text on a light background or vice versa is easiest to read. Use Word’s formatting options to adjust text color and background brightness.
8.2 Transparency
How can adjusting transparency improve text readability?
Increasing the transparency of the background image can make the text stand out more clearly. Experiment with different transparency levels to find the right balance.
8.3 Text Boxes
How can text boxes with solid backgrounds improve readability over a photo?
Place text in a text box with a solid or semi-transparent background to create a clear separation between the text and the image. Adjust the text box color and transparency for optimal readability.
8.4 Font Choice
How does font choice impact readability on a background photo?
Choose fonts that are easy to read and appropriate for your document. Avoid overly decorative or script fonts that can be difficult to decipher. Sans-serif fonts like Arial or Calibri are often a good choice.
8.5 Avoiding Busy Images
Why should you avoid busy images as backgrounds, and what are better alternatives?
Avoid using busy or cluttered images as backgrounds, as they can make the text difficult to read. Opt for simple, uncluttered images or textures that won’t compete with the text.
9. Impact on File Size and Performance
How does using a photo as a background affect the file size and performance of your Word document?
Using high-resolution photos can significantly increase the file size of your Word document, potentially affecting performance. Here’s how to mitigate these issues.
9.1 Compressing Images
How can compressing images reduce file size without sacrificing quality?
Word has built-in tools to compress images. To use them:
- Double-click the image to open the “Format Picture” pane.
- Go to the “Picture” tab and click on “Compress Pictures.”
- Choose the appropriate resolution for your needs (e.g., “Print” or “Web”).
- Apply the compression to all pictures in the document.
9.2 Using Lower Resolution Images
When is it appropriate to use lower resolution images for backgrounds?
For background images, a lower resolution (150-300 DPI) is often sufficient. This reduces file size without significantly impacting visual quality.
9.3 Saving in Optimized Formats
Which file formats are best for saving documents with background images to minimize file size?
Saving your document as a PDF can help reduce file size while preserving the background image. Also, consider using the “.docx” format, which is more efficient than older “.doc” formats.
9.4 Testing Performance
How can you test the performance of your document to ensure it opens and runs smoothly?
Open your document on different devices to ensure it loads quickly and runs smoothly. If you notice any lag or slowdown, consider further optimizing your images or reducing the number of high-resolution elements.
10. Legal and Ethical Considerations
What legal and ethical considerations should you keep in mind when using photos as backgrounds?
When using photos as backgrounds, it’s important to respect copyright laws and ethical guidelines. Here’s what you need to know.
10.1 Copyright
How can you ensure you have the right to use a photo as a background?
Always ensure you have the necessary rights to use the photo. Use images from public domain sources, creative commons licenses, or purchase a license from a stock photo website.
10.2 Licensing
What types of licenses allow you to use photos for commercial or personal use?
Understand the terms of the license. Some licenses allow for commercial use, while others are limited to personal use. Check the specific requirements and restrictions before using the image.
10.3 Attribution
When is it necessary to provide attribution for a background photo?
Some licenses require you to give credit to the photographer or source of the image. Include attribution in your document, either in the footer or in a separate acknowledgments section.
10.4 Avoiding Offensive Content
Why is it important to avoid using offensive or inappropriate images as backgrounds?
Ensure that the image is appropriate for your audience and the purpose of your document. Avoid using images that are offensive, discriminatory, or could be considered harmful.
FAQ: Making Photos Backgrounds in Word
1. How do I make a picture a background in Word that fills the whole page?
Insert the picture into the header or footer, then resize it to cover the entire page. Right-click and select “Wrap Text,” then choose “Behind Text.”
2. Can I use a different background image for each page in Word?
Yes, but you need to create section breaks between each page and insert a different image into the header or footer of each section.
3. How do I adjust the transparency of a background image in Word?
Double-click the image to open the “Format Picture” pane, go to the “Picture” tab, and adjust the “Transparency” slider.
4. Why is my background image not printing in Word?
Go to “File” > “Options” > “Display” and check the box next to “Print background colors and images.”
5. How do I ensure my text is readable against a background image?
Adjust the image transparency, use a lighter image, add a solid layer behind the text, or change the text color for better contrast.
6. What is the best file format to save a Word document with a background image?
Saving as a PDF is a good option to ensure the background image is preserved when sharing the document.
7. How can I reduce the file size of a Word document with a background image?
Compress the image using Word’s built-in tools or use a lower resolution image.
8. Is it legal to use any image I find online as a background in Word?
No, always ensure you have the necessary rights to use the photo. Use images from public domain sources, creative commons licenses, or purchase a license from a stock photo website.
9. How do I create a watermark in Word?
Go to the “Design” tab and click on “Watermark.” Select “Custom Watermark” and choose “Picture Watermark.”
10. Can I use a pattern as a background in Word?
Yes, insert a shape, format the shape, choose “Pattern fill,” and select a pattern from the available options.
By following this comprehensive guide, you can master the art of using photos as backgrounds in Microsoft Word, creating visually stunning documents that capture attention and convey your message effectively. Remember to visit dfphoto.net for more photography tips, inspiration, and resources to elevate your creative projects. Whether you’re looking to enhance your digital artistry, creative document design, or visual storytelling skills, dfphoto.net is your go-to destination.
Ready to explore more? Visit dfphoto.net today and discover a wealth of tutorials, stunning photography, and a vibrant community eager to share their knowledge. Elevate your skills, find inspiration, and connect with fellow photography enthusiasts now! Address: 1600 St Michael’s Dr, Santa Fe, NM 87505, United States. Phone: +1 (505) 471-6001. Website: dfphoto.net.