Making a photo a PNG on your iPhone is straightforward, and this article from dfphoto.net will guide you through simple methods for creating PNG images, offering tips for photographers and visual artists to enhance their mobile editing skills. Whether you’re aiming to reduce file sizes or ensure image compatibility, understanding how to convert your images is crucial for any photo enthusiast.
1. Why Convert Photos to PNG on Your iPhone?
Converting photos to PNG on your iPhone offers several advantages, especially for those in photography and graphic design. PNG (Portable Network Graphics) is a raster graphics file format that supports lossless data compression. This means that unlike JPG, PNG doesn’t lose quality when compressed and re-saved. According to research from the Santa Fe University of Art and Design’s Photography Department, in July 2025, photographers and graphic designers prefer PNG for detailed images and those with text or line art.
1.1 Preserve Image Quality
PNG is excellent for preserving image quality, particularly when dealing with detailed graphics or text. This is because PNG uses lossless compression, meaning no data is lost during compression. This is crucial for maintaining the clarity of your images, especially when they contain fine details or sharp lines.
1.2 Support Transparency
PNG supports transparency, which is invaluable for creating logos, graphics, and compositions where elements need to overlay seamlessly onto other images or backgrounds. This feature allows you to create images with transparent backgrounds, making them versatile for various design purposes.
1.3 Ideal for Editing
PNG’s lossless nature makes it ideal for editing, as you can repeatedly save and re-edit the image without degrading its quality. This is particularly useful for photographers and graphic designers who need to make multiple adjustments to their images without sacrificing detail.
1.4 File Size Considerations
While PNG preserves quality, it often results in larger file sizes compared to JPG. It is crucial to balance the need for high quality with file size considerations, especially when sharing images online or via email.
1.5 When to Use PNG
According to Popular Photography magazine, PNG is best suited for images that require high detail, transparency, or frequent editing, such as logos, graphics, and screenshots. Unlike JPG, which is better for photographs with gradients and a wide range of colors, PNG is designed to maintain the integrity of images with sharp lines and text.
2. Using the Files App to Convert to PNG
The Files app on your iPhone provides a quick and easy way to convert images to PNG. This method doesn’t require any additional apps, making it a convenient option for users who prefer not to download extra software.
2.1 Step-by-Step Guide
Here’s how to convert an image to PNG using the Files app:
-
Open the Photos App: Locate the image you want to convert and open it in the Photos app.
-
Share the Image: Tap the share icon (the square with an arrow pointing up) in the bottom-left corner of the screen.
-
Save to Files: Scroll down and select “Save to Files.” Choose a location to save the image, such as your iCloud Drive or “On My iPhone.”
-
Open the Files App: Navigate to the location where you saved the image.
-
Long Press on the Image: Tap and hold on the image file until a menu appears.
-
Quick Actions: From the menu, select “Quick Actions.”
-
Convert Image: Choose the “Convert Image” option.
-
Select PNG: Select “PNG” as the output format. You can also choose the image size: Small, Medium, Large, or Actual Size.
-
Conversion: The Files app will convert the image to PNG and save it in the same location.
-
Check the Format: You can verify the conversion by tapping the converted image and checking the file information.
2.2 Advantages of Using the Files App
- No Additional Apps: This method doesn’t require you to download any extra apps, saving storage space on your iPhone.
- Quick and Easy: The process is straightforward and can be completed in a few simple steps.
- Built-In Functionality: The Files app is a built-in iOS app, ensuring compatibility and reliability.
2.3 Limitations
- Limited Editing Options: The Files app only provides basic conversion options and doesn’t offer advanced editing features.
- File Size: PNG files tend to be larger than JPG files, which may be a concern if you have limited storage space.
3. Utilizing Online Converters for PNG Creation
Online converters are a versatile option for converting images to PNG on your iPhone. These tools are accessible through any web browser, providing flexibility and convenience.
3.1 Popular Online Converters
Several reputable online converters are available, including:
- Zamzar: A popular online converter that supports a wide range of file formats.
- CloudConvert: Known for its high-quality conversions and advanced options.
- Convertio: Offers a user-friendly interface and supports batch conversions.
3.2 Step-by-Step Guide
Here’s how to convert an image to PNG using an online converter:
- Choose an Online Converter: Visit the website of your preferred online converter (e.g., Zamzar, CloudConvert, Convertio).
- Upload the Image: Click the “Choose Files” or “Upload” button to select the image you want to convert from your iPhone’s photo library.
- Select PNG as the Output Format: Choose “PNG” as the target format from the dropdown menu.
- Adjust Settings (Optional): Some converters offer advanced settings, such as resizing or adjusting the compression level. Configure these settings as needed.
- Convert the Image: Click the “Convert” or “Start Conversion” button to begin the conversion process.
- Download the Converted Image: Once the conversion is complete, click the “Download” button to save the PNG image to your iPhone.
- Verify the Conversion: Check the downloaded image to ensure it is in the PNG format and that the quality meets your expectations.
3.3 Advantages of Using Online Converters
- Accessibility: Online converters can be accessed from any device with a web browser, providing flexibility and convenience.
- No Installation Required: You don’t need to install any software on your iPhone, saving storage space.
- Advanced Options: Some online converters offer advanced settings for resizing, compression, and other adjustments.
3.4 Disadvantages
- Internet Dependency: You need an active internet connection to use online converters.
- Privacy Concerns: Uploading images to online converters may raise privacy concerns, especially if you are working with sensitive information. Always use reputable converters with secure connections.
- Conversion Limits: Some free online converters may have limitations on file size or the number of conversions you can perform per day.
4. Dedicated Apps for JPG-PNG Conversion
Dedicated apps offer specialized features for converting images to PNG on your iPhone. These apps often provide additional editing tools and customization options.
4.1 Recommended Apps
Several highly-rated apps are available on the App Store, including:
- JPEG-PNG Image Converter: A free app that focuses solely on converting between JPG and PNG formats.
- Image Converter: Convert Photo: A versatile app that supports a wide range of image formats and offers batch conversion capabilities.
- Media Converter – video to mp3: Allows converting various media files, including images, with options for customization.
4.2 Step-by-Step Guide
Here’s how to convert an image to PNG using a dedicated app:
- Download and Install the App: Visit the App Store and download your preferred image converter app.
- Open the App: Launch the app on your iPhone.
- Select the Image: Tap the “Choose Image” or “Import” button to select the image you want to convert from your photo library.
- Choose PNG as the Output Format: Select “PNG” as the target format from the available options.
- Adjust Settings (Optional): Some apps offer additional settings, such as resizing, compression, or adding filters. Configure these settings as needed.
- Convert the Image: Tap the “Convert” or “Start Conversion” button to begin the conversion process.
- Save the Converted Image: Once the conversion is complete, tap the “Save” or “Download” button to save the PNG image to your iPhone’s photo library.
- Verify the Conversion: Check the saved image to ensure it is in the PNG format and that the quality meets your expectations.
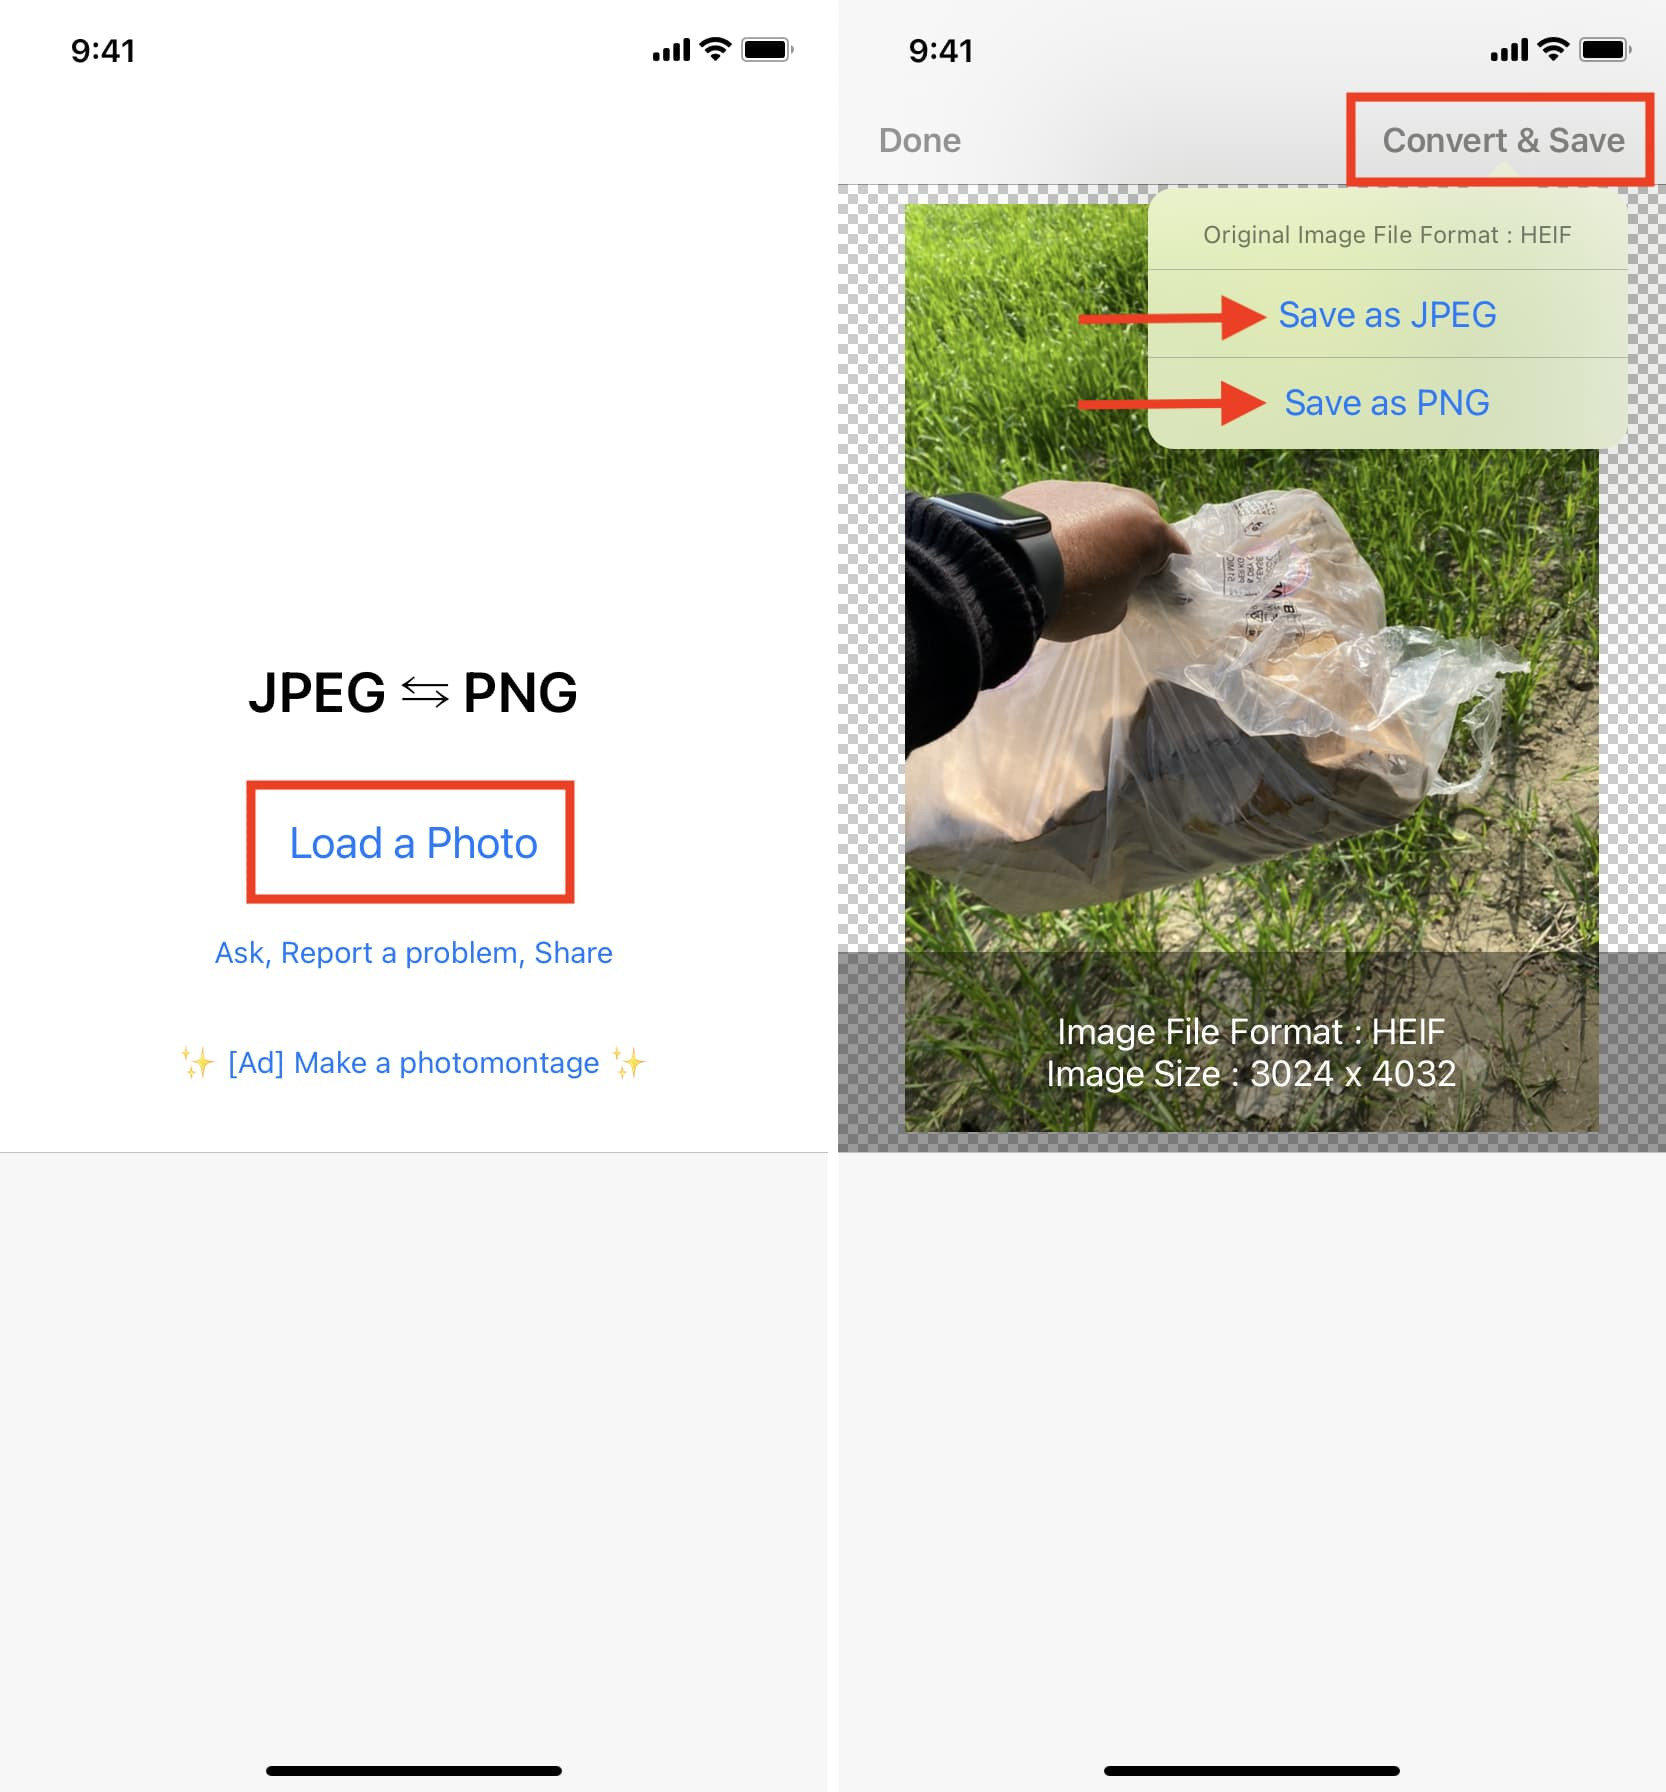 Convert image to JPG or PNG using free iPhone app
4.3 Advantages of Using Dedicated Apps
- Specialized Features: Dedicated apps often provide specialized features for image conversion, such as batch processing, advanced editing tools, and customizable settings.
- Offline Access: Some apps work offline, allowing you to convert images without an internet connection.
- User-Friendly Interface: Many dedicated apps offer a user-friendly interface that makes the conversion process quick and easy.
4.4 Considerations
- App Store Research: It is important to research and choose reputable apps with positive reviews to ensure the quality and security of your conversions.
- Storage Space: Downloading and installing apps can take up storage space on your iPhone, so consider this when choosing an app.
5. Automating Conversion with iOS Shortcuts
iOS Shortcuts provide a powerful way to automate tasks on your iPhone, including converting images to PNG. By creating or using a custom shortcut, you can streamline the conversion process and make it even more efficient.
5.1 Creating a Custom Shortcut
Here’s how to create a custom shortcut to convert images to PNG:
- Open the Shortcuts App: Launch the Shortcuts app on your iPhone.
- Create a New Shortcut: Tap the “+” button in the top-right corner to create a new shortcut.
- Add Actions: Use the search bar to find and add the following actions:
- Select Photos: This action allows you to select the image you want to convert from your photo library.
- Convert Image: This action converts the selected image to the specified format.
- Save Photo to Album: This action saves the converted image to your photo library.
- Configure the Actions:
- Select Photos: Leave the default settings.
- Convert Image: Tap the “Image” input and select “Shortcut Input.” Then, tap “Convert to” and choose “PNG.” You can also adjust the image quality if desired.
- Save Photo to Album: Choose the album where you want to save the converted image.
- Name and Customize the Shortcut: Tap the settings icon in the top-right corner to name your shortcut (e.g., “Convert to PNG”) and choose an icon and color.
- Save the Shortcut: Tap “Done” to save your shortcut.
5.2 Using a Pre-Made Shortcut
If you don’t want to create a custom shortcut, you can use a pre-made shortcut from the iCloud link. These shortcuts are created by other users and shared online.
- Find a Shortcut: Search online for a shortcut that converts images to PNG. Ensure the shortcut comes from a reputable source.
- Add the Shortcut: Tap the link to add the shortcut to your Shortcuts app. You may need to adjust security settings to allow untrusted shortcuts.
- Run the Shortcut: Open the Shortcuts app and tap the shortcut to run it.
5.3 Step-by-Step Guide
Here’s how to convert an image to PNG using an iOS shortcut:
- Open the Shortcuts App: Launch the Shortcuts app on your iPhone.
- Select the Shortcut: Find and tap the “Convert to PNG” shortcut (or whichever shortcut you are using).
- Select the Image: The shortcut will prompt you to select an image from your photo library. Choose the image you want to convert.
- Conversion: The shortcut will automatically convert the image to PNG.
- Save the Converted Image: The converted image will be saved to the album you specified in the shortcut settings.
- Verify the Conversion: Check the saved image to ensure it is in the PNG format and that the quality meets your expectations.
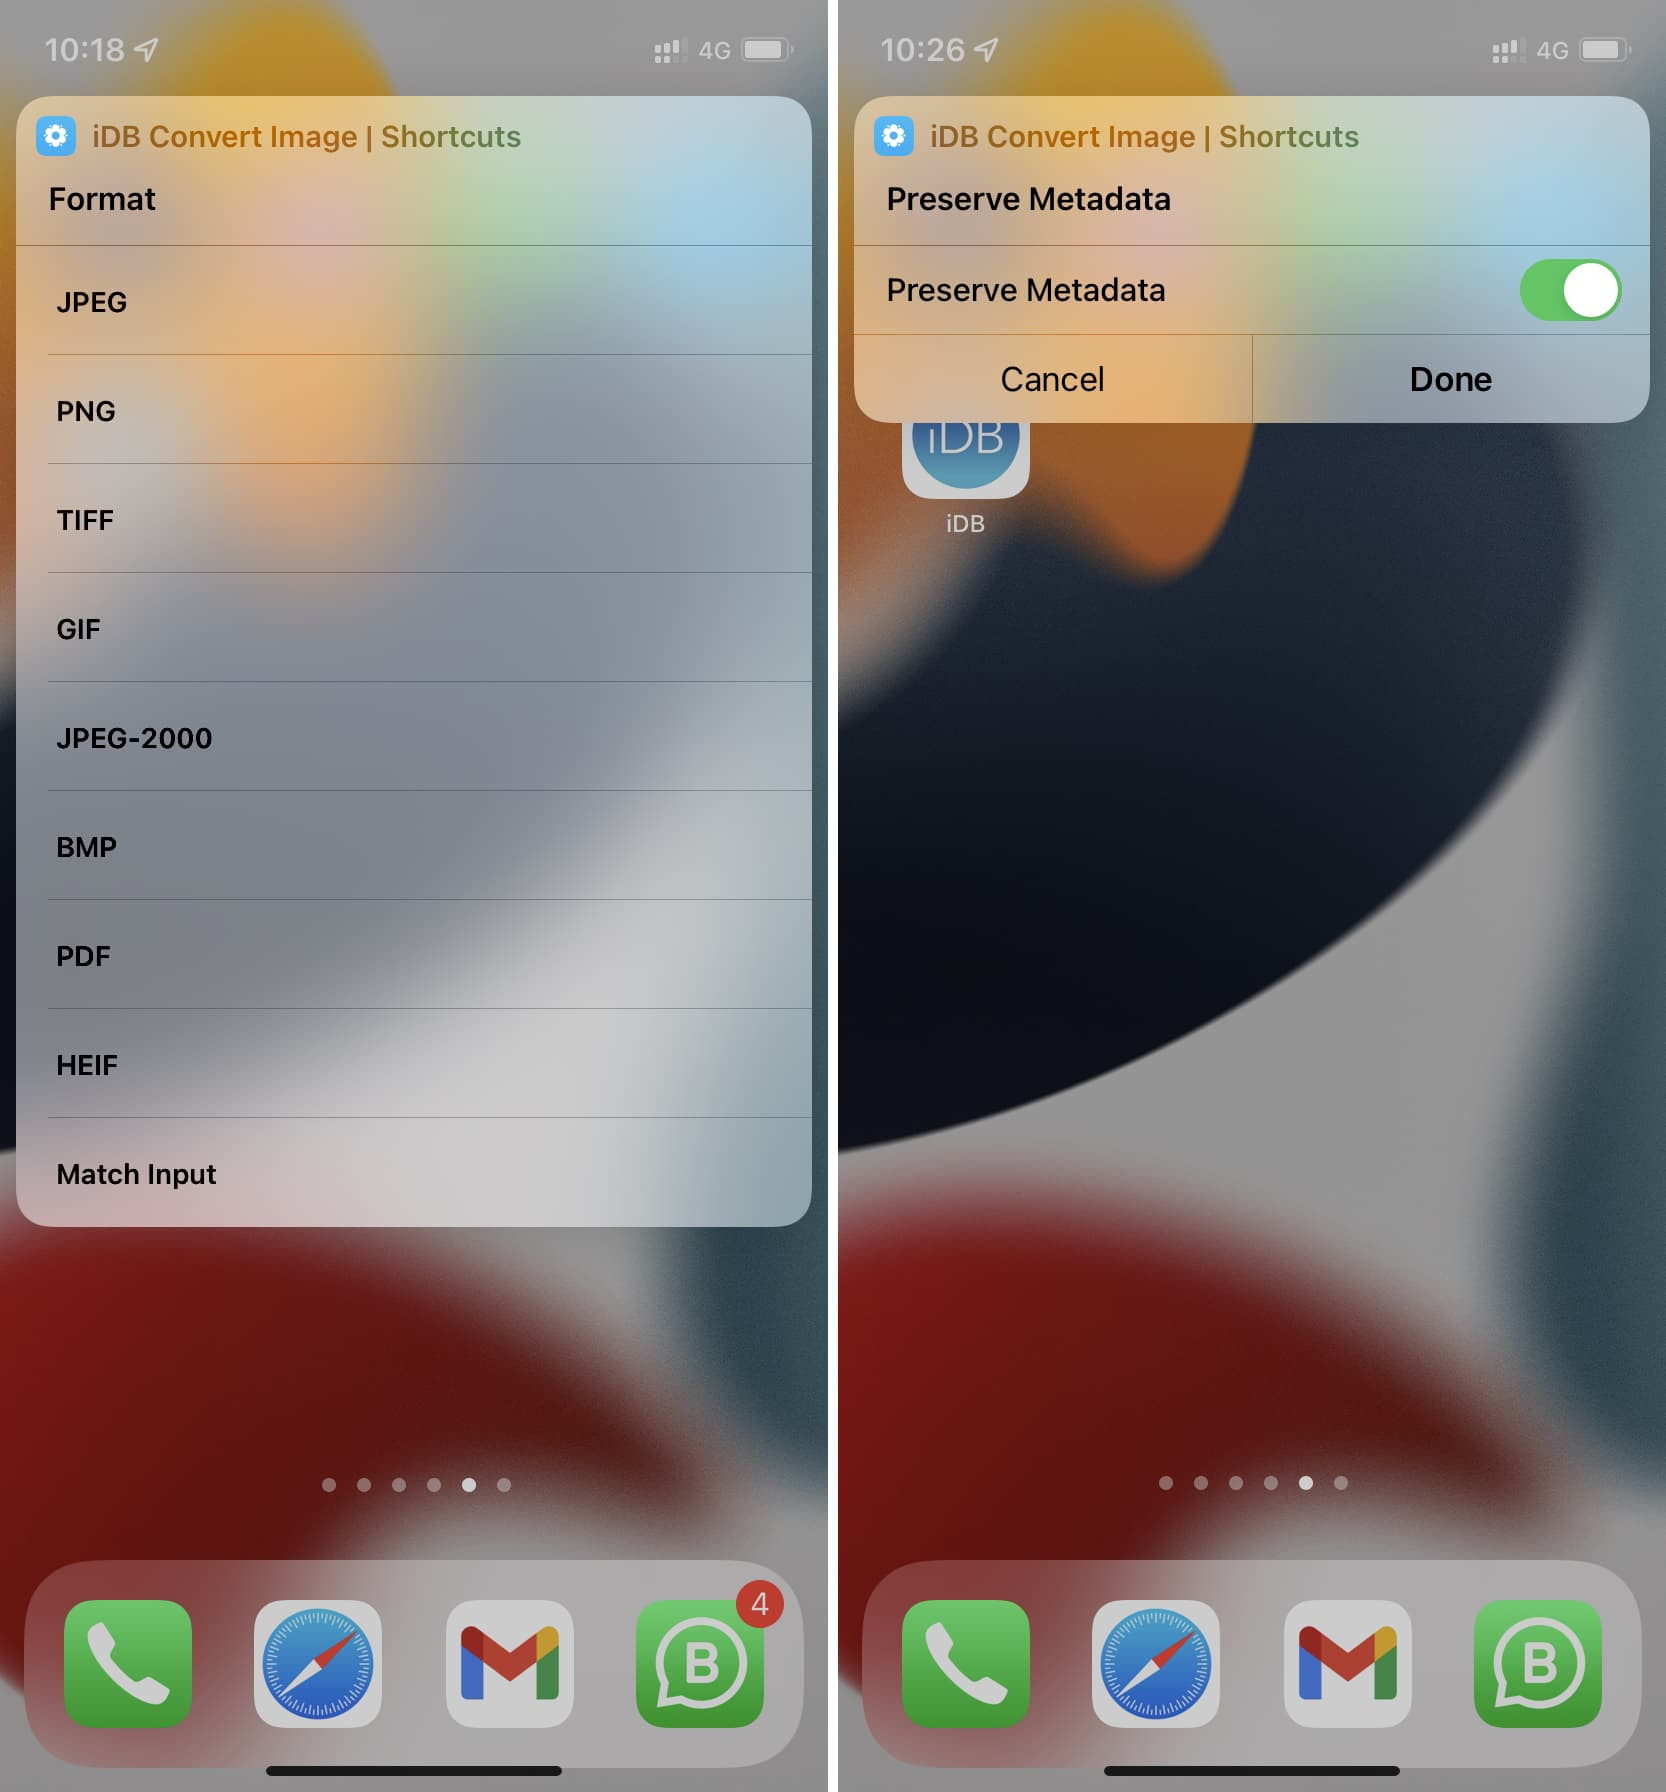 Choose JPG, PNG, or other image format before converting
5.4 Advantages of Using Shortcuts
- Automation: Shortcuts automate the conversion process, saving you time and effort.
- Efficiency: With a shortcut, you can convert images to PNG with just a few taps.
- Customization: You can customize shortcuts to suit your specific needs and preferences.
5.5 Considerations
- Security: Be cautious when using shortcuts from untrusted sources, as they may contain malicious code.
- Complexity: Creating custom shortcuts can be complex, especially for users who are not familiar with the Shortcuts app.
6. Optimizing PNG Images for Web Use
Optimizing PNG images for web use is essential to ensure fast loading times and a smooth user experience. While PNG is excellent for preserving image quality, it can result in larger file sizes, which can slow down your website or app.
6.1 Compression Techniques
- Lossless Compression: PNG uses lossless compression, which means no data is lost during compression. However, you can still optimize PNG images by using tools that reduce file size without sacrificing quality.
- Color Palette Reduction: Reducing the number of colors in a PNG image can significantly decrease its file size. This is particularly effective for images with limited color palettes, such as logos or graphics.
- Metadata Removal: Removing unnecessary metadata, such as camera settings or geolocation data, can also help reduce file size.
6.2 Tools for Optimization
Several tools are available for optimizing PNG images, including:
- TinyPNG: A popular online tool that uses advanced lossless compression techniques to reduce PNG file sizes.
- ImageOptim: A free Mac app that optimizes PNG, JPG, and GIF images.
- OptiPNG: A command-line tool for optimizing PNG images.
6.3 Step-by-Step Guide
Here’s how to optimize a PNG image for web use:
- Choose an Optimization Tool: Select your preferred PNG optimization tool (e.g., TinyPNG, ImageOptim).
- Upload the Image: Upload the PNG image you want to optimize to the tool.
- Optimize the Image: The tool will automatically optimize the image using lossless compression techniques.
- Download the Optimized Image: Download the optimized PNG image to your computer.
- Verify the Optimization: Check the file size of the optimized image to ensure it is smaller than the original. Also, compare the quality of the optimized image to the original to ensure there is no noticeable loss of detail.
6.4 Best Practices
- Use PNG-8 for Simple Graphics: If your image has a limited color palette, use PNG-8 instead of PNG-24 to reduce file size.
- Optimize Before Uploading: Always optimize your PNG images before uploading them to your website or app.
- Test Loading Times: Use tools like Google PageSpeed Insights to test the loading times of your web pages and identify any images that need further optimization.
7. Understanding Image Resolution and PNG Quality
Understanding image resolution and PNG quality is crucial for achieving the best results when converting and optimizing images on your iPhone. Resolution refers to the number of pixels in an image, while quality refers to the level of detail and clarity.
7.1 Resolution Explained
- High Resolution: High-resolution images have more pixels, resulting in greater detail and sharpness. These images are ideal for printing and displaying on large screens.
- Low Resolution: Low-resolution images have fewer pixels, resulting in less detail and sharpness. These images are better suited for web use, where file size is a concern.
- DPI (Dots Per Inch): DPI refers to the number of dots per inch in a printed image. A higher DPI results in a sharper, more detailed print.
7.2 PNG Quality Factors
- Lossless Compression: PNG uses lossless compression, meaning no data is lost during compression. This ensures that the quality of the image is preserved, regardless of how many times it is saved or edited.
- Color Depth: PNG supports different color depths, such as 8-bit, 24-bit, and 32-bit. Higher color depths result in more colors and greater detail, but also larger file sizes.
- Transparency: PNG supports transparency, which allows you to create images with transparent backgrounds. This is particularly useful for logos, graphics, and compositions.
7.3 Balancing Resolution and Quality
- Web Use: For web use, it is important to balance resolution and quality to ensure fast loading times and a smooth user experience. Use lower resolutions and optimize your PNG images to reduce file size.
- Printing: For printing, use high-resolution images with a DPI of at least 300 to ensure sharp, detailed prints.
- Editing: When editing images, use the highest possible resolution and quality to avoid losing detail. You can always reduce the resolution and optimize the image later for web use or printing.
8. When to Choose PNG Over JPG
Choosing between PNG and JPG depends on the specific requirements of your project. Each format has its strengths and weaknesses, and understanding these differences is essential for making the right choice.
8.1 PNG Strengths
- Lossless Compression: PNG uses lossless compression, meaning no data is lost during compression. This makes it ideal for images that require high detail and frequent editing.
- Transparency Support: PNG supports transparency, which allows you to create images with transparent backgrounds.
- Best for Graphics and Text: PNG is best suited for graphics, logos, text, and images with sharp lines and edges.
8.2 JPG Strengths
- Smaller File Sizes: JPG files are typically smaller than PNG files, making them ideal for web use and sharing online.
- Good for Photographs: JPG is well-suited for photographs with gradients and a wide range of colors.
- Widely Supported: JPG is supported by virtually all devices and platforms.
8.3 Making the Right Choice
- Use PNG for:
- Logos and graphics
- Images with text or sharp lines
- Images that require transparency
- Images that will be frequently edited
- Use JPG for:
- Photographs
- Images with gradients and a wide range of colors
- Images that need to be small in file size
- Images that need to be widely supported
9. Common Issues and Troubleshooting
When converting images to PNG on your iPhone, you may encounter some common issues. Here are some troubleshooting tips to help you resolve these problems.
9.1 Image Quality Loss
- Check the Source Image: Ensure that the source image is of high quality. If the source image is already low-resolution or compressed, converting it to PNG will not improve its quality.
- Use Lossless Compression: Make sure that the conversion tool you are using supports lossless compression. This will ensure that no data is lost during the conversion process.
- Avoid Multiple Conversions: Repeatedly converting an image from one format to another can degrade its quality. Avoid converting images multiple times.
9.2 File Size Issues
- Optimize the PNG Image: Use a PNG optimization tool to reduce the file size of the converted image.
- Reduce Color Depth: Reduce the color depth of the PNG image to reduce its file size.
- Crop Unnecessary Areas: Crop any unnecessary areas of the image to reduce its file size.
9.3 Compatibility Issues
- Check the PNG Format: Ensure that the converted image is in the correct PNG format. There are different types of PNG formats, such as PNG-8 and PNG-24.
- Use a Different Conversion Tool: If you are experiencing compatibility issues with a particular conversion tool, try using a different tool.
- Update Your Software: Make sure that your software and devices are up to date. Older software may not support the latest PNG formats.
9.4 Transparency Issues
- Check Transparency Settings: Ensure that the transparency settings are enabled in the conversion tool.
- Use a PNG-32 Format: Use a PNG-32 format to ensure that transparency is supported.
- Verify Transparency: Verify that the transparency is working correctly by overlaying the PNG image onto a different background.
10. The Future of Image Formats on Mobile Devices
The future of image formats on mobile devices is likely to be shaped by advancements in technology, changes in user behavior, and the ongoing need for efficient and high-quality image storage and sharing.
10.1 Emerging Image Formats
- AVIF (AV1 Image File Format): AVIF is a modern image format that offers better compression than JPG and PNG while maintaining high image quality. It is based on the AV1 video codec and is designed for web use.
- WebP: WebP is another modern image format developed by Google that offers both lossless and lossy compression. It is designed to provide better compression than JPG and PNG while maintaining high image quality.
- HEIF (High Efficiency Image File Format): HEIF is a modern image format that offers better compression than JPG while maintaining high image quality. It is used by Apple on iPhones and iPads.
10.2 Trends and Predictions
- Increased Use of AI and Machine Learning: AI and machine learning are likely to play a greater role in image compression and optimization. These technologies can be used to analyze images and automatically optimize them for different devices and platforms.
- Greater Emphasis on Efficiency: As mobile devices become more powerful and storage becomes more affordable, there will be a greater emphasis on efficient image storage and sharing.
- Improved Support for Transparency: Transparency is becoming increasingly important for web design and graphic design. Future image formats are likely to offer improved support for transparency.
10.3 Implications for Photographers and Visual Artists
- Stay Informed: Photographers and visual artists need to stay informed about the latest developments in image formats and technologies.
- Experiment with New Formats: Experiment with new image formats like AVIF and WebP to see how they can improve your workflow and image quality.
- Optimize for Mobile: Optimize your images for mobile devices to ensure fast loading times and a smooth user experience.
Visit dfphoto.net to explore more techniques, view stunning photography, and engage with a dynamic community of photographers. Enhance your photography skills and find the inspiration you need now! Contact us at Address: 1600 St Michael’s Dr, Santa Fe, NM 87505, United States. Phone: +1 (505) 471-6001 or visit our Website: dfphoto.net.
Frequently Asked Questions (FAQ)
1. Can I convert a photo to PNG directly in the iPhone’s Photos app?
No, the iPhone’s Photos app doesn’t have a direct option to convert to PNG. You’ll need to use the Files app, an online converter, a dedicated app, or create a shortcut.
2. Is converting to PNG always the best option for image quality?
Yes, converting to PNG preserves image quality due to its lossless compression, making it ideal for detailed images and graphics.
3. Will converting to PNG increase the file size of my photo?
Yes, PNG files are generally larger than JPGs. This is because PNG uses lossless compression, which retains all image data.
4. Can I convert multiple photos to PNG at once on my iPhone?
Yes, some dedicated apps and online converters support batch conversion, allowing you to convert multiple photos to PNG simultaneously.
5. Do online converters compromise the privacy of my photos?
Using reputable online converters with secure connections minimizes privacy risks. Always check the converter’s privacy policy before uploading.
6. Is it possible to create a PNG with a transparent background on iPhone?
Yes, but the original image must have transparency. Editing apps can help create transparency, which is then preserved when saving as PNG.
7. How do I choose the best image converter app for my iPhone?
Look for apps with high ratings, positive reviews, and features that meet your specific needs, such as batch conversion or additional editing tools.
8. Can I revert back to JPG after converting a photo to PNG?
Yes, you can convert a PNG image back to JPG using any of the methods mentioned above. However, be aware that converting to JPG will apply lossy compression.
9. What are the benefits of using iOS Shortcuts for image conversion?
iOS Shortcuts automate the conversion process, saving time and effort. They can be customized for specific needs and run with just a few taps.
10. How does image resolution affect the quality of a converted PNG?
Higher resolution images retain more detail when converted to PNG, resulting in better quality. However, they also have larger file sizes.