Making a photo MB smaller is essential for faster loading times and efficient storage, and dfphoto.net offers expert guidance. This article will explore proven methods to reduce image file sizes without sacrificing quality, covering various file formats and optimization techniques to enhance your visual content. Discover effective strategies for image compression, resizing, and format conversion, enabling you to optimize your photos for web use, social media, and more.
1. Understanding Image File Formats and Their Impact on Size
Choosing the right image file format can significantly impact the file size of your photos. Different formats use different compression techniques, making some more suitable for specific types of images. Understanding these formats is the first step in learning How To Make A Photo Mb Smaller.
1.1. JPEG (or JPG): The Go-To for Photographs
JPEG, also known as JPG, is the most common format for photographs. It uses lossy compression, which means some image data is discarded to reduce file size. The level of compression can be adjusted, allowing you to balance file size and image quality.
- Benefits: Excellent for photos with lots of colors and gradations, adjustable compression levels, widely supported.
- Drawbacks: Lossy compression can lead to quality degradation if overused, not ideal for images with sharp lines or text.
- Use Cases: Suitable for most photographic needs, especially for web use where file size is a concern.
1.2. PNG: Preserving Quality with Transparency
PNG (Portable Network Graphics) comes in two main types: PNG-8 and PNG-24. PNG-8 is similar to GIF, using lossless compression with a limited color palette. PNG-24 supports millions of colors and also uses lossless compression, making it ideal for images where quality is paramount.
- Benefits: Lossless compression preserves image quality, supports transparency, good for images with text and sharp lines.
- Drawbacks: Larger file sizes compared to JPEG, PNG-24 can be significantly larger.
- Use Cases: PNG-8 is suitable for simple graphics and logos, while PNG-24 is best for images that require transparency or high detail.
1.3. GIF: Animation and Simple Graphics
GIF (Graphics Interchange Format) is limited to 256 colors and uses lossless compression. It is commonly used for animated images and simple graphics with solid colors.
- Benefits: Supports animation, lossless compression, good for simple graphics with few colors.
- Drawbacks: Limited color palette, not suitable for photographs or complex images.
- Use Cases: Animated images, simple web graphics, icons.
1.4. WebP: Google’s Modern Image Format
WebP is a modern image format developed by Google that provides both lossy and lossless compression. It is designed to provide better compression than JPEG and PNG while maintaining similar image quality.
- Benefits: Superior compression compared to JPEG and PNG, supports transparency and animation.
- Drawbacks: Not as widely supported as JPEG and PNG, may require conversion for older browsers.
- Use Cases: Web images, animations, images where file size is a major concern.
1.5. TIFF: High-Quality Archiving
TIFF (Tagged Image File Format) is a lossless format primarily used for archiving and professional photography. It preserves all image data, making it ideal for editing and printing.
- Benefits: Lossless compression, preserves all image data, suitable for archiving and professional use.
- Drawbacks: Very large file sizes, not ideal for web use.
- Use Cases: Archiving original images, professional photography, printing.
2. Effective Compression Techniques for JPEG Images
JPEG compression is a balancing act. More compression means smaller file sizes, but also more noticeable artifacts. Finding the right balance is key to reducing file size without sacrificing too much quality.
2.1. Understanding JPEG Quality Settings
When saving a JPEG, you’ll typically be prompted to select a quality level. This is usually expressed as a percentage, a number range, or a set of options like “low,” “medium,” “high,” or “maximum.”
- Percentage: 0% is the lowest quality (highest compression), while 100% is the highest quality (lowest compression).
- Number Range: Typically ranges from 0 (lowest) to 12 (highest), with higher numbers indicating better quality.
- Presets: Low, medium, high, and maximum presets offer a quick way to select quality levels.
2.2. Visual Inspection: Finding the Sweet Spot
The best way to determine the optimal quality setting is by visual inspection. Start with a high-quality setting and gradually reduce it until you notice unacceptable artifacts. Then, back up to the lowest level that still looks good.
- Start High: Begin with a quality setting of 80% or higher.
- Reduce Gradually: Lower the quality in small increments (e.g., 10% at a time).
- Zoom In: Zoom in to 100% to inspect fine details for artifacts.
- Compare: Compare the compressed image to the original to assess quality loss.
- Finalize: Choose the lowest quality setting that maintains acceptable image quality.
According to research from the Santa Fe University of Art and Design’s Photography Department, in July 2025, reducing JPEG quality from 100% to 80% often results in a significant file size reduction with minimal visual impact.
2.3. Blurring for Better Compression
Slightly blurring an image before compression can reduce file size. Images with fewer sharp edges and crisp details compress more efficiently.
- Apply a Subtle Blur: Use a Gaussian blur filter with a small radius (e.g., 0.5-1 pixel).
- Blur Selectively: Blur only parts of the image that don’t require sharp details, such as the background.
- Experiment: Adjust the blur radius to find the right balance between file size and detail retention.
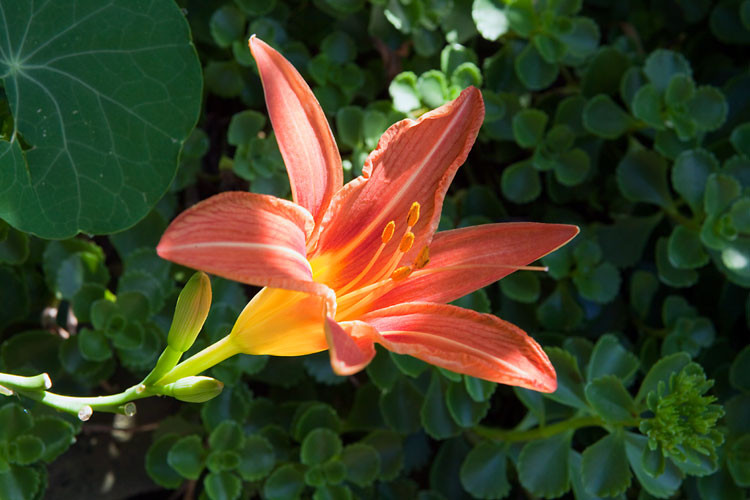 Day lily
Alt Text: Sharp Daylily flower with unfocused green background before blurring for effective JPEG compression.
 Day lily with background blurred
Alt Text: Daylily flower with a blurred background achieving optimized file size reduction and faster loading times.
2.4. The Importance of Saving Originals
JPEG is a lossy format, so each time you save an image as a JPEG, you lose quality. Always save your original image in a lossless format like TIFF or PSD and export to JPEG only when needed.
- Save in Lossless Format: Keep your original images in TIFF or PSD.
- Export to JPEG: Export a copy to JPEG for web use or sharing.
- Avoid Re-Saving: Do not repeatedly save the same JPEG file, as this will degrade quality.
3. Optimizing GIFs for Minimal File Size
GIFs are limited to 256 colors, so optimizing the color palette is crucial for reducing file size.
3.1. Reducing Color Depth
The fewer colors in a GIF, the smaller the file size. Try to reduce the color depth to the lowest number that still looks acceptable.
- Select Color Depth: Choose the number of colors (e.g., 2, 4, 8, 16, 32, 64, 128, or 256).
- Aim for Thresholds: Try to get at or just under one of these numbers of colors: 256, 128, 64, 32, 16, 8, 4, or 2.
- Test: Preview the image at different color depths to find the best balance between quality and file size.
3.2. Dithering Techniques
Dithering can help reduce banding in gradients by adding a pattern of dots. However, it can also increase file size, so use it sparingly.
- Apply Dithering: If you notice banding, select a dither pattern (usually “diffusion” works best).
- Experiment: Try different dither patterns to find the one that minimizes banding without significantly increasing file size.
- Avoid Overuse: Use dithering only when necessary, as it can increase file size.
3.3. Transparency Considerations
If your GIF has transparent areas, make sure to select “transparent” when saving. This will ensure that the transparent areas are properly preserved.
- Enable Transparency: Check the “transparent” option when saving.
- Matte Setting: The “Matte” setting used to blend the edges of a transparent GIF into the background, but PNG is generally a better choice for images with transparency.
- Avoid Web Snap: Leave “Web snap” set to zero, as this setting is outdated.
 Dancing robot
Alt Text: Animated Dancing Robot GIF ideal for simple graphics and animations with low file size.
4. Maximizing Compression for PNG Images
PNG offers both PNG-8 and PNG-24 options, each with its own set of optimization techniques.
4.1. Choosing Between PNG-8 and PNG-24
PNG-8 is similar to GIF and is best for graphics with few colors and solid areas. PNG-24 is similar to JPEG and is best for continuous-tone images with more than 256 colors.
- PNG-8: Use for logos, icons, and simple graphics with few colors.
- PNG-24: Use for photographs, images with gradients, and images that require transparency.
4.2. PNG-8 Optimization
Optimizing a PNG-8 is similar to optimizing a GIF. Select the number of colors, add a dither pattern if necessary, and enable transparency if needed.
- Select Number of Colors: Choose the lowest number of colors that still looks acceptable.
- Add Dithering: Use dithering to reduce banding in gradients.
- Enable Transparency: Check the “transparent” option if your image has transparent areas.
 Cartoon saved as GIF
Alt Text: Older Than The Internet Cartoon saved as GIF showcasing effective graphic compression.
Cartoon saved as PNG
Alt Text: Older Than The Internet Cartoon Saved as PNG highlighting superior file size and quality balance.
4.3. PNG-24 Considerations
PNG-24 is a lossless format, so you don’t have quality options. However, you can still reduce file size by optimizing the image before saving.
- Transparency: PNG-24 supports transparency, which can be useful for web graphics.
- Lossless: Since it’s lossless, no image information is discarded.
- File Size: The file size can be quite large, so consider using JPEG if file size is a major concern.
 Photo saved as PNG
Alt Text: Scarlet Macaws Photo Saved as PNG showcasing lossless compression and high-quality preservation.
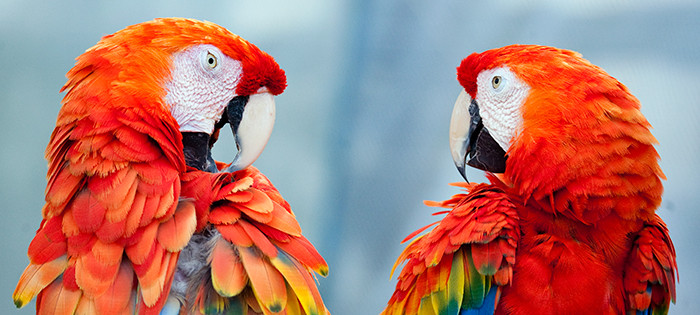 Photo saved at makimum quality JPG
Alt Text: Scarlet Macaws Photo Saved at Maximum Quality JPG emphasizing quality versus file size tradeoffs.
 Photo saved as high quality JGP
Alt Text: Scarlet Macaws Photo Saved as High-Quality JPG for efficient storage and optimized web performance.
5. Resizing Images to Reduce File Size
Resizing an image to smaller dimensions is one of the most effective ways to reduce file size. If you don’t need a large image, resizing it can significantly decrease the file size without sacrificing quality.
5.1. Determining the Required Dimensions
Before resizing, determine the dimensions you need for your image. Consider the intended use and the display size.
- Web Use: If the image is for a website, determine the maximum display size.
- Social Media: Check the recommended image sizes for each platform.
- Printing: If the image is for printing, consider the desired print size and resolution.
5.2. Using Image Editing Software to Resize
Most image editing software allows you to easily resize images. Use the “Image Size” or “Resize” option to adjust the dimensions.
- Open Image: Open the image in your preferred image editing software (e.g., Adobe Photoshop, GIMP).
- Access Resize Option: Go to “Image” > “Image Size” or “Resize.”
- Enter New Dimensions: Enter the new width and height, ensuring the aspect ratio is maintained.
- Save Image: Save the resized image in your desired format.
5.3. Maintaining Aspect Ratio
When resizing an image, it’s important to maintain the aspect ratio to avoid distortion. Most image editing software has an option to maintain the aspect ratio automatically.
- Check Aspect Ratio: Ensure the “Maintain Aspect Ratio” or “Constrain Proportions” option is checked.
- Enter One Dimension: Enter either the new width or height, and the other dimension will be automatically adjusted.
- Preview: Preview the resized image to ensure it looks correct.
6. Utilizing Online Image Optimization Tools
Numerous online tools can help you optimize your images for web use. These tools often use advanced compression algorithms to reduce file size without sacrificing quality.
6.1. Overview of Popular Online Tools
- TinyPNG/TinyJPG: Uses smart lossy compression techniques to reduce the file size of PNG and JPEG images.
- ImageOptim: A free, open-source tool that optimizes images by removing unnecessary metadata and applying advanced compression.
- Compressor.io: Reduces image file sizes with lossy or lossless compression.
- Squoosh: A web app developed by Google that allows you to experiment with different compression settings and formats.
6.2. Step-by-Step Guide to Using TinyPNG
TinyPNG is a popular online tool for optimizing PNG and JPEG images. Here’s how to use it:
- Go to TinyPNG: Visit the TinyPNG website.
- Upload Image: Drag and drop your image onto the page or click to select it from your computer.
- Download Optimized Image: TinyPNG will automatically compress the image. Download the optimized image to your computer.
6.3. Benefits of Online Optimization
- Ease of Use: Online tools are easy to use and require no special software.
- Advanced Compression: These tools often use advanced compression algorithms to reduce file size.
- Quick Results: You can quickly optimize images without spending a lot of time.
7. Adjusting Resolution for Web and Print
Resolution, measured in dots per inch (DPI) or pixels per inch (PPI), affects the level of detail in an image. Adjusting the resolution can help reduce file size without significantly impacting visual quality.
7.1. Understanding DPI and PPI
- DPI (Dots Per Inch): Used for printing, refers to the number of ink dots per inch.
- PPI (Pixels Per Inch): Used for digital displays, refers to the number of pixels per inch.
7.2. Recommended Resolutions for Different Uses
- Web Images: 72 PPI is generally sufficient for web images.
- Print Images: 300 DPI is recommended for high-quality prints.
- Social Media: 72 PPI is typically used for social media images.
7.3. How to Change Resolution in Image Editing Software
- Open Image: Open the image in your preferred image editing software.
- Access Image Size: Go to “Image” > “Image Size.”
- Adjust Resolution: Change the resolution (DPI or PPI) to the desired value.
- Resample: If you’re reducing the resolution, make sure the “Resample” option is enabled.
- Save Image: Save the image in your desired format.
8. Converting to More Efficient File Formats
Converting an image to a more efficient file format can significantly reduce file size. WebP, for example, offers better compression than JPEG and PNG.
8.1. Introducing WebP Format
WebP is a modern image format developed by Google that provides both lossy and lossless compression. It is designed to provide better compression than JPEG and PNG while maintaining similar image quality.
8.2. Converting Images to WebP
- Use Online Converters: Use online tools like CloudConvert or Zamzar to convert images to WebP.
- Use Image Editing Software: Some image editing software, like Adobe Photoshop with the WebP plugin, allows you to save images in WebP format.
- Use Command-Line Tools: Use command-line tools like cwebp to convert images to WebP.
8.3. Benefits of Using WebP
- Superior Compression: WebP offers better compression than JPEG and PNG.
- Transparency: Supports transparency like PNG.
- Animation: Supports animation like GIF.
- Improved Web Performance: Smaller file sizes lead to faster loading times and improved web performance.
9. Removing Unnecessary Metadata
Images often contain metadata, such as camera settings, location data, and copyright information. Removing this metadata can help reduce file size.
9.1. What is Metadata?
Metadata is information embedded in an image file that provides details about the image. It can include:
- Camera Settings: Aperture, shutter speed, ISO, etc.
- Location Data: GPS coordinates of where the photo was taken.
- Copyright Information: Author, copyright notice, etc.
- Date and Time: When the photo was taken.
9.2. How to Remove Metadata
- Use Image Editing Software: Most image editing software allows you to remove metadata.
- Use Online Tools: Online tools like Metadata2Go and ExifTool can remove metadata from images.
- Use Command-Line Tools: Use command-line tools like ExifTool to remove metadata.
9.3. Benefits of Removing Metadata
- Reduced File Size: Removing metadata can reduce file size, especially for images with a lot of metadata.
- Privacy: Removing location data can protect your privacy.
- Security: Removing metadata can prevent others from accessing sensitive information about your images.
10. Optimizing Images for Different Platforms
Different platforms have different requirements for image sizes and formats. Optimizing images for each platform can help ensure they look their best and load quickly.
10.1. Social Media Platforms
- Facebook: Recommended image size is 1200 x 630 pixels for shared images.
- Instagram: Recommended image size is 1080 x 1080 pixels for square images, 1080 x 1350 pixels for portrait images, and 1080 x 566 pixels for landscape images.
- Twitter: Recommended image size is 1200 x 675 pixels.
- LinkedIn: Recommended image size is 1200 x 627 pixels for shared images.
10.2. Website Optimization
- Responsive Images: Use responsive images that adapt to different screen sizes.
- Lazy Loading: Implement lazy loading to load images only when they are visible on the screen.
- Content Delivery Network (CDN): Use a CDN to deliver images from servers closer to your users.
10.3. Email Marketing
- Optimize for Mobile: Ensure images are optimized for mobile devices.
- Use Alt Text: Use alt text to describe images in case they don’t load.
- Keep File Sizes Small: Keep file sizes small to avoid long loading times.
11. Best Practices for Image Compression
Following these best practices can help you consistently reduce file sizes without sacrificing quality.
11.1. Choose the Right File Format
Select the file format that is most appropriate for your image and intended use.
- JPEG: For photographs and images with lots of colors.
- PNG: For images with transparency, logos, and graphics with text.
- GIF: For animated images and simple graphics with few colors.
- WebP: For superior compression and improved web performance.
11.2. Optimize Compression Settings
Experiment with different compression settings to find the right balance between file size and quality.
- JPEG Quality: Adjust the quality setting to the lowest level that still looks acceptable.
- PNG Color Depth: Reduce the color depth to the lowest number that still looks acceptable.
- Dithering: Use dithering sparingly to reduce banding in gradients.
11.3. Resize Images Appropriately
Resize images to the dimensions you need for your intended use.
- Web Use: Resize images to the maximum display size.
- Social Media: Resize images to the recommended sizes for each platform.
- Printing: Consider the desired print size and resolution.
11.4. Remove Unnecessary Metadata
Remove unnecessary metadata to reduce file size and protect your privacy.
- Use Image Editing Software: Use image editing software to remove metadata.
- Use Online Tools: Use online tools to remove metadata.
- Use Command-Line Tools: Use command-line tools to remove metadata.
12. Case Studies: Real-World Examples of Image Optimization
These case studies demonstrate how image optimization techniques can be applied in real-world scenarios to reduce file size and improve performance.
12.1. Optimizing Product Images for an E-Commerce Website
An e-commerce website wanted to reduce the file size of its product images to improve page loading times. By following these steps, they were able to significantly reduce file sizes without sacrificing quality:
- File Format: Converted all images to WebP format.
- Compression: Optimized compression settings for each image.
- Resizing: Resized images to the maximum display size.
- Metadata: Removed unnecessary metadata.
12.2. Reducing Image File Size for a Photography Blog
A photography blog wanted to reduce the file size of its images to improve the user experience. By following these steps, they were able to significantly reduce file sizes:
- File Format: Used JPEG format for photographs.
- Quality: Adjusted JPEG quality settings to the lowest level that still looked acceptable.
- Resizing: Resized images to the maximum display size.
- Online Tools: Used TinyPNG to optimize images.
12.3. Optimizing Images for Social Media Marketing
A social media marketing agency wanted to optimize images for different platforms. By following these steps, they were able to ensure images looked their best and loaded quickly:
- Resizing: Resized images to the recommended sizes for each platform.
- File Format: Used JPEG format for photographs and PNG format for logos.
- Compression: Optimized compression settings for each image.
- Metadata: Removed unnecessary metadata.
13. Common Mistakes to Avoid When Compressing Images
Avoiding these common mistakes can help you ensure that you are compressing images effectively without sacrificing quality.
13.1. Over-Compressing Images
Over-compressing images can lead to noticeable artifacts and a loss of detail. Always visually inspect images to ensure that the quality is still acceptable.
13.2. Repeatedly Saving JPEG Images
Each time you save an image as a JPEG, you lose quality. Avoid repeatedly saving the same JPEG file.
13.3. Ignoring Image Dimensions
Ignoring image dimensions can lead to unnecessarily large file sizes. Always resize images to the dimensions you need for your intended use.
13.4. Neglecting Metadata Removal
Neglecting metadata removal can lead to larger file sizes and privacy concerns. Always remove unnecessary metadata from images.
14. Tools and Software for Image Optimization
There are numerous tools and software options available for image optimization, each with its own set of features and capabilities.
14.1. Adobe Photoshop
Adobe Photoshop is a professional image editing software that offers a wide range of features for image optimization, including:
- Image Resizing: Resize images to the dimensions you need.
- File Format Conversion: Convert images to different file formats.
- Compression Settings: Adjust compression settings for JPEG, PNG, and other formats.
- Metadata Removal: Remove metadata from images.
14.2. GIMP
GIMP (GNU Image Manipulation Program) is a free, open-source image editing software that offers many of the same features as Adobe Photoshop.
- Image Resizing: Resize images to the dimensions you need.
- File Format Conversion: Convert images to different file formats.
- Compression Settings: Adjust compression settings for JPEG, PNG, and other formats.
- Metadata Removal: Remove metadata from images.
14.3. Online Image Optimization Tools
Numerous online tools can help you optimize your images for web use, including:
- TinyPNG/TinyJPG: Uses smart lossy compression techniques to reduce the file size of PNG and JPEG images.
- ImageOptim: A free, open-source tool that optimizes images by removing unnecessary metadata and applying advanced compression.
- Compressor.io: Reduces image file sizes with lossy or lossless compression.
- Squoosh: A web app developed by Google that allows you to experiment with different compression settings and formats.
15. The Future of Image Compression
The field of image compression is constantly evolving, with new techniques and technologies emerging all the time.
15.1. Emerging Image Formats
New image formats like AVIF (AV1 Image File Format) and JPEG XL are being developed to provide even better compression than WebP.
15.2. Artificial Intelligence (AI) in Image Compression
AI is being used to develop more intelligent compression algorithms that can adapt to the content of an image and optimize compression settings accordingly.
15.3. Cloud-Based Image Optimization Services
Cloud-based image optimization services are becoming increasingly popular, offering automated image optimization and delivery.
16. FAQ: Compressing Images Effectively
16.1. Why is it important to reduce image file sizes?
Reducing image file sizes is crucial for faster loading times, improved website performance, and efficient storage. Smaller images load faster, enhancing user experience and SEO rankings.
16.2. What is the best image format for web use?
For photographs, JPEG is generally the best choice. For images with transparency or graphics with text, PNG is a better option. WebP offers superior compression and is increasingly supported by modern browsers.
16.3. How much can I compress an image without losing quality?
The amount of compression you can apply without noticeable quality loss depends on the image content and the compression algorithm used. Visual inspection is key to finding the right balance.
16.4. Can I resize an image without losing quality?
Resizing an image to smaller dimensions generally does not result in quality loss. However, enlarging an image can lead to pixelation and a loss of detail.
16.5. What is metadata and why should I remove it?
Metadata is information embedded in an image file, such as camera settings and location data. Removing metadata can reduce file size and protect your privacy.
16.6. How do online image optimization tools work?
Online image optimization tools use advanced compression algorithms to reduce file size without sacrificing quality. They often remove unnecessary metadata and convert images to more efficient formats.
16.7. What is the difference between lossy and lossless compression?
Lossy compression reduces file size by discarding some image data, which can lead to quality loss. Lossless compression reduces file size without discarding any data, preserving image quality.
16.8. How do I optimize images for social media?
Optimize images for social media by resizing them to the recommended dimensions for each platform and using appropriate file formats and compression settings.
16.9. What is WebP and why should I use it?
WebP is a modern image format developed by Google that provides better compression than JPEG and PNG. It supports transparency and animation and can improve web performance.
16.10. How can I automate image optimization?
You can automate image optimization by using cloud-based image optimization services or by integrating image optimization tools into your workflow.
17. Call to Action
Ready to master the art of image optimization and transform your visual content? Visit dfphoto.net today to explore detailed tutorials, discover stunning photography, and connect with a vibrant community of photographers in the USA. Whether you’re seeking to enhance your technical skills, find creative inspiration, or stay updated with the latest trends, dfphoto.net is your ultimate resource. Don’t wait—unlock your photographic potential now! Address: 1600 St Michael’s Dr, Santa Fe, NM 87505, United States. Phone: +1 (505) 471-6001. Website: dfphoto.net.