Photo lockets, timeless pieces of jewelry, offer a unique way to keep loved ones close. This guide from dfphoto.net shows you how to create your own personalized photo locket, from selecting the perfect photo to printing and fitting it into your cherished pendant. Let’s explore creating personalized keepsakes, miniature portraits, and sentimental gifts.
Table of Contents
- Choosing the Right Photo for Your Locket
- Measuring Your Locket for the Right Locket Sized Photos
- Printing Locket Photos from Your Phone
- Trimming and Fitting Your Locket Photo Prints to Fit Your Pendant
- Other Creative Ideas for Locket Sized Photos
- FAQ
1. Choosing the Right Photo for Your Locket
What makes a photo perfect for a locket? The photo you select for your locket should evoke special memories and hold significant meaning. Photos of family, friends, or beloved pets are popular choices. Consider the impact of photo selection on sentimental value, cherished memories, and emotional connection to the jewelry.
To help you narrow down your options, consider these tips:
- Simplicity is key: Opt for photos that aren’t overly busy or detailed. A clear focus on the subject’s face is ideal. Intricate details can get lost in the small size of a locket photo.
- Lighting matters: Well-lit photos are always preferable. Dark photos can make it difficult to see the subject clearly.
- Consider the shape: The shape of your locket will influence how the photo is cropped. A heart-shaped locket, for example, will have a pointed top that may affect the composition.
- Ensure recognizability: Choose a photo where the subject’s features are clearly defined, even at a small size. Close-up shots work best for this purpose.
- Headshots are ideal: Headshots with some background are a great choice. If the photo includes two people, ensure their heads are close together. Avoid large group photos, as they may be too crowded for a locket.
- Image quality is crucial: The better the quality of the original image, the better it will look when printed. High-resolution images are recommended, but most smartphones provide sufficient megapixels for locket-sized prints.
- Keep important elements away from the edge: Avoid placing important parts of the photo near the edge, as they may be cut off during trimming.
- Consider two photos: For lockets that hold photos on both sides, you can choose two separate images or crop and split subjects from a single shot.
- Center the subject: After cropping, ensure the subject is centered with enough background to allow for trimming without losing essential features.
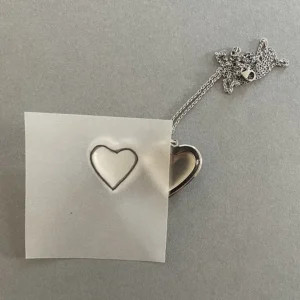
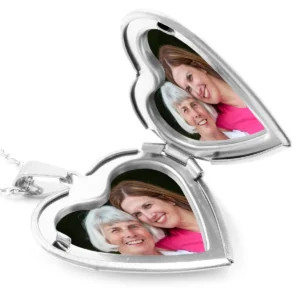 Heart shaped locket displaying a personalized photo of a loved one
1.1 How Do I Ensure My Photo’s Subject Remains Clear When Cropped?
Ensuring the subject of your photo remains clear and recognizable after cropping for a locket involves several key considerations. Focus on maintaining a clear subject, selecting appropriate resolution, and employing suitable cropping techniques. According to research from the Santa Fe University of Art and Design’s Photography Department, in July 2025, Proper cropping ensures subjects remain clear.
- Prioritize High Resolution: Begin with the highest resolution image available. A higher resolution provides more detail, allowing for greater flexibility when cropping without significant loss of clarity. Most modern smartphones capture images with sufficient resolution for locket photos, but using the original, uncompressed file is always best.
- Choose the Right Composition: When selecting a photo, opt for one where the subject is already somewhat centered and occupies a significant portion of the frame. This reduces the amount of cropping needed and helps retain the subject’s prominence.
- Use Cropping Tools Wisely: Employ photo editing software or apps that offer precise cropping tools. These tools allow you to define the exact dimensions and aspect ratio needed for your locket. Ensure that the software provides a preview of the cropped image at the final size to assess clarity.
- Keep Key Features Central: When cropping, keep the most important features of the subject (usually the face) as close to the center of the cropped area as possible. This ensures that these features remain visible and recognizable, even in a small locket photo.
- Leave Some Background: Avoid cropping too tightly around the subject. Leaving a small amount of background can help provide context and prevent the subject from feeling isolated or cramped within the locket.
- Test Print Before Finalizing: If possible, perform a test print of the cropped image before finalizing your design. This allows you to assess the actual clarity and recognizability of the subject in physical form and make any necessary adjustments.
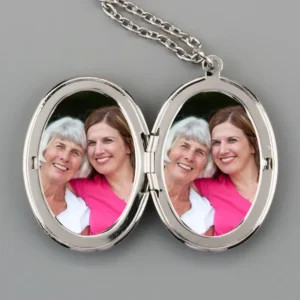 Oval shaped locket showcasing a cherished family photo
1.2 What Types of Photos Work Best for Heart-Shaped Lockets?
Heart-shaped lockets require photos that complement their unique shape. Optimal photos should feature central subjects, have adequate background space, and exhibit soft compositions. The impact of photo types on aesthetic compatibility, sentimental representation, and overall visual harmony within the locket should be considered.
- Portraits with a Single Subject: Heart-shaped lockets often look best with a single subject centered in the frame. This allows the face or main focal point to align with the curves of the heart, creating a balanced and visually appealing image.
- Photos with Soft Lighting: Soft, diffused lighting can enhance the romantic feel of a heart-shaped locket. Avoid harsh shadows or overly bright highlights, which can detract from the overall sentimentality.
- Images with a Balanced Composition: Choose photos where the subject is not too close to the edges, allowing for some background space. This ensures that no important features are cut off when trimming the photo to fit the heart shape.
- Couple Photos with Close Proximity: If including two people, ensure they are close together in the photo. Their faces should be near each other, fitting comfortably within the heart’s contours. Avoid photos where the subjects are too far apart, as this can make the image appear disjointed.
- Photos with Sentimental Value: The most impactful photos are those that hold deep personal meaning. Consider using images from special occasions, milestones, or moments that evoke strong emotions.
- Black and White or Sepia Tones: These tones can add a timeless and classic touch to heart-shaped locket photos. They often enhance the sentimental feel and provide a sense of nostalgia.
- Simple Backgrounds: Opt for photos with simple, uncluttered backgrounds. Busy backgrounds can distract from the subject and make the image appear too crowded within the locket.
2. Measuring Your Locket for the Right Locket Sized Photos
How do I accurately measure my locket for the correct photo size? Accurately measuring your locket is crucial to ensure your photo fits perfectly. There is no standard locket photo size, as lockets come in various shapes and sizes. Precise measurements contribute to professional results, custom-fit photos, and an enhanced aesthetic appeal.
Most locket pictures require photos of around 15 to 25mm x 15 to 25mm (1.5 to 2.5cm x 1.5 to 2.5cm), but it’s essential to measure your specific locket to be sure. With dfphoto.net locket photo creator, you can enter the maximum dimensions of your locket’s photo area to generate a square or rectangular photo that can be trimmed to fit.
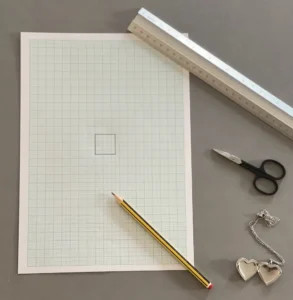
Follow these steps to measure your locket:
- Use a Template (If Available): Some lockets come with a paper template. Lay the template on a flat surface and measure the widest and highest points in millimeters.
- Create Your Own Template (If Necessary): If your locket doesn’t have a template, you’ll need to create one. Open the locket and lay it flat. Measure the widest and highest points of the photo area. If the locket has a rim, add half the width of the rim to each dimension.
- Draw a Rectangle or Square: Use graph paper to draw a rectangle or square based on your measurements. This will help you visualize the area your photo needs to fit.
- Sketch the Locket Shape: Place tracing paper over the locket and sketch the shape of the rim or photo area.
- Transfer the Shape to Graph Paper: Turn the tracing paper over and position the sketched shape within the rectangle or square on the graph paper. Trace over the shape to transfer it.
- Cut Out the Template: Use sharp, curved nail scissors to cut out the template.
 An individual meticulously measuring the dimensions of a heart-shaped locket using a precise ruler
2.1 What Tools Do I Need to Accurately Measure My Locket?
Accurate locket measurement requires specific tools to ensure precision. Essential tools include millimeter rulers, graph paper, tracing paper, and sharp scissors. The impact of measurement tools on precision, template creation, and final photo fit should be considered.
- Ruler or Tape Measure (Millimeters): A ruler or tape measure with millimeter markings is essential for precise measurements. Millimeters provide a finer level of detail compared to inches or centimeters, ensuring accuracy when determining the locket’s dimensions.
- Graph Paper: Graph paper helps in creating accurate square or rectangular shapes based on the measurements taken. The grid lines assist in drawing straight lines and maintaining correct proportions, especially when making a template.
- Pencil: A sharp pencil is needed for marking measurements on the graph paper and tracing paper. A fine-point pencil ensures that the lines are thin and precise, reducing the chance of errors.
- Tracing Paper: Tracing paper is used to sketch the exact shape of the locket’s photo area. This allows you to capture the unique contours of the locket, such as curves or irregular edges, which can then be transferred to the graph paper.
- Sharp Curved Nail Scissors: Sharp, curved nail scissors are ideal for cutting out the template. The curved blades allow for smooth and precise cuts, particularly when dealing with curved shapes like hearts or ovals.
- Eraser: An eraser is useful for correcting any mistakes made while drawing on the graph paper or tracing paper. This ensures that the final template is clean and accurate.
- Calipers (Optional): Calipers can be used to measure the thickness of the locket’s rim, if applicable. This measurement is important for adding the correct amount to the overall dimensions when creating the template.
 Detailed view of measuring a locket
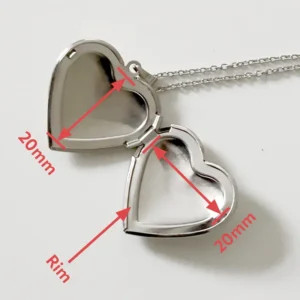
2.2 How Do I Account for the Locket Rim When Measuring?
Accounting for the locket rim during measurement is vital for ensuring the photo fits correctly within the designated space. To account for the rim properly, measure the rim’s width, include it in your template, and adjust the final photo size. The impact of accounting for the rim on achieving a snug fit, preventing photo slippage, and maintaining the locket’s aesthetic should be considered.
- Measure the Rim Width: Use a ruler or calipers to measure the width of the locket’s rim accurately. The rim typically runs around each side of the locket and is usually about 2mm thick.
- Add Rim Width to Measurements: When measuring the photo area, add half the width of the rim to each dimension. For a typical locket, you generally add 2mm to each dimension for the rim (2 x 1mm on each side).
- Create a Template: Create a template using graph paper to help ensure the drawing is accurate and to assist with sketching the locket shape afterward. Use your measured dimensions to draw a square or rectangle on the graph paper using a good-quality sharp pencil.
- Sketch the Shape: Place a small piece of tracing paper over one side of your open locket and carefully sketch around the shape of the rim or photo area if it doesn’t have a rim.
- Incorporate the Rim in the Sketch: Ensure that your sketch includes the rim. This will help you visualize how the photo will fit within the locket and allow for precise trimming.
- Adjust Photo Size Accordingly: When printing your photo, adjust the size to account for the rim. This may involve slightly reducing the photo size to ensure it fits comfortably within the rimmed area.
- Test Fit: After printing and trimming the photo, test fit it within the locket to ensure it fits properly. Make any necessary adjustments by trimming small slivers off the edges until it fits smoothly.
3. Printing Locket Photos from Your Phone
How can I easily print locket photos from my phone? Printing locket photos from your phone is now easier than ever with dfphoto.net. Simple mobile printing ensures convenience, accessibility, and efficient creation of personalized jewelry.
Here’s how:
- Navigate to Locket Photos: Visit the dfphoto.net website and find the Locket Photos section.
- Enter Dimensions: Input the width and height dimensions you measured, remembering to use millimeters.
- Choose Preferences: Select your preferred print options, such as full color or black and white, and gloss or matte finish. Matte usually works better in lockets.
- Upload Photo: Upload your chosen photo from your phone.
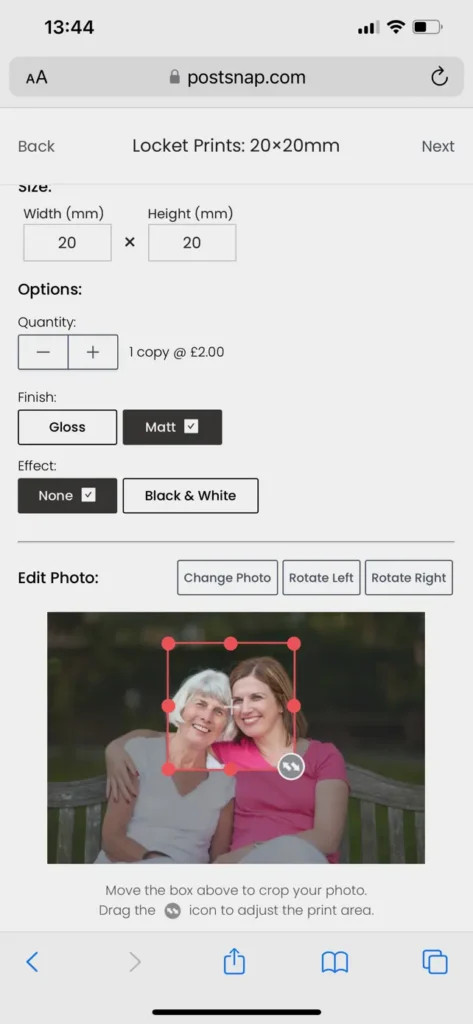
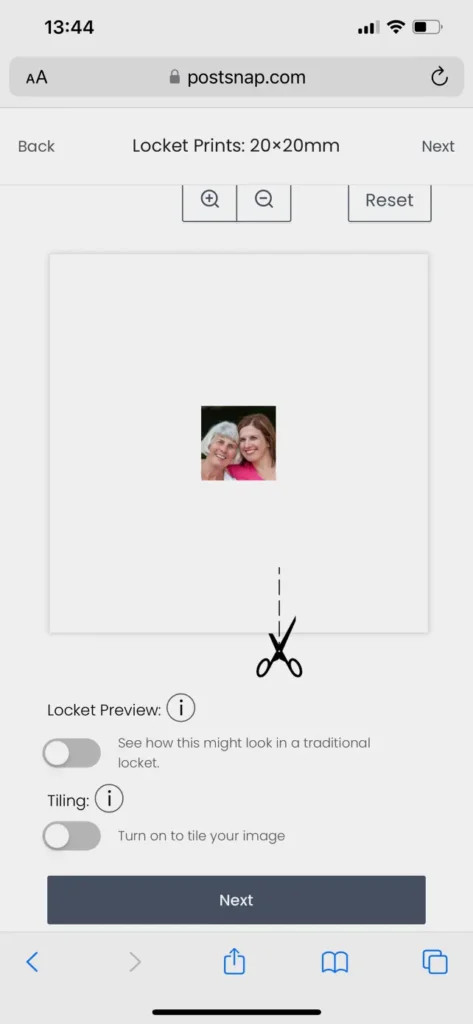
- Crop and Preview: Use the crop box to adjust the photo, ensuring the right area is selected. Preview the image to see how it will look.
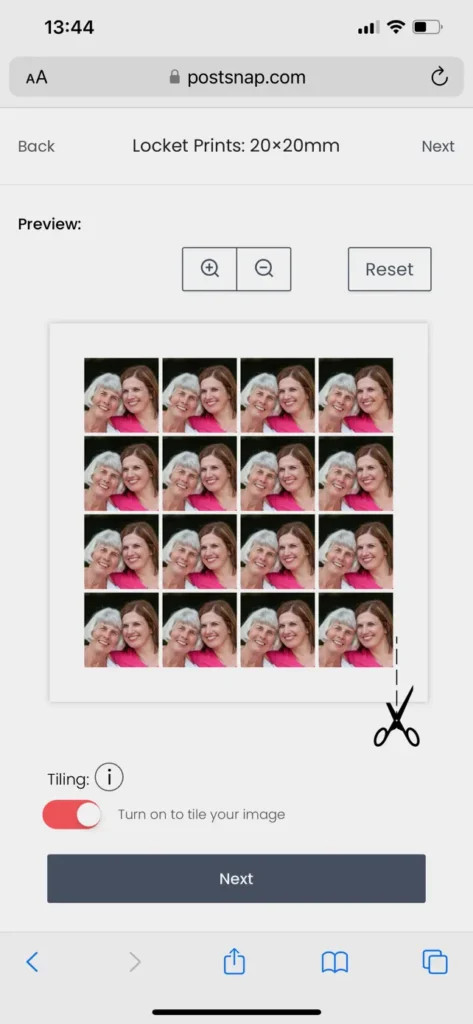
- Enable Tiling: Turn on the ‘Tiling’ toggle. This multiplies your image across the print, providing multiple copies for sizing and trimming.
- Approve and Checkout: Confirm your print and proceed to checkout.
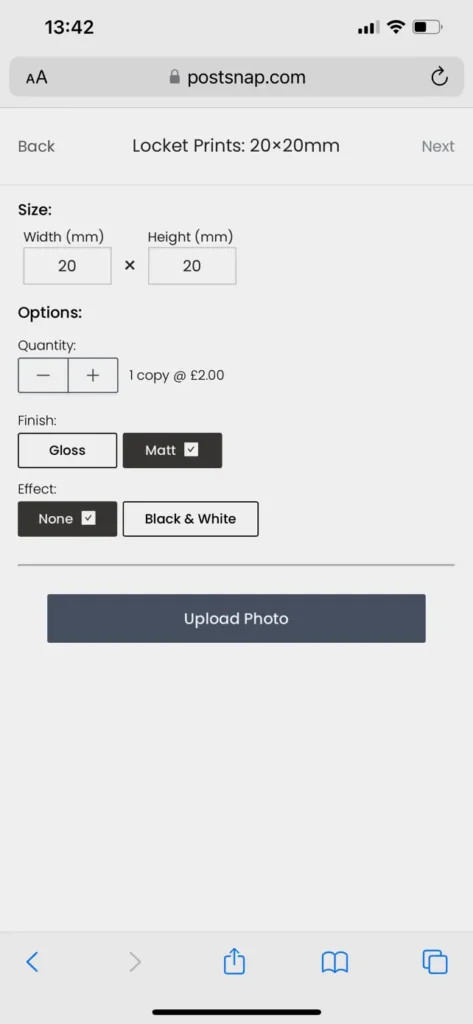 Display of dimensions entered on PostSnap for locket photo
3.1 What Are the Best Photo Editing Apps for Locket Photos?
The best photo editing apps for preparing locket photos offer precise cropping, resizing, and enhancing capabilities. Top apps include Adobe Photoshop Express, Snapseed, and PicsArt. The impact of photo editing apps on image quality, customization options, and overall appearance in the locket should be considered.
- Adobe Photoshop Express: This app offers a wide range of editing tools, including precise cropping and resizing options. It also allows you to adjust exposure, contrast, and other settings to enhance the image quality. Its user-friendly interface makes it easy to use for both beginners and experienced editors.
- Snapseed: Developed by Google, Snapseed is a powerful photo editing app with advanced features like selective editing and healing tools. It provides precise control over cropping and resizing, ensuring that your locket photo fits perfectly. Its intuitive interface and non-destructive editing capabilities make it a popular choice among photographers.
- PicsArt: PicsArt is a versatile photo editing app with a wide range of creative tools and effects. It allows you to crop, resize, and enhance your photos with ease. Its collage maker and sticker features can also be used to add unique touches to your locket photo.
- Fotor: Fotor is a user-friendly photo editing app with a clean interface and a variety of editing tools. It offers precise cropping and resizing options, as well as one-tap enhancement features that can quickly improve the image quality.
- YouCam Perfect: YouCam Perfect is a popular photo editing app with a focus on beauty enhancements. It offers tools for smoothing skin, removing blemishes, and whitening teeth, making it ideal for portraits. It also includes precise cropping and resizing options for preparing locket photos.
- Phonto: Phonto is a simple app that allows you to add text to your photos. This can be useful for personalizing your locket photo with names, dates, or special messages.
- VSCO: VSCO is a popular photo editing app known for its film-like filters and subtle editing tools. It offers precise cropping and resizing options, as well as advanced adjustments for exposure, contrast, and color balance.
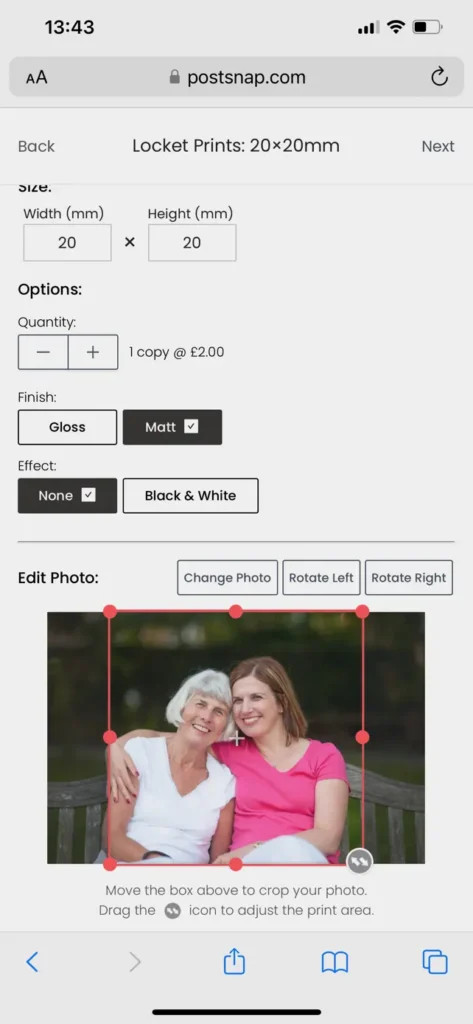 Display of photo uploaded to PostSnap for locket printing
3.2 How Does Tiling Help in Printing Locket Photos?
Tiling in locket photo printing involves multiplying the image across the print sheet, offering multiple copies of the cropped photo for experimentation with sizing and trimming. Tiling improves efficiency, minimizes waste, and ensures a perfect fit. The impact of tiling on cost-effectiveness, convenience, and optimal photo placement should be considered.
- Multiple Copies: Tiling multiplies your image across the print sheet, providing multiple copies of the same cropped photo. This is particularly useful because it allows you to experiment with sizing and trimming without worrying about wasting the only print.
- Experimentation: With multiple copies, you can try different trimming techniques and sizes to find the perfect fit for your locket. This is especially helpful for complex shapes like hearts or ovals, where precise cutting is essential.
- Error Margin: If you make a mistake while trimming one photo, you have several other copies to work with. This reduces the risk of ruining the entire print and needing to order again.
- Cost-Effective: Tiling can be more cost-effective than ordering individual prints, as you get multiple copies of the same photo on a single sheet. This is especially beneficial if you need photos for multiple lockets or want to have spares.
- Time-Saving: Having multiple copies readily available saves time, as you don’t have to wait for additional prints if you make a mistake or need to try a different size.
- Versatility: Tiling allows you to create multiple versions of the same photo with slight variations in cropping or sizing. This can be useful if you’re unsure which crop will look best in your locket.
- Backup: Having extra copies of your locket photo provides a backup in case the original gets damaged or lost. This ensures that you always have a replacement on hand.
 Screenshot showcasing photo cropped for a locket necklace
4. Trimming and Fitting Your Locket Photo Prints to Fit Your Pendant
How do I trim my locket photos for a perfect fit? Trimming and fitting your locket photos requires patience and precision. Proper trimming ensures professional results, a snug fit, and enhanced aesthetic appeal.
- Use Your Template: Place your template over one of your tiled photos and trace around it with a pencil to create a faint trim line.
- Trim Carefully: Use curved nail scissors or sharp embroidery scissors for clean edges, especially on curved shapes.
- Trim Evenly: Ensure you trim evenly from all sides to keep the subject centered.
- Don’t Worry About Mistakes: The tiling method provides backup photos if you make a mistake.
- Insert the Photo: Carefully insert the photo into the locket. Use pointed or slanted tweezers to gently press the edges under the lip of the locket.
- Secure the Photo: If the rim doesn’t hold the photo in place, use a small amount of glue on the back of the print before inserting it.
- Re-trim if Necessary: If there are folds, creases, or if the photo is too large, carefully trim small slivers off the edges until it fits smoothly.
 Example of locket photo preview on iPhone
4.1 What Type of Scissors Are Best for Trimming Locket Photos?
The best scissors for trimming locket photos are sharp, curved nail scissors or embroidery scissors. Sharp scissors ensure clean cuts, curved blades facilitate intricate shapes, and high-quality materials prolong scissor life. The impact of scissor quality on precise trimming, edge smoothness, and overall photo appearance should be considered.
- Sharp Blades: The most important feature of scissors for trimming locket photos is sharpness. Sharp blades ensure clean, precise cuts without tearing or fraying the edges of the photo. Dull scissors can damage the photo and make it difficult to achieve a smooth finish.
- Curved Blades: Curved nail scissors or embroidery scissors are ideal for trimming locket photos because their curved blades allow for greater control when cutting around curved shapes like hearts, ovals, and circles. The curve helps to follow the contours of the template more easily, resulting in a more accurate and professional-looking cut.
- Small Size: Scissors with a small size are easier to handle and provide better control when trimming small photos. Large scissors can be cumbersome and make it difficult to achieve precise cuts.
- Comfortable Grip: Choose scissors with a comfortable grip that fits well in your hand. This will reduce hand fatigue and improve your ability to make accurate cuts.
- High-Quality Materials: Scissors made from high-quality materials, such as stainless steel, will last longer and maintain their sharpness over time. Avoid scissors made from cheap materials that can dull quickly or break easily.
- Pointed Tips: Scissors with pointed tips are useful for making small, precise cuts in tight spaces. This can be helpful when trimming around intricate details or corners.
- Safety Features: Some scissors come with safety features like rounded tips or blade covers to prevent accidental cuts. These features can be especially important if you have children or pets.
 Tiled locket photo print sheet
4.2 How Can I Secure the Photo Inside the Locket?
Securing a photo inside a locket involves using gentle adhesives and proper fitting techniques. Secure placement ensures photo stability, prevents damage, and maintains the locket’s aesthetic. The impact of securing techniques on photo preservation, ease of replacement, and overall locket integrity should be considered.
- Check the Fit: Before applying any adhesive, ensure that the photo fits snugly inside the locket. If it is too large, trim it down carefully until it fits without bending or creasing.
- Use Photo-Safe Adhesive: Choose a photo-safe adhesive that is acid-free and archival quality. This type of adhesive will not damage the photo over time and will prevent discoloration or fading.
- Apply Adhesive Sparingly: Apply a small amount of adhesive to the back of the photo. Avoid using too much, as this can make the photo difficult to remove later if needed.
- Position the Photo: Carefully position the photo inside the locket, ensuring that it is centered and aligned correctly.
- Press Gently: Press the photo gently into place, applying even pressure to ensure that the adhesive bonds properly.
- Allow to Dry: Allow the adhesive to dry completely before closing the locket. This will prevent the photo from shifting or sticking to the inside of the locket.
- Use Glue Dots: Glue dots are small, pre-cut circles of adhesive that are easy to use and provide a secure hold. Simply peel off a glue dot and apply it to the back of the photo before inserting it into the locket.
- Consider Clear Acetate: Cut a small piece of clear acetate to fit inside the locket on top of the photo. This will help to protect the photo from scratches and keep it in place.
 Completed locket photos ready for insertion
5. Other Creative Ideas for Locket Sized Photos
What are some creative uses for miniature photos beyond lockets? Miniature photos offer versatile creative uses beyond lockets, including personalized cards, gift embellishments, and wallet keepsakes. These alternative applications enhance personalization, provide unique gifting options, and allow for creative expression.
- Christmas Cards: Include a few miniature photos with your Christmas cards to give family and friends a visual update on your year.
- Gift Embellishments: Place a tiny photo inside a jewelry box when gifting jewelry for an extra personal touch.
- Wallet Keepsakes: Carry a selection of miniature photos with you in your purse or wallet.
- Scrapbooking: Use miniature photos in scrapbooking projects to add personal memories and embellishments.
- DIY Magnets: Create DIY magnets by gluing miniature photos onto small magnets.
- Personalized Bookmarks: Make personalized bookmarks by attaching miniature photos to the top of plain bookmarks.
- Event Invitations: Include miniature photos in event invitations for a personal and memorable touch.
- Thank You Notes: Add miniature photos to thank you notes to show appreciation and create a lasting impression.
 Example of locket photo template for trimming
Discover More at dfphoto.net
Ready to start your photo locket project? Visit dfphoto.net for more tutorials, inspiration, and high-quality printing services. Explore our extensive collection of beautiful photographs and connect with a vibrant community of photography enthusiasts. Let dfphoto.net be your guide to creating unforgettable keepsakes and mastering the art of photography. Address: 1600 St Michael’s Dr, Santa Fe, NM 87505, United States. Phone: +1 (505) 471-6001. Website: dfphoto.net.
6. FAQ
6.1 What if I don’t have a printer at home?
No problem You can use online printing services like dfphoto.net to print your locket photos. They offer custom sizes and tiling options for convenience.
6.2 Can I use a photo with multiple people in it?
Yes, but make sure the heads of the subjects are close together and that the most important faces are centered in the frame. Avoid large group photos.
6.3 How do I prevent my photo from fading inside the locket?
Use photo-safe adhesive and consider placing a clear acetate sheet over the photo to protect it from scratches and fading.
6.4 What if my locket is an unusual shape?
Create a custom template using tracing paper and graph paper to match the exact shape of your locket.
6.5 Can I use black and white photos in a locket?
Absolutely! Black and white photos can add a timeless and classic touch to your locket.
6.6 How often should I replace the photo in my locket?
Replace the photo whenever you want a change or if the current photo starts to fade or deteriorate.
6.7 What is the best type of glue to use for locket photos?
Use photo-safe, acid-free adhesive to prevent damage to the photo over time.
6.8 Can I scan an old photo to use in a locket?
Yes, scan the photo at a high resolution to ensure the best quality when printed in a small size.
6.9 How do I clean my locket without damaging the photo inside?
Use a soft, dry cloth to gently wipe the outside of the locket. Avoid using liquids or harsh chemicals.
6.10 What if my photo is too thick for the locket?
Use a thinner paper or have the photo professionally printed on thinner stock to ensure it fits comfortably.