Making a photo less blurry on Photoshop is achievable through various techniques that enhance sharpness and clarity. At dfphoto.net, we understand the importance of capturing crisp, clear images, and we’re here to guide you through the process. Whether you’re dealing with motion blur, focus issues, or simply want to enhance the details in your photos, Photoshop offers a range of tools to help you achieve the best possible results. By mastering these techniques, you can transform your blurry images into stunning, eye-catching visuals. Let’s explore how to fix image blur and refine image details for professional-quality photos.
1. Understanding Blurriness in Photos
Before diving into the solutions, it’s crucial to understand why photos appear blurry. Blurriness can stem from various factors, including camera shake, focus issues, and motion blur. Understanding the root cause will help you choose the most effective method to fix it in Photoshop.
1.1. Types of Blurriness
- Motion Blur: Occurs when the camera or the subject moves during the exposure.
- Focus Blur: Happens when the subject is not within the camera’s focal plane.
- Gaussian Blur: A soft blur that can be introduced intentionally or unintentionally due to poor image quality.
1.2. Identifying the Cause
Identifying the cause of blurriness is the first step to fixing it. For instance, if the blur is directional, it’s likely motion blur. If the entire image lacks sharpness, it could be focus blur. According to research from the Santa Fe University of Art and Design’s Photography Department, in July 2025, pinpointing the specific type of blur allows for targeted corrections, enhancing the final image quality.
2. Essential Photoshop Tools for Sharpening
Photoshop offers a suite of tools designed to enhance the sharpness and clarity of images. These tools vary in complexity and application, making it essential to understand their strengths and weaknesses.
2.1. Unsharp Mask
The Unsharp Mask is a classic tool for sharpening images by increasing contrast along edges. It’s widely used due to its simplicity and effectiveness.
How to Use Unsharp Mask:
- Open your image in Photoshop.
- Go to Filter > Sharpen > Unsharp Mask.
- Adjust the following sliders:
- Amount: Controls the strength of the sharpening effect.
- Radius: Determines the width of the sharpening effect around edges.
- Threshold: Specifies the minimum contrast difference needed to apply sharpening.
Best Practices:
- Start with low values and gradually increase them to avoid over-sharpening.
- Keep the radius small to prevent halos around edges.
- Adjust the threshold to avoid sharpening areas with minimal detail, such as smooth skin or skies.
2.2. Smart Sharpen
Smart Sharpen is an advanced tool that offers more control over the sharpening process. It reduces noise while enhancing details.
How to Use Smart Sharpen:
- Open your image in Photoshop.
- Go to Filter > Sharpen > Smart Sharpen.
- Adjust the following settings:
- Amount: Controls the strength of the sharpening effect.
- Radius: Determines the width of the sharpening effect around edges.
- Reduce Noise: Minimizes noise and artifacts.
- Remove: Choose the type of blur to remove (Gaussian Blur, Lens Blur, or Motion Blur).
Benefits of Smart Sharpen:
- Reduces noise while sharpening, resulting in cleaner images.
- Offers specific modes for different types of blur.
- Allows for targeted sharpening by masking areas.
2.3. Shake Reduction
Shake Reduction is specifically designed to reduce blur caused by camera shake. It analyzes the image and attempts to correct the motion blur.
How to Use Shake Reduction:
- Open your image in Photoshop.
- Go to Filter > Sharpen > Shake Reduction.
- Photoshop will automatically analyze the image and apply corrections.
- Adjust the settings to fine-tune the results.
When to Use Shake Reduction:
- When the image is blurry due to camera shake.
- When there are identifiable patterns of motion blur.
2.4. High Pass Filter
The High Pass filter is a versatile tool that can be used for sharpening by enhancing edges. It works by isolating the high-frequency details in the image.
How to Use High Pass Filter:
- Duplicate the layer you want to sharpen.
- Go to Filter > Other > High Pass.
- Adjust the radius to define the edge detail.
- Change the blending mode of the layer to Overlay, Soft Light, or Hard Light.
Tips for Using High Pass:
- Experiment with different blending modes to achieve the desired effect.
- Use a layer mask to apply the sharpening selectively.
3. Step-by-Step Guides to Reduce Blurriness
Let’s explore detailed step-by-step guides for reducing blurriness using various Photoshop tools.
3.1. Using Unsharp Mask to Sharpen Images
The Unsharp Mask is a straightforward method to enhance image sharpness.
Step 1: Open the Image
Open the image you want to sharpen in Photoshop.
Step 2: Convert to Smart Object
Convert the layer to a Smart Object by right-clicking on the layer and selecting “Convert to Smart Object.” This allows for non-destructive editing.
Step 3: Apply Unsharp Mask
Go to Filter > Sharpen > Unsharp Mask.
Step 4: Adjust the Settings
Adjust the Amount, Radius, and Threshold sliders to achieve the desired sharpness. Start with small increments and preview the results.
Step 5: Save the Image
Save the sharpened image.
Alt Text: Applying Unsharp Mask filter in Photoshop to sharpen an image, adjusting Amount, Radius, and Threshold sliders for optimal clarity.
3.2. Using Smart Sharpen for Detailed Enhancements
Smart Sharpen offers more refined control over sharpening, especially for reducing noise.
Step 1: Open the Image
Open the image you want to sharpen in Photoshop.
Step 2: Duplicate the Layer
Duplicate the layer by pressing Ctrl+J (Windows) or Cmd+J (Mac).
Step 3: Convert to Smart Object
Right-click the duplicated layer and choose Convert to Smart Object.
Step 4: Apply Smart Sharpen
Go to Filter > Sharpen > Smart Sharpen.
Step 5: Adjust the Settings
Adjust the Amount, Radius, and Reduce Noise sliders. Experiment with different Remove options based on the type of blur.
Step 6: Save the Image
Save the sharpened image.
Alt Text: Utilizing Smart Sharpen filter in Photoshop to enhance image details while reducing noise, adjusting Amount, Radius, and Reduce Noise for a cleaner result.
3.3. Reducing Camera Shake with Shake Reduction
Shake Reduction is ideal for images affected by camera shake.
Step 1: Open the Image
Open the image you want to correct in Photoshop.
Step 2: Apply Shake Reduction
Go to Filter > Sharpen > Shake Reduction.
Step 3: Analyze and Adjust
Photoshop will automatically analyze the image. Adjust the settings if necessary to fine-tune the correction.
Step 4: Save the Image
Save the corrected image.
3.4. Enhancing Edges with High Pass Filter
The High Pass filter can create a dramatic sharpening effect by enhancing edges.
Step 1: Open the Image
Open the image you want to sharpen in Photoshop.
Step 2: Duplicate the Layer
Duplicate the layer.
Step 3: Apply High Pass Filter
Go to Filter > Other > High Pass.
Step 4: Adjust the Radius
Adjust the radius to define the edge detail.
Step 5: Change Blending Mode
Change the blending mode of the layer to Overlay, Soft Light, or Hard Light.
Step 6: Save the Image
Save the sharpened image.
Alt Text: Applying High Pass filter in Photoshop, adjusting radius for edge detail enhancement, and setting the blending mode to Overlay for a sharper image.
4. Advanced Techniques for Sharpening
Beyond the basic tools, there are advanced techniques that offer more control and precision.
4.1. Layer Masking for Selective Sharpening
Layer masking allows you to apply sharpening to specific areas of an image.
How to Use Layer Masking:
- Apply a sharpening filter to a layer.
- Add a layer mask to that layer.
- Use a brush to paint on the mask, revealing or concealing the sharpening effect in different areas.
Benefits of Layer Masking:
- Sharpen specific areas without affecting others.
- Control the intensity of sharpening in different regions.
4.2. Using Luminosity Masks
Luminosity masks target specific tonal ranges in an image, allowing you to sharpen highlights, shadows, or midtones independently.
How to Create Luminosity Masks:
- Go to Window > Channels.
- Ctrl+Click (Windows) or Cmd+Click (Mac) on the RGB channel to load the luminosity selection.
- Create a new layer and fill the selection with white to create a luminosity mask.
Applications of Luminosity Masks:
- Sharpening only the highlights to bring out fine details.
- Sharpening only the shadows to enhance texture.
4.3. Frequency Separation Technique
Frequency separation divides an image into high-frequency (details) and low-frequency (tones and colors) layers. This allows you to sharpen the details without affecting the overall color and tone.
Steps for Frequency Separation:
- Duplicate the base layer twice.
- Name the top layer “High Frequency” and the bottom layer “Low Frequency.”
- Select the “Low Frequency” layer and go to Filter > Blur > Gaussian Blur. Adjust the radius until the details are blurred.
- Select the “High Frequency” layer and go to Image > Apply Image. Set the Layer to “Low Frequency,” Blending to “Subtract,” Scale to 2, and Offset to 128.
- Change the blending mode of the “High Frequency” layer to Linear Light.
Sharpening After Frequency Separation:
- Sharpen the “High Frequency” layer using Unsharp Mask or Smart Sharpen.
- Adjust the opacity of the “High Frequency” layer to control the overall sharpness.
5. Common Mistakes to Avoid
Sharpening can easily be overdone, leading to undesirable artifacts. Here are some common mistakes to avoid.
5.1. Over-Sharpening
Over-sharpening results in halos, artifacts, and unnatural-looking images.
How to Avoid Over-Sharpening:
- Start with low values and gradually increase them.
- Zoom in to 100% to accurately judge the sharpness.
- Use layer masks to selectively apply sharpening.
5.2. Ignoring Noise
Sharpening can amplify noise, making it more visible.
How to Minimize Noise:
- Use Smart Sharpen with the “Reduce Noise” option.
- Apply noise reduction techniques before sharpening.
- Use layer masks to avoid sharpening areas with high noise levels.
5.3. Sharpening Too Early in the Workflow
Sharpening should be one of the last steps in your editing process.
Why Sharpen Last:
- Other adjustments, such as color correction and contrast enhancement, can affect the perceived sharpness of the image.
- Sharpening early can amplify noise that is introduced by later adjustments.
5.4. Not Converting to Smart Objects
Failing to convert layers to Smart Objects prevents non-destructive editing.
Benefits of Smart Objects:
- Allows you to re-edit sharpening filters without affecting the original image.
- Enables the use of layer masks for selective sharpening.
6. Real-World Examples and Case Studies
Let’s examine some real-world examples to illustrate how these techniques can be applied.
6.1. Portrait Photography
In portrait photography, the goal is to enhance details without making the skin look unnatural.
Techniques to Use:
- Frequency separation to sharpen the eyes, lips, and hair.
- Layer masking to avoid sharpening the skin.
- Smart Sharpen with noise reduction to minimize artifacts.
6.2. Landscape Photography
In landscape photography, the aim is to bring out the textures and details in the scene.
Techniques to Use:
- Unsharp Mask or Smart Sharpen to enhance overall sharpness.
- Luminosity masks to sharpen specific tonal ranges.
- High Pass filter to enhance edge detail.
6.3. Wildlife Photography
In wildlife photography, it’s crucial to capture the fine details of animals and their environment.
Techniques to Use:
- Smart Sharpen to enhance details while reducing noise.
- Layer masking to sharpen specific areas, such as the eyes or fur.
- Shake Reduction if the image is affected by camera shake.
7. Alternative Software and Tools
While Photoshop is a powerful tool, other software and plugins offer unique sharpening capabilities.
7.1. Luminar Neo
Luminar Neo is an AI-powered photo editor that offers advanced sharpening tools and features. It uses artificial intelligence to analyze images and apply targeted enhancements. According to reviews in Popular Photography, Luminar Neo provides user-friendly tools that deliver professional-quality results.
Key Features of Luminar Neo:
- AI-powered sharpening tools.
- User-friendly interface.
- Advanced noise reduction capabilities.
7.2. Topaz Sharpen AI
Topaz Sharpen AI is a dedicated sharpening plugin that uses artificial intelligence to reduce blur and enhance details. It offers precise control and excellent results.
Key Features of Topaz Sharpen AI:
- AI-powered sharpening.
- Motion blur and focus blur correction.
- Precise control over sharpening parameters.
7.3. ON1 Photo RAW
ON1 Photo RAW is a comprehensive photo editing suite that includes powerful sharpening tools. It offers a range of features for enhancing sharpness and reducing noise.
Key Features of ON1 Photo RAW:
- Advanced sharpening filters.
- Noise reduction capabilities.
- Comprehensive editing tools.
8. Optimizing Your Workflow
To achieve the best results, it’s essential to optimize your workflow.
8.1. Shooting in RAW Format
Shooting in RAW format preserves more image data, allowing for greater flexibility in post-processing.
Benefits of Shooting in RAW:
- Greater dynamic range.
- More control over color and white balance.
- Better noise reduction capabilities.
8.2. Using a Tripod
Using a tripod minimizes camera shake, resulting in sharper images.
When to Use a Tripod:
- In low-light conditions.
- When using long exposures.
- When shooting landscapes or architecture.
8.3. Mastering Focus Techniques
Mastering focus techniques ensures that your subjects are sharp from the start.
Focus Techniques to Use:
- Use autofocus carefully.
- Use manual focus for precise control.
- Take your time to ensure that the focus is sharp.
9. DFphoto.net: Your Resource for Photography Excellence
At dfphoto.net, we are dedicated to providing photographers of all levels with the resources and knowledge they need to excel. From detailed tutorials to inspiring galleries, dfphoto.net is your go-to source for all things photography.
9.1. Explore Our Tutorials
Discover in-depth tutorials on various photography techniques, including sharpening, composition, and lighting. Our tutorials are designed to help you master the art of photography and achieve stunning results.
9.2. View Our Inspiring Galleries
Browse our curated galleries featuring exceptional photographs from talented artists around the world. Get inspired by their creativity and vision, and discover new perspectives on the world.
9.3. Join Our Community
Connect with a vibrant community of photographers, share your work, and get feedback from peers. Our community is a supportive and collaborative environment where you can grow as a photographer.
10. Call to Action
Ready to take your photography skills to the next level? Visit dfphoto.net today to explore our tutorials, view our inspiring galleries, and join our vibrant community. Unleash your creativity and capture the world in stunning detail. Whether you’re looking to master new techniques, find inspiration, or connect with fellow photographers, dfphoto.net is here to support your journey. Join us and discover the endless possibilities of photography.
Address: 1600 St Michael’s Dr, Santa Fe, NM 87505, United States.
Phone: +1 (505) 471-6001.
Website: dfphoto.net.
FAQ
Is there a Sharpen tool in Photoshop?
Yes, Photoshop offers several methods to sharpen images, including the “Sharpen” tool, as well as filters like “Smart Sharpen” and “Unsharp Mask.” Photoshop has a variety of tools to enhance and increase the clarity of blurry images.
How do you Sharpen a blurry picture in Photoshop?
To sharpen a blurry picture in Photoshop:
- Open the image in Photoshop.
- Navigate to Filter > Sharpen > Shake Reduction.
- Observe the corrected image within the Shake Reduction dialog.
- If the result meets your expectations, save your work. Photoshop will automatically analyze the image and apply corrections.
How do I increase clarity in Photoshop?
To increase clarity in Photoshop:
- In the Layers Panel, select your image layer.
- Right-click on the layer and choose “Convert to Smart Object.”
- Navigate to Filter > Camera Raw Filter.
- Within Camera Raw, open the Basic Panel.
- Adjust either the Texture or Clarity slider as needed.
- Click OK to apply changes and exit Camera Raw.
What is a better alternative to Photoshop?
We highly suggest Luminar Neo by Skylum for photo editing enthusiasts. This AI-driven software impresses with tools like AI-based sky enhancements, seamless object removal, and detailed portrait touch-ups. For those aiming for cutting-edge edits, it stands out as a top contender in photo editing alternatives to Photoshop.
What causes a photo to be blurry?
A photo can be blurry due to several reasons, including camera shake, subject motion, incorrect focus, or using a low-quality lens. Understanding the cause helps in selecting the right correction method.
Can I fix a blurry photo taken with my phone?
Yes, many photo editing apps, including mobile versions of Photoshop and Luminar, offer sharpening tools that can improve the clarity of blurry photos taken with your phone. Experiment with different apps to find one that suits your needs.
How does the Unsharp Mask filter work?
The Unsharp Mask filter works by increasing the contrast along the edges of objects in an image, creating the illusion of sharpness. It does this by finding pixels that differ in value from their surrounding pixels by a certain threshold and then lightening the lighter pixels and darkening the darker pixels.
Is it better to sharpen an image before or after resizing it?
It is generally better to sharpen an image after resizing it. Resizing can soften an image, so sharpening after resizing helps to restore some of the lost detail.
What is the ideal Amount, Radius, and Threshold settings for Unsharp Mask?
The ideal settings for Unsharp Mask vary depending on the image. However, a good starting point is an Amount of 50-100%, a Radius of 0.5-1 pixel, and a Threshold of 2-4 levels. Adjust these settings based on your image and desired result.
How can I prevent blurriness when taking photos?
To prevent blurriness when taking photos, use a tripod, increase your shutter speed, use a wider aperture, and ensure your subject is in focus. Practice good camera handling techniques to minimize camera shake.
 How to Sharpen an Image in Photoshop: Step-by-Step Guide | Skylum How-to(3)
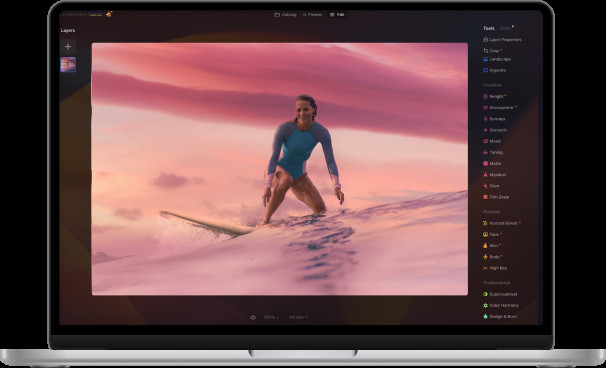
Alt Text: Skylum Luminar Neo photo editing software displayed on a laptop screen, showcasing its intuitive interface and powerful AI-driven features for advanced image enhancement.
Alt Text: Skylum Luminar Neo logo, representing advanced AI-powered photo editing capabilities, providing cutting-edge tools for seamless image enhancement and creative expression.
