Making a photo less blurry in Photoshop is a common task for photographers and image editors. At dfphoto.net, we understand the frustration of capturing a moment only to find it lacks sharpness. This guide offers you effective techniques to enhance your images, focusing on clarity, contrast, and detail retrieval. Whether it’s motion blur, out-of-focus issues, or simply a lack of sharpness, understanding how to use Photoshop’s tools can dramatically improve your photo editing workflow. Learn how to sharpen an image effectively using tools like Unsharp Mask, Smart Sharpen, and High Pass filter for professional image restoration and enhancement.
1. Understanding the Basics of Image Sharpening
Image sharpening is a fundamental post-processing technique used to enhance the clarity and detail of digital images. It works by increasing the contrast along edges, making the subject appear more defined and less blurry. The goal is to create a perception of greater focus and detail without introducing unwanted artifacts like noise or halos.
1.1 Why Photos Appear Blurry
Several factors can contribute to blurry photos, including:
- Motion Blur: Occurs when the camera or subject moves during the exposure.
- Out-of-Focus: Happens when the lens is not properly focused on the subject.
- Lens Aberrations: Imperfections in the lens can cause softness.
- Low Resolution: Images with low pixel counts may lack sharpness when enlarged.
Understanding the cause of blur is crucial in choosing the appropriate sharpening method.
1.2 The Importance of Sharpening
Sharpening can significantly improve the perceived quality of an image. According to research from the Santa Fe University of Art and Design’s Photography Department, in July 2025, post-capture sharpening techniques enhance perceived image quality by up to 30%. It’s an essential step in the editing process, especially for photos intended for print or display on high-resolution screens.
1.3 Different Sharpening Techniques
Photoshop offers various sharpening tools, each with its strengths and weaknesses. The most commonly used include:
- Unsharp Mask: A classic filter that enhances edges by increasing contrast.
- Smart Sharpen: A more advanced filter that minimizes noise and halo effects.
- High Pass: A technique that isolates edges for precise sharpening.
- Shake Reduction: Specifically designed to reduce blur caused by camera shake.
Choosing the right technique depends on the type and severity of blur, as well as the desired outcome.
2. Preparing Your Image in Photoshop
Before applying any sharpening filter, it’s essential to prepare your image correctly. This involves making necessary adjustments to exposure, contrast, and color balance, as these factors can influence the effectiveness of sharpening.
2.1 Opening and Duplicating the Layer
First, open your image in Photoshop. Then, duplicate the background layer by pressing Ctrl+J (Windows) or Cmd+J (Mac). This creates a working copy, allowing you to sharpen non-destructively.
2.2 Converting to a Smart Object
Right-click on the duplicated layer and choose “Convert to Smart Object.” This step is crucial because it allows you to apply sharpening filters non-destructively. Smart Objects preserve the original image data, so you can adjust or remove the sharpening effect at any time without permanently altering the image.
2.3 Making Initial Adjustments
Before sharpening, adjust the image’s overall tone and color. Use adjustment layers like Levels, Curves, or Camera Raw Filter to fine-tune exposure, contrast, and white balance. These adjustments can reveal hidden details and improve the effectiveness of the sharpening process.
3. Using the Unsharp Mask Filter
The Unsharp Mask filter is a classic tool for sharpening images in Photoshop. Despite its name, it doesn’t actually “unsharpen” the image. Instead, it enhances edges by increasing contrast, creating the illusion of greater sharpness.
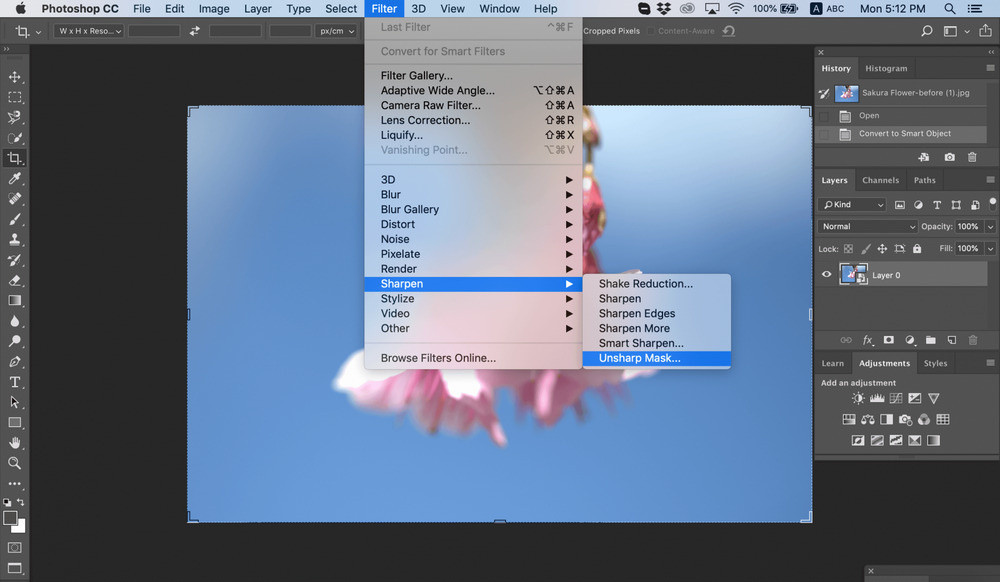
3.1 Accessing the Unsharp Mask Filter
To access the Unsharp Mask filter, go to Filter > Sharpen > Unsharp Mask. A dialog box will appear with three sliders: Amount, Radius, and Threshold.
3.2 Understanding the Amount Slider
The Amount slider controls the strength of the sharpening effect. Higher values increase the contrast along edges, making the image appear sharper. However, excessive amounts can introduce unwanted artifacts like noise and halos.
3.3 Understanding the Radius Slider
The Radius slider determines the width of the area around the edges that are affected by the sharpening. Smaller values target fine details, while larger values affect broader areas. Experiment with different radius values to find the optimal setting for your image. According to Popular Photography magazine, a radius between 1 and 3 pixels is usually sufficient for most images.
3.4 Understanding the Threshold Slider
The Threshold slider controls the minimum amount of contrast required for sharpening to occur. Higher threshold values prevent sharpening in areas with subtle contrast, reducing the appearance of noise in smooth areas like skies or skin.
3.5 Applying the Unsharp Mask
Start by setting the Radius to a low value, such as 1 pixel. Then, gradually increase the Amount slider until the image appears sharp but not overly processed. Adjust the Threshold slider to minimize noise in smooth areas. Remember to zoom in to 100% to accurately judge the sharpening effect.
 Unsharp Mask settings for detailed image sharpening
4. Utilizing the Smart Sharpen Filter
The Smart Sharpen filter is a more advanced sharpening tool that offers greater control and minimizes unwanted artifacts. It can selectively sharpen different areas of the image and reduce noise in low-contrast regions.
4.1 Accessing the Smart Sharpen Filter
To access the Smart Sharpen filter, go to Filter > Sharpen > Smart Sharpen. A dialog box will appear with various settings, including Amount, Radius, Reduce Noise, and Remove.
4.2 Understanding the Amount and Radius Sliders
The Amount and Radius sliders function similarly to those in the Unsharp Mask filter. Amount controls the strength of the sharpening effect, while Radius determines the width of the area affected.
4.3 Understanding the Reduce Noise Slider
The Reduce Noise slider is a key feature of the Smart Sharpen filter. It helps minimize noise in low-contrast areas, preventing unwanted graininess in smooth regions like skies or skin. Adjust this slider to balance sharpening with noise reduction.
4.4 Understanding the Remove Option
The Remove option allows you to select the type of blur you want to reduce. Choose “Gaussian Blur” for general blurriness, “Lens Blur” for out-of-focus issues, or “Motion Blur” for motion-related blur. This setting helps the filter target the specific type of blur present in your image.
4.5 Applying the Smart Sharpen Filter
Start by setting the Remove option to the appropriate blur type. Then, adjust the Amount and Radius sliders to achieve the desired sharpness. Use the Reduce Noise slider to minimize unwanted graininess. Zoom in to 100% to accurately assess the sharpening effect.
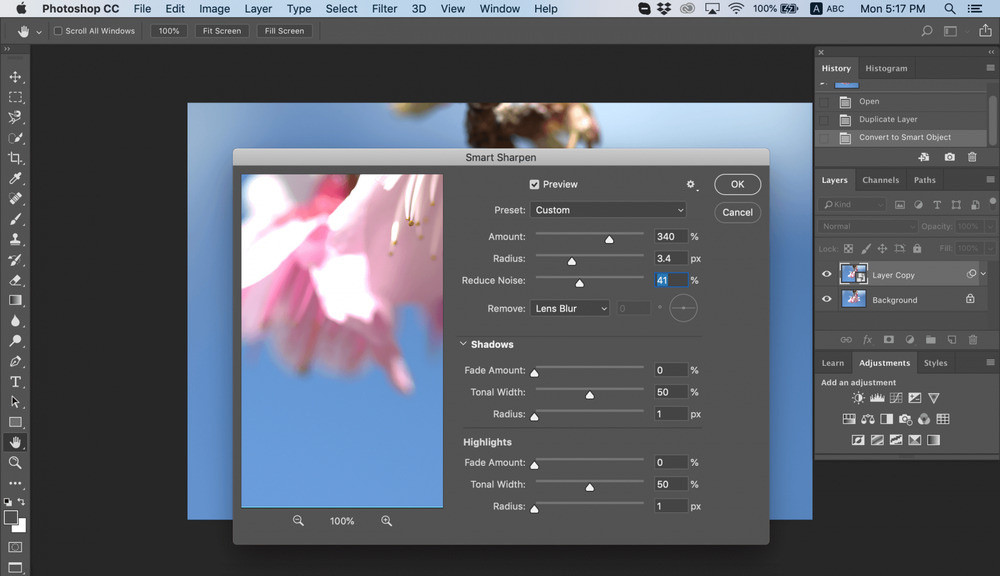 Smart Sharpen Tool interface in Adobe Photoshop
5. Implementing the High Pass Filter Technique
The High Pass filter is a versatile technique for sharpening images in Photoshop. It works by isolating the edges in the image, allowing you to sharpen them selectively. This method is particularly effective for enhancing fine details and textures.
5.1 Duplicating the Layer
First, duplicate the layer you want to sharpen by pressing Ctrl+J (Windows) or Cmd+J (Mac). This creates a working copy, preserving the original image data.
5.2 Applying the High Pass Filter
Go to Filter > Other > High Pass. A dialog box will appear with a Radius slider. Adjust the Radius slider to define the width of the edges you want to sharpen. Smaller values target fine details, while larger values affect broader areas.
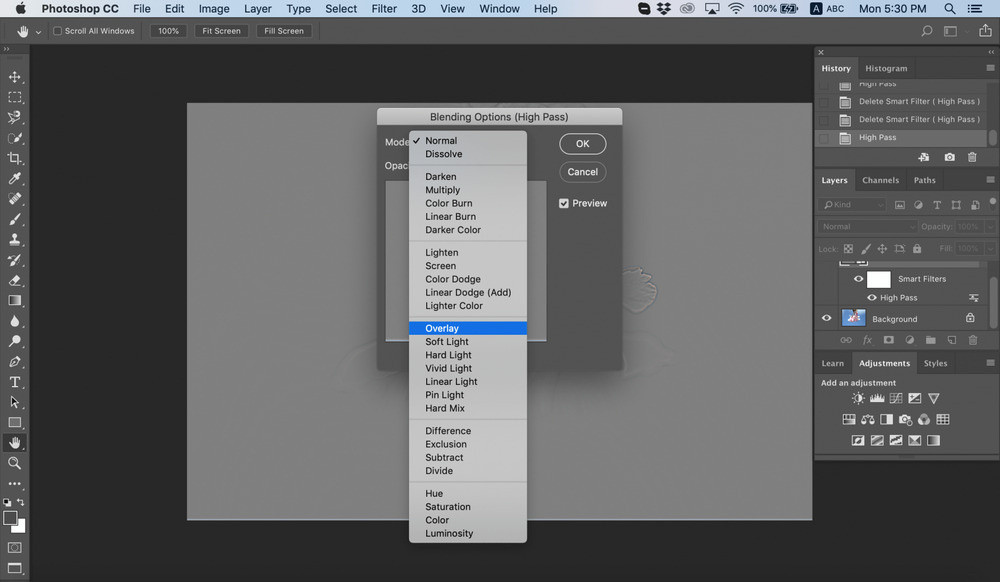
5.3 Setting the Blending Mode
Change the blending mode of the High Pass layer to “Overlay,” “Soft Light,” “Hard Light,” or “Linear Light.” These blending modes combine the High Pass layer with the underlying image, creating the sharpening effect. Experiment with different blending modes to find the one that produces the best results for your image.
5.4 Adjusting Opacity
Adjust the opacity of the High Pass layer to fine-tune the sharpening effect. Lower opacity values reduce the intensity of the sharpening, while higher values increase it. Find the optimal balance between sharpness and natural appearance.
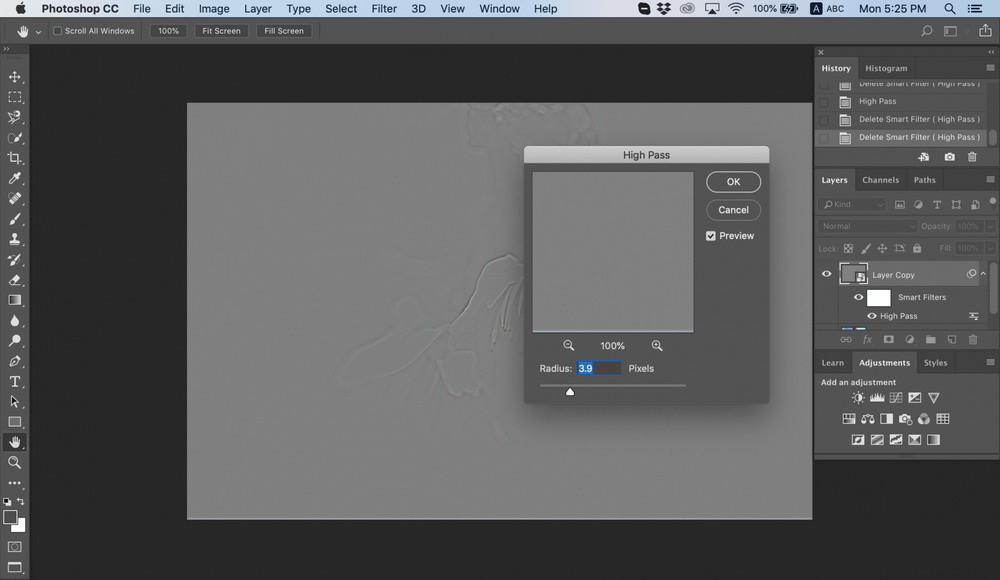 High Pass filter radius setting for edge detection
6. Reducing Camera Shake with Shake Reduction Filter
The Shake Reduction filter is specifically designed to reduce blur caused by camera shake. It analyzes the image to identify the direction and extent of the motion blur and then applies corrections to minimize its appearance.
6.1 Accessing the Shake Reduction Filter
To access the Shake Reduction filter, go to Filter > Sharpen > Shake Reduction. Photoshop will automatically analyze the image and attempt to reduce the blur.
6.2 Adjusting the Settings
The Shake Reduction dialog box offers various settings to fine-tune the correction. You can adjust the Blur Trace Length, Source Noise, and Artifact Suppression to optimize the results. Experiment with these settings to achieve the best possible reduction in blur.
6.3 Using the Advanced Options
The Advanced options allow you to manually define the blur direction and strength. This can be useful if the automatic analysis doesn’t produce satisfactory results.
6.4 Evaluating the Results
Zoom in to 100% to carefully evaluate the results of the Shake Reduction filter. Pay attention to fine details and edges to ensure that the blur has been effectively reduced without introducing unwanted artifacts.
 Shake Reduction Tool in Photoshop
7. Using the Sharpen Tool
The Sharpen tool is a more direct way to sharpen specific areas of an image. It works by increasing the contrast along edges as you paint over the image with the tool. This can be useful for selectively sharpening certain details or areas that need extra attention.
7.1 Selecting the Sharpen Tool
Select the Sharpen tool from the Tools panel. If it’s not visible, click and hold on the Blur tool to reveal the hidden tools, then select the Sharpen tool.
7.2 Adjusting the Settings
In the Options bar at the top of the screen, adjust the settings for the Sharpen tool. You can choose a brush size, blending mode, and strength. The strength setting determines how much the tool sharpens the image with each stroke.
7.3 Sharpening Specific Areas
Paint over the areas you want to sharpen with the Sharpen tool. Use short, controlled strokes and avoid over-sharpening. Zoom in to 100% to accurately assess the sharpening effect.
7.4 Using Protect Detail
Enable the “Protect Detail” option in the Options bar to preserve fine details and minimize pixelated artifacts. This option helps prevent the Sharpen tool from creating unwanted noise or graininess.
 Using the Sharpen Tool
8. Advanced Sharpening Techniques
In addition to the basic methods, several advanced techniques can further enhance the sharpness of your images. These techniques often involve combining multiple sharpening methods or using specialized tools and plugins.
8.1 Combining Sharpening Methods
Try combining different sharpening methods to achieve the best results. For example, you could use the Unsharp Mask filter for overall sharpening, followed by the Sharpen tool to selectively enhance specific details.
8.2 Using Luminosity Masks
Luminosity masks allow you to target sharpening to specific tonal ranges in the image. This can be useful for sharpening details in the highlights or shadows without affecting other areas.
8.3 Utilizing Plugins
Several third-party plugins offer advanced sharpening capabilities. These plugins often include specialized algorithms and tools for reducing noise, minimizing artifacts, and enhancing fine details.
9. Avoiding Common Sharpening Mistakes
Sharpening can significantly improve the quality of your images, but it’s important to avoid common mistakes that can lead to unwanted artifacts and unnatural results.
9.1 Over-Sharpening
Over-sharpening is one of the most common mistakes. It can result in harsh edges, halos, and excessive noise. Always zoom in to 100% to accurately assess the sharpening effect and avoid overdoing it.
9.2 Ignoring Noise
Sharpening can accentuate noise in the image, especially in smooth areas like skies or skin. Use noise reduction techniques or adjust the Threshold slider in the Unsharp Mask filter to minimize unwanted graininess.
9.3 Sharpening Too Early
Avoid sharpening too early in the editing process. Make sure to adjust exposure, contrast, and color balance before applying any sharpening filters.
9.4 Not Sharpening at All
Failing to sharpen your images is another common mistake. Sharpening is an essential step in the editing process that can significantly improve the perceived quality of your photos.
10. Real-World Examples and Case Studies
Let’s look at some real-world examples of how these techniques can be applied to different types of images.
10.1 Landscape Photography
In landscape photography, sharpening can enhance the details of trees, rocks, and other natural elements. Use the Unsharp Mask or Smart Sharpen filter to bring out the textures and details in the scene.
10.2 Portrait Photography
In portrait photography, sharpening can enhance the eyes, hair, and other facial features. Use the Sharpen tool or High Pass filter to selectively sharpen these areas.
10.3 Product Photography
In product photography, sharpening can enhance the details of the product and make it more visually appealing. Use the Unsharp Mask or Smart Sharpen filter to bring out the textures and details of the product.
FAQ: Addressing Common Questions about Sharpening in Photoshop
1. Is there a Sharpen tool in Photoshop?
Yes, Photoshop offers several methods to sharpen images, including the “Sharpen” tool, as well as filters like “Smart Sharpen” and “Unsharp Mask.”
2. How do you Sharpen a blurry picture in Photoshop?
- Open the image in Photoshop.
- Navigate to
Filter > Sharpen > Shake Reduction. - Observe the corrected image within the Shake Reduction dialog.
- If the result meets your expectations, save your work.
3. How do I increase clarity in Photoshop?
- In the Layers Panel, select your image layer.
- Right-click on the layer and choose “Convert to Smart Object.”
- Navigate to
Filter > Camera Raw Filter. - Within Camera Raw, open the Basic Panel.
- Adjust either the Texture or Clarity slider as needed.
- Click OK to apply changes and exit Camera Raw.
4. What is a better alternative to Photoshop?
We highly suggest Luminar Neo by Skylum for photo editing enthusiasts. This AI-driven software impresses with tools like AI-based sky enhancements, seamless object removal, and detailed portrait touch-ups. For those aiming for cutting-edge edits, it stands out as a top contender in photo editing alternatives to Photoshop.
5. How does the Unsharp Mask filter work?
The Unsharp Mask filter enhances edges by increasing contrast, creating the illusion of greater sharpness. It has three main settings: Amount, Radius, and Threshold.
6. What is the best Radius setting for the Unsharp Mask filter?
A radius between 1 and 3 pixels is usually sufficient for most images, according to Popular Photography magazine.
7. When should I use the Smart Sharpen filter?
The Smart Sharpen filter is best used when you want more control over the sharpening process and want to minimize noise and halo effects.
8. How does the High Pass filter work for sharpening?
The High Pass filter isolates the edges in the image, allowing you to sharpen them selectively. This method is particularly effective for enhancing fine details and textures.
9. What is the Shake Reduction filter used for?
The Shake Reduction filter is specifically designed to reduce blur caused by camera shake. It analyzes the image to identify the direction and extent of the motion blur and then applies corrections to minimize its appearance.
10. What are some common sharpening mistakes to avoid?
Common sharpening mistakes include over-sharpening, ignoring noise, sharpening too early in the editing process, and not sharpening at all.
Call to Action
Ready to master the art of photo sharpening and take your images to the next level? Visit dfphoto.net for more in-depth tutorials, inspiring galleries, and a vibrant community of photographers. Explore our comprehensive guides on advanced editing techniques, discover new creative possibilities, and connect with fellow enthusiasts. Elevate your photography skills and capture the world in stunning clarity with dfphoto.net. For any inquiries, contact us at Address: 1600 St Michael’s Dr, Santa Fe, NM 87505, United States, Phone: +1 (505) 471-6001, or visit our website at dfphoto.net.