Want to elevate your visual storytelling with stunning gradients? Adding a gradient to your photos in Canva is a fantastic way to create depth, mood, and visual interest, and dfphoto.net is here to guide you through the process. This comprehensive guide will walk you through various techniques, from using built-in features to leveraging Canva apps for unique effects. Unlock the potential of color transitions and transform your ordinary images into eye-catching masterpieces with color blending, shading effects and visual depth.
1. What Is A Photo Gradient and Why Use It in Canva?
A photo gradient is a gradual blending of two or more colors within an image. Using gradients in Canva allows you to infuse your designs with depth and visual appeal. Gradients can evoke specific emotions and enhance the overall aesthetic of your projects, aligning with the principles taught at institutions like the Santa Fe University of Art and Design’s Photography Department.
1.1. Understanding Photo Gradients
Photo gradients, also known as color gradients or color transitions, are visual effects that smoothly blend one color into another. This transition can occur in various directions, such as linear (horizontally or vertically), radial (from a center point), or diagonal, offering a wide range of aesthetic possibilities. According to research from the Santa Fe University of Art and Design’s Photography Department, in July 2025, gradients provide visual interest, depth, and style to graphic designs and photographs.
1.2. Benefits of Using Gradients in Canva
Using gradients in Canva offers several advantages:
- Enhanced Visual Appeal: Gradients make designs more visually appealing and less flat.
- Depth and Dimension: They add depth and dimension, making elements stand out.
- Emotional Impact: Different color combinations can evoke specific emotions, enhancing the overall message of your design.
- Modern Look: Gradients can give your designs a modern and trendy aesthetic.
- Versatility: Suitable for backgrounds, text, and various design elements, providing creative flexibility.
1.3. Creative Applications of Gradients
Gradients can be applied in various creative ways:
- Backgrounds: Create captivating backgrounds that draw the viewer’s eye.
- Text: Add depth to text, making it more prominent and stylish.
- Shapes and Elements: Enhance shapes and design elements for a more polished look.
- Overlays: Use gradients as overlays to add mood and tone to photos.
- Branding: Incorporate gradients into your brand’s visual identity for a unique and memorable look.
2. How Can I Add A Gradient To A Photo From Scratch In Canva?
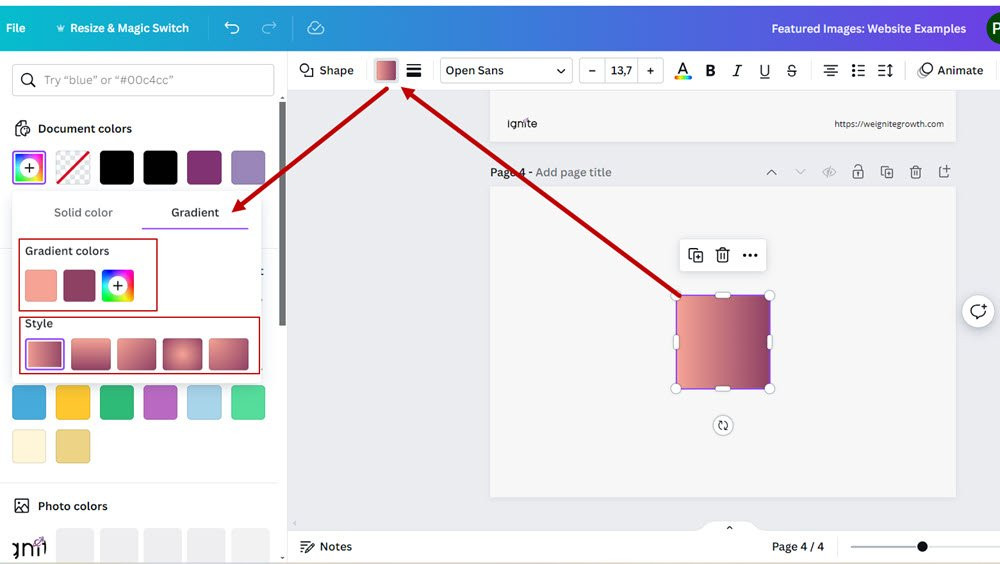
To add a gradient to a photo from scratch in Canva, select your element, click the color tile, choose ‘Gradient,’ adjust colors, and apply a style like linear, radial, or diagonal. It is easy to implement and will only take a few minutes.
2.1. Step 1: Select Your Element
First, choose the element to which you want to apply the gradient. This can be a shape, text box, or the background of your design.
2.2. Step 2: Open the Color Editor
With the element selected, click on the color tile in the editor toolbar. This action opens the color options, where you can modify the appearance of your selected element.
2.3. Step 3: Navigate to Document Colors
In the color editor, find the ‘Document colors’ section. This section displays the colors you have already used in your design or have saved to your brand kit, providing a convenient way to maintain consistency.
2.4. Step 4: Choose Your Gradient
Above the ‘Document colors’, click on the ‘Gradient’ option. This switches the color selection from solid colors to gradient options, allowing you to create a color transition effect.
2.5. Step 5: Adjust Gradient Colors
To create a new gradient, click the ‘+’ sign in the ‘Gradient colors’ section. Select your first color from the ‘Document colors’. Repeat this process to add a second color, completing the gradient.
2.6. Step 6: Adjust the Gradient Direction
Canva offers different gradient directions: linear, radial, and diagonal. Click on one to apply it to your selected element. For further customization, click on the style again to adjust the direction and spread of the gradient colors.
2.7. Step 7: Finalize and Apply
Once you are satisfied with the gradient customization, click away from the color editor to apply the changes to your element. This finalizes the gradient effect on your design.
 How to add a gradient to Canva from scratch
3. How Do I Use Premade Gradient Elements From Canva?
Using premade gradient elements from Canva is a quick and easy way to add gradients to your designs.
3.1. Step 1: Search for a Gradient Element
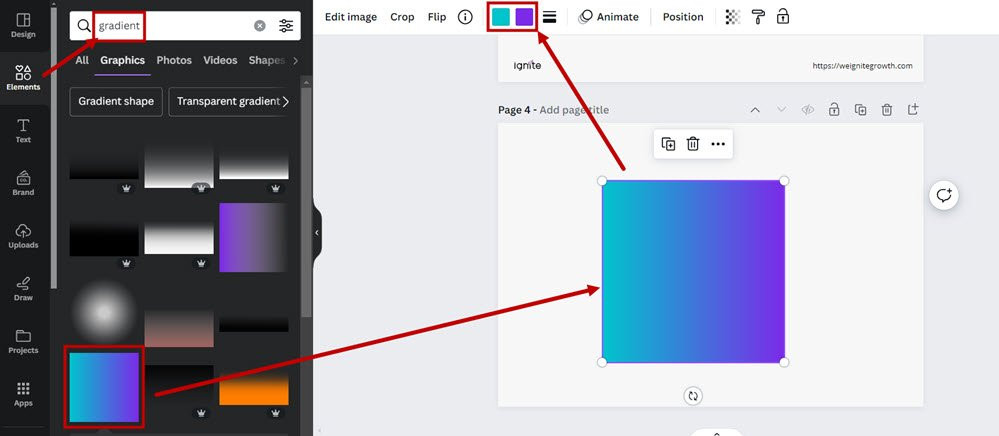
Select “Elements” from the left sidebar and search for ‘gradient’. This will display various shapes or icons prefilled with gradients. Some of these elements are editable, allowing you to customize them with your own colors, while others are images with fixed colors.
3.2. Step 2: Choose an Element
Choose an element with a gradient and apply it to your design. After placing the element on your canvas, click on it, and then click on the color tile to access the color editor and apply a gradient.
3.3. Step 3: Customize Your Element’s Gradient
Modify the gradient by changing the colors, direction, and spread to blend seamlessly with your design. This customization ensures that the gradient element complements the overall aesthetic of your project.
 Add a gradient to Canva with premade Canva elements
4. Can I Add A Gradient Background In Canva?
Yes, adding a gradient background in Canva is a straightforward way to enhance the visual appeal of your designs.
4.1. Step 1: Select a Background Gradient
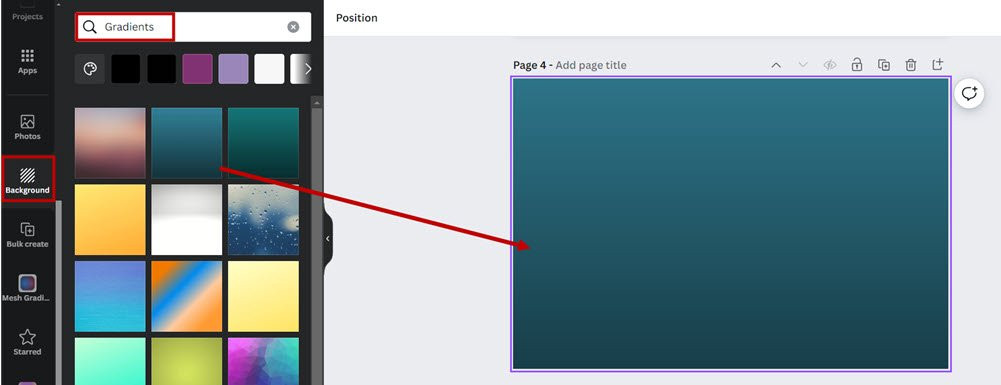
Open your project in Canva and click on ‘Background’ from the menu on the left. You will see options such as Landscapes, Patterns, and Gradients. Click on ‘Gradients’ -> ‘Show All’ to view all available background options with gradients. Like the elements, some of these backgrounds are editable, while others are not.
4.2. Step 2: Set a Gradient Background
Once you have identified the gradient background you want, click on it. This action sets the selected gradient as the background for your entire design. Unlike adding an element, which is just a shape added to your design, choosing a background gradient applies it to the entire canvas. If the background allows it, you can adjust the gradient direction and colors to match your design aesthetics.
 Add a gradient background to Canva
5. How Do I Use Canva Apps to Add Gradients?
Canva Apps offer additional tools for creating unique gradients, enhancing your design capabilities.
5.1. Step 1: Search for Gradient in Canva Apps
From your design page, click on “Apps” from the left-hand toolbar to open the apps and integrations menu.
5.2. Step 2: Select Your Gradient App
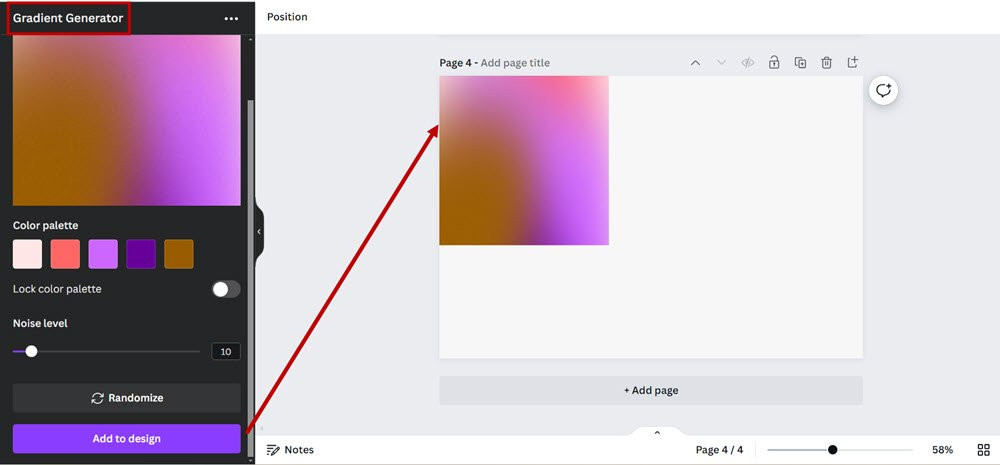
If you want to use a gradient within a shape, you will have to use the Gradient Generator or the Mesh Gradient app. The Gradient Generator allows you to add more colors and some noise or texture, while the Mesh Gradient app lets you add only 2 colors but gives you more of a 3D look with the gradients.
5.3. Step 3: Generate and Customize Gradients
Choose the app you want, and then use the app’s interface to create a custom gradient. These apps primarily allow you to adjust color schemes rather than the direction or intensity of the gradient.
5.4. Step 4: Apply the Gradient
Once you’ve created the gradient, click on ‘Use it in design’, and the gradient element will be applied to your canvas in Canva. This allows you to incorporate the custom gradient into your design seamlessly.
 Add gradient to Canva with app Gradient Generator
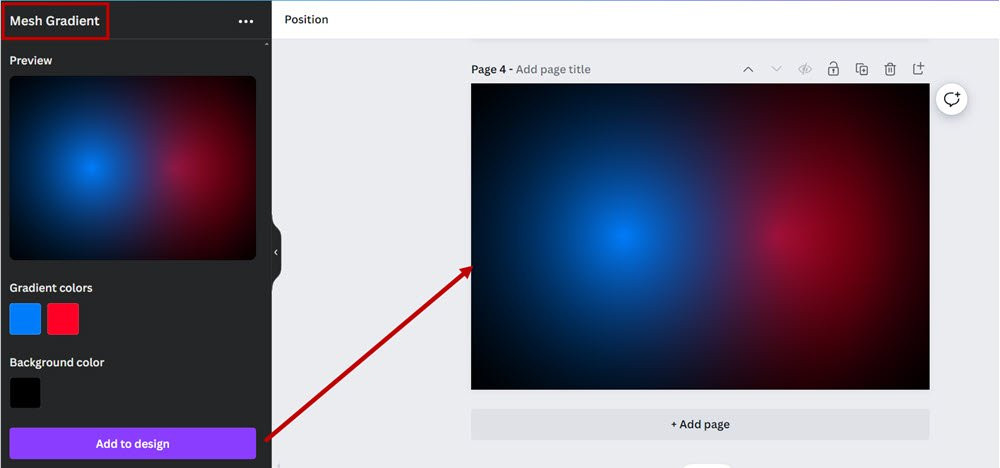 Add gradient to Canva with app Mesh Gradient
6. How Can I Add A Gradient To Text In Canva?
Adding a gradient to text in Canva can make your typography stand out and add a stylish touch to your designs.
6.1. Step 1: Find the TypeGradient App
Search for ‘gradient’ in Canva apps to find the TypeGradient app. This app is specifically designed for adding gradients to text elements.
6.2. Step 2: Write Your Text
In the TypeGradient app interface, enter the text you want to add a gradient to. Choose your desired font and alignment options to ensure the text fits your design needs.
6.3. Step 3: Customize the Colors
Add as many colors as you need to the text gradient. You can also adjust the sliders to change the position of the colors, allowing for precise control over the gradient effect. Once you are satisfied with the customization, click ‘Add to Design’ to apply the gradient to your text in Canva.
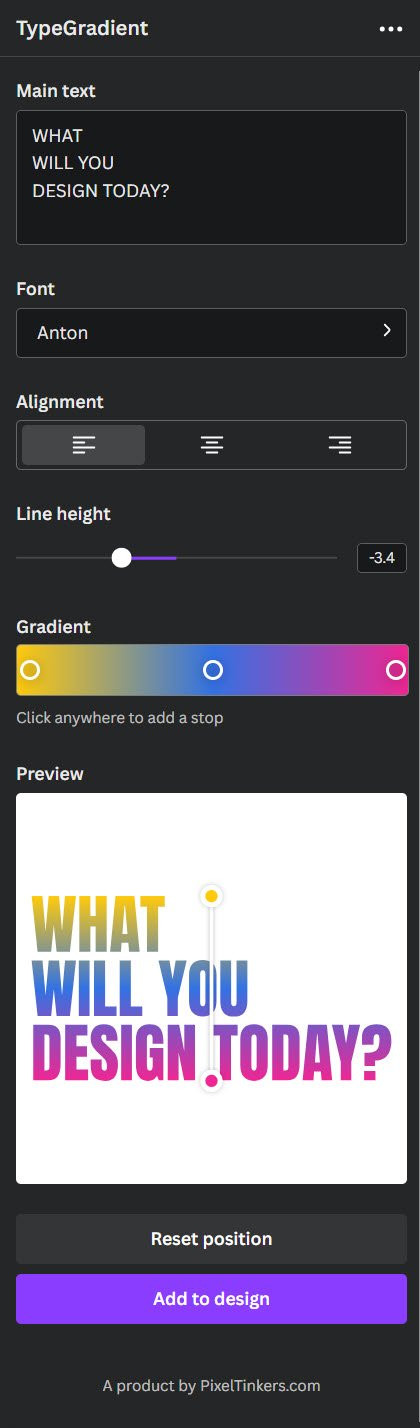 Add gradient to Canva
7. Optimizing Photo Gradients for Different Design Purposes
Optimizing photo gradients for various design purposes involves understanding how different color combinations, gradient styles, and placements can impact the overall aesthetic and message of your design. Whether you’re creating backgrounds, enhancing text, or adding visual interest to shapes, tailoring the gradient to the specific design element is essential.
7.1. Gradients for Backgrounds
- Subtle and Soft: For backgrounds, use subtle gradients with pastel or muted colors to create a soft, unobtrusive backdrop.
- Bold and Vibrant: If you want the background to stand out, opt for bold and vibrant color combinations.
- Direction and Flow: Consider the direction of the gradient to guide the viewer’s eye. Linear gradients can create a sense of flow, while radial gradients can draw attention to the center of the design.
7.2. Gradients for Text
- Readability: Ensure the gradient does not compromise the readability of the text. Use contrasting colors that allow the text to remain clear and legible.
- Emphasis: Gradients can emphasize specific words or phrases within the text. Use a gradient that transitions towards a brighter color at the point you want to highlight.
- Style Matching: Match the style of the gradient to the overall tone of the design. A modern design might benefit from a sleek, linear gradient, while a playful design could use a vibrant, multi-colored gradient.
7.3. Gradients for Shapes and Elements
- Depth and Dimension: Add depth and dimension to shapes and elements by using gradients that mimic light and shadow.
- Visual Hierarchy: Use gradients to create a visual hierarchy, making certain elements appear more prominent than others.
- Complementary Colors: Choose colors that complement the surrounding elements to create a cohesive design.
7.4. Color Psychology in Gradients
- Emotional Impact: Understand the emotional impact of different color combinations. For instance, blues and greens can evoke feelings of calmness and serenity, while reds and oranges can convey excitement and energy.
- Brand Consistency: Use colors that align with your brand identity to maintain a consistent look and feel.
- Target Audience: Consider the preferences of your target audience when choosing colors. Different demographics may respond differently to various color combinations.
7.5. Examples of Effective Gradient Use
- Website Hero Section: A gradient background that transitions from a deep blue to a light cyan can create a sense of trustworthiness and innovation for a tech company.
- Social Media Post: A vibrant, multi-colored gradient on a text overlay can grab attention and create a sense of excitement for a promotional event.
- Presentation Slide: A subtle gradient on a shape can add depth and visual interest without distracting from the content.
By optimizing photo gradients for different design purposes, you can create visually stunning and effective designs that capture attention and convey your intended message.
8. Advanced Techniques for Creating Gradients in Canva
Delving into advanced techniques for creating gradients in Canva unlocks a realm of creative possibilities.
8.1. Layering Gradients
- Creating Complex Effects: Layering multiple gradient elements can produce complex and visually rich effects. Start by adding a base gradient to your background, then overlay additional gradient shapes or elements on top.
- Blending Modes: Experiment with blending modes like “Multiply,” “Screen,” or “Overlay” to create unique interactions between the layered gradients. Each blending mode alters how the colors combine, resulting in a variety of textures and visual effects.
- Transparency: Adjust the transparency of each gradient layer to control the intensity and visibility of the underlying elements. Subtle transparency adjustments can add depth and nuance to your design.
8.2. Using Masks with Gradients
- Shaping Gradients: Masks allow you to confine a gradient to a specific shape or area. By applying a mask to a gradient, you can create intricate designs where the gradient appears only within the defined shape.
- Text and Shapes: Use text or custom shapes as masks to create unique gradient typography or design elements. This technique is particularly effective for logos, headings, and decorative accents.
- Photo Integration: Combine masks with photos to seamlessly integrate gradients into your images. This can be used to create striking visual effects, such as gradient overlays that blend with the underlying photograph.
8.3. Animating Gradients
- Dynamic Backgrounds: Animate gradients to create dynamic and eye-catching backgrounds for videos or animated graphics. Use Canva’s animation tools to gradually shift the colors, direction, or intensity of the gradient over time.
- Transitions: Incorporate animated gradients into transitions between scenes or slides. This can add a smooth and visually appealing flow to your content.
- Subtle Movement: Add subtle movement to static designs by animating the gradient. Even a slow, gradual shift in color can draw the viewer’s eye and create a sense of depth.
8.4. Custom Color Palettes
- Brand Consistency: Develop custom color palettes that align with your brand identity. Using a consistent set of colors across all your designs ensures a cohesive and professional look.
- Harmonious Combinations: Choose color combinations that are harmonious and visually pleasing. Tools like Adobe Color can help you create balanced and complementary color palettes.
- Accessibility: Consider accessibility when selecting colors. Ensure that there is sufficient contrast between the colors in your gradient to make your design readable and usable for people with visual impairments.
8.5. Incorporating Textures
- Adding Depth: Combine gradients with textures to add depth and visual interest to your designs. Use textures like grain, noise, or patterns to create a tactile feel.
- Realistic Effects: Apply textures to gradients to mimic real-world materials like metal, wood, or fabric. This can add a sense of realism and authenticity to your designs.
- Subtle Overlays: Use textures as subtle overlays to add a vintage or distressed look to your gradients. This can be particularly effective for designs that aim to evoke a sense of nostalgia or history.
By mastering these advanced techniques, you can elevate your gradient creations in Canva and produce designs that are both visually stunning and highly effective.
9. Common Mistakes to Avoid When Using Gradients
Even with a user-friendly platform like Canva, it’s easy to make mistakes when using gradients. Here are some common pitfalls to avoid:
- Overdoing It: Using too many gradients in a single design can be overwhelming and distracting. Stick to a limited number of gradients and use them strategically to enhance specific elements.
- Poor Color Choices: Choosing colors that clash or are visually jarring can ruin the effect of a gradient. Use a color wheel or online tools to find harmonious color combinations.
- Ignoring Readability: Applying gradients to text can make it difficult to read if the colors are too similar or the contrast is too low. Always prioritize readability when using gradients with text.
- Inconsistent Style: Failing to maintain a consistent style across all your gradients can result in a disjointed design. Use the same gradient direction, color palette, and blending modes throughout your project.
- Neglecting Transparency: Overlooking transparency settings can lead to gradients that are too harsh or overpowering. Adjust the transparency to create a subtle and balanced effect.
- Ignoring Context: Applying gradients without considering the overall context of your design can result in a mismatch between the visual style and the intended message. Tailor your gradient choices to the specific purpose and audience of your design.
- Over Complicating: Complicated design can easily scare your user away.
10. Inspiring Examples of Photo Gradients in Design
To spark your creativity, here are some inspiring examples of photo gradients in design:
- Spotify: Spotify uses subtle gradients in its logo and branding to create a modern and sophisticated look.
- Instagram: Instagram’s logo features a vibrant gradient that reflects the platform’s dynamic and colorful content.
- Apple: Apple often uses gradients in its product marketing to showcase the depth and texture of its devices.
- Nike: Nike incorporates gradients into its apparel and advertising to convey a sense of movement and energy.
- Airbnb: Airbnb uses soft gradients in its website and app to create a welcoming and user-friendly experience.
11. Frequently Asked Questions (FAQs) About Photo Gradients in Canva
-
Q1: Can I use gradients in Canva for free?
- Yes, Canva offers a variety of free gradient options. However, Canva Pro provides access to more advanced gradient tools and features.
-
Q2: How do I change the direction of a gradient in Canva?
- Select the gradient element, click on the color tile, and choose the desired gradient direction from the available options (linear, radial, diagonal).
-
Q3: Can I add multiple colors to a gradient in Canva?
- Yes, using the Gradient Generator app in Canva allows you to add multiple colors to a gradient.
-
Q4: How do I make a gradient background transparent in Canva?
- Select the gradient background, adjust the transparency slider in the toolbar to achieve the desired level of transparency.
-
Q5: Can I use custom colors in gradients in Canva?
- Yes, you can use custom colors by entering the hex code or using the color picker in the color editor.
-
Q6: How do I save a gradient for future use in Canva?
- Save the design as a template, or add the gradient colors to your brand kit for easy access.
-
Q7: Can I animate gradients in Canva?
- Yes, Canva allows you to animate gradients using its animation tools.
-
Q8: How do I create a metallic gradient in Canva?
- Use colors that mimic metallic tones, such as gold, silver, or bronze, and adjust the gradient direction and intensity to create a realistic metallic effect.
-
Q9: Can I use gradients in Canva for print designs?
- Yes, Canva supports gradients in print designs, but make sure to use high-resolution images and export your design in a print-ready format.
-
Q10: How do I create a smooth gradient in Canva?
- Choose colors that are close to each other on the color wheel, and adjust the gradient stops to create a seamless transition between the colors.
12. Conclusion: Mastering Photo Gradients in Canva
Mastering photo gradients in Canva is a powerful way to enhance your designs, and dfphoto.net is committed to providing you with the resources and inspiration you need. By following the techniques and tips outlined in this guide, you can add depth, visual interest, and emotional impact to your projects. Whether you’re creating backgrounds, enhancing text, or adding visual flair to shapes, gradients offer endless creative possibilities.
Ready to take your photography skills to the next level? Visit dfphoto.net today to explore our extensive collection of tutorials, stunning photo galleries, and a vibrant community of photographers. Don’t miss out on the opportunity to elevate your craft and connect with fellow enthusiasts.
For any questions or further assistance, please contact us at:
Address: 1600 St Michael’s Dr, Santa Fe, NM 87505, United States
Phone: +1 (505) 471-6001
Website: dfphoto.net