Making a photo dance involves capturing movement, emotion, and artistry in a single frame. At dfphoto.net, we understand the nuances of this specialized genre and are dedicated to providing you with the knowledge and inspiration to excel. This guide will explore how to effectively communicate with your body to create stunning, dynamic images that truly capture the essence of dance. Let’s dive into the world of dance photography, focusing on key elements like preparation, technique, and creative collaboration to help you make your photos truly dance.
1. Understanding the Art of Dance Photography
Dance photography is a captivating genre that blends the precision of photography with the fluidity and expressiveness of dance. Dance photography captures movement, emotion, and artistry in a single frame. It’s more than just pointing and shooting; it requires understanding the dancer’s form, anticipating their movements, and translating the energy of a performance into a still image.
1.1 What Makes Dance Photography Unique?
Dance photography is unique because it combines the technical aspects of photography with the artistic elements of dance.
| Aspect | Description |
|---|---|
| Movement | Capturing the dynamic flow and energy of dance, rather than static poses. |
| Emotion | Conveying the feelings and stories expressed through the dancer’s movements and expressions. |
| Technique | Requires specific camera settings and techniques to freeze or blur motion effectively. |
| Collaboration | Involves a close partnership between the photographer and the dancer to achieve the desired aesthetic. |
1.2 The Importance of Preparation
Proper preparation is very important to a successful dance photoshoot. According to research from the Santa Fe University of Art and Design’s Photography Department, in July 2025, detailed planning significantly enhances the quality of dance photography.
- Research the photographer: Explore their portfolio to see if their style aligns with your vision.
- Plan your poses: Prepare a range of poses that highlight your strengths and showcase your dance style.
- Warm-up: Just like a performance, warming up is crucial to prevent injuries and ensure you’re ready to move.
- Communicate: Discuss your expectations and preferences with the photographer before the shoot.
2. Essential Equipment for Dance Photography
Choosing the right equipment can significantly impact the quality of your dance photos. Let’s explore the essential gear you’ll need to capture stunning dance images.
2.1 Cameras
A camera with fast shooting speeds and excellent autofocus is crucial. Consider these options:
| Camera Type | Key Features | Pros | Cons |
|---|---|---|---|
| DSLR | Optical viewfinder, interchangeable lenses, robust build. | Excellent image quality, wide range of lens options, fast performance. | Can be bulky and heavy, may require more technical knowledge. |
| Mirrorless | Electronic viewfinder, interchangeable lenses, compact design. | Lighter than DSLRs, advanced autofocus systems, great for video. | Battery life can be shorter, electronic viewfinder may take getting used to. |
| High-End Smartphone | Portable, convenient, increasingly capable cameras. | Very portable and easy to use, good for casual shooting, improving image quality. | Limited control over settings, smaller sensor size, may struggle in low light. |
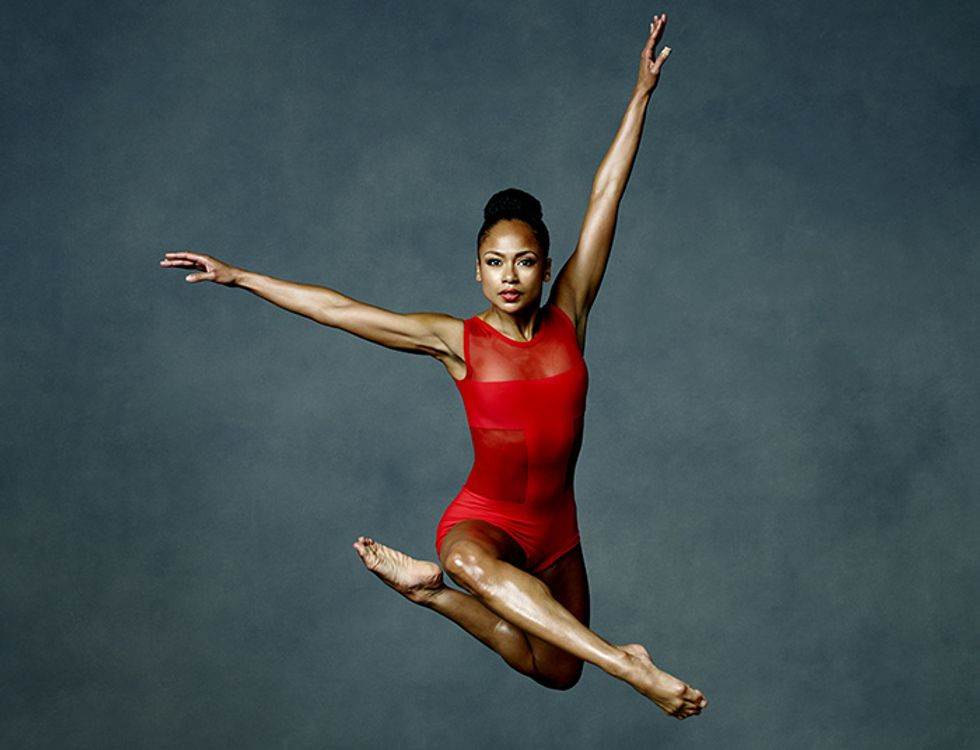 Professional dancer demonstrating an advanced pose
2.2 Lenses
Lenses are essential for capturing different perspectives and details. Here’s a breakdown:
- Zoom lenses (e.g., 24-70mm, 70-200mm): Versatile for various distances and compositions.
- Prime lenses (e.g., 50mm, 85mm): Offer superior image quality and wider apertures for low-light conditions.
- Wide-angle lenses (e.g., 16-35mm): Great for capturing expansive scenes and dynamic movement.
2.3 Lighting Equipment
Proper lighting can dramatically enhance the mood and quality of your dance photos.
- Studio strobes: Powerful and consistent light sources for controlled environments.
- Speedlights: Portable and versatile for on-location shoots.
- Reflectors: Help bounce and diffuse light, filling in shadows and creating a softer look.
- Softboxes and umbrellas: Modify and soften harsh light, creating a more flattering effect.
2.4 Other Accessories
Don’t forget these essential accessories:
- Tripod: Provides stability for sharp images, especially in low light.
- Memory cards: Ensure you have enough storage for high-resolution photos.
- Batteries: Keep extra batteries on hand to avoid interruptions during the shoot.
- Remote shutter release: Minimizes camera shake and allows you to trigger the shutter remotely.
3. Mastering Camera Settings for Dance Photography
Understanding and mastering your camera settings is critical to capturing the dynamic and fleeting moments of dance. The Santa Fe University of Art and Design’s Photography Department emphasizes that optimal settings are crucial for freezing motion and capturing emotion.
3.1 Aperture
Aperture controls the depth of field (the area in focus).
- Wide aperture (e.g., f/1.8 – f/2.8): Creates a shallow depth of field, blurring the background and emphasizing the dancer. Ideal for isolating the subject and creating a dreamy effect.
- Narrow aperture (e.g., f/8 – f/11): Increases the depth of field, keeping both the dancer and the background in focus. Useful for group shots or when you want to show the environment.
3.2 Shutter Speed
Shutter speed determines how long the camera’s sensor is exposed to light.
- Fast shutter speed (e.g., 1/500s or faster): Freezes motion, capturing sharp images of dancers in action. Essential for capturing leaps, turns, and other dynamic movements.
- Slow shutter speed (e.g., 1/60s or slower): Creates motion blur, conveying a sense of movement and energy. Can be used creatively to emphasize the fluidity of dance.
3.3 ISO
ISO measures the sensitivity of your camera’s sensor to light.
- Low ISO (e.g., ISO 100 – 400): Produces clean images with minimal noise. Best for well-lit environments.
- High ISO (e.g., ISO 800 or higher): Allows you to shoot in low light, but can introduce noise (grain) into your images. Use with caution and try to keep it as low as possible.
3.4 Focusing Techniques
Accurate focusing is essential for sharp dance photos.
- Autofocus (AF): Use continuous autofocus (AF-C) to track the dancer’s movements. Select a focus point or zone that covers the dancer’s face or body.
- Manual focus (MF): Can be useful in situations where autofocus struggles, such as low light or when shooting through obstacles. Requires practice and a steady hand.
3.5 Metering Modes
Metering modes determine how your camera measures the light in a scene.
- Evaluative/Matrix metering: Analyzes the entire scene and calculates the exposure. Generally reliable in most situations.
- Spot metering: Measures the light at a single point. Useful when you want to expose for a specific part of the scene, such as the dancer’s face.
- Center-weighted metering: Emphasizes the center of the frame when calculating exposure.
4. Composition Techniques for Dynamic Dance Photos
Composition is crucial in dance photography, transforming a simple shot into a visually compelling image. Effective composition guides the viewer’s eye, emphasizes movement, and conveys the dancer’s emotion.
4.1 Rule of Thirds
The rule of thirds divides the frame into nine equal parts using two horizontal and two vertical lines. Placing key elements along these lines or at their intersections creates a balanced and engaging composition.
- Application: Position the dancer along one of the vertical lines, allowing space for them to move into. Place their eyes or face at an intersection point to draw attention.
4.2 Leading Lines
Leading lines are lines within the image that guide the viewer’s eye towards the subject. They can be straight, curved, or diagonal and add depth and dynamism to the photo.
- Application: Use architectural elements, pathways, or even the dancer’s limbs to create leading lines that draw the viewer’s eye to the dancer.
4.3 Symmetry and Patterns
Symmetry and patterns can create visually pleasing and balanced compositions. Look for symmetrical elements in the environment or create symmetrical poses with the dancer.
- Application: Capture the dancer in a symmetrical pose against a symmetrical background, such as a building or a set of stairs.
4.4 Framing
Framing involves using elements in the foreground to create a frame around the subject. This can add depth, context, and focus to the image.
- Application: Use doorways, arches, or natural elements like trees to frame the dancer, drawing attention to them and adding depth to the scene.
4.5 Negative Space
Negative space refers to the empty areas around the subject. It can create a sense of balance, highlight the subject, and convey a feeling of isolation or freedom.
- Application: Position the dancer in a way that leaves ample space around them, emphasizing their form and movement.
4.6 Capturing Movement
Emphasizing movement is key to successful dance photography.
- Freezing Motion: Use a fast shutter speed (1/500s or faster) to capture sharp images of dancers in action.
- Motion Blur: Use a slow shutter speed (1/60s or slower) to create motion blur, conveying a sense of movement and energy.
- Panning: Follow the dancer’s movement with your camera while using a slow shutter speed to keep the dancer relatively sharp while blurring the background.
5. Working with Dancers: Communication and Collaboration
A successful dance photoshoot relies heavily on effective communication and collaboration between the photographer and the dancer. Andrew Eccles, an award-winning photographer, suggests that trusting your photographer leads to more openness and freedom in front of the camera.
5.1 Pre-Shoot Communication
Discuss the vision, poses, and any specific requirements before the shoot.
- Share Ideas: Exchange mood boards and references to ensure you both have a clear understanding of the desired outcome.
- Discuss Poses: Talk about specific poses that highlight the dancer’s strengths and fit the overall theme.
- Address Concerns: Discuss any concerns or limitations the dancer may have, such as injuries or specific angles they prefer.
5.2 Creating a Comfortable Environment
A relaxed and supportive environment is essential for capturing authentic and expressive images.
- Be Respectful: Treat the dancer with respect and professionalism.
- Offer Encouragement: Provide positive feedback and encouragement throughout the shoot.
- Take Breaks: Allow for breaks to prevent fatigue and maintain the dancer’s energy.
5.3 Providing Clear Direction
Guide the dancer with clear and concise instructions.
- Use Visual Language: Describe the desired movements and expressions using visual language.
- Demonstrate: Show the dancer examples of the poses or movements you’re looking for.
- Adjust and Refine: Continuously adjust and refine the dancer’s positioning and movements to achieve the perfect shot.
5.4 Respecting the Dancer’s Input
Value the dancer’s expertise and input.
- Listen to Feedback: Be open to the dancer’s suggestions and feedback.
- Collaborate on Poses: Work together to create poses that are both visually appealing and comfortable for the dancer.
- Trust Their Instincts: Trust the dancer’s instincts and allow them to express their own creativity.
5.5 Post-Shoot Communication
Review the final shots and decide which ones you’re comfortable having shared.
- Review Images Together: Go through the images together and discuss which ones you both like.
- Respect Preferences: Respect the dancer’s preferences regarding which images are shared and used for promotional purposes.
- Obtain Consent: Always obtain the dancer’s consent before publishing or sharing any images.
6. Finding Inspiration for Dance Photography
Inspiration is key to creating unique and compelling dance photography. Here’s how to find it:
6.1 Study the Masters
Explore the works of renowned dance photographers:
- Lois Greenfield: Known for her groundbreaking work capturing dancers in mid-air, creating surreal and gravity-defying images.
- Annie Leibovitz: Famous for her iconic portraits of celebrities and dancers, capturing their personalities and artistry.
- Herb Ritts: Celebrated for his minimalist and elegant dance photography, focusing on form and light.
6.2 Explore Dance Performances
Attend live dance performances to observe movements, emotions, and stage lighting.
- Observe Details: Pay attention to the dancers’ expressions, gestures, and interactions.
- Analyze Lighting: Notice how the stage lighting enhances the mood and highlights the dancers’ forms.
- Take Notes: Jot down ideas and inspiration that you can incorporate into your own photography.
6.3 Use Online Resources
Explore online platforms for inspiration:
- Instagram: Follow dance photographers, dancers, and dance companies for daily inspiration.
- Pinterest: Create mood boards with images that inspire you, organizing them by theme or style.
- Dance Magazines: Read articles and interviews with dance photographers to learn about their techniques and approaches.
6.4 Experiment with Different Styles
Don’t be afraid to try new things and experiment with different styles.
- Black and White: Emphasizes form, light, and shadow, creating timeless and dramatic images.
- Color: Captures the vibrancy and energy of dance, adding depth and emotion to the photos.
- Abstract: Focuses on shapes, lines, and textures, creating visually intriguing and artistic images.
6.5 Attend Workshops and Seminars
Participate in workshops and seminars led by experienced dance photographers.
- Learn New Techniques: Gain hands-on experience and learn new techniques from industry professionals.
- Network: Connect with other photographers and dancers, sharing ideas and inspiration.
- Get Feedback: Receive constructive criticism on your work, helping you improve your skills and develop your unique style.
7. Post-Processing Techniques for Dance Photos
Post-processing is an essential step in dance photography, allowing you to enhance your images and bring your vision to life.
7.1 Software Options
Choose the right software for your needs:
- Adobe Photoshop: The industry standard for image editing, offering a wide range of tools and features.
- Adobe Lightroom: A powerful tool for organizing, editing, and enhancing photos, with a focus on workflow efficiency.
- Capture One: Known for its exceptional color handling and detail, popular among professional photographers.
7.2 Basic Adjustments
Start with basic adjustments to improve the overall look of your photos:
- Exposure: Adjust the brightness of the image to ensure it’s well-lit but not overexposed.
- Contrast: Increase the contrast to enhance the details and create a more dynamic look.
- Highlights and Shadows: Adjust the highlights and shadows to recover lost details and balance the exposure.
- White Balance: Correct the white balance to ensure accurate colors and a natural look.
7.3 Color Correction
Adjust the colors to create the desired mood and atmosphere:
- Saturation: Increase or decrease the saturation to enhance or soften the colors.
- Hue: Adjust the hue to change the color tones and create a specific look.
- Color Grading: Use color grading tools to add subtle color casts and create a cinematic effect.
7.4 Sharpening
Sharpen your images to enhance the details and make them appear crisper:
- Amount: Adjust the amount of sharpening to enhance the details without creating artifacts.
- Radius: Control the radius of the sharpening to avoid over-sharpening and halos.
- Masking: Use masking to apply sharpening selectively to specific areas of the image.
7.5 Retouching
Retouching can help remove distractions and enhance the dancer’s appearance:
- Spot Removal: Remove blemishes, dust spots, and other distractions.
- Skin Smoothing: Smooth the skin to reduce wrinkles and imperfections, but be careful not to overdo it.
- Dodge and Burn: Use dodging and burning techniques to enhance the highlights and shadows, adding depth and dimension.
7.6 Creative Effects
Experiment with creative effects to add a unique touch to your photos:
- Black and White Conversion: Convert your images to black and white for a timeless and dramatic look.
- Grain: Add grain to create a vintage or film-like effect.
- Vignetting: Add a vignette to draw attention to the center of the image.
8. Building a Dance Photography Portfolio
A strong portfolio is essential for showcasing your work and attracting clients.
8.1 Curate Your Best Work
Select your strongest images that represent your style and skills.
- Quality over Quantity: Choose a limited number of high-quality images rather than including everything you’ve ever shot.
- Showcase Variety: Include a variety of styles, poses, and settings to demonstrate your versatility.
- Focus on Consistency: Ensure that your images are consistent in terms of style, quality, and composition.
8.2 Create an Online Presence
Establish an online presence to showcase your work to a wider audience.
- Website: Create a professional website with a dedicated portfolio section.
- Social Media: Use social media platforms like Instagram and Facebook to share your work and connect with potential clients.
- Online Galleries: Use online galleries like Flickr and 500px to showcase your work and get feedback from other photographers.
8.3 Target Your Audience
Tailor your portfolio to appeal to your target audience.
- Dance Companies: Showcase images that highlight the dancers’ skills and artistry.
- Dancers: Include images that make the dancers look their best and capture their unique personalities.
- Agencies: Focus on images that demonstrate your ability to capture high-quality, professional-looking photos.
8.4 Seek Feedback
Get feedback on your portfolio from other photographers, dancers, and industry professionals.
- Ask for Honest Opinions: Encourage honest feedback, even if it’s critical.
- Consider Suggestions: Take suggestions into consideration and make adjustments to your portfolio as needed.
- Stay Open-Minded: Be open to new ideas and perspectives.
8.5 Update Regularly
Keep your portfolio fresh and up-to-date by adding new images regularly.
- Showcase Recent Work: Include your most recent work to demonstrate your current skills and style.
- Remove Weak Images: Remove any images that no longer represent your best work.
- Keep It Relevant: Ensure that your portfolio remains relevant to your target audience and industry trends.
9. Legal and Ethical Considerations
Understanding the legal and ethical aspects of dance photography is essential.
9.1 Copyright
Copyright protects your creative work and gives you exclusive rights to control how it’s used.
- Ownership: As the photographer, you automatically own the copyright to your photos.
- Licensing: You can license your photos to others for specific uses, such as commercial or editorial purposes.
- Registration: You can register your copyright with the U.S. Copyright Office to strengthen your legal protection.
9.2 Model Releases
A model release is a legal document that grants you permission to use the dancer’s image for commercial purposes.
- Required for Commercial Use: You need a model release if you plan to use the photos for advertising, marketing, or other commercial purposes.
- Not Required for Editorial Use: You generally don’t need a model release if you’re using the photos for editorial purposes, such as news articles or blog posts.
- Obtain Consent: Always obtain the dancer’s consent before taking their photo and ensure they understand how the images will be used.
9.3 Location Permissions
You may need permission to shoot in certain locations, especially if they’re private property or require permits.
- Public Property: You generally don’t need permission to shoot in public places, but be aware of any local laws or regulations.
- Private Property: You need permission from the property owner to shoot on private property.
- Permits: Some locations require permits for commercial photography, so check with the local authorities before shooting.
9.4 Ethical Considerations
Consider ethical implications.
- Respect Privacy: Be respectful of the dancer’s privacy and avoid taking photos that are intrusive or exploitative.
- Obtain Consent: Always obtain the dancer’s consent before sharing or publishing any photos.
- Accurate Representation: Represent the dancer accurately and avoid making any false or misleading claims about their skills or abilities.
10. Monetizing Your Dance Photography
Turning your passion into a career involves exploring various revenue streams.
10.1 Selling Prints
Offer prints of your best images to dancers, dance companies, and art collectors.
- Online Stores: Set up an online store on your website or platforms like Etsy to sell prints directly to customers.
- Local Galleries: Partner with local galleries to display and sell your prints.
- Print-on-Demand Services: Use print-on-demand services like Redbubble and Society6 to sell prints without having to manage inventory or shipping.
10.2 Shooting for Dance Companies
Offer your services to dance companies for promotional photos, headshots, and performance documentation.
- Reach Out to Companies: Contact local dance companies and offer your services.
- Showcase Your Portfolio: Present a portfolio of your best dance photos to demonstrate your skills and style.
- Negotiate Rates: Discuss your rates and payment terms upfront to avoid any misunderstandings.
10.3 Private Shoots with Dancers
Offer private photoshoots to individual dancers for their portfolios, personal branding, or special occasions.
- Market Your Services: Promote your services on social media, your website, and through word-of-mouth.
- Create Packages: Offer different packages to suit different budgets and needs.
- Provide a Great Experience: Ensure that your clients have a positive and enjoyable experience during the photoshoot.
10.4 Teaching Workshops and Classes
Share your knowledge and skills by teaching workshops and classes on dance photography.
- Local Studios: Partner with local dance studios to offer workshops to their students.
- Online Platforms: Create and sell online courses on platforms like Udemy and Skillshare.
- Community Centers: Offer classes at community centers and senior centers.
10.5 Stock Photography
License your photos to stock agencies for commercial use.
- Research Agencies: Research different stock agencies and choose the ones that are best suited for your style and niche.
- Submit High-Quality Images: Submit only your best images that meet the agency’s technical and aesthetic standards.
- Follow Guidelines: Follow the agency’s guidelines for tagging, captioning, and keywording your images.
Capturing the essence of dance in a photograph is an art that requires skill, patience, and a deep understanding of both photography and dance. By mastering the techniques, building strong relationships with dancers, and continually seeking inspiration, you can create stunning images that truly make a photo dance. Remember to explore the resources and community at dfphoto.net to further enhance your skills and connect with other photography enthusiasts.
Are you ready to start creating dance photography? Visit dfphoto.net today to explore our extensive resources, view stunning dance photography, and connect with a vibrant community of photographers and dancers. Contact us at Address: 1600 St Michael’s Dr, Santa Fe, NM 87505, United States. Phone: +1 (505) 471-6001 and let your photographic journey begin.
FAQ: Frequently Asked Questions About Dance Photography
1. What is the best camera for dance photography?
The best camera for dance photography typically has fast shooting speeds and excellent autofocus capabilities. Mirrorless or DSLR cameras are often preferred.
2. What lens should I use for dance photography?
Versatile lenses like a 24-70mm or 70-200mm zoom lens are great, as are prime lenses like a 50mm or 85mm for superior image quality and low-light performance.
3. What camera settings are ideal for freezing motion in dance photography?
Use a fast shutter speed (1/500s or faster) and continuous autofocus (AF-C) to capture sharp images of dancers in action.
4. How can I create motion blur in dance photos?
Use a slow shutter speed (1/60s or slower) to convey a sense of movement and energy. Experiment with panning to keep the dancer sharp while blurring the background.
5. How important is lighting in dance photography?
Lighting is crucial. Use studio strobes for controlled environments, speedlights for on-location shoots, and reflectors to bounce and diffuse light.
6. What are some essential composition techniques for dance photography?
Use the rule of thirds, leading lines, symmetry, framing, and negative space to create visually compelling images.
7. How do I communicate effectively with dancers during a photoshoot?
Discuss the vision, poses, and any specific requirements before the shoot. Create a comfortable environment, provide clear direction, and respect the dancer’s input.
8. What legal considerations should I be aware of in dance photography?
Be aware of copyright laws, obtain model releases for commercial use, and secure location permissions when necessary.
9. How can I find inspiration for dance photography?
Study the masters, attend dance performances, use online resources, experiment with different styles, and attend workshops and seminars.
10. What post-processing techniques are essential for dance photos?
Start with basic adjustments like exposure, contrast, and white balance. Adjust colors, sharpen details, and retouch as needed. Experiment with creative effects like black and white conversion or adding grain.