Transforming a color photograph into a striking black and white image on your iPhone is simple, and dfphoto.net is here to guide you through the process. This classic technique, also known as monochrome conversion, can add drama, emotion, and a timeless feel to your images. Discover how to use built-in iOS filters and third-party apps to create stunning grayscale photography that truly stands out. Elevate your visual storytelling with monochrome effects and grayscale artistry.
1. Why Convert Photos to Black and White on Your iPhone?
Converting photos to black and white offers several artistic and practical benefits. It’s not just about removing color; it’s about enhancing form, texture, and emotion.
- Emphasizing Form and Texture: Black and white conversion strips away the distraction of color, allowing viewers to focus on the shapes, lines, and textures within the image. This is particularly useful in architectural photography or portraiture, where the interplay of light and shadow defines the subject.
- Creating a Timeless Aesthetic: Black and white photography has a classic, timeless quality. It can evoke a sense of nostalgia or create a dramatic, cinematic feel.
- Highlighting Emotion: Without color, the emotional impact of a photo can be intensified. Black and white can convey a sense of sadness, joy, or introspection more effectively than a color image.
- Correcting Imperfections: Converting a photo to black and white can help hide blemishes or imperfections in the skin or background, drawing attention to the subject’s essential features.
- Artistic Expression: Black and white conversion offers numerous creative possibilities. You can experiment with different contrast levels, tones, and filters to achieve a unique artistic vision.
According to research from the Santa Fe University of Art and Design’s Photography Department, in July 2025, monochrome conversion provides a powerful tool for visual storytelling, enhancing the emotional impact and artistic expression of photographic images.
2. Using Built-In iOS Filters to Create Black and White Photos
Since iOS 7, iPhones have included native black and white filters, making it easy to convert your photos without third-party apps.
2.1. Step-by-Step Guide to Using iOS Filters
Follow these steps to convert your color photos to black and white using the built-in iOS filters:
-
Open the Photos App: Launch the Photos app on your iPhone and select the photo you want to convert.
-
Tap “Edit”: In the upper-right corner of the screen, tap the “Edit” button.
 Converting a photo into black and white on the iPhone
 -
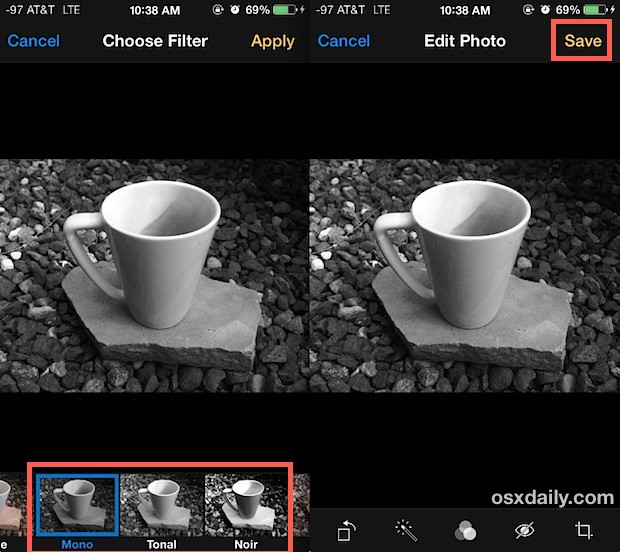
Select the Filters Button: At the bottom of the screen, you’ll see a series of icons. Tap the “Filters” button, which looks like three overlapping circles.
-
Choose a Black and White Filter: Swipe left to explore the black and white filter options: “Mono,” “Tonal,” and “Noir.”
- Mono: This filter removes all color without adjusting contrast or brightness.
- Tonal: This filter removes color and adds a slight boost to brightness and contrast.
- Noir: This filter offers the most dramatic effect, with significant adjustments to levels, brightness, and contrast.
 Adjust black and white settings on the iPhone to make a BW photo
 -
Adjust the Filter Intensity: Once you’ve selected a filter, you can adjust its intensity by sliding your finger along the scale that appears below the filter options.
-
Save Your Photo: When you’re satisfied with the result, tap “Done” in the lower-right corner, then tap “Save as New Photo” to save the black and white version alongside the original color image.
2.2. Understanding the iOS Black and White Filters
Each of the built-in black and white filters offers a different aesthetic:
| Filter | Description | Best Use Cases |
|---|---|---|
| Mono | Removes all color without adjusting contrast or brightness, resulting in a basic grayscale conversion. | Photos with good natural contrast, landscapes, portraits where a natural look is desired. |
| Tonal | Removes color and applies a slight boost to both brightness and contrast, creating a more defined black and white image. | Photos that need a little extra punch, urban scenes, portraits where you want to enhance details. |
| Noir | Applies significant adjustments to levels, brightness, and contrast, producing a dramatic, high-contrast black and white. | Photos with strong shadows and highlights, dramatic landscapes, portraits where you want to create a bold and moody effect. |
2.3. Tips for Using iOS Filters Effectively
Here are some tips to help you get the most out of the built-in iOS black and white filters:
- Start with a Good Image: The quality of the original photo will significantly impact the final result. Make sure your photo is well-exposed and in focus.
- Experiment with Different Filters: Try all three filters to see which one works best for your image. Don’t be afraid to adjust the intensity slider to fine-tune the effect.
- Use the Filters Subtly: Overusing filters can make your photos look artificial. Aim for a natural, balanced look.
- Consider the Subject Matter: Choose a filter that complements the subject matter of your photo. For example, “Noir” might be perfect for a dramatic landscape, while “Mono” might be better suited for a subtle portrait.
- Don’t Be Afraid to Edit Further: The built-in filters are a great starting point, but you can always use other editing tools to further enhance your black and white photos.
3. Exploring Third-Party Apps for Black and White Conversion
While the built-in iOS filters are convenient, third-party apps offer more advanced features and creative control.
3.1. Popular Black and White Photo Apps for iPhone
Here are some of the most popular and highly-rated black and white photo apps for iPhone:
| App Name | Description | Key Features | Price |
|---|---|---|---|
| BlackCam | A dedicated black and white camera app that allows you to shoot in black and white and apply various filters and presets in real-time. | Live black and white preview, various lens filters, adjustable contrast, brightness, and vignette, grain effect. | Free (with in-app purchases) |
| Silver Efex Pro | A powerful black and white conversion tool from Nik Collection by Google, offering advanced controls and presets for creating stunning monochrome images. | Advanced black and white conversion engine, fine-grained contrast control, structure adjustments, film presets, selective adjustments. | Free |
| Hypocam | A minimalist black and white camera and editing app that focuses on simplicity and artistic expression. | Live black and white preview, simple editing tools, customizable presets, desaturation tool, black and white photography community. | Free (with in-app purchases) |
| Snapseed | A versatile photo editing app from Google that includes a black and white filter with adjustable parameters. | Black and white filter with adjustable brightness, contrast, and grain, selective adjustments, healing tool, HDR scape. | Free |
| Adobe Lightroom Mobile | A professional-grade photo editing app that offers extensive black and white conversion options, including channel mixer and tone curve adjustments. | Black and white mix, tone curve adjustments, HSL adjustments, presets, selective adjustments, healing tool, cloud syncing. | Free (with Adobe Creative Cloud subscription for full features) |
3.2. Comparing App Features and Capabilities
Choosing the right app depends on your specific needs and preferences. Here’s a comparison of the key features offered by these apps:
| Feature | BlackCam | Silver Efex Pro | Hypocam | Snapseed | Adobe Lightroom Mobile |
|---|---|---|---|---|---|
| Live Preview | Yes | No | Yes | No | Yes |
| Presets | Yes | Yes | Yes | Yes | Yes |
| Advanced Controls | No | Yes | No | Yes | Yes |
| Selective Adjustments | No | Yes | No | Yes | Yes |
| Real-time Editing | Yes | No | Yes | No | Yes |
| User-Friendly Interface | Yes | No | Yes | Yes | No |
3.3. How to Use Third-Party Apps for Black and White Conversion
The exact steps will vary depending on the app you choose, but here’s a general overview of the process:
- Download and Install the App: Find the app in the App Store and download it to your iPhone.
- Import Your Photo: Open the app and import the photo you want to convert from your camera roll.
- Select a Black and White Filter or Preset: Browse the available filters or presets and choose one that suits your image.
- Adjust the Settings: Most apps allow you to adjust the intensity of the filter, as well as other parameters like contrast, brightness, and sharpness.
- Save Your Photo: Once you’re happy with the result, save the black and white version to your camera roll.
4. Advanced Techniques for Black and White Photography on iPhone
To take your black and white photography to the next level, consider these advanced techniques:
4.1. Understanding Tone and Contrast
Tone refers to the lightness or darkness of different areas in an image, while contrast is the difference between the lightest and darkest tones. Mastering tone and contrast is essential for creating impactful black and white photos.
- High Contrast: High contrast images have strong blacks and whites with few mid-tones. This can create a dramatic, edgy look.
- Low Contrast: Low contrast images have a narrow range of tones, with many mid-tones and few pure blacks or whites. This can create a soft, dreamy look.
4.2. Using the Channel Mixer
The channel mixer allows you to control how the different color channels (red, green, and blue) contribute to the final black and white image. This can be used to selectively lighten or darken certain areas of the photo.
4.3. Dodging and Burning
Dodging and burning are traditional darkroom techniques that involve selectively lightening (dodging) or darkening (burning) specific areas of a photo. Many photo editing apps offer digital dodging and burning tools.
4.4. Adding Grain
Adding grain can give your black and white photos a classic, film-like look. However, it’s important to use grain sparingly, as too much grain can make your photos look noisy.
4.5. Creating Selective Black and White
Selective black and white involves converting most of the image to black and white while leaving certain elements in color. This can be a powerful way to draw attention to specific details.
5. Black and White Photography Tips for Different Scenarios
The best black and white techniques will vary depending on the subject matter and shooting conditions.
5.1. Portraits
- Focus on the Eyes: The eyes are the most important part of a portrait, so make sure they are sharp and well-lit.
- Use Soft Lighting: Harsh lighting can create unflattering shadows on the face. Use soft, diffused lighting for a more flattering look.
- Experiment with Different Poses: Try different poses to see what works best for your subject.
- Pay Attention to the Background: Choose a background that complements your subject and doesn’t distract from the portrait.
5.2. Landscapes
- Look for Strong Lines and Shapes: Black and white landscapes often benefit from strong lines and shapes.
- Use a Wide-Angle Lens: A wide-angle lens can help capture the vastness of the landscape.
- Shoot During Golden Hour: The golden hour (the hour after sunrise and the hour before sunset) provides warm, soft light that can enhance your landscape photos.
- Use a Polarizing Filter: A polarizing filter can reduce glare and increase contrast in your landscape photos.
5.3. Street Photography
- Capture Candid Moments: Street photography is all about capturing candid moments of everyday life.
- Be Patient: Wait for the right moment to capture a compelling image.
- Pay Attention to Composition: Use leading lines, symmetry, and other compositional techniques to create visually interesting photos.
- Be Respectful: Be mindful of the people you are photographing and avoid invading their privacy.
6. Finding Inspiration for Black and White Photography
To improve your black and white photography, it’s helpful to study the work of master photographers and explore different sources of inspiration.
6.1. Studying Master Photographers
Some of the most influential black and white photographers include:
- Ansel Adams: Known for his stunning black and white landscapes of the American West.
- Henri Cartier-Bresson: A pioneer of street photography, known for his “decisive moment” approach.
- Dorothea Lange: A documentary photographer who captured iconic images of the Great Depression.
- Sebastião Salgado: A social documentary photographer who has documented the lives of people around the world.
6.2. Exploring Online Resources and Communities
There are many online resources and communities dedicated to black and white photography, including:
- dfphoto.net: A website dedicated to photography, offering tutorials, inspiration, and a community forum.
- 500px: An online photography community where you can share your photos and discover the work of other photographers.
- Flickr: Another popular photography community with a large collection of black and white photos.
- Instagram: A social media platform where you can find inspiration and connect with other photographers using hashtags like #blackandwhitephotography and #monochrome.
6.3. Visiting Photography Exhibitions and Galleries
Visiting photography exhibitions and galleries is a great way to see black and white prints in person and learn from the work of established and emerging photographers.
7. Preserving and Sharing Your Black and White Photos
Once you’ve created your black and white masterpieces, it’s important to preserve and share them effectively.
7.1. Saving Your Photos in High Resolution
Always save your photos in the highest resolution possible to ensure they look their best when printed or displayed on large screens.
7.2. Printing Your Photos
Printing your photos is a great way to enjoy them in a tangible form. Consider using a professional printing service for the best results.
7.3. Sharing Your Photos Online
Share your photos on social media platforms like Instagram, Facebook, and Twitter to reach a wider audience. Use relevant hashtags to help people discover your work.
7.4. Creating a Portfolio
Create an online portfolio to showcase your best black and white photos and attract potential clients or collaborators.
8. Troubleshooting Common Black and White Conversion Issues
Even with the best tools and techniques, you may encounter some common issues when converting photos to black and white.
8.1. Dealing with Muddy Tones
Muddy tones occur when the black and white image lacks contrast and appears gray and washed out. To fix this, try increasing the contrast or adjusting the black and white mix to emphasize certain tones.
8.2. Correcting Overexposed or Underexposed Photos
Overexposed photos may appear too bright, while underexposed photos may appear too dark. Use the brightness and contrast controls to correct these issues.
8.3. Reducing Noise
Noise can be a problem in low-light photos or images with high ISO settings. Use noise reduction tools to minimize noise without sacrificing detail.
8.4. Sharpening Your Photos
Sharpening can help bring out details in your photos, but it’s important to use it sparingly, as too much sharpening can create unwanted artifacts.
9. The Future of Black and White Photography on iPhone
As iPhone cameras continue to improve and photo editing apps become more sophisticated, the possibilities for black and white photography on iPhone are endless.
9.1. Advancements in iPhone Camera Technology
Newer iPhones offer advanced features like computational photography, which uses artificial intelligence to enhance image quality. These features can be particularly beneficial for black and white photography.
9.2. Emerging Trends in Photo Editing Apps
Photo editing apps are constantly evolving, with new features and tools being added all the time. Some emerging trends include AI-powered editing tools and more sophisticated selective adjustment options.
9.3. The Enduring Appeal of Black and White Photography
Despite the rise of color photography, black and white photography continues to be a popular and enduring art form. Its ability to distill the essence of a scene and evoke emotion ensures its place in the world of photography.
10. Conclusion: Embrace the Art of Black and White Photography on Your iPhone
Converting photos to black and white on your iPhone is a simple yet powerful way to enhance your images and express your creativity. Whether you use the built-in iOS filters or explore the advanced features of third-party apps, the possibilities are endless. Experiment with different techniques, find your own style, and share your black and white masterpieces with the world.
Visit dfphoto.net to discover more photography tips, explore stunning photo collections, and connect with a vibrant community of photographers. We offer detailed tutorials, inspiring galleries, and a forum where you can share your work and learn from others. Join us today and unlock your full potential as a photographer. Address: 1600 St Michael’s Dr, Santa Fe, NM 87505, United States. Phone: +1 (505) 471-6001. Website: dfphoto.net.
FAQ: How to Make a Photo Black and White on iPhone
1. What is the easiest way to make a photo black and white on iPhone?
The easiest way to make a photo black and white on iPhone is by using the built-in filters in the Photos app; simply open the photo, tap “Edit,” select the “Filters” icon, and choose either “Mono,” “Tonal,” or “Noir” filter.
2. Are there any free apps to convert photos to black and white on iPhone?
Yes, there are several free apps to convert photos to black and white on iPhone, including Snapseed, Hypocam, and Adobe Lightroom Mobile (with limited features without a subscription); these apps offer various filters and editing tools for creating monochrome images.
3. How do I adjust the contrast in a black and white photo on iPhone?
To adjust the contrast in a black and white photo on iPhone, use the “Edit” option in the Photos app, then navigate to “Adjust” and modify the “Contrast” slider; for more advanced control, consider using third-party apps like Snapseed or Adobe Lightroom Mobile.
4. What is the difference between the Mono, Tonal, and Noir filters on iPhone?
The Mono filter removes all color without adjusting contrast or brightness, Tonal removes color and adds a slight boost to brightness and contrast, and Noir applies significant adjustments to levels, brightness, and contrast for a dramatic effect.
5. Can I selectively convert part of a photo to black and white on iPhone?
Yes, you can selectively convert part of a photo to black and white on iPhone using apps like Snapseed, which offers a selective adjustment tool; this allows you to apply the black and white effect to specific areas while leaving other parts in color.
6. How do I add grain to a black and white photo on iPhone?
To add grain to a black and white photo on iPhone, use editing apps like Snapseed or Adobe Lightroom Mobile, which have grain or texture options in their editing tools; adjust the slider to achieve the desired level of graininess for a film-like effect.
7. What are some tips for taking great black and white photos with my iPhone?
Some tips for taking great black and white photos with your iPhone include focusing on strong lines and shapes, shooting in good lighting conditions to maximize contrast, experimenting with different angles and compositions, and using the rule of thirds for visually appealing images.
8. How do I revert a black and white photo back to color on iPhone?
To revert a black and white photo back to color on iPhone, open the edited photo in the Photos app, tap “Edit,” then “Revert” to go back to the original color version; if you saved the black and white version as a new photo, the original color version will still be in your library.
9. Which is the best app for professional black and white photo editing on iPhone?
For professional black and white photo editing on iPhone, Adobe Lightroom Mobile is often considered the best option due to its advanced features like the black and white mix, tone curve adjustments, HSL adjustments, and selective adjustments.
10. How can I share my black and white photos from iPhone on social media?
You can share your black and white photos from iPhone on social media by tapping the share icon in the Photos app, then selecting the desired platform, such as Instagram, Facebook, or Twitter; add relevant hashtags like #blackandwhitephotography and #monochrome to increase visibility.