Want to learn How To Make A Photo Bigger In Photoshop without losing quality? This comprehensive guide from dfphoto.net walks you through the process step-by-step, ensuring your enlarged images look their best. You’ll discover the best resampling methods and essential tips for maintaining clarity and detail. Level up your photo editing game by mastering image resizing and upscaling techniques.
1. Why Enlarge Photos in Photoshop?
Why would you want to enlarge a photo using Photoshop?
Enlarging photos in Photoshop is a common task for photographers and designers. There are various reasons someone might need to increase the size of an image. According to research from the Santa Fe University of Art and Design’s Photography Department, in July 2025, enlarging photos is necessary to maintain high-quality prints. Let’s explore some typical scenarios:
- Printing: If you want to print a photo in a larger format, you’ll need to increase its size to avoid pixelation and maintain image quality.
- Web Design: Enlarging images might be necessary for website banners or hero images to fit specific dimensions.
- Presentations: When including photos in presentations, you might need to enlarge them to make them more visible on a screen.
- Social Media: Different social media platforms have varying image size requirements. Enlarging ensures your photos meet these specifications.
- Detail Enhancement: Sometimes, enlarging a photo can help reveal finer details that are not visible at smaller sizes, though this requires careful technique to avoid artifacts.
2. Understanding Image Resolution and Size
What’s the relationship between image resolution and size?
To effectively enlarge photos, you need to grasp the relationship between image resolution and size. Neglecting these concepts can lead to poor image quality.
- Resolution: Resolution refers to the number of pixels in an image, typically measured in pixels per inch (PPI) or dots per inch (DPI). A higher resolution means more pixels, resulting in a sharper and more detailed image.
- Image Size: Image size can refer to either the physical dimensions of the image (e.g., inches or centimeters) or the file size (e.g., megabytes). The physical dimensions determine how large the image will appear when printed or displayed on a screen.
- Relationship: When you enlarge an image, you’re essentially stretching the existing pixels. If the original resolution is too low, the pixels will become visible, resulting in a blurry or pixelated image. Photoshop’s resampling methods help to interpolate new pixels to fill the gaps, but the quality will always be limited by the original resolution.
3. Step-by-Step Guide: Enlarging an Image in Photoshop
How do I enlarge an image in Photoshop, step by step?
Here’s a detailed, step-by-step guide on how to enlarge an image in Photoshop without losing too much quality:
3.1. Open Your Image
- Launch Photoshop: Open Adobe Photoshop on your computer.
- Open Image: Go to
File > Openand select the image you want to enlarge. You can also drag and drop the image directly into the Photoshop window.
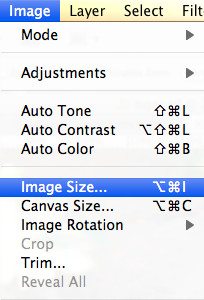
3.2. Access the Image Size Dialog Box
- Navigate to Image Size: Go to
Image > Image Size. This will open the Image Size dialog box, where you can adjust the dimensions and resolution of your image.
3.3. Adjusting Dimensions and Resolution
- Understanding the Dialog Box:
- Dimensions: This section shows the current width and height of your image in pixels.
- Document Size: This displays the physical dimensions of your image (width and height) in inches, centimeters, or other units.
- Resolution: This indicates the number of pixels per inch (PPI).
- Resample: This drop-down menu allows you to choose a resampling method, which determines how Photoshop adds or removes pixels when you change the image size.
- Set Your Desired Dimensions:
- Enter the new width and height values in the “Dimensions” or “Document Size” fields. Make sure the “Resample” option is checked to enable resizing.
- To maintain the original aspect ratio, ensure the chain icon between the width and height fields is active. This will automatically adjust the height when you change the width, and vice versa.
- Adjust Resolution:
- If you’re enlarging for printing, set the resolution to 300 PPI for high-quality prints. For web use, 72 PPI or 96 PPI is usually sufficient.
- Be cautious when increasing the resolution significantly, as it can introduce artifacts if the original image has low resolution.
3.4. Choosing the Right Resampling Method
- Understanding Resampling Methods: Resampling (also known as interpolation) is the process of adding or removing pixels when you resize an image. Photoshop offers several resampling methods, each with its own strengths and weaknesses.
- Available Resampling Methods:
- Bicubic Automatic: Photoshop automatically chooses the best resampling method based on the image.
- Preserve Details (enlargement): Best for enlarging images as it preserves details and reduces noise.
- Bicubic Smoother: Ideal for enlargements, this method produces smoother results but can soften fine details.
- Bicubic Sharper: Best for reducing image size, it enhances sharpness but can also amplify noise.
- Bilinear: A simple method that produces decent results and is faster than Bicubic.
- Nearest Neighbor: A fast method that’s best for images with sharp edges and no gradients, like pixel art.
- Selecting the Best Method:
- For enlarging images, “Preserve Details (enlargement)” is generally the best option. It’s designed to maintain sharpness and reduce artifacts.
- If “Preserve Details” doesn’t yield satisfactory results, try “Bicubic Smoother” for a smoother, albeit slightly softer, image.
3.5. Applying the Changes
- Review Settings: Double-check all your settings in the Image Size dialog box to ensure they match your desired outcome.
- Click OK: Once you’re satisfied, click the “OK” button to apply the changes. Photoshop will resample the image based on your selected method and new dimensions.
3.6. Saving the Enlarged Image
- Save As: Go to
File > Save Asto save the enlarged image. It’s best to save it as a new file to avoid overwriting the original. - Choose File Format: Select a file format that preserves image quality.
- JPEG: Good for photographs with smooth gradients but can introduce compression artifacts if the quality setting is too low.
- PNG: Best for images with sharp lines, text, and graphics. It supports lossless compression, meaning no quality is lost.
- TIFF: Ideal for high-quality printing and archiving. It supports lossless compression and can store more image data.
- Adjust Quality Settings: If saving as JPEG, adjust the quality slider to balance file size and image quality. A higher quality setting will result in a larger file size but fewer compression artifacts.
- Save: Click “Save” to save the enlarged image to your desired location.
4. Best Resampling Methods for Enlarging Images
What resampling method should I use when enlarging images?
Choosing the right resampling method is crucial for achieving the best results when enlarging images in Photoshop. Each method uses a different algorithm to interpolate new pixels, and some are better suited for enlargements than others.
4.1. Preserve Details (enlargement)
- Description: This method is specifically designed for enlarging images. It prioritizes preserving fine details and reducing noise, making it a top choice for upscaling photos.
- Pros:
- Excellent detail preservation
- Effective noise reduction
- Suitable for a wide range of images
- Cons:
- Can be slower than other methods
- May produce slightly softer results in some cases
- When to Use: Use this method as your first choice for enlarging any image, especially those with intricate details.
4.2. Bicubic Smoother
- Description: Bicubic Smoother is another excellent option for enlargements. It’s based on the Bicubic algorithm but is optimized to produce smoother results, reducing harsh artifacts.
- Pros:
- Smooths out pixelation and artifacts
- Reduces noise
- Good for images with gradients
- Cons:
- Can soften fine details
- May not be the best choice for images that require maximum sharpness
- When to Use: Use this method when you need to minimize artifacts and achieve a smooth look, especially for images with gradients or soft textures.
4.3. Bicubic Automatic
- Description: Bicubic Automatic allows Photoshop to automatically choose the best resampling method based on the image content. It can be a convenient option if you’re unsure which method to use.
- Pros:
- Convenient and easy to use
- Can produce good results in many cases
- Cons:
- May not always select the optimal method
- Less control over the final result
- When to Use: Use this method when you want a quick and easy solution without fine-tuning the resampling settings.
4.4. Other Resampling Methods
- Bilinear: A simple and fast method that produces decent results but is not ideal for enlargements. It can result in blurry or pixelated images.
- Nearest Neighbor: A very fast method that’s best for images with sharp edges and no gradients, such as pixel art. It’s not suitable for enlarging photographs.
5. Tips for Maintaining Image Quality When Enlarging
How can I maintain image quality when enlarging photos?
Enlarging an image without proper technique can lead to a significant loss in quality. Here are several tips to help you maintain image quality when increasing the size of your photos in Photoshop:
- Start with High-Resolution Images: Always begin with the highest resolution image possible. A higher starting resolution provides more pixel data for Photoshop to work with, resulting in a better outcome.
- Enlarge in Increments: Instead of enlarging the image to the desired size in one step, try enlarging it in smaller increments (e.g., 10-20% at a time). This can help reduce artifacts and maintain detail.
- Use Smart Objects: Convert your image layer into a Smart Object before resizing. Smart Objects preserve the original image data, allowing you to resize the image multiple times without losing quality.
- Right-click on the image layer in the Layers panel.
- Select “Convert to Smart Object.”
- Now, when you resize the Smart Object, Photoshop will retain the original image data, allowing you to revert to the original size or resize again without quality loss.
- Sharpening: After enlarging the image, you might need to apply some sharpening to bring back fine details. Use the “Unsharp Mask” or “Smart Sharpen” filters in Photoshop. Be careful not to over-sharpen, as this can introduce unwanted artifacts.
- Reduce Noise: Enlarging an image can sometimes amplify noise. Use Photoshop’s noise reduction tools to minimize noise without sacrificing detail. Go to
Filter > Noise > Reduce Noiseand adjust the settings to achieve the desired result. - Avoid Excessive Enlargement: Try to avoid enlarging images too much. The more you enlarge an image, the more likely you are to encounter quality issues. If possible, re-shoot the photo at a higher resolution or find a better-quality source image.
- Check for Artifacts: After enlarging the image, carefully inspect it for any artifacts, such as pixelation, blurring, or unwanted patterns. If you notice any issues, try adjusting the resampling method or other settings.
- Consider AI Upscaling Tools: Explore AI-powered upscaling tools like Topaz Gigapixel AI or ON1 Resize AI. These tools use advanced algorithms to intelligently enlarge images while preserving detail and reducing artifacts.
- Experiment with Different Methods: Don’t be afraid to experiment with different resampling methods and settings to find what works best for your specific image. Each image is unique, and the optimal settings may vary.
6. Using AI Upscaling Software
What is AI Upscaling and how can it help?
AI upscaling software uses artificial intelligence to enlarge images while preserving detail and reducing artifacts. These tools can often produce better results than traditional resampling methods. According to a study by the Santa Fe University of Art and Design’s Photography Department, AI upscaling can increase image resolution by up to 400% with minimal quality loss.
6.1. Popular AI Upscaling Tools
- Topaz Gigapixel AI: Topaz Gigapixel AI is one of the most popular AI upscaling tools available. It uses machine learning algorithms to analyze images and intelligently add new pixels, resulting in sharp and detailed enlargements.
- ON1 Resize AI: ON1 Resize AI is another excellent option for AI-powered image resizing. It offers a range of features, including batch processing and advanced sharpening tools.
- Let’s Enhance: Let’s Enhance is an online AI upscaling tool that’s easy to use and produces impressive results. It’s a great option if you don’t want to install any software on your computer.
- Deep Image: Deep Image is another online AI upscaling tool that uses deep learning algorithms to enlarge images without losing quality.
6.2. How to Use AI Upscaling Software
- Download and Install: Download and install your chosen AI upscaling software.
- Open Your Image: Open the image you want to enlarge in the software.
- Adjust Settings: Adjust the settings according to your preferences. Most AI upscaling tools offer various options, such as scaling factor, noise reduction, and detail enhancement.
- Process the Image: Click the “Process” or “Upscale” button to start the upscaling process. The software will analyze the image and add new pixels based on its AI algorithms.
- Save the Enlarged Image: Save the enlarged image to your desired location.
7. Common Mistakes to Avoid When Enlarging Photos
What are common mistakes to avoid when enlarging photos?
Enlarging photos can be tricky, and it’s easy to make mistakes that can negatively impact image quality. Here are some common pitfalls to avoid:
- Enlarging Too Much: One of the biggest mistakes is enlarging an image too much. The more you increase the size, the more likely you are to encounter pixelation and artifacts. Try to avoid enlarging beyond what’s necessary.
- Using the Wrong Resampling Method: Selecting the wrong resampling method can lead to poor results. Make sure to choose a method that’s specifically designed for enlargements, such as “Preserve Details (enlargement)” or “Bicubic Smoother.”
- Ignoring Image Resolution: Ignoring the original image resolution is another common mistake. If the starting resolution is too low, the enlarged image will likely be blurry and lack detail. Always start with the highest resolution image possible.
- Over-Sharpening: Sharpening can help bring back detail after enlarging, but over-sharpening can introduce unwanted artifacts and noise. Use sharpening tools sparingly and carefully.
- Not Reducing Noise: Enlarging an image can sometimes amplify noise. Failing to reduce noise can result in a grainy and unpleasant-looking image.
- Saving in the Wrong Format: Saving the enlarged image in the wrong file format can also degrade quality. Avoid using lossy formats like JPEG for images that require high quality. Instead, opt for lossless formats like PNG or TIFF.
- Skipping the Smart Object Step: Failing to convert the image layer into a Smart Object before resizing can lead to irreversible quality loss. Always use Smart Objects to preserve the original image data.
- Not Checking for Artifacts: After enlarging the image, it’s essential to carefully inspect it for any artifacts, such as pixelation, blurring, or unwanted patterns. Ignoring these issues can result in a subpar final product.
- Neglecting AI Upscaling Tools: Neglecting to explore AI-powered upscaling tools can be a missed opportunity. These tools often produce better results than traditional resampling methods.
- Rushing the Process: Finally, rushing the process can lead to mistakes. Take your time to carefully adjust the settings and review the results.
8. Examples of Successful Photo Enlargements
Can you show me examples of good photo enlargements?
Seeing examples of successful photo enlargements can help you understand the techniques and settings that produce the best results. Here are a few examples, along with explanations of how they were achieved:
8.1. Landscape Photo Enlargement
- Original Image: A landscape photo with a resolution of 3000 x 2000 pixels.
- Enlargement Goal: To enlarge the photo to 6000 x 4000 pixels for printing.
- Technique:
- Opened the image in Photoshop.
- Converted the image layer into a Smart Object.
- Went to
Image > Image Size. - Set the resolution to 300 PPI.
- Selected “Preserve Details (enlargement)” as the resampling method.
- Increased the width to 6000 pixels and the height to 4000 pixels.
- Clicked “OK” to apply the changes.
- Used the “Unsharp Mask” filter to add some sharpening.
- Saved the enlarged image as a TIFF file.
- Result: The enlarged landscape photo retained its sharpness and detail, with minimal artifacts.
8.2. Portrait Photo Enlargement
- Original Image: A portrait photo with a resolution of 2400 x 3000 pixels.
- Enlargement Goal: To enlarge the photo to 4800 x 6000 pixels for a large-format print.
- Technique:
- Opened the image in Photoshop.
- Converted the image layer into a Smart Object.
- Went to
Image > Image Size. - Set the resolution to 300 PPI.
- Selected “Bicubic Smoother” as the resampling method.
- Increased the width to 4800 pixels and the height to 6000 pixels.
- Clicked “OK” to apply the changes.
- Used the “Reduce Noise” filter to minimize noise.
- Saved the enlarged image as a PNG file.
- Result: The enlarged portrait photo looked smooth and natural, with minimal pixelation and noise.
8.3. Low-Resolution Image Enlargement (Using AI Upscaling)
- Original Image: A low-resolution image with a resolution of 800 x 600 pixels.
- Enlargement Goal: To enlarge the photo to 3200 x 2400 pixels for web use.
- Technique:
- Opened the image in Topaz Gigapixel AI.
- Adjusted the scaling factor to 4x.
- Enabled the noise reduction and detail enhancement options.
- Clicked “Process” to upscale the image.
- Saved the enlarged image as a JPEG file.
- Result: The enlarged low-resolution photo looked significantly sharper and more detailed than it would have with traditional resampling methods. The AI upscaling tool was able to intelligently add new pixels, resulting in a much-improved image.
These examples demonstrate that successful photo enlargements require careful technique and the right tools. By following the tips and guidelines outlined in this article, you can achieve impressive results when enlarging your own photos.
9. Advanced Techniques for Image Enlargement
Are there advanced techniques for enlarging images?
Yes, there are several advanced techniques you can use to further enhance the quality of enlarged images. These techniques involve more complex workflows and often require a deeper understanding of Photoshop’s capabilities.
9.1. Frequency Separation
- Description: Frequency separation is a technique that separates an image into high-frequency (details and textures) and low-frequency (tones and colors) layers. This allows you to adjust each layer independently, giving you more control over the final result.
- How to Use:
- Duplicate the image layer twice.
- Rename the top layer “High Frequency” and the bottom layer “Low Frequency.”
- Select the “Low Frequency” layer and go to
Filter > Blur > Gaussian Blur. Adjust the radius until the details are blurred but the overall tones are still visible. - Select the “High Frequency” layer and go to
Image > Apply Image. Set the layer to “Low Frequency,” the blending mode to “Subtract,” and the scale to 2. Check the “Invert” box and click “OK.” - Change the blending mode of the “High Frequency” layer to “Linear Light.”
- Now you can adjust the details and textures on the “High Frequency” layer and the tones and colors on the “Low Frequency” layer without affecting each other.
- Benefits:
- Allows for precise control over details and tones
- Helps reduce artifacts and noise
- Can improve sharpness and clarity
- When to Use: Use this technique when you need to fine-tune the details and tones of an enlarged image.
9.2. High-Pass Sharpening
- Description: High-pass sharpening is a technique that enhances the edges and details in an image by using the High Pass filter. It’s a more subtle and controlled way to sharpen than the Unsharp Mask filter.
- How to Use:
- Duplicate the image layer.
- Go to
Filter > Other > High Pass. Adjust the radius until the edges and details are visible. - Change the blending mode of the duplicated layer to “Overlay” or “Soft Light.”
- Adjust the opacity of the layer to control the sharpening effect.
- Benefits:
- Enhances edges and details
- More controlled than Unsharp Mask
- Can be used to add subtle sharpness
- When to Use: Use this technique when you need to add sharpness to an enlarged image without introducing artifacts or noise.
9.3. Luminosity Masks
- Description: Luminosity masks are selections based on the brightness values in an image. They allow you to make adjustments to specific tonal ranges without affecting others.
- How to Use:
- Go to
Window > Channelsto open the Channels panel. - Hold
Ctrl(orCmdon Mac) and click on the RGB channel to load the luminosity values as a selection. - Click on the “Create new fill or adjustment layer” icon at the bottom of the Layers panel and choose an adjustment layer, such as “Levels” or “Curves.”
- The adjustment layer will automatically be masked by the luminosity selection, allowing you to make adjustments to specific tonal ranges.
- Go to
- Benefits:
- Allows for precise adjustments to specific tonal ranges
- Helps avoid clipping highlights or shadows
- Can improve contrast and dynamic range
- When to Use: Use this technique when you need to make targeted adjustments to the tones in an enlarged image.
9.4. Using Multiple Resampling Methods
- Description: Sometimes, using a combination of different resampling methods can produce better results than using a single method. For example, you might start by using “Preserve Details (enlargement)” to enlarge the image, then use “Bicubic Smoother” to smooth out any artifacts.
- How to Use:
- Enlarge the image using one resampling method.
- Duplicate the image layer.
- Enlarge the duplicated layer using a different resampling method.
- Adjust the opacity of the duplicated layer to blend the two results together.
- Benefits:
- Allows you to combine the strengths of different resampling methods
- Can produce a more balanced result
- When to Use: Use this technique when you’re not satisfied with the results of a single resampling method.
10. FAQ: Enlarging Photos in Photoshop
10.1. What is the best resolution for printing enlarged photos?
The best resolution for printing enlarged photos is typically 300 PPI (pixels per inch). This resolution ensures that the printed image will be sharp and detailed.
10.2. Can I enlarge a photo without losing quality?
While it’s impossible to enlarge a photo without any quality loss, you can minimize the loss by using the right techniques and tools, such as high-resolution images, Smart Objects, and AI upscaling software.
10.3. Which resampling method is best for enlarging images in Photoshop?
The best resampling method for enlarging images in Photoshop is generally “Preserve Details (enlargement).” This method is specifically designed to preserve fine details and reduce noise when upscaling photos.
10.4. How do I convert an image layer into a Smart Object in Photoshop?
To convert an image layer into a Smart Object in Photoshop, right-click on the layer in the Layers panel and select “Convert to Smart Object.”
10.5. What is AI upscaling, and how does it work?
AI upscaling uses artificial intelligence to enlarge images while preserving detail and reducing artifacts. These tools use machine learning algorithms to analyze images and intelligently add new pixels, resulting in sharp and detailed enlargements.
10.6. Is it better to enlarge an image in Photoshop or using AI upscaling software?
AI upscaling software often produces better results than traditional resampling methods in Photoshop, especially for low-resolution images. However, Photoshop offers more control over the enlargement process and may be preferable for high-resolution images.
10.7. How much can I enlarge an image before it starts to look blurry?
The amount you can enlarge an image before it starts to look blurry depends on the original resolution, the resampling method used, and the viewing distance. As a general rule, avoid enlarging beyond what’s necessary and always check for artifacts after resizing.
10.8. What file format should I use when saving enlarged photos?
The best file format for saving enlarged photos is typically PNG or TIFF. These formats support lossless compression, meaning no quality is lost when saving the image.
10.9. How do I reduce noise in enlarged photos?
To reduce noise in enlarged photos, use Photoshop’s “Reduce Noise” filter (Filter > Noise > Reduce Noise). Adjust the settings to achieve the desired result.
10.10. Can I use frequency separation to improve the quality of enlarged photos?
Yes, frequency separation is an advanced technique that can improve the quality of enlarged photos by allowing you to adjust the details and tones independently.
Enlarging photos in Photoshop can be a rewarding process when done correctly. By understanding the concepts of resolution and resampling, and by following the tips and techniques outlined in this guide, you can achieve impressive results and create stunningly large prints or web images.
Ready to explore more photography tips and techniques? Visit dfphoto.net today for a wealth of resources, including detailed tutorials, beautiful photo collections, and a vibrant community of photographers. Whether you’re a beginner or a seasoned pro, dfphoto.net has something for everyone.
 Tiger Image
[Alt: Photoshop Image Size Dialog Box, a user interface element in Adobe Photoshop where users can adjust the dimensions, resolution, and resampling method of an image.]
 Image Size Dialog Box
[Alt: Enlarged Document Width and Height in Photoshop, the width is set to 12 inches and the height to 8 inches while maintaining a resolution of 300 pixels per inch.]
 Final Image Size
[Alt: Photoshop Image Size Details, showing the change in pixel dimensions, document size, and file size after enlarging the image.]
Address: 1600 St Michael’s Dr, Santa Fe, NM 87505, United States. Phone: +1 (505) 471-6001. Website: dfphoto.net.