Making a photo involves capturing light and transforming it into a lasting memory, and this guide will show you how. At dfphoto.net, we understand that photography is more than just pointing and shooting; it’s an art form that combines technical skills with creative vision, so we’ll help you to master the skills. Whether you’re using a DSLR, a mirrorless camera, or your smartphone, let’s learn How To Make A Photograph, exploring everything from camera settings to post-processing techniques. Consider this your ultimate resource for photography tips, visual storytelling, and creative expression.
1. Understanding Your Camera: The Foundation of How to Make a Photo
The first step in how to make a photo is understanding the tool you’ll be using, your camera. According to research from the Santa Fe University of Art and Design’s Photography Department, in July 2025, a photographer’s knowledge of their equipment directly correlates with the quality and creativity of their images. Regardless of whether you’re using a DSLR, mirrorless camera, or even a smartphone, it’s crucial to understand the basic functions and settings that control the exposure, focus, and overall look of your photographs.
1.1. What Are the Key Camera Settings You Should Know To Make A Photo?
The key camera settings you should know to make a photo are aperture, shutter speed, and ISO, which form the exposure triangle. Understanding how each of these settings affects your image is the first step to mastering photography.
-
Aperture: Aperture controls the size of the lens opening through which light passes, measured in f-stops (e.g., f/1.8, f/5.6, f/16). A wider aperture (smaller f-number) allows more light into the camera, creating a shallow depth of field, ideal for portraits and isolating subjects. A narrow aperture (larger f-number) allows less light and increases the depth of field, which is perfect for landscapes and group shots.
-
Shutter Speed: Shutter speed determines how long the camera’s sensor is exposed to light, measured in seconds or fractions of a second (e.g., 1/4000s, 1/60s, 1s). Fast shutter speeds freeze motion, while slow shutter speeds allow motion blur and are useful in low-light conditions.
-
ISO: ISO measures the sensitivity of the camera’s sensor to light. Lower ISO settings (e.g., ISO 100) produce cleaner images with less noise, while higher ISO settings (e.g., ISO 3200) are used in low-light situations but can introduce grain or noise.
1.2. How Does the Exposure Triangle Work When You Want To Make A Photo?
The exposure triangle works by balancing the aperture, shutter speed, and ISO to achieve a well-exposed photograph. Adjusting one setting often requires compensating with the others to maintain the desired brightness and clarity.
For instance, if you increase the aperture (lower f-number) to let more light in, you may need to decrease the shutter speed to avoid overexposure. Similarly, if you increase the ISO to shoot in low light, you may need to adjust the aperture or shutter speed to compensate for the increased sensitivity. Experimenting with these settings will help you understand their interplay and how they affect the final image.
1.3. What Is The Significance of White Balance When You Want To Make A Photo?
The significance of white balance is ensuring that the colors in your photograph appear accurate, regardless of the lighting conditions. Different light sources have different color temperatures, measured in Kelvin (K).
For example, daylight is around 5500K, while incandescent light is around 2700K. Setting the correct white balance ensures that white objects appear white in your photos, and other colors are rendered naturally. Most cameras have preset white balance options (e.g., daylight, cloudy, tungsten) as well as a custom white balance setting that allows you to manually calibrate the color temperature.
1.4. What is The Role of Focusing Modes in How To Make A Photo?
The role of focusing modes is to ensure your subject is sharp and clear. Modern cameras offer several autofocus modes designed for different shooting scenarios.
-
Single Autofocus (AF-S or One-Shot): Locks focus on a stationary subject when the shutter button is half-pressed.
-
Continuous Autofocus (AF-C or AI Servo): Continuously adjusts focus as the subject moves, ideal for action and sports photography.
-
Manual Focus (MF): Allows you to adjust the focus manually, providing precise control and is useful in situations where autofocus struggles, such as low light or macro photography.
Understanding and using the appropriate focusing mode will help you capture sharp, well-defined images.
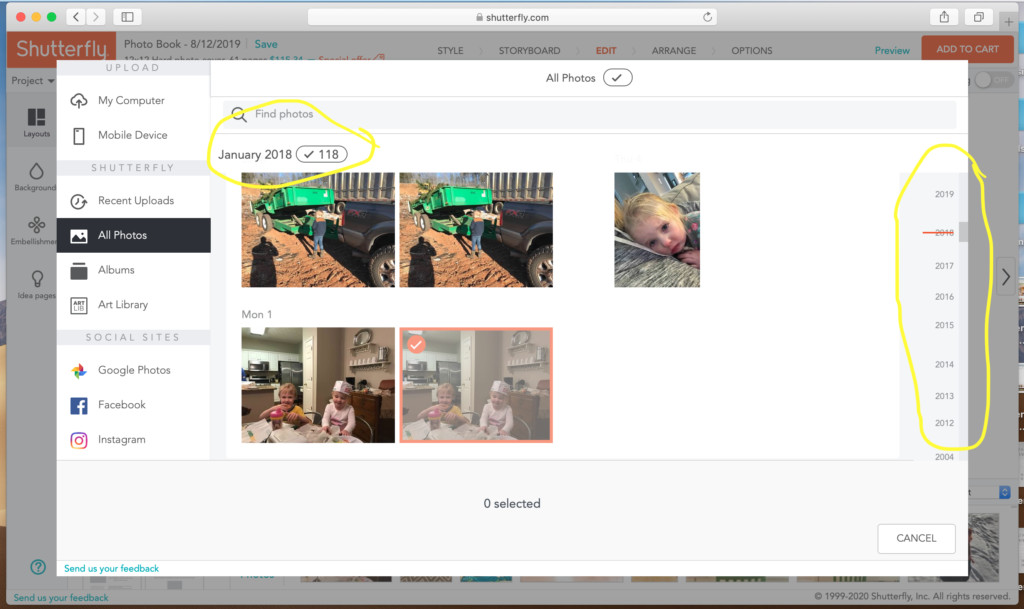 Timeline tools to help you quickly select one month’s worth of photos at a time
2. Composition Techniques: How to Frame Your Story
Composition techniques involve arranging elements within your frame to create visually appealing and impactful images, and are crucial in how to make a photo. A well-composed photograph guides the viewer’s eye, tells a story, and evokes emotion.
2.1. How Can The Rule of Thirds Improve My Photos?
The rule of thirds improves your photos by guiding you to place key elements off-center, creating a more dynamic and engaging composition. Imagine dividing your frame into nine equal parts with two horizontal and two vertical lines. According to Popular Photography magazine, placing important elements along these lines or at their intersections can create a more balanced and visually interesting image.
For example, when photographing a landscape, position the horizon line along the upper or lower horizontal line, rather than in the middle of the frame. When shooting a portrait, place the subject’s eyes at one of the intersections. This technique helps to draw the viewer’s eye and creates a sense of depth and balance.
2.2. Why Should I Use Leading Lines To Make A Photo?
You should use leading lines because they guide the viewer’s eye through the image, creating a sense of depth and leading to the main subject. Leading lines can be roads, rivers, fences, or any other linear element that draws the viewer into the scene.
For example, in a landscape photograph, a winding road leading towards a mountain can create a compelling composition. By strategically positioning these lines, you can control how the viewer explores the image and emphasize the focal point.
2.3. What Is The Significance of Symmetry and Patterns To Make A Photo?
The significance of symmetry and patterns is that they create visually pleasing and harmonious images. Symmetry involves creating a balanced composition where elements on one side of the frame mirror those on the other side. Patterns, whether natural or man-made, can add visual interest and a sense of rhythm to your photographs.
For example, photographing a building with symmetrical architecture or capturing a field of flowers with repeating patterns can result in striking images. Breaking the symmetry or pattern can also create a point of interest and draw attention to a specific element.
2.4. How Can Negative Space Enhance A Photo?
Negative space enhances a photo by providing a visual “break” and drawing attention to the main subject. Negative space is the empty area around the subject, and it can create a sense of balance, simplicity, and drama.
For example, in a portrait, a large expanse of background can emphasize the subject and create a sense of isolation or focus. Using negative space effectively can simplify the composition and make the subject stand out.
2.5. What Role Does Framing Play When You Want To Make A Photo?
Framing plays a crucial role by using elements within the scene to create a frame around the main subject, which isolates it from its surroundings and adds depth. Natural frames can be trees, archways, windows, or any other element that surrounds the subject.
For example, photographing a person through an open doorway or framing a landscape with tree branches can add visual interest and draw the viewer’s eye to the focal point. Framing can also create a sense of mystery or intimacy, inviting the viewer to explore the scene.
 Sample title page with a short summary of our year
3. Mastering Light: Essential for How to Make a Photo
Mastering light is essential for how to make a photo because light is the foundation of every photograph, which shapes the mood, tone, and overall impact of your images. Understanding how to work with different types of light is crucial for creating compelling photographs.
3.1. What Are The Different Types of Natural Light to Consider When Making A Photo?
The different types of natural light to consider are direct sunlight, diffused light, and golden hour light. Each type of light has its own characteristics and affects the appearance of your photographs differently.
-
Direct Sunlight: Harsh and creates strong shadows, which can be challenging to work with but can also add drama and contrast.
-
Diffused Light: Soft and even, produced by clouds or shade, which is ideal for portraits and minimizing harsh shadows.
-
Golden Hour Light: Warm and soft light that occurs during the hour after sunrise and the hour before sunset, which is perfect for landscapes and portraits due to its flattering qualities.
3.2. How Does Artificial Light Differ From Natural Light When Making A Photo?
Artificial light differs from natural light in that it is controlled and consistent, but often requires additional equipment and knowledge. Artificial light sources include studio strobes, speedlights, and continuous lights, each with its own set of advantages and disadvantages.
Studio strobes provide powerful and consistent light, ideal for studio portraits and product photography. Speedlights are portable and versatile, suitable for on-location shoots and events. Continuous lights offer real-time preview and are useful for video and still photography.
3.3. What Are Some Techniques for Shooting in Low Light To Make A Photo?
Some techniques for shooting in low light include using a wide aperture, increasing the ISO, using a tripod, and employing slow shutter speeds. Shooting in low light can be challenging, but with the right techniques, you can capture stunning images.
-
Wide Aperture: Allows more light into the camera.
-
High ISO: Increases the camera’s sensitivity to light but can introduce noise.
-
Tripod: Stabilizes the camera for sharp images with slow shutter speeds.
-
Slow Shutter Speeds: Capture more light but can result in motion blur if the subject is moving.
3.4. How Can Reflectors and Diffusers Help When Making A Photo?
Reflectors and diffusers help by modifying and controlling light, which is crucial for achieving desired effects. Reflectors bounce light onto the subject, filling in shadows and creating a more balanced exposure. Diffusers soften harsh light, reducing contrast and creating a more flattering look.
For example, using a reflector to bounce sunlight onto a subject’s face can eliminate shadows and brighten the skin. A diffuser placed between the sun and the subject can soften the light, creating a more even and pleasing illumination.
3.5. What Is the Importance of Understanding Color Temperature for Making A Photo?
The importance of understanding color temperature is ensuring accurate and pleasing color rendition in your photographs. Color temperature refers to the warmth or coolness of a light source, measured in Kelvin (K).
Different light sources have different color temperatures, and setting the correct white balance is crucial for achieving accurate colors. For example, if you are shooting indoors under incandescent light (around 2700K), setting the white balance to “tungsten” will ensure that white objects appear white and other colors are rendered naturally.
 These are my January pages
4. Choosing the Right Gear: Essential for How to Make a Photo
Choosing the right gear is essential for how to make a photo because it directly impacts the quality, versatility, and creative possibilities of your photography. The right equipment can enhance your ability to capture stunning images in various conditions and genres.
4.1. How Do I Select the Right Camera Body To Make A Photo?
You select the right camera body by considering your specific needs, budget, and the type of photography you intend to pursue. There are several types of camera bodies available, each with its own set of features and advantages.
-
DSLR (Digital Single-Lens Reflex): Offers a wide range of lenses and accessories, good image quality, and robust performance.
-
Mirrorless: Lighter and more compact than DSLRs, with advanced features like electronic viewfinders and fast autofocus.
-
Point-and-Shoot: Simple and affordable, ideal for beginners and casual photography.
-
Smartphone: Convenient and versatile, with improving image quality and built-in editing tools.
4.2. What Types of Lenses Are Essential for Different Photography Styles To Make A Photo?
The types of lenses that are essential for different photography styles vary widely depending on the subject matter and creative goals. Here are some common lens types and their ideal uses:
| Lens Type | Focal Length | Ideal Uses |
|---|---|---|
| Wide-Angle Lens | 10mm – 35mm | Landscapes, architecture, interior photography, and capturing expansive scenes. |
| Standard Lens | 35mm – 70mm | General photography, street photography, portraits, and everyday shooting. |
| Telephoto Lens | 70mm – 300mm+ | Sports, wildlife, and capturing distant subjects with compressed perspective. |
| Prime Lens | Fixed Focal Length | Portraits, low-light photography, and achieving shallow depth of field with high image quality. |
| Macro Lens | 50mm – 200mm | Close-up photography of small subjects like insects, flowers, and textures with exceptional detail. |
| Zoom Lens | Variable Focal Length | Versatile for various subjects, providing flexibility to adjust the focal length without changing lenses. |
4.3. What Are The Benefits of Using a Tripod When You Want To Make A Photo?
The benefits of using a tripod are that it provides stability, sharpness, and versatility, especially in low-light conditions or when using slow shutter speeds. A tripod eliminates camera shake, resulting in sharper images and allowing for longer exposures without blur. It also enables precise framing and composition, making it an essential tool for landscape, architecture, and night photography.
4.4. How Can Filters Enhance Your Photos To Make A Photo?
Filters enhance your photos by modifying light and color, which allows you to achieve specific effects and improve the overall image quality. There are several types of filters available, each designed for different purposes.
-
UV Filter: Protects the lens from scratches and reduces UV light.
-
Polarizing Filter: Reduces glare, enhances colors, and deepens the sky.
-
Neutral Density (ND) Filter: Reduces the amount of light entering the lens, allowing for longer exposures or wider apertures.
-
Graduated Neutral Density (GND) Filter: Darkens specific areas of the image, such as the sky, while leaving the rest of the scene unaffected.
4.5. What Other Accessories Are Useful for Making A Photo?
Other accessories that are useful include a camera bag, extra batteries, memory cards, a lens cleaning kit, and a remote shutter release. A camera bag protects your equipment during transport, while extra batteries and memory cards ensure you don’t run out of power or storage space.
A lens cleaning kit keeps your lenses clean and free from dust and smudges, and a remote shutter release eliminates camera shake when using a tripod.
5. Post-Processing Techniques: Refining How to Make a Photo
Post-processing techniques involve editing and enhancing your images after they have been captured, and they are crucial in how to make a photo. Post-processing allows you to correct imperfections, adjust colors and tones, and add creative effects to your photographs.
5.1. What Are Some Essential Post-Processing Software Options To Make A Photo?
Some essential post-processing software options include Adobe Photoshop, Adobe Lightroom, Capture One, and GIMP (a free open-source alternative). Each software offers a range of tools and features for editing and enhancing your images.
Adobe Photoshop is the industry standard for advanced image editing, with powerful tools for retouching, compositing, and graphic design. Adobe Lightroom is designed for managing and editing large batches of photos, with a user-friendly interface and non-destructive editing capabilities. Capture One is known for its exceptional color handling and tethering capabilities, making it a favorite among professional photographers.
5.2. How Can I Adjust Exposure and Contrast in Post-Processing To Make A Photo?
You can adjust exposure and contrast in post-processing to correct brightness levels and enhance the tonal range of your images. Exposure controls the overall brightness of the image, while contrast adjusts the difference between the highlights and shadows.
Increasing the exposure brightens the image, while decreasing it darkens the image. Increasing the contrast enhances the separation between the bright and dark areas, while decreasing it reduces the difference.
5.3. What Is The Importance of Color Correction and White Balance Adjustment When Making A Photo?
The importance of color correction and white balance adjustment is ensuring accurate and pleasing color rendition in your photographs. Color correction involves adjusting the individual colors in the image to achieve a more natural and balanced look. White balance adjustment corrects the color temperature, ensuring that white objects appear white.
For example, if your image has a blue tint, you can increase the warmth to neutralize the color cast. If the colors appear muted, you can increase the saturation to make them more vibrant.
5.4. How Can Sharpening and Noise Reduction Improve Your Photos To Make A Photo?
Sharpening and noise reduction improve your photos by enhancing detail and reducing unwanted artifacts. Sharpening increases the perceived sharpness of the image, bringing out fine details and textures. Noise reduction reduces grain or noise, which can be particularly useful for images shot at high ISO settings.
However, it’s important to use these tools sparingly, as over-sharpening can create unwanted halos and over-smoothing can result in a loss of detail.
5.5. What Are Some Creative Editing Techniques I Can Use To Make A Photo?
Some creative editing techniques you can use include selective color adjustments, split toning, adding vignettes, and creating black and white conversions. Selective color adjustments allow you to modify specific colors in the image, creating dramatic effects or emphasizing certain elements.
Split toning involves adding different colors to the highlights and shadows, creating a unique and stylized look. Adding vignettes darkens the edges of the image, drawing the viewer’s eye to the center. Black and white conversions can transform a color image into a timeless and classic photograph.
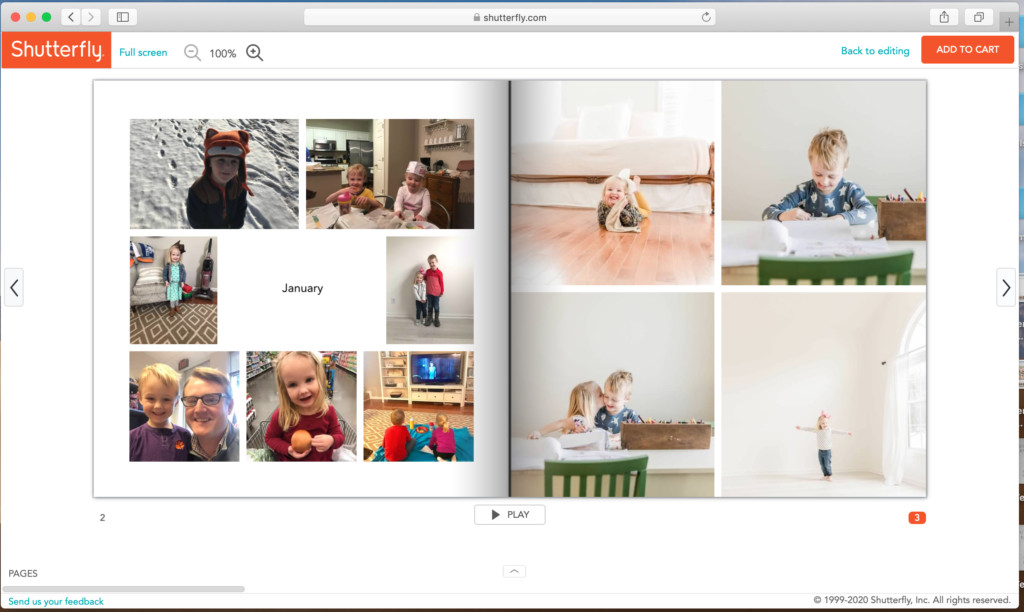
 Final January pages, then I continue the same process with February and the rest of the year
6. Exploring Different Genres: Broadening How to Make a Photo
Exploring different genres is essential for broadening how to make a photo because it allows you to develop new skills, discover your passions, and expand your creative horizons. Each genre presents its own unique challenges and opportunities, and experimenting with different styles can help you grow as a photographer.
6.1. What Are The Key Elements of Landscape Photography To Make A Photo?
The key elements of landscape photography include composition, light, and capturing the beauty of the natural world. Composition is crucial for creating visually appealing images, using techniques like the rule of thirds, leading lines, and framing.
Light plays a vital role in setting the mood and tone of the photograph, with golden hour light being particularly prized for its warm and soft qualities. Capturing the beauty of the natural world involves showcasing the unique features of the landscape, from majestic mountains to serene coastlines.
6.2. How Does Portrait Photography Differ From Other Genres When You Want To Make A Photo?
Portrait photography differs from other genres in that it focuses on capturing the personality, emotion, and essence of the subject. It involves working closely with the model to create a connection and convey a sense of intimacy.
Lighting is particularly important in portrait photography, with soft and diffused light often preferred for flattering skin tones and minimizing harsh shadows. Composition techniques like framing and negative space can also be used to enhance the portrait and draw attention to the subject’s face.
6.3. What Are Some Tips for Street Photography To Make A Photo?
Some tips for street photography include being discreet, observant, and patient, as well as capturing candid moments and telling stories about everyday life. Street photography involves documenting the human experience in public spaces, and it requires a keen eye for detail and a willingness to approach strangers.
Being discreet is important for capturing authentic moments without disrupting the scene, while being observant allows you to spot interesting subjects and compositions. Patience is key for waiting for the right moment to capture the perfect shot, and telling stories involves conveying a sense of place, time, and emotion.
6.4. How Can I Capture Stunning Action Shots To Make A Photo?
You can capture stunning action shots by using fast shutter speeds, continuous autofocus, and burst mode, as well as anticipating the action and following the subject. Fast shutter speeds freeze motion, while continuous autofocus ensures that the subject remains sharp as it moves. Burst mode allows you to capture a series of images in rapid succession, increasing your chances of capturing the perfect moment.
Anticipating the action involves predicting what the subject will do next and positioning yourself accordingly, while following the subject allows you to maintain focus and composition as it moves through the frame.
6.5. What Are The Unique Challenges of Night Photography To Make A Photo?
The unique challenges of night photography include low light, long exposures, and noise, as well as dealing with light pollution and capturing detail in dark areas. Low light requires the use of wide apertures, high ISO settings, and slow shutter speeds, which can result in noise and motion blur.
Long exposures require a tripod to stabilize the camera and prevent camera shake, while noise can be reduced through post-processing techniques. Dealing with light pollution involves finding dark locations and using filters to reduce the effects of artificial light, and capturing detail in dark areas requires careful exposure and post-processing adjustments.
7. Building Your Portfolio: Showcasing How to Make a Photo
Building your portfolio is essential for showcasing how to make a photo because it provides a platform for displaying your best work, attracting clients, and advancing your career. A well-curated portfolio demonstrates your skills, style, and creative vision, and it is an essential tool for any aspiring or professional photographer.
7.1. How Do I Select My Best Photos for My Portfolio To Make A Photo?
You select your best photos by choosing images that showcase your technical skills, creative vision, and unique style. Your portfolio should represent your strongest work and demonstrate your ability to capture compelling images in various genres and conditions.
Choose images that are technically sound, with good exposure, sharpness, and composition. Select images that are visually appealing and evoke emotion, and prioritize images that are consistent with your brand and target audience.
7.2. What Are Some Platforms for Showcasing My Photography Online To Make A Photo?
Some platforms for showcasing your photography online include your website, social media (Instagram, Facebook, etc.), online portfolio sites (Behance, Dribbble, etc.), and photography communities (Flickr, 500px, etc.). Each platform offers its own set of features and advantages, and it’s important to choose the ones that best suit your needs and goals.
Your website provides a professional and customizable platform for showcasing your work, while social media allows you to reach a large audience and engage with potential clients. Online portfolio sites offer a dedicated space for displaying your best work, while photography communities provide opportunities for feedback, inspiration, and networking.
7.3. How Can I Optimize My Online Portfolio for Search Engines To Make A Photo?
You can optimize your online portfolio for search engines by using relevant keywords, optimizing image file names and alt tags, creating high-quality content, and building backlinks. Using relevant keywords in your website copy, image file names, and alt tags can help search engines understand what your portfolio is about and improve its visibility in search results.
Optimizing image file names and alt tags involves using descriptive and keyword-rich names for your image files and adding alt tags to each image, describing what the image is about. Creating high-quality content involves writing informative and engaging blog posts about your photography, while building backlinks involves getting other websites to link to your portfolio, which can improve its authority and ranking in search results.
7.4. What Are The Benefits of Participating in Photography Contests and Exhibitions To Make A Photo?
The benefits of participating in photography contests and exhibitions include gaining exposure, recognition, and validation, as well as networking with other photographers and industry professionals. Winning a photography contest or being selected for an exhibition can significantly boost your career and open doors to new opportunities.
It can also provide valuable feedback on your work and inspire you to push your creative boundaries. Networking with other photographers and industry professionals can lead to collaborations, mentorships, and new business opportunities.
7.5. How Can I Use Social Media To Promote My Photography To Make A Photo?
You can use social media to promote your photography by sharing your best work, engaging with your audience, using relevant hashtags, and collaborating with other photographers and influencers. Sharing your best work involves posting high-quality images that showcase your skills, style, and creative vision.
Engaging with your audience involves responding to comments and messages, asking questions, and creating interactive content. Using relevant hashtags can help your posts reach a wider audience and attract new followers, while collaborating with other photographers and influencers can expose your work to new audiences and build your credibility.
Ready to take your photography to the next level? Visit dfphoto.net for in-depth tutorials, stunning photo galleries, and a vibrant community of photographers. Whether you’re looking to master camera settings, refine your composition skills, or find inspiration for your next project, dfphoto.net has everything you need to unleash your creative potential. Join us today and start capturing the world in a whole new light. Address: 1600 St Michael’s Dr, Santa Fe, NM 87505, United States. Phone: +1 (505) 471-6001. Website: dfphoto.net.
FAQ: How To Make A Photo
How can I learn to take better photos with my smartphone?
You can learn to take better photos with your smartphone by understanding its camera settings, using natural light, composing your shots carefully, and editing your photos with mobile apps. Most smartphones have built-in camera settings that allow you to adjust the exposure, focus, and white balance.
What are the best camera settings for outdoor photography?
The best camera settings for outdoor photography depend on the specific conditions, but generally, you should use a low ISO (100-400), a moderate aperture (f/5.6-f/11), and a shutter speed that is fast enough to avoid motion blur. When shooting in bright sunlight, you may need to use a faster shutter speed or a smaller aperture to avoid overexposure.
How do I choose the right lens for my camera?
You choose the right lens for your camera by considering the type of photography you intend to pursue, the focal length you need, and your budget. Wide-angle lenses (10mm-35mm) are ideal for landscapes and architecture, while telephoto lenses (70mm-300mm+) are suitable for sports and wildlife.
What is the best time of day to take photos?
The best time of day to take photos is during the golden hour (the hour after sunrise and the hour before sunset), when the light is soft, warm, and flattering. The golden hour provides beautiful, diffused light that enhances colors and minimizes harsh shadows.
How can I improve my composition skills in photography?
You can improve your composition skills by learning and applying the rule of thirds, using leading lines, framing your subject, and experimenting with different angles and perspectives. The rule of thirds involves dividing your frame into nine equal parts with two horizontal and two vertical lines, and positioning key elements along these lines or at their intersections.
What are some common mistakes to avoid in photography?
Some common mistakes to avoid in photography include shooting in automatic mode, ignoring composition, overexposing or underexposing your images, and over-editing your photos in post-processing. Shooting in automatic mode can limit your creative control, while ignoring composition can result in visually unappealing images.
How can I protect my photography from theft or copyright infringement?
You can protect your photography from theft or copyright infringement by watermarking your images, registering your copyright, and monitoring online platforms for unauthorized use of your work. Watermarking your images involves adding a visible or invisible mark that identifies you as the copyright holder.
What is the difference between RAW and JPEG image formats?
The difference between RAW and JPEG image formats is that RAW files contain all the unprocessed data captured by the camera’s sensor, while JPEG files are compressed and processed, resulting in smaller file sizes but also a loss of detail. RAW files offer more flexibility for post-processing, as you can adjust the exposure, white balance, and other settings without losing image quality.
How can I find inspiration for my photography?
You can find inspiration for your photography by studying the work of other photographers, exploring different genres, visiting museums and galleries, and experimenting with new techniques and styles. Studying the work of other photographers can expose you to new ideas and approaches, while exploring different genres can help you discover your passions and expand your creative horizons.
What are some essential photography accessories for beginners?
Some essential photography accessories for beginners include a camera bag, extra batteries, memory cards, a lens cleaning kit, and a tripod. A camera bag protects your equipment during transport, while extra batteries and memory cards ensure you don’t run out of power or storage space. A lens cleaning kit keeps your lenses clean and free from dust and smudges, and a tripod provides stability for sharp images, especially in low-light conditions.