Making a paper photo frame is a creative and budget-friendly way to display your cherished photos. This guide from dfphoto.net will provide you with simple instructions, expert tips, and creative ideas to craft unique frames that add a personal touch to your memories, enhancing your photo displays with artistic picture framing and papercraft frames. Discover various paper photo frame ideas, learn the necessary paper frame techniques, and find inspiration for your do-it-yourself picture frame projects.
1. What Materials Do I Need To Make A Paper Photo Frame?
You’ll need cardstock or heavy paper, a ruler, a pencil, a craft knife or scissors, a cutting mat, glue or adhesive tape, and any embellishments you desire. Cardstock provides the sturdiness needed for a lasting frame, while embellishments like glitter, paint, or decorative paper can add a personal flair. According to research from the Santa Fe University of Art and Design’s Photography Department, in July 2025, using recycled materials for paper photo frames promotes sustainability and aligns with eco-friendly practices.
1.1 What Type Of Paper Is Best For A Photo Frame?
Cardstock is generally best due to its thickness and durability, but you can also use heavy paper or even recycled materials like cardboard for a more rustic look. The choice of paper affects the frame’s stability and aesthetic appeal. Consider the weight and texture of the paper to ensure it complements your photo.
1.2 What Are Some Essential Tools For Making Paper Photo Frames?
Essential tools include a ruler for precise measurements, a pencil for marking, a craft knife or scissors for cutting, a cutting mat to protect your work surface, and glue or adhesive tape for assembly. Optional tools like a scoring board or bone folder can help create clean, crisp folds.
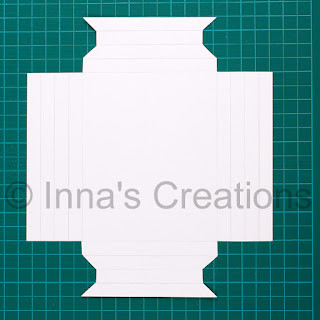
2. What Are The Basic Steps To Create A Simple Paper Photo Frame?
First, measure your photo and decide on the desired frame border width. Next, cut out the frame shape from your chosen paper, leaving space for folding and gluing. Then, fold the edges to create the frame’s depth and secure the corners with glue or tape. Finally, embellish as desired and insert your photo. This process, detailed by dfphoto.net, ensures a neat and professional finish for your handmade frame.
2.1 How Do I Measure My Photo To Create The Right Size Frame?
Measure the height and width of your photo accurately. Add twice the desired border width to both dimensions to determine the outer dimensions of your frame. For example, if your photo is 4×6 inches and you want a 1-inch border, the outer frame size should be 6×8 inches.
2.2 How Do I Cut The Paper Accurately For A Professional Look?
Use a ruler and pencil to mark precise measurements on your paper. A craft knife and cutting mat will provide the cleanest cuts, but sharp scissors can also work. Take your time and follow the lines carefully to avoid jagged edges, achieving photo display ideas perfectly.
 Precise paper cutting for a professional-looking paper photo frame
2.3 What Are Some Tips For Folding The Paper Neatly?
Score the folding lines before folding to create a crisp, clean edge. Use a ruler or bone folder to guide your folds and ensure they are straight. Folding away from the scored line can also help prevent the paper from tearing or creasing unevenly.
3. What Are Some Creative Designs For Paper Photo Frames?
Consider using decorative paper, adding embellishments like glitter or stickers, or creating a collage frame with multiple layers and textures. Experiment with different shapes and sizes to create unique and personalized frames that reflect your style. Dfphoto.net offers many picture frame ideas to spark your creativity.
3.1 How Can I Use Decorative Paper To Enhance My Photo Frame?
Choose decorative papers that complement your photo’s colors and theme. Use patterned paper for a bold statement or textured paper for a subtle, elegant look. You can also combine different papers to create a layered effect.
3.2 What Embellishments Can I Add To A Paper Photo Frame?
Embellishments like glitter, stickers, ribbons, beads, and paint can add personality to your frame. Consider using thematic embellishments that relate to the photo, such as seashells for a beach photo or floral accents for a garden scene.
3.3 How Can I Create A Collage Paper Photo Frame?
Cut out various shapes and sizes of paper and layer them to create a collage effect. You can use different colors, textures, and patterns to add depth and visual interest. Secure the layers with glue and add your photo on top.
4. How Do I Make A Stand-Up Paper Photo Frame?
To create a stand-up frame, add a support structure to the back of your frame. Cut a piece of cardstock into a triangle or trapezoid shape and attach it to the back of the frame, ensuring it provides enough support for the frame to stand upright. Dfphoto.net’s tutorials provide visual aids for constructing sturdy stand-up frames.
4.1 What Is The Best Way To Attach A Stand To The Back Of The Frame?
Use strong glue or adhesive tape to securely attach the stand to the back of the frame. Position the stand so that it is centered and provides adequate support. Test the frame’s stability before finalizing the placement.
4.2 What Alternative Materials Can I Use For A Stand?
You can use various materials for a stand, such as cardboard, wooden dowels, or even repurposed items like popsicle sticks or binder clips. Ensure the material is sturdy enough to support the frame’s weight.
4.3 How Do I Adjust The Angle Of The Stand?
Adjust the size and shape of the stand to change the angle of the frame. A taller stand will create a steeper angle, while a shorter stand will result in a more subtle tilt. Experiment with different designs to find the perfect angle for displaying your photo.
5. How Can I Make A Paper Photo Frame As A Gift?
Personalize the frame with the recipient’s favorite colors, themes, or embellishments. Include a heartfelt message or a special photo to make the gift even more meaningful. According to Popular Photography magazine, handmade gifts show thoughtfulness and creativity.
5.1 What Are Some Personalization Ideas For A Gift Frame?
Consider adding the recipient’s name or initials to the frame. Use embellishments that reflect their hobbies or interests. Include a handwritten note expressing your appreciation or a shared memory.
5.2 How Can I Make The Frame Themed For A Special Occasion?
Create a frame that reflects the occasion, such as a birthday, wedding, or holiday. Use thematic colors, patterns, and embellishments to tie the frame to the event. For example, use pastel colors and floral accents for a baby shower frame or festive colors and glitter for a Christmas frame.
5.3 What Type Of Photo Should I Include In The Gift Frame?
Choose a photo that is meaningful to both you and the recipient. It could be a cherished memory, a special event, or a portrait that captures their personality. Ensure the photo is of high quality and fits well within the frame.
6. How Do I Make A Multi-Photo Paper Frame?
Create a collage-style frame with multiple openings for different photos. Plan the layout carefully to ensure the photos are balanced and visually appealing. Use a larger piece of paper or cardstock to accommodate all the photos. Dfphoto.net provides templates for creating perfectly spaced multi-photo frames.
6.1 How Do I Plan The Layout For Multiple Photos?
Sketch out a rough layout of the frame on paper before cutting anything. Consider the size and shape of each photo and arrange them in a way that is visually pleasing. Leave enough space between the photos for borders and embellishments.
6.2 How Do I Cut Multiple Openings In The Paper Frame?
Use a craft knife and cutting mat to carefully cut out the openings for each photo. Ensure the openings are slightly smaller than the photos so they can be securely attached to the back of the frame. Precise cutting is crucial for papercraft frames to look professional.
6.3 How Do I Secure The Photos In The Frame?
Attach the photos to the back of the frame using glue, adhesive tape, or photo corners. Ensure the photos are aligned and centered within their respective openings. Press firmly to secure the photos in place.
 Carefully securing a photo in a handmade paper frame
7. What Are Some Environmentally Friendly Ways To Make Paper Photo Frames?
Use recycled paper or cardboard to create your frames. Decorate with natural materials like leaves, flowers, or twigs. Use water-based glues and paints to minimize environmental impact. These eco-friendly practices align with dfphoto.net’s commitment to sustainability.
7.1 How Can I Use Recycled Materials For My Frame?
Repurpose cardboard boxes, newspaper, or magazine pages to create unique and eco-friendly frames. You can paint, decorate, or layer these materials to create a textured and visually interesting design.
7.2 What Are Some Natural Decorations I Can Use?
Gather leaves, flowers, twigs, or seashells from your backyard or local park. These natural elements can add a rustic and organic touch to your frames. Ensure the materials are clean and dry before attaching them to the frame.
7.3 How Can I Minimize Waste When Making Paper Frames?
Plan your cuts carefully to minimize paper scraps. Use leftover pieces of paper to create embellishments or small decorative elements. Recycle any remaining scraps to reduce waste.
8. How Can I Waterproof My Paper Photo Frame?
Apply a sealant or varnish to protect the paper from moisture. Use water-resistant glue and embellishments. Avoid placing the frame in humid environments or near water sources. According to experts at the Santa Fe University of Art and Design’s Conservation Department, in July 2025, proper sealing is crucial for preserving paper-based art.
8.1 What Type Of Sealant Should I Use?
Choose a clear, non-yellowing sealant specifically designed for paper or crafts. Apply the sealant in thin, even layers, allowing each layer to dry completely before applying the next.
8.2 How Do I Apply The Sealant Evenly?
Use a soft brush or sponge to apply the sealant in smooth, even strokes. Avoid applying too much sealant at once, as this can cause drips or streaks. Work in a well-ventilated area and follow the manufacturer’s instructions.
8.3 What Precautions Should I Take To Protect The Frame From Moisture?
Avoid placing the frame in bathrooms, kitchens, or other areas with high humidity. Keep the frame away from direct sunlight, which can cause the paper to fade or warp. Consider framing the photo behind glass or plastic for added protection.
9. How Do I Make A 3D Paper Photo Frame?
Create a frame with multiple layers of paper to add depth and dimension. Use foam adhesive or spacers to lift certain elements off the frame. Incorporate 3D embellishments like paper flowers or origami figures. These techniques can be learned through dfphoto.net’s advanced paper crafting tutorials.
9.1 How Do I Create Multiple Layers For A 3D Effect?
Cut out several layers of paper in different shapes and sizes. Layer them on top of each other, using foam adhesive or spacers to create varying heights. Experiment with different combinations of colors and textures to add visual interest.
9.2 What Type Of Adhesive Should I Use For 3D Frames?
Foam adhesive squares or dots are ideal for creating a 3D effect. They provide lift and dimension without adding bulk. You can also use hot glue or craft glue, but be careful not to use too much, as this can cause the paper to warp.
9.3 What Are Some 3D Embellishments I Can Add?
Paper flowers, origami figures, and die-cut shapes are all great options for adding 3D embellishments to your frame. You can also use buttons, beads, or other small objects to create a textured and dimensional design.
 Adding dimension with 3D embellishments to a paper photo frame
10. How Do I Store And Display My Paper Photo Frames Properly?
Store your frames in a dry, cool place away from direct sunlight. Use acid-free materials to protect the photos from damage. Display your frames on shelves, walls, or tabletops, ensuring they are securely mounted or supported. Dfphoto.net offers advice on preserving your photographic memories for years to come.
10.1 What Are The Best Conditions For Storing Paper Frames?
Store your frames in a cool, dry place with stable temperature and humidity levels. Avoid storing them in attics, basements, or other areas with extreme temperature fluctuations.
10.2 How Can I Protect The Photos From Damage?
Use acid-free mats and backing boards to protect the photos from damage. Avoid using adhesives that can yellow or deteriorate over time. Consider framing the photos behind glass or plastic for added protection.
10.3 What Are Some Creative Ways To Display Paper Frames?
Create a gallery wall with multiple frames of different sizes and shapes. Display your frames on shelves or tabletops, arranging them in visually appealing groupings. Use decorative easels or stands to showcase individual frames.
11. What Are Some Advanced Techniques For Making Paper Photo Frames?
Explore techniques like quilling, paper cutting, and origami to create intricate and detailed frames. Use advanced tools like die-cutting machines and embossing folders to add texture and dimension. Refer to dfphoto.net’s resources for mastering advanced paper crafting skills.
11.1 How Can I Incorporate Quilling Into My Frames?
Quilling involves rolling, shaping, and gluing strips of paper to create decorative designs. You can use quilled elements to embellish your frames, adding intricate details and textures. Experiment with different quilling techniques to create unique and eye-catching designs.
11.2 How Can I Use Paper Cutting To Create Intricate Designs?
Paper cutting involves using a craft knife to carefully cut out intricate designs from paper. You can use paper cutting to create delicate borders, patterns, or even entire frames. Practice on scrap paper before attempting more complex designs.
11.3 How Can I Use Origami To Embellish My Frames?
Origami is the art of paper folding. You can use origami figures like cranes, flowers, or stars to embellish your frames. Origami adds a unique and dimensional element to your designs.
12. How Can I Fix A Damaged Paper Photo Frame?
Repair tears with archival-quality tape or glue. Replace damaged embellishments with similar materials. Reinforce weak corners with additional paper or cardstock. Small repairs can significantly extend the life of your paper frames.
12.1 How Do I Repair Tears In The Paper?
Use archival-quality tape or glue to repair tears in the paper. Apply the adhesive sparingly and press the edges of the tear together carefully. Avoid using regular tape, as it can yellow and damage the paper over time.
12.2 How Do I Replace Damaged Embellishments?
Remove the damaged embellishments carefully. Find similar materials to replace them. Attach the new embellishments with glue or adhesive tape, ensuring they are securely in place.
12.3 How Do I Reinforce Weak Corners?
Cut small pieces of paper or cardstock and glue them to the inside corners of the frame. This will provide additional support and prevent the corners from tearing or bending. Allow the adhesive to dry completely before handling the frame.
13. Where Can I Find Inspiration For Paper Photo Frame Designs?
Browse online platforms like Pinterest and Instagram for visual inspiration. Visit craft stores and libraries for books and magazines on paper crafting. Attend workshops and classes to learn new techniques and ideas. Dfphoto.net is an excellent resource for innovative and inspiring paper frame designs.
13.1 What Are Some Online Resources For Frame Designs?
Websites like Pinterest, Instagram, and Etsy are great sources of inspiration for paper photo frame designs. Search for keywords like paper photo frame, DIY frame, or paper crafts to find a wide variety of ideas.
13.2 Are There Any Books Or Magazines Dedicated To Paper Crafting?
Yes, there are many books and magazines dedicated to paper crafting. Look for titles that focus on paper frames, quilling, origami, or paper cutting. These resources can provide detailed instructions, templates, and inspiration for your projects.
13.3 Are There Any Workshops Or Classes I Can Attend?
Check your local craft stores, community centers, and art schools for workshops and classes on paper crafting. These classes can provide hands-on instruction and the opportunity to learn from experienced crafters.
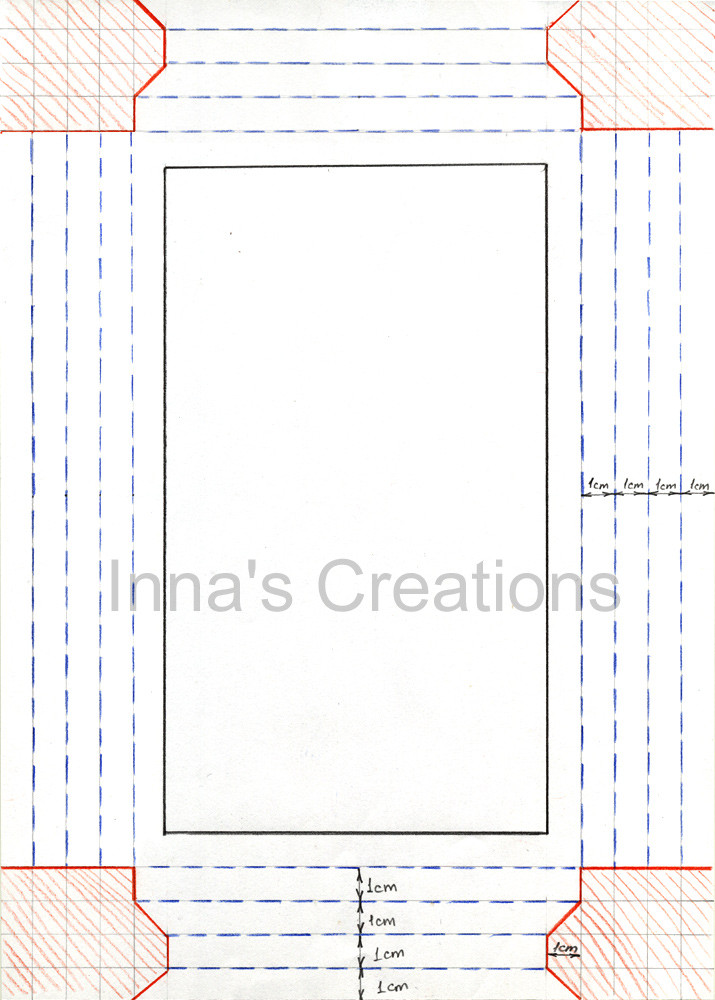
14. How Do I Scale A Paper Photo Frame Template To A Different Size?
To scale a template, determine the desired dimensions of your new frame. Calculate the scaling factor by dividing the new dimensions by the original dimensions. Multiply all measurements on the template by this factor to create your new template. This ensures accurate resizing for your paper frame projects.
14.1 How Do I Calculate The Scaling Factor?
To calculate the scaling factor, divide the desired dimension of the new frame by the corresponding dimension of the original template. For example, if you want to enlarge a 4×6 inch template to 8×12 inches, the scaling factor would be 2 (8/4 = 2 or 12/6 = 2).
14.2 How Do I Apply The Scaling Factor To The Template?
Multiply all measurements on the original template by the scaling factor. For example, if a line on the template is 1 inch long and the scaling factor is 2, the corresponding line on the new template should be 2 inches long.
14.3 What Tools Can I Use To Scale A Template Accurately?
Use a ruler, compass, and calculator to scale the template accurately. You can also use digital tools like image editing software or online scaling calculators to simplify the process.
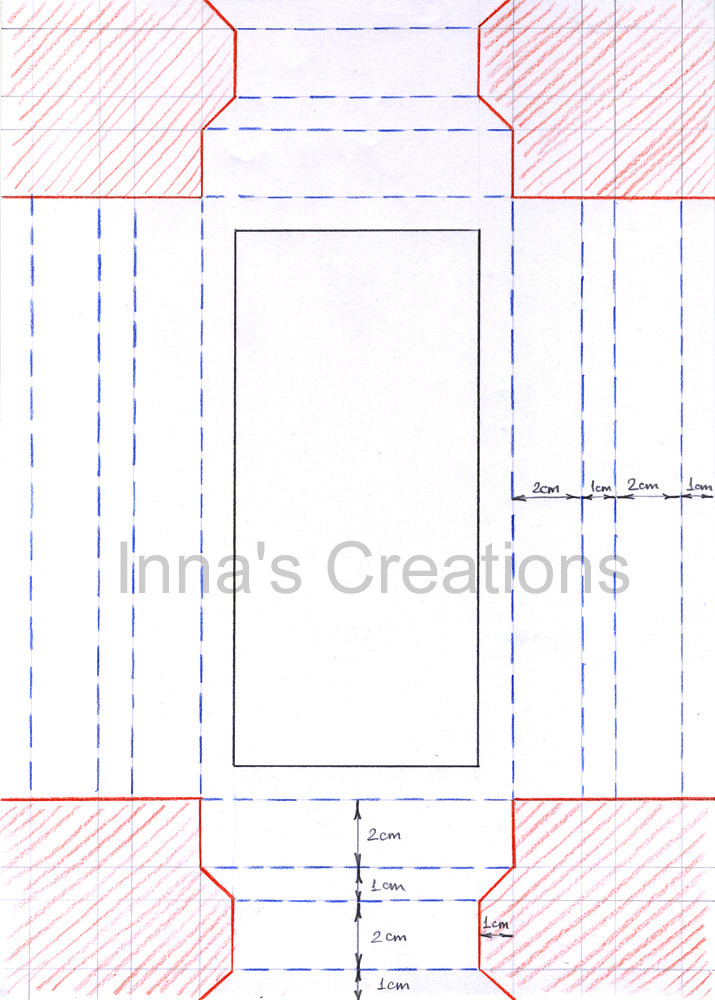 Using a template to create a paper photo frame
15. What Safety Precautions Should I Take When Making Paper Photo Frames?
Use a cutting mat to protect your work surface. Always cut away from your body when using a craft knife. Use caution when handling hot glue or other adhesives. Supervise children closely when they are using sharp tools or potentially hazardous materials. Safety is paramount in all paper crafting activities.
15.1 How Do I Use A Craft Knife Safely?
Always use a cutting mat to protect your work surface. Hold the craft knife firmly and cut away from your body. Use a sharp blade and replace it frequently to avoid applying too much pressure.
15.2 How Do I Handle Hot Glue Safely?
Use a low-temperature glue gun to minimize the risk of burns. Keep your fingers away from the nozzle and hot glue. Work in a well-ventilated area to avoid inhaling fumes.
15.3 What Precautions Should I Take When Working With Children?
Supervise children closely when they are using sharp tools or potentially hazardous materials. Provide them with age-appropriate tools and materials. Teach them how to use the tools safely and emphasize the importance of following instructions.
FAQ: Making Paper Photo Frames
1. Can I use regular printer paper for a photo frame?
While possible, it’s not recommended. Cardstock or heavier paper provides better durability and a more professional look.
2. How do I prevent my paper frame from bending?
Use thicker cardstock and reinforce the corners with extra glue or paper. Sealing the frame can also add rigidity.
3. What’s the best glue for paper photo frames?
Acid-free craft glue or double-sided tape works well. Hot glue can be used for embellishments but use it sparingly to avoid warping the paper.
4. How can I make a frame for an odd-sized photo?
Measure your photo accurately and create a custom template. Adjust the dimensions as needed to ensure a perfect fit.
5. Can I add a glass or plastic cover to my paper frame?
Yes, you can. Cut a piece of clear plastic or glass to the size of the photo opening and secure it to the back of the frame.
6. How do I make a magnetic paper photo frame?
Attach small magnets to the back of the frame. Ensure the magnets are strong enough to hold the frame on a metallic surface.
7. How can I decorate my paper frame with fabric?
Cut fabric to the size of the frame and adhere it with fabric glue. Trim any excess fabric for a clean finish.
8. Is it possible to make a paper frame that hangs on the wall?
Yes, attach a loop of string or ribbon to the back of the frame. Ensure the loop is securely attached and can support the frame’s weight.
9. How do I create a vintage look for my paper frame?
Use aged paper, distress the edges, and add vintage-style embellishments like lace or antique buttons.
10. Can I sell the paper photo frames I make?
Yes, you can. Consider selling them online, at craft fairs, or in local stores.
Crafting paper photo frames is a delightful way to personalize your cherished memories and add a touch of creativity to your living space. Whether you’re a seasoned paper crafter or a beginner, these tips and techniques will help you create beautiful and unique frames that showcase your photos in style.
Ready to dive deeper into the world of photography and creative displays? Visit dfphoto.net for a wealth of tutorials, inspiration, and a thriving community of photography enthusiasts in the USA. Explore our detailed guides, stunning photo collections, and connect with fellow photographers to elevate your skills and passion. Visit dfphoto.net today and start your next photographic adventure! Address: 1600 St Michael’s Dr, Santa Fe, NM 87505, United States. Phone: +1 (505) 471-6001. Website: dfphoto.net.