Do you want to showcase your photos in a unique and affordable way? At dfphoto.net, we provide a simple solution: crafting your own paper photo frames, offering a personal touch to your cherished memories and visual arts projects. Learn the art of paper crafting and transform ordinary photos into eye-catching displays.
1. What Are The Benefits Of Making A Paper Frame?
Making a paper frame for a photo offers numerous benefits. Paper frames provide a personalized touch to your displayed memories, visual arts and allow for customization in design and size to perfectly fit your photos. According to a study by the Santa Fe University of Art and Design’s Photography Department, in July 2025, DIY projects like paper frames enhance creativity and offer a cost-effective alternative to store-bought frames.
- Cost-Effective: Paper is an inexpensive material, making it a budget-friendly framing option.
- Customizable: You can tailor the size, shape, and design to match your photo and décor.
- Personalized Touch: Handmade frames add a unique, personal element to your displays.
- Creative Outlet: Crafting paper frames can be a fun and rewarding DIY project.
- Lightweight: Easy to hang or display without heavy hardware.
- Eco-Friendly: Use recycled paper for an environmentally conscious option.
- Versatile: Suitable for various photos, artwork, and craft projects.
- Easy to Make: Simple techniques make it accessible for all skill levels.
- Portable: Lightweight and easy to move around as needed.
- Unique Gifts: Handmade frames make thoughtful, personalized gifts.
2. What Materials Do I Need To Make A Paper Photo Frame?
To make a paper photo frame, gather essential materials. You’ll need paper or cardstock, a ruler, a pencil, scissors or a craft knife, glue or adhesive tape, and any desired decorative elements. These basic supplies will help you create a simple yet elegant frame.
- Paper or Cardstock: Choose paper that is sturdy enough to hold its shape. Cardstock is ideal for durability.
- Ruler: For measuring and drawing straight lines.
- Pencil: To mark measurements and guidelines on the paper.
- Scissors or Craft Knife: For cutting the paper accurately. A craft knife works well for intricate designs.
- Glue or Adhesive Tape: To secure the frame’s corners and attach the photo.
- Decorative Elements (Optional): Embellishments like paint, markers, stickers, glitter, or decorative paper can add a personal touch.
- Cutting Mat (Optional): If using a craft knife, a cutting mat will protect your work surface.
- Bone Folder or Scoring Tool (Optional): For creating clean, crisp folds.
3. How Do I Measure And Cut The Paper For My Photo Frame?
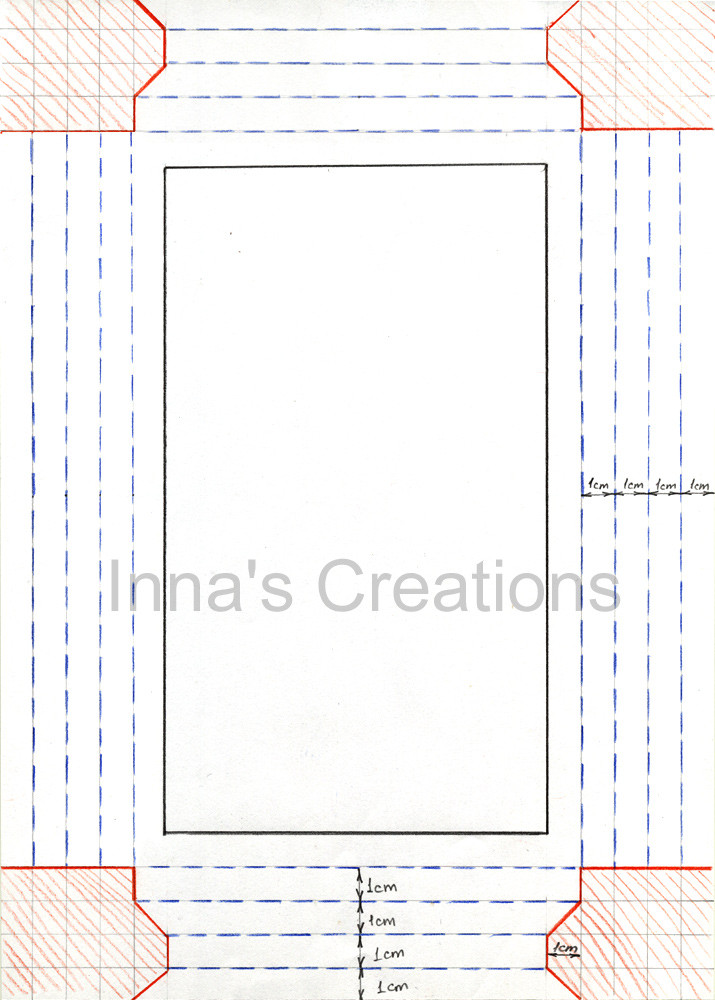 Measuring and cutting the paper for a paper photo frame project
Measure and cut the paper accurately. Begin by measuring your photo and deciding on the desired width of the frame borders. Add these measurements to the photo dimensions to determine the size of the outer rectangle. Cut out the outer rectangle, then measure and cut out the inner rectangle, leaving the desired border width to create the frame. Remember, not the absolute size but the ratios are important for this explanation. Using this template you can make a frame that has borders of equal width and height. The parts to be removed are marked in red, the inner bold rectangle shows the part of a picture that will be visible.
- Measure Your Photo: Use a ruler to measure the height and width of the photo you want to frame.
- Decide on Border Width: Determine how wide you want the frame borders to be. A common width is 1-2 inches.
- Calculate Outer Rectangle Size:
- Add twice the border width to the photo’s height.
- Add twice the border width to the photo’s width.
- These sums will be the dimensions of your outer rectangle.
- Cut the Outer Rectangle:
- Use a ruler and pencil to draw the outer rectangle on your paper or cardstock.
- Carefully cut along the lines using scissors or a craft knife.
- Measure and Cut the Inner Rectangle:
- Measure the photo’s height and width again.
- Use these measurements to draw the inner rectangle inside the outer rectangle, centering it.
- Carefully cut out the inner rectangle, leaving the frame border.
- Check the Fit: Place your photo behind the frame to ensure it fits properly and the borders are even.
4. What Are Some Creative Design Ideas For Paper Photo Frames?
Explore creative design ideas for paper photo frames. Consider using decorative paper, adding embellishments like stickers or glitter, or employing techniques like origami or quilling to create unique textures and patterns. Experiment with different colors and shapes to match your personal style and the photo you are framing.
- Decorative Paper: Use patterned or textured paper for a unique look.
- Embellishments: Add stickers, glitter, beads, or rhinestones to personalize the frame.
- Origami: Fold paper into interesting shapes and attach them to the frame.
- Quilling: Create intricate designs by rolling and shaping strips of paper.
- Painting: Paint the frame with watercolors, acrylics, or markers.
- Stamping: Use rubber stamps to add patterns or images to the frame.
- Collage: Create a collage using different types of paper, fabric, or other materials.
- Washi Tape: Decorate the frame with colorful washi tape.
- Die Cuts: Use die-cut shapes to add detailed designs.
- Ribbons and Lace: Attach ribbons or lace for an elegant touch.
5. How Do I Assemble A Simple Paper Photo Frame?
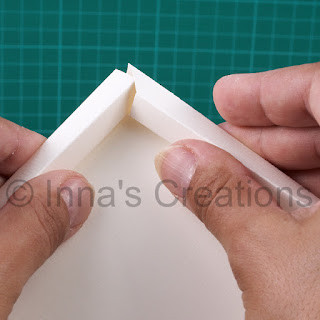
To assemble a simple paper photo frame, start by folding the edges of your cut-out frame inward to create a border. Apply glue or adhesive tape to the back of these folded edges. Carefully position your photo behind the frame and press the edges down to secure it in place. Ensure all edges are firmly attached for a clean and professional finish.
- Fold the Edges: If your design involves folding, start by folding along the marked lines.
- Apply Adhesive: Place glue or adhesive tape on the back of the frame’s edges.
- Position the Photo: Carefully center your photo behind the frame, ensuring it’s aligned as desired.
- Secure the Edges: Press the edges of the frame firmly onto the photo to secure it in place.
- Reinforce Corners (Optional): Add extra glue or tape to the corners for added stability.
- Check the Alignment: Make sure the photo is straight and the frame is evenly positioned.
- Allow to Dry: If using glue, allow it to dry completely before handling the frame further.
- Add a Backing (Optional): Cut a piece of cardboard or paper to fit the back of the frame for added support and a finished look.
- Attach a Hanger (Optional): If you want to hang the frame, attach a small loop of string or a clip to the back.
6. Can I Make A Stand For My Paper Photo Frame?
Yes, you can easily make a stand for your paper photo frame. Cut a strip of sturdy paper or cardstock, fold it into a triangular prism, and attach it to the back of the frame. Ensure the stand is positioned to provide stable support. This allows your frame to stand upright on a desk or shelf.
- Cut a Strip of Paper: Use sturdy paper or cardstock and cut a strip that is about 1-2 inches wide and long enough to create a stable stand.
- Fold into a Triangle: Fold the strip into a triangular prism shape. This will be the stand for your frame.
- Secure the Triangle: Use glue or adhesive tape to secure the edges of the triangle, maintaining its shape.
- Attach to the Back of the Frame: Apply glue or tape to one side of the triangular stand.
- Position for Stability: Attach the stand to the back of the frame, positioning it so that the frame will stand upright without tipping over. Experiment with the placement to find the best balance.
- Allow to Dry: If using glue, allow it to dry completely before standing the frame.
- Test the Stand: Gently set the frame upright to ensure the stand provides stable support. Adjust the stand’s position if necessary.
7. What Types Of Paper Work Best For Making Photo Frames?
The best types of paper for making photo frames are cardstock, heavyweight paper, and decorative paper. Cardstock offers durability and sturdiness, while heavyweight paper provides a balance of thickness and flexibility. Decorative paper adds aesthetic appeal with various colors, patterns, and textures, enhancing the overall look of your frame.
- Cardstock: Ideal for its thickness and durability, providing a sturdy frame.
- Heavyweight Paper: Offers a good balance between thickness and flexibility.
- Decorative Paper: Adds visual appeal with various colors, patterns, and textures.
- Recycled Paper: An eco-friendly option for a sustainable craft project.
- Watercolor Paper: Suitable if you plan to paint or add wet media to the frame.
- Construction Paper: A budget-friendly option, but less durable than cardstock.
- Photo Paper: Can be used for a glossy finish or to match the photo itself.
- Metallic Paper: Adds a touch of elegance and shine.
- Vellum Paper: Translucent paper for a unique, layered effect.
- Textured Paper: Adds tactile interest with embossed or textured surfaces.
8. How Can I Decorate My Paper Photo Frame To Match A Specific Theme?
Decorate your paper photo frame to match a specific theme by using relevant colors, patterns, and embellishments. For a beach theme, use blue and sandy colors with seashell accents. For a vintage theme, use antique-looking paper and add lace or vintage-style stickers. Tailor the design to complement the photo and the overall décor.
- Choose a Theme: Decide on the theme you want to match (e.g., beach, vintage, floral, holiday).
- Select Colors: Use colors that are relevant to the theme. For example, blues and greens for a nature theme, or reds and golds for a holiday theme.
- Incorporate Patterns: Choose patterns that complement the theme, such as floral patterns for a spring theme or geometric patterns for a modern theme.
- Add Embellishments:
- Beach Theme: Use seashells, sand, and blue-tinted glitter.
- Vintage Theme: Add lace, antique-style stickers, and sepia-toned paper.
- Floral Theme: Incorporate dried flowers, leaf-shaped cutouts, and floral stickers.
- Holiday Theme: Use holiday-themed stickers, ribbons, and glitter.
- Use Themed Paper: Select decorative paper that matches the theme.
- Apply Themed Techniques:
- Distressing: For a vintage theme, distress the paper edges with sandpaper or ink.
- Layering: Create depth by layering different themed elements.
- Stamping: Use themed rubber stamps to add images or patterns.
- Coordinate with the Photo: Ensure the frame’s theme complements the photo you are framing.
9. How Do I Prevent My Paper Photo Frame From Bending Or Warping?
To prevent your paper photo frame from bending or warping, use sturdy cardstock or heavyweight paper, apply a backing for added support, and avoid exposure to moisture and extreme temperatures. Proper storage and handling will also help maintain the frame’s shape and integrity.
- Use Sturdy Material: Choose cardstock or heavyweight paper for the frame.
- Apply a Backing: Add a piece of cardboard or thick paper to the back of the frame for added support.
- Laminate the Frame: Laminating the paper frame can provide a protective layer and prevent bending.
- Avoid Moisture: Keep the frame away from humid environments to prevent warping.
- Store Flat: Store the frame flat to avoid bending or distortion.
- Use a Frame Protector: Place the frame in a protective sleeve or cover.
- Reinforce Corners: Add extra glue or tape to the corners to strengthen them.
- Avoid Direct Sunlight: Prolonged exposure to direct sunlight can cause the paper to warp.
- Handle with Care: Avoid bending or folding the frame when handling it.
- Use a Sealer: Apply a paper sealer to protect the frame from moisture and damage.
10. What Are Some Tips For Making A Professional-Looking Paper Photo Frame?
 Close-up of paper photo frame with clean corners
For a professional-looking paper photo frame, use precise measurements and clean cuts, choose high-quality paper, and ensure neat and secure assembly. Pay attention to detail in your design, use embellishments sparingly, and finish the frame with a clean backing for a polished appearance. Generally, no adhesive is needed, but you may want to secure the frame with a small amount of glue.
- Precise Measurements: Use accurate measurements to ensure the frame fits the photo perfectly.
- Clean Cuts: Make clean, straight cuts using a sharp craft knife or scissors.
- High-Quality Paper: Choose high-quality cardstock or decorative paper for a professional look.
- Neat Assembly: Assemble the frame carefully, ensuring all edges are aligned and secure.
- Clean Adhesive Application: Use glue or adhesive sparingly to avoid visible residue.
- Attention to Detail: Pay attention to small details like corner alignment and embellishment placement.
- Minimalist Design: Avoid overcrowding the frame with too many embellishments.
- Smooth Edges: Ensure all edges are smooth and free of rough spots.
- Professional Backing: Add a clean, professional-looking backing to the frame.
- Consistent Theme: Maintain a consistent theme throughout the design.
11. Can I Use Recycled Materials To Make A Paper Photo Frame?
Yes, you can use recycled materials to make a paper photo frame. Use recycled paper, cardboard, or even old magazines to create unique and eco-friendly frames. This is a great way to reduce waste and create personalized, sustainable décor.
- Recycled Paper: Use recycled paper or cardstock for the frame.
- Cardboard: Repurpose cardboard from old boxes for a sturdy frame backing.
- Old Magazines: Cut and collage colorful magazine pages onto the frame for a unique design.
- Newspaper: Use newspaper for a vintage or artistic look.
- Paper Bags: Recycle paper bags into a rustic-looking frame.
- Junk Mail: Use junk mail and flyers to create a collage effect.
- Fabric Scraps: Attach fabric scraps to a cardboard frame for a textured look.
- Buttons and Beads: Use old buttons and beads for embellishments.
- Twine and Ribbon: Use recycled twine and ribbon for decorative accents.
- Natural Elements: Incorporate dried leaves, twigs, and other natural elements for an eco-friendly touch.
12. How Do I Attach The Photo To The Paper Frame Securely?
To attach the photo to the paper frame securely, use double-sided tape, glue dots, or photo-safe adhesive. Apply the adhesive to the back of the photo, carefully position it within the frame, and press firmly to ensure a strong bond. Avoid using liquid glue to prevent warping.
- Double-Sided Tape: Apply strips of double-sided tape to the back of the photo.
- Glue Dots: Use glue dots for a clean and secure attachment.
- Photo-Safe Adhesive: Choose an adhesive that is specifically designed for photos to prevent damage.
- Adhesive Strips: Use adhesive strips for a strong and even bond.
- Corner Photo Mounts: Use corner photo mounts for a non-invasive attachment method.
- Dry Mounting Tissue: Use dry mounting tissue with a heat press for a permanent bond (advanced technique).
- Avoid Liquid Glue: Liquid glue can cause the paper to warp and damage the photo.
- Apply Even Pressure: Press the photo firmly onto the frame to ensure a strong bond.
- Check Alignment: Make sure the photo is aligned correctly before securing it.
- Use Multiple Attachment Points: Use multiple adhesive points to distribute the pressure evenly.
13. What Are Some Common Mistakes To Avoid When Making Paper Photo Frames?
Some common mistakes to avoid when making paper photo frames include using inaccurate measurements, cutting unevenly, applying too much glue, and not allowing the frame to dry properly. Attention to detail and careful execution are key to achieving a professional finish.
- Inaccurate Measurements: Double-check all measurements to ensure the frame fits the photo properly.
- Uneven Cuts: Use a sharp craft knife or scissors for clean, straight cuts.
- Too Much Glue: Apply glue sparingly to avoid visible residue and warping.
- Rushing the Process: Take your time to ensure each step is done correctly.
- Not Allowing to Dry: Allow the frame to dry completely before handling or displaying it.
- Using Weak Paper: Choose sturdy cardstock or heavyweight paper for durability.
- Ignoring Alignment: Pay attention to the alignment of edges and embellishments.
- Over-Embellishing: Avoid overcrowding the frame with too many decorations.
- Using Acidic Materials: Use photo-safe adhesives and acid-free paper to protect the photo.
- Neglecting the Backing: Add a clean backing for a professional finish.
14. How Can I Make A Multi-Photo Paper Frame Or Collage?
To make a multi-photo paper frame or collage, start by measuring and cutting a large piece of sturdy paper or cardstock. Plan the layout of your photos, leaving space between each. Cut individual frames for each photo and attach them to the base. Embellish the frame with decorative elements to create a cohesive collage.
- Measure and Cut the Base: Cut a large piece of sturdy paper or cardstock to the desired size for the collage.
- Plan the Layout: Arrange the photos on the base to determine the layout and spacing.
- Cut Individual Frames: Cut out individual frames for each photo, ensuring they are slightly larger than the photos.
- Attach Frames to Base: Glue or tape the frames to the base, leaving space between each frame.
- Insert Photos: Place the photos behind the frames and secure them with adhesive.
- Embellish the Frame: Add decorative elements like stickers, paint, or washi tape to create a cohesive design.
- Use Overlapping Frames: Overlap the frames for a dynamic and layered look.
- Add Themed Elements: Incorporate elements that match a specific theme or event.
- Create a Grid: Arrange the photos in a grid pattern for a structured collage.
- Use Different Frame Shapes: Experiment with different frame shapes for visual interest.
15. What Are Some Alternatives To Paper For Making Photo Frames?
Alternatives to paper for making photo frames include cardboard, wood, fabric, and foam board. Each material offers unique textures and durability, providing a range of options for creating personalized and stylish frames.
- Cardboard: A sturdy and recycled option for making durable frames.
- Wood: Provides a classic and elegant look, suitable for more permanent displays.
- Fabric: Offers a soft and textured alternative, ideal for cozy or rustic themes.
- Foam Board: Lightweight and easy to cut, perfect for lightweight and customizable frames.
- Plastic: Durable and water-resistant, suitable for outdoor or high-moisture environments.
- Metal: Adds a modern and industrial touch, often used for sleek and minimalist designs.
- Glass: Used for protective coverings, providing a clear and polished finish.
- Acrylic: A lightweight and shatter-resistant alternative to glass.
- Ceramic: Used for decorative frames, offering intricate designs and a unique aesthetic.
- Leather: Provides a luxurious and sophisticated look, often used for high-end frames.
16. How Can I Protect My Paper Photo Frame From Dust And Damage?
To protect your paper photo frame from dust and damage, consider laminating it, storing it in a protective sleeve, or displaying it behind glass or acrylic. Regular dusting and careful handling will also help maintain its condition over time.
- Laminate the Frame: Laminating provides a protective layer that prevents dust and damage.
- Use a Protective Sleeve: Store the frame in a clear plastic sleeve to keep out dust and moisture.
- Display Behind Glass or Acrylic: Place the frame behind glass or acrylic in a display case.
- Dust Regularly: Gently dust the frame with a soft cloth to remove surface dust.
- Handle with Care: Avoid bending or folding the frame when handling it.
- Keep Away from Moisture: Store the frame in a dry environment to prevent warping and damage.
- Avoid Direct Sunlight: Prolonged exposure to direct sunlight can cause fading and damage.
- Use a Sealer: Apply a paper sealer to protect the frame from moisture and UV damage.
- Store Flat: Store the frame flat to prevent bending or distortion.
- Use Archival-Quality Materials: Use acid-free paper and photo-safe adhesives to protect the photo and frame.
17. Can I Sell My Handmade Paper Photo Frames?
Yes, you can sell your handmade paper photo frames. Create unique designs, market them online or at craft fairs, and offer customization options to attract customers. Handmade frames can be a popular and profitable craft item.
- Create Unique Designs: Develop unique and appealing designs that stand out.
- Market Online: Sell your frames on platforms like Etsy, Shopify, or your own website.
- Attend Craft Fairs: Participate in local craft fairs and markets to showcase your products.
- Offer Customization: Provide options for customers to customize frames with specific colors, patterns, or embellishments.
- Set Competitive Prices: Research the market and set prices that are competitive yet profitable.
- High-Quality Materials: Use high-quality materials to ensure durability and customer satisfaction.
- Professional Presentation: Present your frames in a professional manner with clean packaging and clear product descriptions.
- Promote on Social Media: Use social media platforms to promote your frames and reach a wider audience.
- Build a Brand: Create a brand identity with a logo and consistent style to build recognition.
- Offer Wholesale Options: Consider offering wholesale options to retailers or businesses.
18. How Do I Make A Paper Frame For An Odd-Sized Photo?
To make a paper frame for an odd-sized photo, carefully measure the photo’s dimensions and create a custom template. Cut the outer rectangle to the desired frame size and the inner rectangle to fit the photo precisely. This ensures a snug and professional fit for any unique photo size.
- Measure the Photo: Accurately measure the height and width of the odd-sized photo.
- Create a Custom Template: Use the measurements to create a template on paper or cardstock.
- Determine Border Width: Decide on the desired width of the frame borders.
- Calculate Outer Dimensions: Add twice the border width to the photo’s height and width to calculate the outer dimensions of the frame.
- Cut the Outer Rectangle: Use the outer dimensions to cut the outer rectangle from the paper.
- Cut the Inner Rectangle: Cut the inner rectangle to match the exact size of the photo.
- Assemble the Frame: Assemble the frame by attaching the backing and securing the photo.
- Check the Fit: Ensure the photo fits snugly within the frame.
- Adjust as Needed: Make any necessary adjustments to the template or frame for a perfect fit.
- Use a Craft Knife: Use a craft knife for precise cuts, especially for intricate shapes.
19. What Are Some Advanced Techniques For Paper Photo Framing?
Advanced techniques for paper photo framing include using beveled edges, layered designs, and intricate paper cutting. Incorporate advanced folding techniques like origami or modular construction for unique and sophisticated frames.
- Beveled Edges: Create beveled edges for a more professional and polished look.
- Layered Designs: Layer different pieces of paper to add depth and dimension to the frame.
- Intricate Paper Cutting: Use advanced paper cutting techniques to create detailed designs.
- Origami: Incorporate origami techniques for unique and decorative elements.
- Modular Construction: Use modular paper folding techniques to create complex frames.
- Embossing: Emboss patterns or textures onto the paper for added visual interest.
- Die Cutting: Use die-cutting machines to create precise and intricate shapes.
- Pop-Up Elements: Add pop-up elements to the frame for a surprise effect.
- Mixed Media: Combine paper with other materials like fabric, beads, or metal for a mixed-media frame.
- 3D Effects: Create three-dimensional effects using paper sculpting techniques.
20. How Can I Make My Paper Photo Frame More Durable?
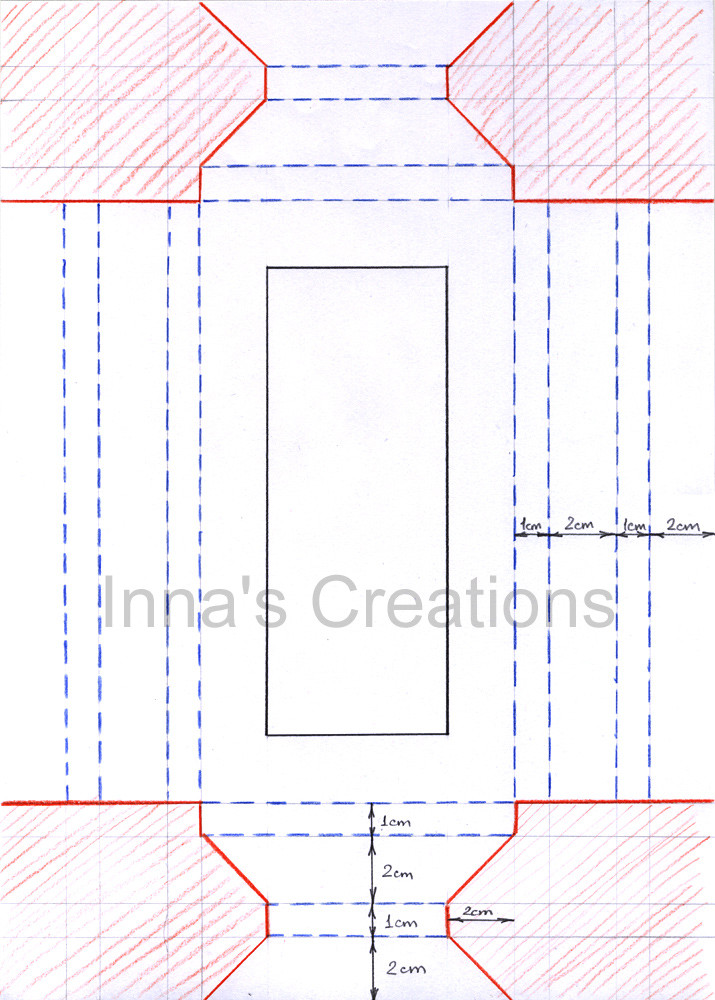 Making a paper photo frame with wide borders
To make your paper photo frame more durable, use sturdy cardstock, apply a protective laminate, and reinforce the corners with extra glue or tape. Adding a backing and avoiding exposure to moisture will also help prolong the frame’s lifespan. If you want to make a frame with wide borders, the template will look like this (pay attention to the proportions).
- Use Sturdy Cardstock: Choose heavy cardstock for the frame.
- Apply Laminate: Laminate the frame for added protection against moisture and wear.
- Reinforce Corners: Add extra glue or tape to the corners for added stability.
- Add a Backing: Attach a piece of cardboard or thick paper to the back of the frame.
- Use a Sealer: Apply a paper sealer to protect the frame from moisture and UV damage.
- Avoid Moisture: Keep the frame away from humid environments to prevent warping.
- Handle with Care: Avoid bending or folding the frame when handling it.
- Use Archival-Quality Materials: Use acid-free paper and photo-safe adhesives.
- Reinforce with Tape: Reinforce the edges with clear packing tape for added durability.
- Apply a Varnish: Apply a thin coat of varnish to protect the paper from scratches and wear.
FAQ: Paper Photo Frames
1. Can I use any type of paper to make a photo frame?
While you can use various types of paper, sturdy cardstock is recommended for durability.
2. How do I measure the correct size for my paper frame?
Measure your photo and add the desired border width to each side to determine the frame dimensions.
3. What is the best adhesive for attaching my photo to the frame?
Double-sided tape or photo-safe adhesive dots work well without damaging the photo.
4. How can I decorate my paper frame to match a specific theme?
Use themed colors, patterns, and embellishments to match the desired theme.
5. How do I prevent my paper frame from bending or warping?
Use sturdy cardstock, apply a backing, and avoid moisture and extreme temperatures.
6. Can I make a stand for my paper photo frame?
Yes, create a triangular prism from paper and attach it to the back for a stand.
7. How do I make a multi-photo paper frame or collage?
Cut a large base, plan the layout, cut individual frames, and attach them to the base.
8. Can I sell my handmade paper photo frames?
Yes, create unique designs and market them online or at craft fairs.
9. What are some alternatives to paper for making photo frames?
Alternatives include cardboard, wood, fabric, and foam board.
10. How do I protect my paper frame from dust and damage?
Laminate it, store it in a protective sleeve, or display it behind glass.
Ready to create your own paper photo frames and add a personal touch to your displays? Explore dfphoto.net for more DIY ideas, photography tips, and creative inspiration. Join our community of photography enthusiasts and discover the beauty of visual arts!
Address: 1600 St Michael’s Dr, Santa Fe, NM 87505, United States
Phone: +1 (505) 471-6001
Website: dfphoto.net
At dfphoto.net, we understand the challenges photographers face, such as mastering complex techniques and finding inspiration. That’s why we offer comprehensive tutorials, equipment reviews, and a vibrant community to support your creative journey. Visit dfphoto.net today and unleash your photographic potential.