Making a new album in Photos on your iPhone is an excellent way to organize and showcase your cherished memories, and dfphoto.net is here to guide you through the process. With just a few simple steps, you can create personalized collections of your favorite photos and videos. Ready to become a photo organizing pro? Let’s explore how to create, customize, and manage your albums, along with some creative ideas to inspire your next photographic project like organizing by photo editing techniques, image file types, and camera gear used!
Here’s a comprehensive guide on How To Make A New Album In Photos, tailored for photography enthusiasts in the USA:
1. Understanding Photo Albums on iPhone
Photo albums in the Photos app serve as virtual scrapbooks, allowing you to group related photos and videos together. They’re perfect for organizing memories from specific events, trips, or themes. If you use iCloud Photos, albums are stored in iCloud. They’re up to date and accessible on devices where you’re signed in to the same Apple Account. According to research from the Santa Fe University of Art and Design’s Photography Department, in July 2025, efficient photo organization enhances creative workflow and reduces time spent searching for specific images.
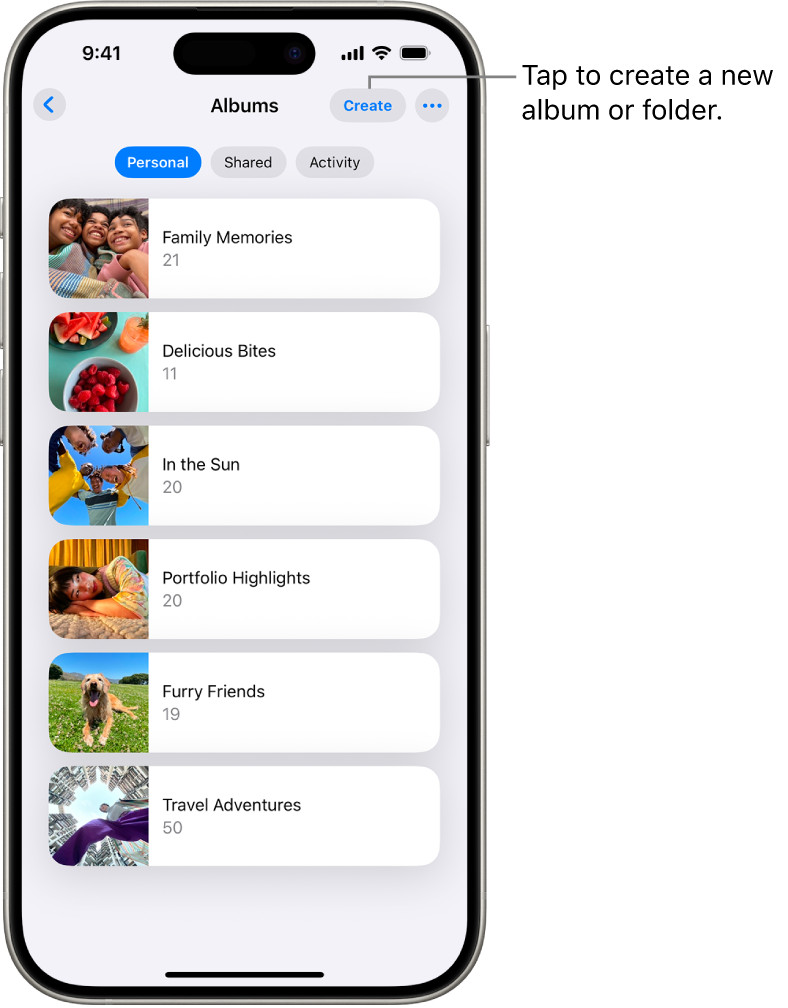 iPhone Photos app albums view, displaying a list of albums under the Personal tab
1.1. Why Use Albums?
Albums offer several benefits:
- Organization: Keep your photo library tidy and easily accessible.
- Storytelling: Group photos to tell a visual story.
- Sharing: Quickly share entire collections with friends and family.
- Creativity: Curate themed albums for inspiration or artistic projects.
1.2. iCloud Integration
iCloud Photos seamlessly syncs your albums across all your Apple devices. Any changes you make on your iPhone, such as adding photos or renaming an album, will automatically reflect on your iPad, Mac, and other devices.
2. Creating a New Album: Step-by-Step
How do I start a new photo album on my iPhone?
Starting a new photo album on your iPhone is easy: Open the Photos app, tap “Albums,” then “Create New Album,” name it, add your desired photos, and tap “Done”.
Here’s a detailed breakdown of the process:
- Open the Photos App: Locate the Photos app icon on your iPhone’s home screen and tap to open it.
- Navigate to Albums: At the bottom of the screen, tap the “Albums” tab. This will display all your existing albums and folders.
- Create a New Album: In the upper-left corner, tap the plus (+) button. A menu will appear with two options: “New Album” and “New Folder”. Select “New Album”.
- Name Your Album: A text field will appear, prompting you to name your new album. Choose a descriptive name that reflects the album’s content, such as “Vacation in Santa Fe,” “Family Portraits,” or “Street Photography.”
- Add Photos: After naming the album, you’ll be taken to your photo library. Select the photos and videos you want to include in the album by tapping on them. A blue checkmark will appear on each selected item.
- Tap Done: Once you’ve selected all the desired photos, tap “Done” in the upper-right corner. Your new album will be created and populated with the chosen media.
2.1. Pro Tip: Selecting a Key Photo
When creating an album, the Photos app automatically selects a “key photo” to represent the album’s cover. You can change this by opening the album, tapping and holding the desired photo, and selecting “Make Key Photo.” Choose an image that best encapsulates the album’s theme or content.
2.2. Creative Album Ideas
Need some inspiration? Here are a few album ideas to get you started:
- “Golden Hour Landscapes”: A collection of landscape photos taken during the magical golden hour.
- “Black and White Portraits”: Showcase your best black and white portrait photography.
- “Macro Adventures”: Capture the intricate details of the world through macro photography.
- “Santa Fe Street Scenes”: Document the vibrant street life of Santa Fe, New Mexico.
3. Reordering Your Albums
How do I rearrange my photo albums for better organization?
Rearranging your photo albums for better organization is achieved by tapping “Albums”, selecting the three dots menu, choosing a sort option like “Custom Order” to manually drag albums into your preferred sequence.
3.1. Sorting Options
The Photos app offers several sorting options to help you organize your albums:
- Alphabetical: Sort albums by name in ascending or descending order.
- Date Created: Sort albums by the date they were created, with the newest or oldest albums appearing first.
- Custom Order: Manually arrange albums in your preferred sequence.
3.2. Manual Reordering
To manually reorder your albums:
- Go to the Albums Tab: Open the Photos app and tap the “Albums” tab.
- Tap the More Button: In the upper-right corner, tap the three dots button.
- Choose Sort: Select “Sort” from the menu.
- Select Custom Order: Choose “Custom Order” from the sorting options.
- Drag and Drop: Tap and hold an album, then drag it to your desired position in the list. Repeat this process for all albums you want to reorder.
3.3. Filtering Albums and Folders
You can filter your album view to show only albums or only folders. To do this, tap the “Filter” button (located next to the “Sort” button) and choose your desired option. This can be helpful when you have a large number of albums and folders and want to focus on a specific type of content.
4. Renaming an Album
Can I change the name of a photo album after it’s created?
Yes, you can easily rename a photo album after it’s created: Simply open the album, tap the three dots menu, tap the compose button, enter the new name, and tap “Done”.
4.1. Step-by-Step Guide
- Open the Photos App: Launch the Photos app on your iPhone.
- Navigate to Albums: Tap the “Albums” tab at the bottom of the screen.
- Select the Album: Tap the album you want to rename.
- Tap the More Button: In the upper-right corner, tap the three dots button.
- Tap the Compose Button: Tap the compose button.
- Enter the New Name: A text field will appear, displaying the album’s current name. Delete the existing name and enter the new name you want to use.
- Tap Done: Once you’ve entered the new name, tap “Done” in the upper-right corner. The album’s name will be updated immediately.
4.2. Choosing the Right Name
A well-chosen album name can make it easier to find and manage your photos. Consider these tips when naming your albums:
- Be Specific: Use descriptive names that accurately reflect the album’s content.
- Use Keywords: Include relevant keywords to improve searchability.
- Maintain Consistency: Use a consistent naming convention for all your albums.
5. Sharing an Album
What’s the best way to share an entire photo album with friends and family?
The best way to share an entire photo album is by opening the album, tapping the share button, and selecting a sharing option like AirDrop, Messages, or Mail.
5.1. Sharing Options
The Photos app offers several ways to share your albums:
- AirDrop: Share with nearby Apple devices.
- Messages: Send the album via text message.
- Mail: Email the album to your contacts.
- Social Media: Share the album on platforms like Facebook, Instagram, or Twitter.
- iCloud Link: Create a public link to share the album with anyone.
5.2. Step-by-Step Guide
- Open the Photos App: Launch the Photos app on your iPhone.
- Navigate to Albums: Tap the “Albums” tab at the bottom of the screen.
- Select the Album: Tap the album you want to share.
- Tap the More Button: In the upper-right corner, tap the share button.
- Choose a Sharing Option: Select your preferred sharing method from the menu. Follow the on-screen instructions to complete the sharing process.
5.3. Shared Albums
For collaborative sharing, consider using Shared Albums. This feature allows you to invite others to view, add photos, and comment on the album. To create a Shared Album, tap the plus (+) button in the Albums tab and select “New Shared Album.”
6. Deleting an Album
How do I delete a photo album without deleting the photos inside?
Deleting a photo album is a simple process: Go to “Albums,” touch and hold the album you want to delete, tap “Delete Album,” noting that the photos remain in your library.
6.1. Important Note
Deleting an album only removes the album itself, not the photos and videos within it. The media will remain in your photo library and any other albums they were added to.
6.2. Step-by-Step Guide
- Open the Photos App: Launch the Photos app on your iPhone.
- Navigate to Albums: Tap the “Albums” tab at the bottom of the screen.
- Touch and Hold the Album: Locate the album you want to delete. Touch and hold the album icon until a menu appears.
- Tap Delete Album: Select “Delete Album” from the menu.
- Confirm Deletion: A confirmation message will appear. Tap “Delete” to confirm the deletion.
6.3. Recovering Deleted Photos
If you accidentally delete photos from your library, you can recover them from the “Recently Deleted” album. This album stores deleted photos and videos for 30 days, allowing you to restore them if needed.
7. Organizing Albums with Folders
What’s the best way to group multiple photo albums together?
Grouping multiple photo albums together is best achieved by creating a new folder: Tap “Albums,” then “Create New Folder,” name the folder, and move your desired albums into it.
7.1. Creating a New Folder
- Open the Photos App: Launch the Photos app on your iPhone.
- Navigate to Albums: Tap the “Albums” tab at the bottom of the screen.
- Tap the Create Button: In the upper-left corner, tap the plus (+) button.
- Choose New Folder: Select “New Folder” from the menu.
- Name the Folder: A text field will appear, prompting you to name your new folder. Choose a descriptive name that reflects the folder’s content, such as “Travel Albums,” “Family Events,” or “Photography Projects.”
- Tap Save: Once you’ve entered the name, tap “Save” in the upper-right corner.
7.2. Moving Albums into a Folder
- Open the Photos App: Launch the Photos app on your iPhone.
- Navigate to Albums: Tap the “Albums” tab at the bottom of the screen.
- Touch and Hold the Album: Locate the album you want to move. Touch and hold the album icon until a menu appears.
- Tap Move Album to Folder: Select “Move Album to Folder” from the menu.
- Choose the Folder: Select the folder you want to move the album to. The album will be moved into the selected folder.
7.3. Removing Albums from a Folder
- Open the Photos App: Launch the Photos app on your iPhone.
- Navigate to Albums: Tap the “Albums” tab at the bottom of the screen.
- Open the Folder: Tap the folder containing the album you want to remove.
- Touch and Hold the Album: Locate the album you want to remove. Touch and hold the album icon until a menu appears.
- Tap “Move Album out of [Name]”: Select “Move Album out of [Name]” from the menu, where [Name] is the name of the folder. The album will be moved out of the folder and back to the main Albums view.
8. Advanced Album Management Tips
What are some advanced tips for managing my photo albums efficiently?
Advanced tips include using smart albums, leveraging third-party apps, and regularly backing up your photo library for efficient album management.
8.1. Smart Albums
Smart Albums automatically organize your photos based on criteria you set, such as date, location, keywords, or people. While the iPhone Photos app doesn’t offer Smart Albums directly, you can achieve similar results using third-party apps like Google Photos or Adobe Lightroom Mobile.
8.2. Third-Party Apps
Several third-party apps offer advanced album management features, such as:
- Google Photos: Offers unlimited photo storage (with some compression), automatic album creation, and powerful search capabilities.
- Adobe Lightroom Mobile: Provides professional-grade photo editing tools and advanced organization features, including Smart Albums and keyword tagging.
- Darkroom: A powerful photo editor with excellent album management features, including the ability to create custom filters and batch edit photos.
8.3. Regular Backups
To protect your precious memories, it’s essential to back up your photo library regularly. You can use iCloud Photos, Google Photos, or a combination of both. Additionally, consider backing up your photos to an external hard drive or NAS device for added security.
9. Optimizing Your Photo Workflow
How can I optimize my photo workflow for better organization and creativity?
Optimize your photo workflow by importing photos efficiently, editing and rating them, organizing them into albums, and backing them up regularly for better organization and creativity.
9.1. Efficient Importing
Import photos from your camera or other devices directly into the Photos app. Use a Lightning to USB adapter or a card reader for faster transfer speeds.
9.2. Editing and Rating
Take the time to edit and rate your photos. Use the built-in editing tools in the Photos app or a third-party app like Lightroom Mobile. Assign star ratings or use keywords to identify your best shots.
9.3. Album Organization
Create albums for different projects, events, or themes. Use descriptive names and select key photos to make your albums easy to find and manage.
9.4. Regular Backups
Back up your photo library regularly to protect your memories from loss or damage. Use iCloud Photos, Google Photos, or an external hard drive.
10. How to Make a New Album in Photos: Search Intent
Here is a breakdown of the search intent behind “how to make a new album in photos”:
- Informational: Users are seeking a step-by-step guide on creating a new album within the Photos app, typically on a specific device (e.g., iPhone, iPad).
- Procedural: Users need detailed instructions on the exact steps required to create a new album, including navigation within the app and any specific options or settings to use.
- Device-Specific: Users may be looking for instructions specific to their device or operating system version, as the process may vary slightly across different platforms.
- Troubleshooting: Users might be encountering issues with the album creation process (e.g., missing options, error messages) and are seeking solutions or workarounds.
- Feature Discovery: Users may be new to the Photos app and want to explore its features, including album creation, to better organize their photos and videos.
FAQ: Creating Photo Albums
I have some more questions about creating photo albums, are there some frequently asked questions I can review?
Of course, here are some frequently asked questions related to creating and managing photo albums to help you.
1. Can I add the same photo to multiple albums?
Yes, you can add the same photo to multiple albums without creating duplicates. The photo remains in your library and is simply referenced in each album.
2. How many photos can I add to an album?
There is no limit to the number of photos you can add to an album. However, performance may be affected if you add an extremely large number of photos to a single album.
3. Can I create an album directly from the camera app?
No, you cannot create an album directly from the camera app. You must first take the photo and then add it to an album in the Photos app.
4. Can I password-protect my photo albums?
No, the Photos app does not offer built-in password protection for albums. However, you can use third-party apps or create a hidden album to protect your sensitive photos.
5. How do I hide an album from the main Albums view?
You can hide an album by moving it into a folder. This will remove it from the main Albums view but still allow you to access it by opening the folder.
6. Can I create an album on my Mac and sync it to my iPhone?
Yes, if you use iCloud Photos, any albums you create on your Mac will automatically sync to your iPhone and other Apple devices.
7. How do I change the order of photos within an album?
To change the order of photos within an album, open the album, tap the three dots button, select “Sort,” and choose your desired sorting option. You can also manually drag and drop photos to rearrange them.
8. Can I add captions or descriptions to photos in an album?
Yes, you can add captions or descriptions to individual photos in an album. Open the photo, tap the “i” button, and enter your caption in the text field.
9. How do I find a specific photo within an album?
You can use the search bar in the Photos app to find a specific photo within an album. Enter keywords related to the photo, such as the date, location, or people in the photo.
10. Can I create an album from a Live Photo?
Yes, you can add Live Photos to albums. The Live Photo will retain its animation and sound within the album.
Conclusion: Capturing Memories with dfphoto.net
Creating and managing photo albums on your iPhone is a simple yet powerful way to organize your memories and express your creativity. By following the steps outlined in this guide, you can create personalized collections of your favorite photos and videos, share them with friends and family, and protect them for years to come.
Ready to take your photography to the next level? Visit dfphoto.net to discover more tips, tricks, and inspiration. Explore our collection of stunning photographs, learn from expert photographers, and connect with a vibrant community of photography enthusiasts.
Looking to enhance your photography skills or find the perfect photographer for your next event? Contact us today:
Address: 1600 St Michael’s Dr, Santa Fe, NM 87505, United States
Phone: +1 (505) 471-6001
Website: dfphoto.net
Discover the art of visual storytelling with dfphoto.net!