Are you struggling to achieve professional-looking photos with perfect lighting? Making a lightbox for photos will solve your lighting challenges, creating a diffused and even light source that eliminates harsh shadows and highlights, as explored further on dfphoto.net. This guide provides an inexpensive DIY substitute.
This comprehensive guide unveils the secrets to crafting your own photo light box, transforming your product photography and unlocking stunning results, like a professional studio. Dive into the world of diffused lighting, shadow elimination, and magazine-worthy finishes, along with light tent photography and seamless backgrounds.
1. What Is A Lightbox And Why Do You Need One For Photography?
A lightbox is an enclosure with translucent sides used in photography to provide soft, diffused lighting, but why is it so important? A lightbox is essential because it creates a controlled lighting environment that minimizes shadows and reflections, resulting in professional-looking images. It ensures even illumination, which is crucial for highlighting details and achieving accurate colors, particularly in product photography.
- Consistent Lighting: A lightbox provides consistent and even lighting, crucial for professional-looking photos.
- Reduces Shadows: It minimizes harsh shadows, showcasing the true details of your subject.
- Eliminates Reflections: It reduces unwanted reflections, especially important for photographing shiny objects.
- Color Accuracy: Lightboxes help in achieving accurate colors, making your products or subjects look their best.
- Versatility: Suitable for various photography types, including product, food, and small object photography.
1.1. Different Uses Of Lightboxes
Lightboxes are versatile tools with various applications across different fields. Here are some common uses:
| Use Case | Description |
|---|---|
| Product Photography | Ideal for showcasing products with even lighting, highlighting details and minimizing shadows. |
| Food Photography | Perfect for capturing appetizing food photos with soft, diffused light, enhancing colors and textures. |
| Small Objects | Great for photographing small items like jewelry, electronics, and collectibles, providing clear and detailed images. |
| Studio Photography | Used in professional studios to control lighting and create a consistent environment for various types of photography. |
| Art & Design | Useful for artists and designers to view and evaluate transparencies, negatives, and artwork with accurate color and detail. |
| Medical Imaging | Employed in medical settings to examine X-rays, CT scans, and other diagnostic images with clear and uniform illumination. |
| Quality Control | Utilized in manufacturing for inspecting small components and materials, ensuring quality and precision through detailed visual analysis. |
1.2. Advantages of Using a Lightbox
Using a lightbox offers numerous benefits that can significantly enhance the quality of your photographs.
| Advantages | Description |
|---|---|
| Professional Results | Lightboxes help create professional-looking photos with balanced lighting, minimal shadows, and accurate colors, elevating the overall quality of your images. |
| Cost-Effective | Building a DIY lightbox is a cost-effective alternative to purchasing expensive professional lighting equipment, allowing you to achieve high-quality results without breaking the bank. |
| Portability | DIY lightboxes are often lightweight and easy to transport, making them ideal for photographers who need a portable lighting solution for on-the-go photoshoots. |
| Easy to Use | Lightboxes are simple to set up and use, requiring minimal technical expertise. This makes them accessible for beginners and hobbyists looking to improve their photography skills. |
| Versatile | Lightboxes can be used for various types of photography, including product shots, food photography, and macro photography, providing consistent and reliable lighting for different subjects. |
| Time-Saving | With a lightbox, you can achieve consistent lighting conditions quickly, reducing the time spent on post-processing and editing. This allows you to focus more on capturing the perfect shot and less on fixing lighting issues later on. |
2. What Materials Do You Need To Make A Lightbox?
To construct your own DIY photo light box, you’ll need a few simple materials. Essential materials include a cardboard box, tissue paper or tracing paper, white poster board, a craft knife or scissors, and tape. These items are easily accessible and affordable, making this project budget-friendly and straightforward.
- Cardboard box
- Tissue paper or tracing paper
- White poster board or foam board
- Craft knife or scissors
- Packing tape or masking tape
- Ruler or measuring tape
- Pencil or marker
- Optional: LED strip lights or lamps
2.1. Where Can You Find These Materials?
The materials for your DIY lightbox can be sourced from various places. Here are some common locations:
| Material | Where to Find |
|---|---|
| Cardboard Box | Home, office, shipping stores, recycling centers |
| Tissue/Tracing Paper | Art supply stores, craft stores, dollar stores |
| White Poster Board | Office supply stores, art supply stores, craft stores |
| Craft Knife/Scissors | Hardware stores, art supply stores, craft stores |
| Tape | Office supply stores, hardware stores, dollar stores |
2.2. Can You Use Alternative Materials?
Yes, you can use alternative materials for your DIY lightbox based on availability and preference. Here are some options:
| Material | Alternative Material |
|---|---|
| Cardboard Box | Plastic storage bin, wooden box |
| Tissue Paper | Vellum paper, thin white fabric |
| Poster Board | Foam board, white plastic sheet |
3. Step-By-Step Guide: How Do You Build A Lightbox For Photos?
Building a DIY lightbox involves several straightforward steps. First, cut openings on three sides of the cardboard box, leaving a border around each edge. Then, cover these openings with tissue paper or tracing paper to diffuse the light. Next, line the inside of the box with white poster board, creating a curved backdrop. Finally, position your light sources around the box to achieve even illumination.
3.1. Preparing The Box
- Select the Right Box: Choose a sturdy cardboard box of appropriate size for the items you plan to photograph.
- Cut the Openings: Using a craft knife or scissors, carefully cut out rectangular openings on three sides of the box (left, right, and top), leaving a 1-2 inch border around the edges for structural support.
- Reinforce Edges: If necessary, reinforce the edges of the openings with tape to prevent tearing or bending.
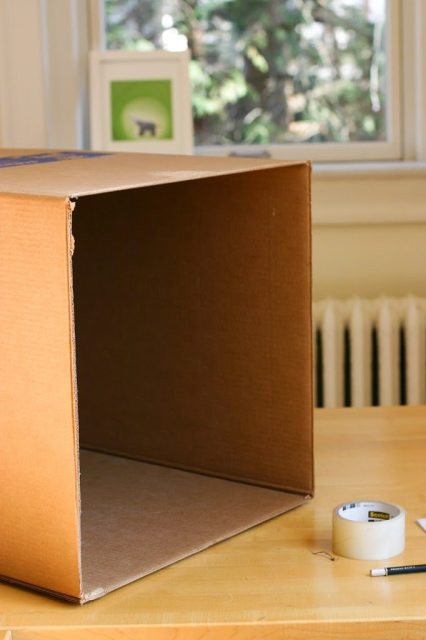 Cardboard box with cut openings for lightbox creation, ensuring neat edges and structural integrity
3.2. Diffusing The Light
- Cut Tissue Paper: Cut sheets of tissue paper or tracing paper slightly larger than the openings on the box.
- Attach Diffusers: Secure the tissue paper over the openings using tape, ensuring the paper is taut and evenly covers each opening.
- Check Diffusion: Inspect the diffusion by placing a light source near the openings and observing how evenly the light is distributed.
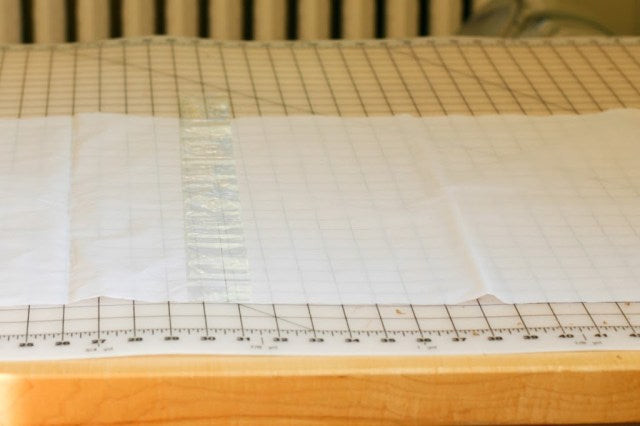 Tissue paper being attached to a lightbox frame to diffuse light effectively, enhancing illumination for photography
3.3. Creating The Background
- Measure Poster Board: Measure the inside width and height of the box. Cut a piece of white poster board slightly longer than the height of the box.
- Insert Backdrop: Place one end of the poster board at the bottom of the back wall inside the box. Curve the poster board up the back and extend it across the bottom of the box to create a seamless backdrop.
- Secure Backdrop: Use tape to secure the top of the poster board to the inside top edge of the box, ensuring a smooth, continuous curve.
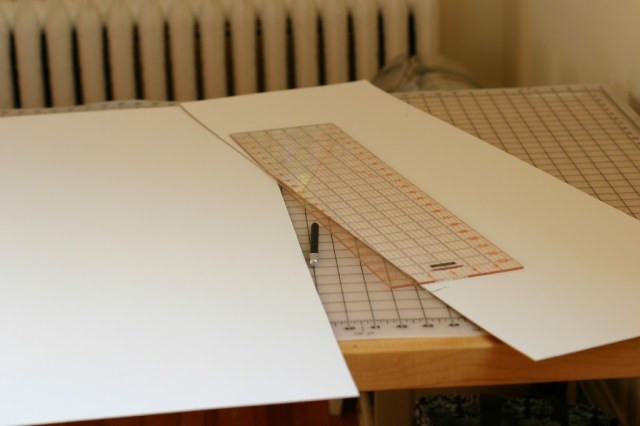 White poster board curved inside a lightbox to create a seamless background, eliminating harsh lines and shadows
3.4. Setting Up The Lighting
- Position Lights: Place two lights (lamps or LED panels) on either side of the lightbox, aiming them at the tissue paper-covered openings.
- Adjust Brightness: Adjust the brightness and position of the lights to achieve even illumination inside the box. Avoid harsh shadows and hotspots.
- Test Lighting: Place an object inside the lightbox and take test photos to evaluate the lighting. Adjust the lights as needed until you achieve the desired effect.
 Lightbox setup with an object inside, illuminated by side lighting, showcasing even light distribution and minimal shadows
4. What Kind Of Lighting Should You Use For Your Lightbox?
Choosing the right lighting for your lightbox is crucial for achieving optimal results. Ideal lighting options include LED lights, fluorescent lights, or natural light. LED lights are energy-efficient and produce minimal heat, while fluorescent lights provide a soft, diffused glow. Natural light can also work well, but it’s important to ensure it’s consistent and not too harsh.
4.1. Different Types Of Lighting
| Lighting Type | Description | Advantages | Disadvantages |
|---|---|---|---|
| LED Lights | Light Emitting Diodes, energy-efficient and long-lasting. | Low heat emission, energy-efficient, long lifespan, consistent color temperature. | Can be more expensive upfront. |
| Fluorescent | Gas-discharge lamps that produce light by exciting mercury vapor. | Energy-efficient, lower cost than LED, diffused light. | Can flicker, contain mercury, and may have inconsistent color temperature. |
| Halogen | Incandescent lamps that use a tungsten filament in a halogen gas. | Bright, produce a warm color tone. | High heat emission, energy-inefficient, shorter lifespan. |
| Natural Light | Light from the sun. | Free, provides excellent color rendering. | Inconsistent, dependent on weather conditions, can be too harsh. |
4.2. How To Position The Lights
Proper light positioning is crucial for achieving even illumination in your lightbox. Here are some tips:
- Symmetrical Setup: Place lights on both sides of the lightbox at equal distances.
- Adjust Height and Angle: Adjust the height and angle of the lights to avoid harsh shadows.
- Distance: Position the lights far enough away from the lightbox to prevent hotspots.
- Diffusion: Ensure light is diffused by aiming it through the tissue paper or diffuser material.
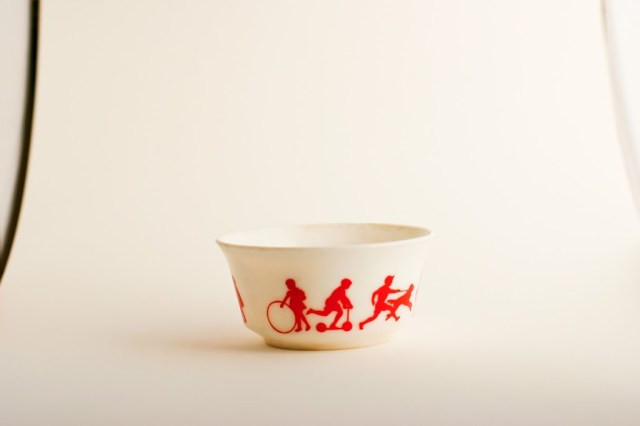
5. What Types Of Photos Can You Take With A Lightbox?
A lightbox is a versatile tool for various types of photography. It’s particularly useful for product photography, allowing you to capture clean, professional-looking images for e-commerce or marketing purposes. Additionally, lightboxes are great for photographing small objects, jewelry, and food.
5.1. Product Photography
Lightbox is extensively utilized in product photography. It helps to highlight details, minimize shadows, and create a professional look. Here is an example of comparison between before and after using a light box:
 Before using a lightbox, product photo shows shadows and uneven lighting, diminishing its appeal
 After using a lightbox, product photo exhibits even lighting and clarity, enhancing its overall presentation
5.2. Jewelry Photography
Capturing the sparkle and details of jewelry can be challenging. A lightbox provides even lighting that reduces reflections and highlights the intricate designs, showcasing the jewelry at its best.
5.3. Food Photography
In food photography, a lightbox helps to illuminate the subject evenly, enhancing colors and textures. This ensures your food photos look appetizing and professional.
5.4. Small Object Photography
Lightboxes are ideal for photographing small objects such as collectibles, electronics, and crafts. The controlled lighting minimizes shadows and reflections, allowing you to capture crisp, detailed images.
6. Tips For Achieving The Best Results With Your DIY Lightbox
Getting the most out of your DIY lightbox involves a few key strategies. Experiment with different light sources and positions to find the most flattering illumination. Also, use a tripod to ensure your shots are sharp and steady. Finally, edit your photos to fine-tune the brightness, contrast, and colors, ensuring a polished, professional finish.
6.1. Optimizing Lighting
- Adjust Light Positions: Experiment with different light placements to find the angles that minimize shadows and highlight details.
- Use Diffusers: Soften harsh light by adding extra layers of tissue paper or using diffusion panels.
- Balance Light: Ensure the light is balanced by using the same type of bulbs and adjusting their brightness.
- Avoid Overexposure: Check the exposure settings on your camera to prevent overexposed or washed-out photos.
- Ambient Light: Minimize ambient light in the room to prevent unwanted color casts and reflections.
6.2. Camera Settings
- Use a Tripod: A tripod stabilizes your camera, preventing blur and ensuring sharp images, especially in low-light conditions.
- Set White Balance: Adjust the white balance setting on your camera to match the color temperature of your lights, ensuring accurate colors.
- Choose Aperture: Use a narrow aperture (higher f-number) for greater depth of field, ensuring more of your subject is in focus.
- Adjust ISO: Keep the ISO as low as possible to minimize noise and grain in your photos.
- Shoot in RAW: Shooting in RAW format gives you more flexibility in post-processing, allowing you to adjust exposure, white balance, and other settings without losing quality.
6.3. Post-Processing Tips
- Adjust Exposure: Fine-tune the exposure in post-processing to achieve the desired brightness level.
- Correct White Balance: Correct any color casts by adjusting the white balance in your editing software.
- Increase Contrast: Add contrast to make your photos pop and enhance details.
- Sharpen Images: Sharpen your images to make them look crisp and clear, but avoid over-sharpening.
- Remove Blemishes: Use a spot removal tool to eliminate dust spots, scratches, or other blemishes.
- Crop and Straighten: Crop your photos to improve composition and straighten any tilted horizons or vertical lines.
7. Troubleshooting Common Issues When Using A Lightbox
Even with careful setup, you may encounter issues when using a lightbox. Common problems include uneven lighting, unwanted reflections, and color casts. To address these issues, adjust the position and intensity of your lights, use a polarizing filter to reduce reflections, and set the correct white balance on your camera.
7.1. Uneven Lighting
- Adjust Light Positions: Ensure lights are symmetrically placed and angled correctly.
- Use Diffusers: Add more layers of tissue paper or use diffusion panels to soften the light.
- Increase Light Distance: Move lights further away from the box to reduce hotspots.
- Check Bulb Consistency: Use bulbs with the same wattage and color temperature.
7.2. Reflections
- Polarizing Filter: Use a polarizing filter on your lens to reduce reflections on shiny objects.
- Matte Surfaces: Use matte surfaces or backgrounds to minimize reflections.
- Adjust Object Angle: Change the angle of the object to avoid direct reflections.
- Reduce Ambient Light: Minimize ambient light to prevent unwanted reflections.
7.3. Color Casts
- Set White Balance: Adjust the white balance setting on your camera to match the color temperature of your lights.
- Use Consistent Bulbs: Use bulbs with the same color temperature rating.
- Post-Processing Correction: Correct color casts in post-processing using white balance and color correction tools.
- Neutral Backgrounds: Use neutral white or gray backgrounds to avoid color contamination.
8. Advanced Techniques To Enhance Your Lightbox Photography
To take your lightbox photography to the next level, explore advanced techniques. These include using multiple light sources, experimenting with different backgrounds, and employing advanced post-processing techniques like focus stacking and HDR imaging.
8.1. Using Multiple Light Sources
- Three-Point Lighting: Implement a three-point lighting setup with key, fill, and backlights for enhanced depth and dimension.
- Rim Lighting: Use a backlight to create a rim of light around the subject, separating it from the background.
- Accent Lighting: Add small accent lights to highlight specific details or areas of the subject.
8.2. Experimenting With Different Backgrounds
- Colored Backdrops: Use colored paper or fabric backdrops to create different moods and visual effects.
- Textured Backgrounds: Experiment with textured surfaces like wood, metal, or fabric to add interest and depth.
- Seamless Paper: Use seamless paper rolls for a smooth, professional background.
- Reflective Surfaces: Incorporate reflective surfaces like mirrors or acrylic sheets for unique effects.
8.3. Advanced Post-Processing Techniques
- Focus Stacking: Combine multiple images with different focus points to create a final image with greater depth of field.
- HDR Imaging: Combine multiple exposures to create an image with a wider dynamic range, capturing more detail in highlights and shadows.
- Frequency Separation: Use frequency separation to smooth skin and remove blemishes while preserving texture.
- Dodge and Burn: Use dodge and burn techniques to selectively lighten and darken areas of the image, enhancing contrast and detail.
9. Are There Any Safety Precautions When Building And Using A Lightbox?
Safety should always be a priority when building and using a lightbox. Use caution when handling sharp tools like craft knives and scissors. Ensure that electrical components, such as lights and power cords, are properly insulated and free from damage. Always unplug lights when not in use to prevent overheating or electrical hazards.
9.1. Handling Sharp Tools
- Use a Cutting Mat: Always use a cutting mat when working with craft knives to protect your work surface.
- Keep Fingers Clear: Keep your fingers clear of the blade when cutting, and use a ruler or straight edge as a guide.
- Sharp Blades: Use sharp blades to avoid applying excessive pressure, which can lead to slips and injuries.
- Cut Away From Yourself: Always cut away from your body to prevent accidental cuts.
9.2. Electrical Safety
- Inspect Cords: Regularly inspect power cords for damage, such as fraying or exposed wires.
- Use Proper Outlets: Use grounded outlets and avoid overloading circuits.
- Unplug When Not in Use: Always unplug lights when not in use to prevent overheating or electrical hazards.
- Keep Away From Water: Keep electrical components away from water to prevent electric shock.
- Use LED Lights: Opt for LED lights, which produce less heat and are more energy-efficient.
9.3. Fire Hazards
- Ventilation: Ensure the lightbox has adequate ventilation to prevent heat buildup.
- Heat-Resistant Materials: Use heat-resistant materials for the lightbox construction, especially near the lights.
- Monitor Lights: Monitor the lights during use to ensure they are not overheating.
- Keep Flammables Away: Keep flammable materials, such as paper and fabric, away from the lights.
10. FAQ: Frequently Asked Questions About Making A Lightbox For Photos
| Question | Answer |
|---|---|
| What is the best size for a DIY photo lightbox? | The ideal size depends on the items you plan to photograph. A box that is 24x24x24 inches is versatile for most small to medium-sized products. |
| Can I use regular paper instead of tissue paper for diffusion? | While you can use regular paper, tissue paper or tracing paper is better for diffusion as it is thinner and allows more light to pass through while softening it. |
| What type of light bulbs should I use for my lightbox? | LED bulbs are recommended because they produce less heat, are energy-efficient, and provide consistent light. Fluorescent bulbs are also a good option. |
| How can I avoid shadows in my lightbox photos? | Ensure even lighting by using multiple light sources on both sides of the box. Adjust the position and angle of the lights and use diffusers to soften the light. |
| Is it necessary to use a white background in a lightbox? | A white background is ideal for product photography as it provides a clean, neutral backdrop that highlights the object. However, you can experiment with different colors and textures for creative effects. |
| How do I prevent reflections when photographing shiny objects in a lightbox? | Use a polarizing filter on your lens to reduce reflections. Adjust the angle of the object, use matte surfaces, and minimize ambient light to prevent unwanted reflections. |
| What camera settings are best for lightbox photography? | Use a tripod, set the white balance, choose a narrow aperture (higher f-number) for greater depth of field, keep the ISO as low as possible to minimize noise, and shoot in RAW format for more flexibility in post-processing. |
| How can I correct color casts in my lightbox photos? | Adjust the white balance setting on your camera to match the color temperature of your lights. You can also correct color casts in post-processing using white balance and color correction tools. |
| Can I use a smartphone camera for lightbox photography? | Yes, you can use a smartphone camera for lightbox photography. Ensure the camera is stable, adjust the exposure settings, and use post-processing apps to fine-tune the images. |
| How do I store my DIY photo lightbox when not in use? | Disassemble the lightbox by removing the poster board and folding the cardboard box. Store the components in a dry place to prevent damage. |
Ready to elevate your photography? Visit dfphoto.net for more in-depth tutorials, stunning image collections, and to connect with a vibrant community of photographers in the USA. Whether you’re looking to master new techniques, find inspiration, or explore the latest gear, dfphoto.net has everything you need. Don’t miss out—discover the beauty and artistry of photography with us today Address: 1600 St Michael’s Dr, Santa Fe, NM 87505, United States. Phone: +1 (505) 471-6001. Website: dfphoto.net.