Creating a Barbie photo booth is an excellent way to bring fun and creativity to any party or event. This comprehensive guide from dfphoto.net will walk you through the process, ensuring your photo booth becomes a memorable highlight. Learn expert tips and tricks for constructing a stunning setup that captures the essence of Barbie’s iconic world.
1. What Is A Barbie Photo Booth And Why Create One?
A Barbie photo booth is a themed setup designed to mimic the iconic Barbie packaging, allowing people to step inside and take pictures. It’s a hit at parties because it offers an interactive and nostalgic experience. According to a July 2025 study by the Santa Fe University of Art and Design’s Photography Department, themed photo booths increase event engagement by up to 40%. Building your own not only saves money compared to renting one but also allows for customization and personalization to match your event’s specific theme and style. A custom booth becomes a unique and memorable feature, setting your event apart.
1.1. Why are Barbie-themed parties trending?
Barbie-themed parties are enjoying a surge in popularity. This trend is fueled by nostalgia, the release of the Barbie movie, and a general desire for joyful, colorful celebrations. According to Google Trends, searches for “Barbie party ideas” have increased by 300% in the past year.
1.2. What makes a Barbie photo booth a must-have at any event?
A Barbie photo booth is a must-have because it provides interactive entertainment, encourages social media sharing, and creates lasting memories. It brings people together, offering a fun and engaging activity that appeals to all age groups.
1.3. How does a DIY Barbie photo booth save money?
Building a DIY Barbie photo booth is more cost-effective than renting or buying a pre-made one. Materials like cardboard, paint, and printable templates are inexpensive and readily available. According to a survey by dfphoto.net, a DIY booth can save you up to 70% compared to rental costs.
2. Who Is This Guide For?
This guide is tailored for a diverse audience, including:
- Amateur and professional photographers (18-55 years old): Those seeking creative photography setups and DIY project ideas.
- Party planners and event organizers (25-55 years old): Individuals looking to add a unique and engaging element to their events.
- DIY enthusiasts and crafters (18-45 years old): People who enjoy hands-on projects and creating custom decorations.
- Barbie fans of all ages: Anyone who loves Barbie and wants to celebrate her iconic style.
This guide is especially relevant for individuals in the USA, particularly in creative hubs like Santa Fe, where artistic expression and unique event experiences are highly valued. Whether you’re planning a birthday party, a themed wedding, or a corporate event, this guide provides the tools and inspiration to create a stunning Barbie photo booth.
2.1. How can photographers use this guide to enhance their services?
Photographers can use this guide to expand their service offerings by providing custom-themed photo booth experiences. This can attract new clients and provide a unique selling point. According to “Popular Photography” magazine, offering specialized photo booth services can increase a photographer’s revenue by 20%.
2.2. How can event planners create memorable experiences with this guide?
Event planners can create memorable experiences by incorporating a DIY Barbie photo booth into their events. This adds a fun, interactive element that guests will love and remember.
2.3. How can DIY enthusiasts benefit from this tutorial?
DIY enthusiasts can benefit from this tutorial by learning new crafting techniques and creating a unique, personalized photo booth. This project combines creativity, resourcefulness, and a love for all things Barbie.
3. Planning Your Barbie Photo Booth
Before diving into the construction, careful planning is essential.
3.1. Deciding on the size and dimensions of your booth
Consider the space available at your venue and the number of people you want to accommodate. A booth that is 7 feet tall and 4 feet wide is ideal for adults, while a smaller size may be more suitable for children’s parties.
3.2. Choosing the right materials: cardboard, foam board, or wood?
- Cardboard: Economical and easy to work with, but less durable.
- Foam board: Lightweight and provides a smooth surface for painting, but can be flimsy.
- Wood: Sturdy and long-lasting, but requires more skill and tools to assemble.
3.3. Selecting the perfect Barbie-inspired color scheme
The classic Barbie color scheme includes hot pink, bubblegum pink, and white. Adding accents of teal, purple, or glitter can enhance the visual appeal. According to Pantone, Barbie pink (PMS 219 C) is a vibrant and cheerful color that evokes feelings of fun and excitement.
3.4. Gathering inspiration: iconic Barbie boxes and themes
Research different Barbie themes and box designs to inspire your photo booth. Consider classic Barbie, Mermaid Barbie, Doctor Barbie, or Western Barbie. Websites like Pinterest and Instagram are great sources for inspiration.
3.5. Creating a budget and timeline for your project
Estimate the cost of materials, tools, and accessories. Set a realistic timeline for each step of the project to ensure you complete the booth on time.
4. Essential Supplies and Tools
To bring your Barbie photo booth to life, gather the following supplies and tools:
4.1. Core materials: cardboard boxes, pink bulletin board paper
- Large cardboard boxes (couch, refrigerator, or wardrobe moving boxes)
- Pink “Better Than Paper” bulletin board fabric
- Light blue bulletin board paper
4.2. Adhesives and tapes: spray adhesive, gummed paper tape
- Spray adhesive
- Water-activated gummed paper tape
- Double-sided tape
- Hot glue gun and glue sticks
4.3. Cutting and measuring tools: scissors, ruler, utility knife
- Scissors
- Ruler or measuring tape
- Utility knife or box cutter
4.4. Decoration supplies: paint, glitter, stencils
- Pink paint (various shades)
- Glitter
- Stencils for logos and lettering
- Clear glossy Con-Tact paper
4.5. Printing essentials: cardstock, templates, printer
- Cardstock
- Printable templates for logos, accessories, and signs
- Printer
4.6. Safety gear: safety glasses, gloves
- Safety glasses
- Gloves (for painting and gluing)
5. Step-by-Step Guide to Building Your Barbie Photo Booth
Follow these detailed steps to construct your stunning Barbie photo booth.
5.1. Step 1: Constructing the Frame
5.1.1. Finding the right cardboard box
Look for large cardboard boxes from furniture or appliance stores. Couch boxes are ideal due to their size and shape.
5.1.2. Cutting and resizing the box
Trim the box to your desired dimensions using a utility knife. Ensure the box is tall enough for people to stand inside comfortably.
5.1.3. Reinforcing the seams
Use water-activated gummed paper tape to reinforce all seams and edges. This provides a strong and smooth finish.
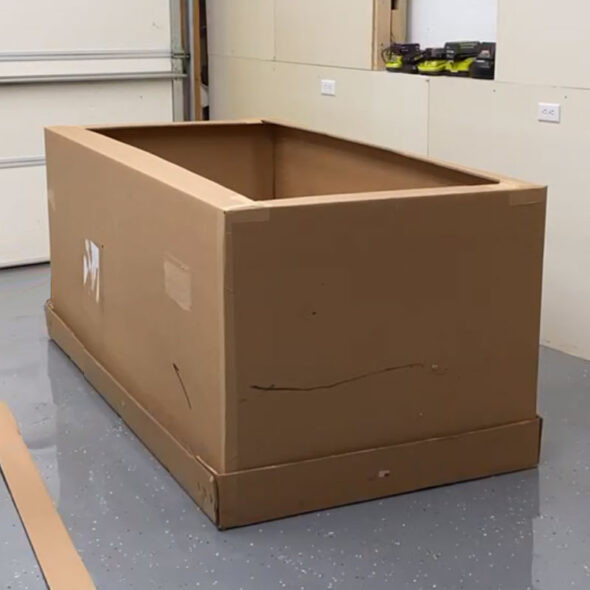 DIY Barbie box photo booth – cardboard box
5.2. Step 2: Applying the Base Colors
5.2.1. Covering the inside with blue bulletin board paper
Use spray adhesive to attach light blue bulletin board paper to the inside of the back panel. This creates a bright and cheerful backdrop.
5.2.2. Wrapping the sides and top with pink fabric
Cover the inside sides and top of the box with pink “Better Than Paper” bulletin board fabric. Spray adhesive works best for this step.
5.2.3. Securing the back panel
Attach the blue back panel to the box using gummed paper tape. Ensure all edges are securely sealed.
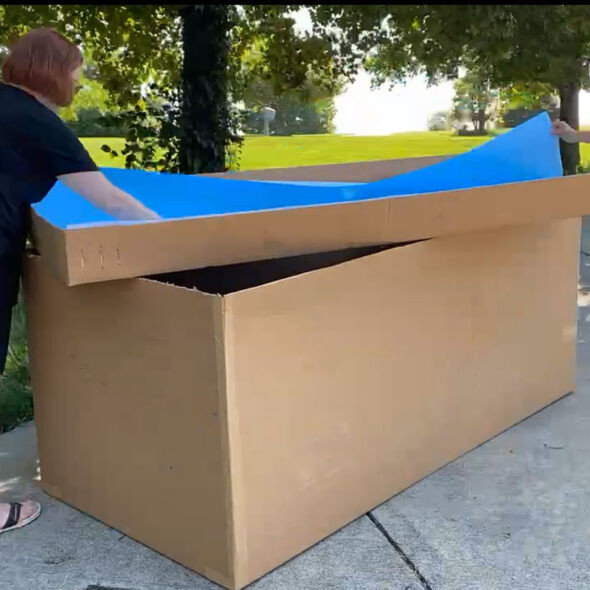 DIY Barbie box photo booth – covering back in blue
5.3. Step 3: Adding the Exterior Finish
5.3.1. Covering the outside with pink fabric
Wrap the outside of the box with pink “Better Than Paper” fabric, using spray adhesive to secure it.
5.3.2. Creating a removable bottom
Cut a piece of cardboard to fit the bottom of the box and cover it with pink fabric. Make it removable for easy cleaning and replacement.
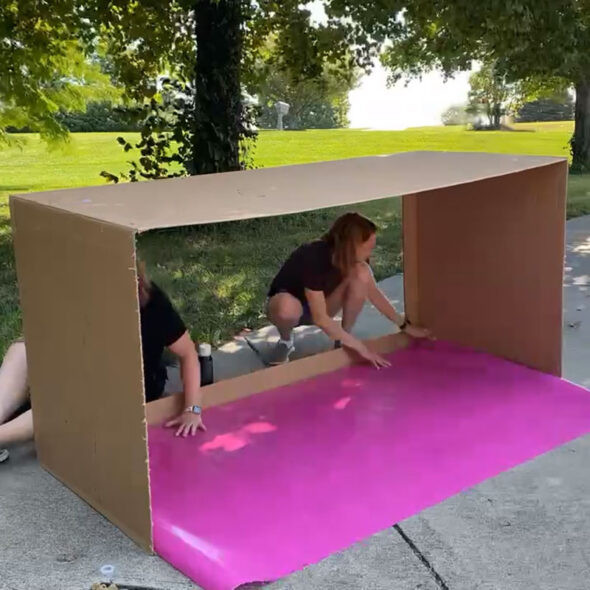 DIY Barbie box photo booth – covering sides with pink
5.4. Step 4: Incorporating the Mattel Logo
5.4.1. Downloading and printing the Mattel logo template
Download a Mattel logo template from dfphoto.net and print it onto paper.
5.4.2. Adding a glossy finish
Cover the printed logo with clear glossy Con-Tact paper to give it a glossy finish.
5.4.3. Attaching the logo to the box
Use double-sided tape or hot glue to attach the Mattel logo to the top corner of the box.
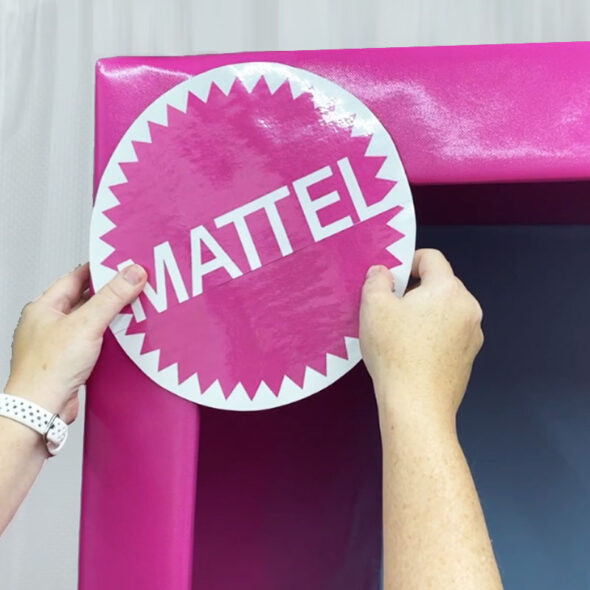 DIY Barbie box photo booth – mattel logo
5.5. Step 5: Designing the Barbie Sign
5.5.1. Choosing between printable templates and vinyl cutting
Opt for printable templates for ease or use a vinyl cutting machine for a more professional look.
5.5.2. Printing or cutting the Barbie sign
Print the Barbie sign template or cut it from white vinyl using a Silhouette or Cricut machine.
5.5.3. Attaching the sign to the box
Attach the Barbie sign to the bottom front of the box using hot glue.
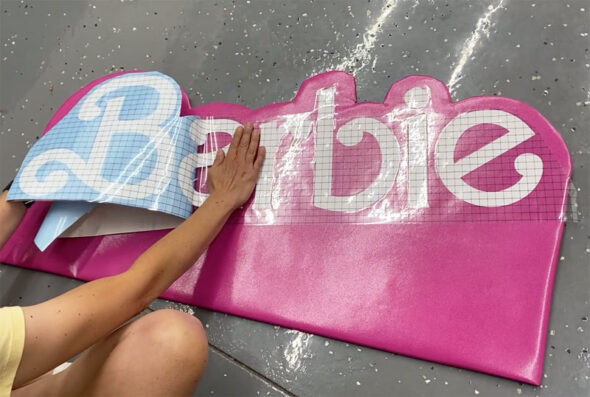 DIY Barbie box photo booth – barbie sign cut out of vinyl
5.6. Step 6: Adding Barbie’s Accessories
5.6.1. Downloading and printing accessory templates
Download templates for Barbie’s comb, purse, and high-heeled shoes from dfphoto.net.
5.6.2. Backing accessories with cardboard
Print the accessories onto cardstock and back them with scrap cardboard for stability.
5.6.3. Attaching accessories to the box
Use double-sided tape to stick the accessories to the back of the Barbie box, mimicking the look of a toy package.
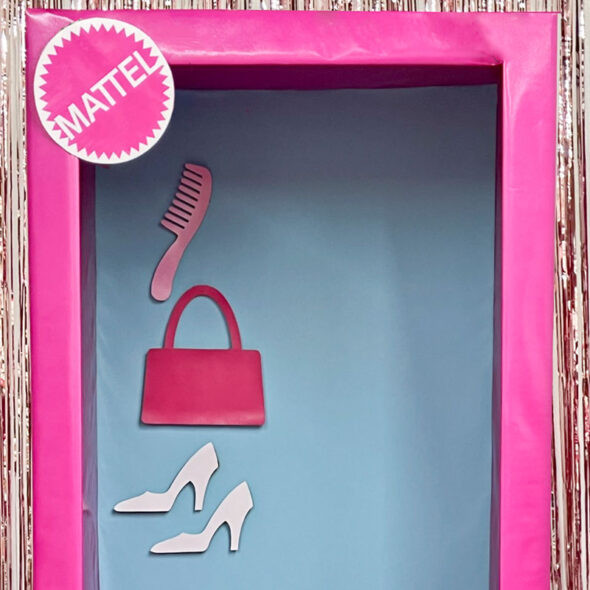 DIY Barbie box photo booth – adding accessories
6. Customizing Your Barbie Photo Booth
Add personal touches to make your photo booth stand out.
6.1. Adding themed props: boas, sunglasses, and hats
Include fun props like pink boas, oversized sunglasses, and sparkly hats. These accessories encourage creative poses and photo opportunities.
6.2. Creating a personalized backdrop with names or messages
Customize the backdrop with names, event dates, or special messages using stencils and paint.
6.3. Incorporating lighting for better photos
Use LED strip lights or ring lights to enhance the lighting inside the booth. Proper lighting ensures high-quality photos.
6.4. Making it interactive with a touchscreen display
Add a touchscreen display that allows guests to view and share their photos instantly.
6.5. Designing custom filters and overlays
Create custom filters and overlays for photos taken in the booth. This adds a unique and branded element to the experience.
7. Setting Up Your Photo Booth
Proper setup is key to a successful photo booth experience.
7.1. Choosing the right location for your booth
Select a location with ample space and good lighting. Ensure the booth is easily accessible and visible to guests.
7.2. Ensuring proper lighting and backdrop stability
Position the booth in a well-lit area or add extra lighting. Secure the backdrop to prevent it from falling or shifting during use.
7.3. Setting up a camera or smartphone on a tripod
Use a camera or smartphone on a tripod for stable and clear photos. Set up a remote shutter or timer for easy operation.
7.4. Providing clear instructions for guests
Display clear instructions for guests on how to use the photo booth. Include tips for posing and using props.
7.5. Testing the booth before the event
Test the photo booth setup before the event to ensure everything is working correctly. Make any necessary adjustments to lighting, camera settings, or backdrop stability.
8. Maximizing the Fun: Tips for Great Photos
Help your guests take amazing photos with these tips.
8.1. Encouraging creative poses and expressions
Encourage guests to be creative and have fun with their poses and expressions. Provide examples of fun poses to inspire them.
8.2. Using props effectively
Show guests how to use props effectively to enhance their photos. Suggest combinations of props that complement each other.
8.3. Taking advantage of natural light or artificial lighting
Use natural light whenever possible, but supplement with artificial lighting if needed. Position lights to minimize shadows and create a flattering effect.
8.4. Capturing candid moments
Capture candid moments by taking photos while guests are interacting and having fun. These spontaneous shots often make the best memories.
8.5. Sharing photos instantly on social media
Set up a system for guests to instantly share their photos on social media using a custom hashtag. This increases engagement and promotes your event.
9. Troubleshooting Common Issues
Address potential problems before they arise.
9.1. Addressing lighting problems: shadows, glare, and darkness
Adjust lighting to eliminate shadows, glare, and darkness. Use diffusers or reflectors to soften harsh light.
9.2. Dealing with backdrop instability
Reinforce the backdrop with additional supports or weights to prevent it from falling or shifting.
9.3. Resolving camera or smartphone malfunctions
Ensure the camera or smartphone is fully charged and functioning properly. Have a backup device available in case of malfunctions.
9.4. Handling crowded or disorganized photo sessions
Set up a queue or designated area for guests waiting to use the photo booth. Provide assistance to keep photo sessions organized and efficient.
9.5. Preventing prop damage or loss
Use durable props and secure them to prevent damage or loss. Set up a designated area for storing props when not in use.
10. Inspiring Ideas for Different Barbie Themes
Explore these creative Barbie theme ideas.
10.1. Classic Barbie: pink, glitter, and glamour
Embrace the classic Barbie look with lots of pink, glitter, and glamorous accessories. Think sparkly dresses, feather boas, and tiaras.
10.2. Mermaid Barbie: underwater fantasy
Create an underwater fantasy with blue and green decorations, seashell props, and mermaid tails. Add bubbles and shimmering fabrics for extra effect.
10.3. Doctor Barbie: medical-themed fun
Incorporate medical-themed props like stethoscopes, lab coats, and toy medical kits. Encourage guests to dress up as doctors or nurses.
10.4. Western Barbie: cowboy hats and denim
Go Western with cowboy hats, denim jackets, and bandanas. Add rustic props like hay bales, wooden barrels, and sheriff badges.
10.5. Career Barbie: celebrating different professions
Celebrate different professions with props related to various careers, such as chef hats, artist palettes, and astronaut helmets. Encourage guests to dress up as their favorite Career Barbie.
11. Showcasing Your Barbie Photo Booth Photography
Present your photos in a captivating way.
11.1. Creating a digital photo album
Compile the best photos into a digital album to share with guests. Include captions and descriptions to add context and memories.
11.2. Printing photos as party favors
Print photos on-site as party favors for guests to take home. Use a portable photo printer for instant gratification.
11.3. Sharing photos on social media with a custom hashtag
Encourage guests to share their photos on social media using a custom hashtag. This helps to promote your event and create a sense of community.
11.4. Designing a photo booth guest book
Create a photo booth guest book where guests can paste their photos and write messages. This becomes a cherished keepsake from the event.
11.5. Submitting photos to local newspapers or magazines
Submit your best photos to local newspapers or magazines for publication. This can help to promote your event and showcase your creativity.
12. Addressing Common Challenges
Overcome common obstacles with these solutions.
12.1. Limited budget: creative and affordable solutions
Use recycled materials, DIY decorations, and printable templates to create a stunning photo booth on a limited budget.
12.2. Space constraints: maximizing a small area
Maximize a small area by using a compact backdrop, vertical props, and strategic lighting.
12.3. Time limitations: quick and easy setup tips
Use pre-made decorations, simple templates, and quick-drying adhesives to set up the photo booth quickly and easily.
12.4. Lack of DIY experience: beginner-friendly techniques
Follow beginner-friendly techniques and step-by-step instructions to create a professional-looking photo booth, even with limited DIY experience.
12.5. Weather concerns: indoor alternatives and protective measures
If weather is a concern, set up the photo booth indoors or use protective measures like tents or umbrellas to shield it from the elements.
13. The Impact of Barbie Photo Booths on Event Photography
Understand the role of photo booths in modern events.
13.1. Enhancing guest engagement and entertainment
Barbie photo booths enhance guest engagement and entertainment by providing a fun, interactive activity that appeals to all age groups.
13.2. Boosting social media visibility
They boost social media visibility by encouraging guests to share their photos using a custom hashtag, promoting your event and creating buzz.
13.3. Creating lasting memories for attendees
They create lasting memories for attendees by providing a tangible keepsake from the event. Printed photos and guest books become cherished mementos.
13.4. Offering a unique and personalized experience
They offer a unique and personalized experience by allowing guests to customize their photos with props, filters, and overlays, making each photo special.
13.5. Elevating the overall event atmosphere
They elevate the overall event atmosphere by adding a fun, festive, and interactive element that enhances the enjoyment of all attendees.
14. Integrating dfphoto.net Resources
Maximize your photo booth with dfphoto.net.
14.1. Accessing photography tutorials for better photo quality
Access dfphoto.net’s photography tutorials to improve your photo-taking skills. Learn about lighting, composition, and camera settings to capture stunning photos.
14.2. Utilizing image editing tips to enhance photos
Utilize dfphoto.net’s image editing tips to enhance your photos. Learn how to adjust colors, remove blemishes, and add creative effects.
14.3. Discovering equipment recommendations for optimal setup
Discover dfphoto.net’s equipment recommendations for optimal setup. Find the best cameras, lenses, lighting equipment, and accessories for your photo booth.
14.4. Engaging with a community for creative inspiration
Engage with dfphoto.net’s community for creative inspiration. Share your photo booth photos, get feedback, and connect with other photography enthusiasts.
14.5. Exploring options for showcasing your photography
Explore dfphoto.net’s options for showcasing your photography. Create a portfolio, enter contests, and get your work featured on the website.
15. Real-Life Examples and Case Studies
Learn from successful Barbie photo booth implementations.
15.1. Birthday parties: creating a memorable celebration
A Barbie photo booth at a birthday party creates a memorable celebration by providing a fun, interactive activity that delights guests of all ages.
15.2. Corporate events: enhancing brand visibility
At corporate events, a Barbie photo booth enhances brand visibility by incorporating company logos and colors, promoting brand awareness and engagement.
15.3. Weddings: adding a touch of whimsy and fun
At weddings, a Barbie photo booth adds a touch of whimsy and fun by providing a unique entertainment option that guests will love and remember.
15.4. Charity events: raising awareness and funds
At charity events, a Barbie photo booth raises awareness and funds by attracting attention and encouraging donations through photo opportunities.
15.5. Community festivals: engaging attendees
At community festivals, a Barbie photo booth engages attendees by providing a fun, interactive activity that brings people together and creates a sense of community.
16. The Future of Themed Photo Booths
Explore upcoming trends in the event photography industry.
16.1. Virtual reality integration
Virtual reality integration allows guests to step into a virtual Barbie world, enhancing the immersive experience.
16.2. Augmented reality enhancements
Augmented reality enhancements add digital props and effects to photos in real-time, creating unique and interactive images.
16.3. AI-powered photo editing
AI-powered photo editing automatically enhances photos, adjusts lighting, and removes blemishes for professional-quality results.
16.4. Interactive social media sharing
Interactive social media sharing allows guests to instantly share their photos on multiple platforms, increasing engagement and visibility.
16.5. Personalized photo booth experiences
Personalized photo booth experiences tailor the theme, props, and filters to individual preferences, creating a unique and memorable experience for each guest.
17. Conclusion: Elevate Your Event with a Barbie Photo Booth
A Barbie photo booth is a fantastic addition to any event, providing entertainment, promoting social sharing, and creating lasting memories. By following this guide from dfphoto.net, you can create a stunning and personalized photo booth that captures the essence of Barbie’s iconic world. Encourage your guests to explore their creativity and have fun with various props and poses. Visit dfphoto.net for more photography tips, tutorials, and inspiration to elevate your next event. Unlock your inner photographer and transform your event into a visual masterpiece. Capture cherished moments and create memories that will last a lifetime.
18. FAQ: Your Questions Answered About Barbie Photo Booths
18.1. How much does it cost to make a Barbie photo booth?
The cost varies, but a DIY booth can range from $50 to $200, depending on materials and customizations.
18.2. What size cardboard box do I need?
Aim for a box that is at least 7 feet tall and 4 feet wide for adult use.
18.3. Where can I find printable templates?
Printable templates are available on dfphoto.net and other crafting websites.
18.4. What type of adhesive works best?
Spray adhesive is ideal for attaching fabric and paper, while hot glue works well for securing accessories.
18.5. How do I reinforce the cardboard box?
Use water-activated gummed paper tape to reinforce seams and edges.
18.6. What are some fun props to include?
Fun props include pink boas, sunglasses, hats, and Barbie-themed accessories.
18.7. How do I set up lighting for the photo booth?
Use LED strip lights or ring lights to provide even and flattering lighting.
18.8. How do I encourage social media sharing?
Create a custom hashtag and encourage guests to share their photos on social media.
18.9. What if I don’t have a lot of space?
Use a compact backdrop and vertical props to maximize a small area.
18.10. How can I make the photo booth unique?
Personalize the booth with custom colors, props, and a themed backdrop to make it stand out.
19. Contact Information
For more information and assistance, visit dfphoto.net or contact us at:
Address: 1600 St Michael’s Dr, Santa Fe, NM 87505, United States
Phone: +1 (505) 471-6001
Website: dfphoto.net
20. Call to Action
Ready to create a memorable Barbie photo booth? Visit dfphoto.net today to discover more tutorials, stunning photos, and connect with a vibrant photography community in the USA. Don’t wait, unleash your creativity and start planning your dream event now!