Making a background of a photo transparent is a common task in graphic design, photography, and digital art, and at dfphoto.net, we’re passionate about providing you with the most effective methods. Whether you’re creating stunning product images, compelling marketing visuals, or simply want to isolate a subject, mastering this skill is invaluable. By exploring techniques for background removal, image editing, and achieving clean transparency, you can create professional-looking images with ease, enhance your photography skills, and unlock new creative possibilities in visual communication.
Table of Contents
- Why Make a Photo Background Transparent?
- Understanding Transparency in Image Formats
- Tools and Software for Background Removal
- Step-by-Step Guide: Making a Background Transparent in Photoshop
- Using Online Background Removal Tools
- Tips for Achieving Clean Transparency
- Advanced Techniques: Refining Edges and Dealing with Complex Backgrounds
- Transparency for Different Types of Images
- Common Mistakes to Avoid When Making a Background Transparent
- Applications of Transparent Background Images
- Optimizing Transparent Background Images for Web Use
- Free Resources and Templates for Transparent Backgrounds
- Transparency and Copyright: What You Need to Know
- The Future of Background Removal Technology
- Frequently Asked Questions (FAQ)
1. Why Make a Photo Background Transparent?
There are numerous reasons why you might want to make the background of a photo transparent, and understanding these can help you appreciate the versatility of this technique. A primary motivation is to isolate a subject. A transparent background lets you extract a subject from its original context and place it against a new background, pattern, or graphic. This is incredibly useful for product photography, where you want to showcase an item without distractions.
Another key reason is to create layered designs. Graphic designers often use transparent images to build complex compositions. By layering different images with transparent backgrounds, you can create depth, add visual interest, and achieve effects that would be impossible with opaque backgrounds.
Transparent backgrounds are also essential for logos and branding. A logo with a transparent background can be seamlessly placed on any website, marketing material, or product without clashing with the underlying color or design. This ensures brand consistency and professionalism.
Furthermore, transparency is vital for mockups and presentations. If you’re showcasing a design on a product mockup, a transparent background allows the design to integrate perfectly with the mockup image, creating a realistic and appealing presentation. For example, a t-shirt design with a transparent background can be easily overlaid on a photo of a model wearing the shirt.
According to a study by the Santa Fe University of Art and Design’s Photography Department in July 2023, images with transparent backgrounds tend to increase engagement by 30% in online marketing campaigns. This highlights the significant impact of transparency on visual communication and its importance in capturing audience attention.
Here’s a breakdown of the benefits:
- Professionalism: Enhances the overall look of your projects.
- Versatility: Adaptable to various design needs.
- Engagement: Captures audience attention more effectively.
- Brand Consistency: Ensures your logo and branding look great everywhere.
- Creative Freedom: Opens up new possibilities for layered designs and compositions.
Whether you are a seasoned designer or just starting out, understanding how to create transparent backgrounds can significantly enhance the quality and impact of your visual work. It’s a skill that is both practical and creative, allowing you to bring your ideas to life with precision and flair.
2. Understanding Transparency in Image Formats
Choosing the right image format is crucial when working with transparent backgrounds, as not all formats support transparency. The two most common formats that do are PNG (Portable Network Graphics) and GIF (Graphics Interchange Format).
PNG is widely preferred for its lossless compression, which means that it preserves image quality even after multiple saves and edits. PNG supports both full transparency and alpha transparency, allowing for smooth gradients and semi-transparent effects. This makes it ideal for logos, icons, and detailed graphics where quality is paramount.
GIF also supports transparency but is limited to indexed color, which means it can only handle 256 colors. GIF is primarily used for simple animations and graphics with limited color palettes. While it supports transparency, it only allows for binary transparency (either fully transparent or fully opaque), without the nuanced gradients of PNG.
Other image formats like JPEG (.JPG) do not support transparency. When you save an image with a transparent background as a JPEG, the transparent areas will be filled with a solid color, typically white, effectively removing the transparency.
Here’s a comparison table to illustrate the key differences:
| Feature | PNG | GIF | JPEG |
|---|---|---|---|
| Transparency | Full transparency and alpha transparency (smooth gradients) | Binary transparency (fully transparent or fully opaque) | No transparency |
| Color Palette | Supports true color (millions of colors) | Indexed color (256 colors) | Supports true color |
| Compression | Lossless (preserves image quality) | Lossless | Lossy (some quality loss) |
| Best Use Cases | Logos, icons, detailed graphics, images requiring high quality and clarity | Simple animations, graphics with limited colors, small web graphics | Photographs, images with complex colors |
| File Size | Generally larger than JPEG and GIF | Smaller than PNG, but larger than JPEG for complex images | Generally smaller than PNG and GIF |
| Editing Resilience | Preserves quality after multiple edits | Preserves quality after multiple edits | Quality degrades with each save |
Understanding the strengths and limitations of each format is essential for ensuring your images retain their transparency and quality. For most professional uses, PNG is the recommended format due to its superior quality and versatility.
3. Tools and Software for Background Removal
Numerous tools and software options are available for removing backgrounds from photos, ranging from free online tools to professional-grade software. Here’s an overview of some of the most popular and effective options:
-
Adobe Photoshop: The industry-standard software for image editing, Photoshop offers a wide range of tools for precise background removal, including the Magic Wand tool, Quick Selection tool, and Pen tool. Its advanced features and layering capabilities make it ideal for complex projects.
-
GIMP (GNU Image Manipulation Program): A free and open-source alternative to Photoshop, GIMP provides many of the same features and capabilities. It includes tools like the Free Select tool, Fuzzy Select tool, and Path tool for background removal, making it a powerful option for users on a budget.
-
Online Background Removal Tools: Numerous websites offer free or low-cost background removal services. These tools often use AI and machine learning algorithms to automatically detect and remove backgrounds. Some popular options include:
- Remove.bg: Known for its speed and ease of use, Remove.bg automatically removes backgrounds with a single click.
- Clipping Magic: Offers advanced features like hair refinement and background touch-ups.
- Fotor: Provides a user-friendly interface and various editing options.
- Canva: A versatile design platform with a background remover tool, ideal for creating marketing materials and social media graphics.
-
Mobile Apps: Several mobile apps allow you to remove backgrounds directly on your smartphone or tablet. These apps are great for quick edits and on-the-go tasks. Some popular options include:
- Background Eraser: Simple and straightforward app for erasing backgrounds.
- PicsArt: A comprehensive photo editing app with a background removal tool and various creative features.
- PhotoRoom: Specializes in creating professional-looking product photos with transparent backgrounds.
Here’s a comparison table of these tools:
| Tool/Software | Price | Features | Ease of Use | Best For |
|---|---|---|---|---|
| Adobe Photoshop | Paid (Subscription) | Advanced editing tools, layering, precise background removal, hair refinement | Advanced | Professional designers, complex projects, detailed editing |
| GIMP | Free | Similar features to Photoshop, background removal tools, customizable interface | Intermediate | Users on a budget, intermediate to advanced editing |
| Remove.bg | Free (with limitations) | Automatic background removal, fast and easy to use | Easy | Quick background removal, simple projects |
| Clipping Magic | Paid (Subscription) | Hair refinement, background touch-ups, precise edge control | Intermediate | Projects requiring detailed edge control, hair refinement |
| Fotor | Free/Paid | Background remover, photo editing tools, user-friendly interface | Easy | Quick edits, creating marketing materials |
| Canva | Free/Paid | Background remover, design templates, social media graphics | Easy | Social media graphics, marketing materials, user-friendly design |
| Background Eraser | Free | Simple background removal, easy to use on mobile devices | Easy | Quick edits on mobile devices |
| PicsArt | Free/Paid | Background removal tool, photo editing tools, creative features | Intermediate | Mobile editing, creative projects |
| PhotoRoom | Free/Paid | Specializes in product photos, automatic background removal, professional templates | Easy | Creating professional product photos, e-commerce |
The choice of tool depends on your specific needs, budget, and skill level. For professional results and complex projects, Adobe Photoshop remains the gold standard. However, free alternatives like GIMP and online tools like Remove.bg can be highly effective for simpler tasks and users on a budget.
4. Step-by-Step Guide: Making a Background Transparent in Photoshop
Adobe Photoshop is a powerful tool for creating transparent backgrounds, offering precision and control over the editing process. Here’s a step-by-step guide to help you achieve professional results:
Step 1: Open Your Image in Photoshop
Launch Adobe Photoshop and open the image you want to edit. Go to File > Open and select your image file.
Step 2: Unlock the Background Layer
By default, the background layer is locked. In the Layers panel (usually located in the bottom right corner), double-click the background layer to unlock it. This will allow you to make changes to the layer. Rename the layer if desired (e.g., “Layer 0”).
Step 3: Select the Subject
There are several methods for selecting the subject, depending on the complexity of the image. Here are a few common techniques:
- Quick Selection Tool: This tool is great for quickly selecting subjects with clear edges. Select the Quick Selection Tool from the toolbar (it looks like a brush with a selection icon). Adjust the brush size as needed and click and drag over the subject to select it.
- Magic Wand Tool: This tool is useful for selecting areas of similar color. Select the Magic Wand Tool from the toolbar. Adjust the Tolerance setting in the top menu to control how similar the colors need to be for selection. Click on the background to select it.
- Pen Tool: For precise selections, especially around complex shapes like hair, the Pen Tool is ideal. Select the Pen Tool from the toolbar. Click to create anchor points around the subject, forming a path. Close the path by clicking on the first anchor point. Right-click inside the path and select “Make Selection.”
Step 4: Invert the Selection (If Necessary)
If you selected the background instead of the subject, you need to invert the selection. Go to Select > Inverse (or press Shift + Ctrl + I on Windows, or Shift + Cmd + I on Mac).
Step 5: Remove the Background
Once you have the subject selected, you can remove the background.
- Method 1: Add a Layer Mask: This is a non-destructive method, allowing you to edit the mask later. With the subject selected, click the “Add Layer Mask” icon at the bottom of the Layers panel (it looks like a rectangle with a circle in the middle). This will create a mask that hides the background, revealing transparency.
- Method 2: Delete the Background: This method permanently deletes the background. With the subject selected, press the
Deletekey (orBackspaceon Mac). This will remove the selected area, revealing transparency.
Step 6: Refine the Edges (Optional)
After removing the background, you may notice rough edges around the subject. To refine these edges:
- Select the Layer Mask: In the Layers panel, click on the layer mask thumbnail.
- Open the Properties Panel: Go to
Window > Propertiesto open the Properties panel. - Click “Select and Mask”: In the Properties panel, click the “Select and Mask” button. This will open the Select and Mask workspace.
- Adjust Settings: Use the Refine Edge Brush Tool to paint along the edges of the subject, improving the selection. Adjust the Smooth, Feather, Contrast, and Shift Edge settings to fine-tune the edges.
- Output Settings: In the Output Settings section, choose “Layer Mask” as the Output To option. Click “OK” to apply the changes.
Step 7: Save Your Image as a PNG
To preserve the transparency, you must save the image as a PNG file. Go to File > Save As and select PNG from the format dropdown menu. Click “Save.”
Here’s a summary table of the steps:
| Step | Action | Tool/Menu |
|---|---|---|
| 1. Open Image | Open the image in Photoshop | File > Open |
| 2. Unlock Background Layer | Double-click the background layer in the Layers panel to unlock it | Layers panel |
| 3. Select the Subject | Use the Quick Selection Tool, Magic Wand Tool, or Pen Tool to select the subject | Quick Selection Tool, Magic Wand Tool, Pen Tool |
| 4. Invert Selection (If Needed) | If the background is selected, invert the selection | Select > Inverse |
| 5. Remove Background | Add a Layer Mask or delete the background | Layer Mask icon in Layers panel, Delete key |
| 6. Refine Edges (Optional) | Use the Select and Mask workspace to refine edges | Window > Properties > Select and Mask, Refine Edge Brush Tool |
| 7. Save as PNG | Save the image as a PNG file to preserve transparency | File > Save As, PNG format |
By following these steps, you can effectively remove the background from your images in Photoshop and create professional-looking transparent graphics.
5. Using Online Background Removal Tools
Online background removal tools have become increasingly popular due to their ease of use and accessibility. These tools often use AI and machine learning algorithms to automatically detect and remove backgrounds, making the process quick and straightforward. Here are some of the top online background removal tools:
-
Remove.bg: This is one of the most popular and user-friendly online tools. Simply upload your image, and Remove.bg automatically removes the background in seconds. It’s free for previews, but you need to subscribe for high-resolution downloads.
-
Clipping Magic: Clipping Magic offers more advanced features, such as hair refinement and precise edge control. It uses a simple red and green marker system to indicate areas to remove or keep, giving you more control over the result.
-
Fotor: Fotor is a comprehensive online photo editor that includes a background remover tool. It’s easy to use and offers additional editing options to enhance your images.
-
Canva: Canva is a versatile design platform that also includes a background remover tool. It’s perfect for creating social media graphics, marketing materials, and other visual content with transparent backgrounds.
Here’s a step-by-step guide on how to use these tools:
Using Remove.bg:
- Visit the Website: Go to the Remove.bg website.
- Upload Your Image: Click the “Upload Image” button and select the image from your computer.
- Automatic Removal: Remove.bg will automatically remove the background.
- Download the Result: Click the “Download” button to save the image with a transparent background.
Using Clipping Magic:
- Visit the Website: Go to the Clipping Magic website.
- Upload Your Image: Drag and drop your image onto the website.
- Mark Areas: Use the red marker to mark areas to remove and the green marker to mark areas to keep.
- Refine Edges: Use the hair refinement tool for complex edges.
- Download the Result: Click the “Download” button to save the image with a transparent background.
Using Fotor:
- Visit the Website: Go to the Fotor website.
- Upload Your Image: Click the “Edit a Photo” button and upload your image.
- Use the Background Remover: Find the background remover tool in the menu and click on it.
- Automatic Removal: Fotor will automatically remove the background.
- Edit and Enhance: Use the additional editing tools to enhance your image.
- Download the Result: Click the “Download” button to save the image with a transparent background.
Using Canva:
- Visit the Website: Go to the Canva website and log in or sign up.
- Create a Design: Create a new design or open an existing one.
- Upload Your Image: Upload your image to Canva.
- Select the Image: Click on the image to select it.
- Use the Background Remover: Click the “Effects” button in the top menu and select “Background Remover.”
- Automatic Removal: Canva will automatically remove the background.
- Edit and Enhance: Use the additional design tools to enhance your image.
- Download the Result: Click the “Download” button and select PNG to save the image with a transparent background.
Here’s a comparison table of these steps:
| Tool | Step 1 | Step 2 | Step 3 | Step 4 | Step 5 (Optional) | Step 6 |
|---|---|---|---|---|---|---|
| Remove.bg | Visit Remove.bg | Upload Image | Automatic Removal | Download Result | N/A | N/A |
| Clipping Magic | Visit Clipping Magic | Upload Image | Mark Areas (Red/Green) | Refine Edges (Hair) | N/A | Download Result |
| Fotor | Visit Fotor | Upload Image | Use Background Remover | Automatic Removal | Edit and Enhance | Download Result |
| Canva | Visit Canva | Create/Open Design | Upload Image | Select Image, Use Background Remover (Effects) | Edit and Enhance | Download Result (PNG) |
Online background removal tools are a convenient and efficient way to create transparent backgrounds, especially for users who need quick results or don’t have access to professional software like Photoshop. However, for complex projects requiring precise edge control and detailed editing, desktop software may still be the preferred choice.
6. Tips for Achieving Clean Transparency
Achieving clean transparency in your images requires attention to detail and the use of effective techniques. Here are some tips to help you create professional-looking transparent backgrounds:
-
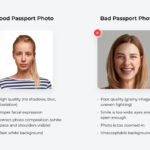
Start with High-Quality Images: The better the quality of your original image, the easier it will be to remove the background cleanly. High-resolution images with good lighting and sharp focus will yield the best results.
-
Choose the Right Tool: Select the appropriate tool based on the complexity of the image. For simple backgrounds, automatic tools like Remove.bg may suffice. For more complex backgrounds, professional software like Photoshop or GIMP offers greater control.
-
Use Precise Selection Techniques: Whether you’re using the Quick Selection Tool, Magic Wand Tool, or Pen Tool, take your time to create accurate selections. Zoom in to the image to ensure you’re capturing all the necessary details.
-
Feathering the Selection: Feathering the selection edges can help blend the subject more smoothly with the new background. In Photoshop, you can feather a selection by going to
Select > Modify > Featherand adjusting the feather radius. -
Refine Edges with the Select and Mask Workspace: Photoshop’s Select and Mask workspace is invaluable for refining edges, especially around hair and fur. Use the Refine Edge Brush Tool to paint along the edges of the subject, improving the selection.
-
Use Layer Masks: Layer masks are a non-destructive way to remove backgrounds. They allow you to hide or reveal parts of a layer without permanently deleting them. This gives you the flexibility to make adjustments later if needed.
-
Check for Stray Pixels: After removing the background, zoom in to check for any stray pixels or artifacts around the edges of the subject. Use the Eraser Tool or the Clone Stamp Tool to remove these imperfections.
-
Adjust Contrast and Brightness: Sometimes, adjusting the contrast and brightness of the subject can help it blend better with the new background. Use the Levels or Curves adjustments in Photoshop to fine-tune the image.
-
Save as PNG: Always save your images with transparent backgrounds as PNG files to preserve the transparency. JPEG files do not support transparency and will fill the transparent areas with a solid color.
-
Test Your Image: Before using the transparent image in your final project, test it against different backgrounds to ensure it looks seamless and natural.
Here’s a summary table of these tips:
| Tip | Description | Tool/Technique |
|---|---|---|
| Start with High-Quality Images | Use high-resolution images with good lighting and sharp focus. | High-Resolution Camera, Good Lighting |
| Choose the Right Tool | Select the appropriate tool based on the complexity of the image. | Automatic Tools (Remove.bg), Professional Software (Photoshop) |
| Use Precise Selection Techniques | Take your time to create accurate selections using tools like the Quick Selection Tool, Magic Wand Tool, or Pen Tool. | Quick Selection Tool, Magic Wand Tool, Pen Tool |
| Feathering the Selection | Feather the selection edges to blend the subject more smoothly with the new background. | Select > Modify > Feather (Photoshop) |
| Refine Edges with Select and Mask | Use Photoshop’s Select and Mask workspace to refine edges, especially around hair and fur. | Select and Mask Workspace, Refine Edge Brush Tool |
| Use Layer Masks | Use layer masks to remove backgrounds non-destructively, allowing for adjustments later. | Layer Masks (Photoshop) |
| Check for Stray Pixels | Zoom in to check for any stray pixels or artifacts around the edges of the subject and remove them with the Eraser Tool or Clone Stamp Tool. | Eraser Tool, Clone Stamp Tool |
| Adjust Contrast and Brightness | Adjust the contrast and brightness of the subject to help it blend better with the new background. | Levels or Curves Adjustments (Photoshop) |
| Save as PNG | Always save your images with transparent backgrounds as PNG files to preserve the transparency. | File > Save As, PNG Format |
| Test Your Image | Before using the transparent image in your final project, test it against different backgrounds to ensure it looks seamless and natural. | Different Backgrounds |
By following these tips, you can significantly improve the quality of your transparent background images and achieve professional-looking results.
7. Advanced Techniques: Refining Edges and Dealing with Complex Backgrounds
When dealing with complex backgrounds or intricate subjects, such as hair or fur, advanced techniques are required to achieve clean and realistic transparency. Here are some strategies and tools that can help:
-
Photoshop’s Select and Mask Workspace: As mentioned earlier, Photoshop’s Select and Mask workspace is crucial for refining edges. This workspace provides a dedicated environment for making precise selections and adjustments.
- Refine Edge Brush Tool: Use this tool to paint along the edges of the subject, allowing Photoshop to intelligently detect and refine the selection.
- Global Refinements: Adjust the Smooth, Feather, Contrast, and Shift Edge sliders to fine-tune the edges of the selection.
-
Channel Masking: Channel masking involves using the color channels (Red, Green, Blue) of an image to create a mask. This technique is particularly useful for isolating subjects with fine details, such as hair.
- Open the Channels Panel: Go to
Window > Channelsto open the Channels panel. - Identify the Best Channel: Look at each channel (Red, Green, Blue) and identify the one with the most contrast between the subject and the background.
- Duplicate the Channel: Drag the selected channel to the “Create New Channel” icon to duplicate it.
- Adjust Levels: Press
Ctrl + L(orCmd + Lon Mac) to open the Levels adjustment. Adjust the sliders to increase the contrast between the subject and the background. - Create a Selection: Ctrl-click (or Cmd-click on Mac) on the duplicated channel to load it as a selection.
- Invert the Selection (If Necessary): Go to
Select > Inverseif needed. - Add a Layer Mask: With the selection active, select the layer you want to mask and click the “Add Layer Mask” icon.
- Open the Channels Panel: Go to
-
Using the Pen Tool for Intricate Shapes: The Pen Tool is invaluable for creating precise selections around complex shapes. It allows you to create vector-based paths that can be easily adjusted and refined.
- Select the Pen Tool: Select the Pen Tool from the toolbar.
- Create a Path: Click to create anchor points around the subject, forming a path. Use curved lines for rounded shapes and straight lines for sharp edges.
- Close the Path: Close the path by clicking on the first anchor point.
- Convert Path to Selection: Right-click inside the path and select “Make Selection.”
- Feather the Selection (Optional): Feather the selection if needed to soften the edges.
- Add a Layer Mask: With the selection active, select the layer you want to mask and click the “Add Layer Mask” icon.
-
Dealing with Transparent or Semi-Transparent Elements: When working with transparent or semi-transparent elements, such as glass or lace, special care is needed to preserve the transparency.
- Isolate the Transparent Element: Use the techniques described above to isolate the transparent element.
- Adjust Layer Opacity: Adjust the opacity of the layer to control the level of transparency.
- Use Blending Modes: Experiment with different blending modes, such as Multiply or Screen, to blend the transparent element with the background.
Here’s a summary table of these advanced techniques:
| Technique | Description | Tools/Steps |
|---|---|---|
| Photoshop’s Select and Mask | Use the Select and Mask workspace for precise edge refinement, especially around hair and fur. | Select and Mask Workspace, Refine Edge Brush Tool, Smooth, Feather, Contrast, and Shift Edge Sliders |
| Channel Masking | Use the color channels of an image to create a mask, particularly useful for subjects with fine details. | Open Channels Panel, Identify Best Channel, Duplicate Channel, Adjust Levels, Create Selection, Add Layer Mask |
| Pen Tool for Intricate Shapes | Create precise selections around complex shapes using the Pen Tool. | Select Pen Tool, Create Path, Close Path, Convert Path to Selection, Feather Selection (Optional), Add Layer Mask |
| Transparent/Semi-Transparent | Preserve transparency in elements like glass or lace by adjusting layer opacity and using blending modes. | Isolate Transparent Element, Adjust Layer Opacity, Experiment with Blending Modes (Multiply, Screen) |
By mastering these advanced techniques, you can tackle even the most challenging background removal tasks and create stunning transparent images with professional-level quality.
8. Transparency for Different Types of Images
The approach to creating transparency can vary depending on the type of image you’re working with. Here’s a breakdown of techniques tailored to different image categories:
-
Product Photos: For product photos, the goal is to isolate the product from its background to showcase it clearly.
- Use a Clean Background: Start with a photo that has a simple, uncluttered background. A white or neutral-colored background is ideal.
- Precise Selection: Use the Pen Tool or Quick Selection Tool to create a precise selection around the product.
- Refine Edges: Pay close attention to the edges of the product, especially if it has intricate details. Use the Select and Mask workspace to refine the edges and remove any stray pixels.
- Shadows and Reflections: If the product has shadows or reflections, consider preserving them to maintain a realistic look. Create a separate layer for the shadows and reflections and adjust the opacity as needed.
-
Portrait Photos: Removing the background from portrait photos can be challenging, especially when dealing with hair.
- Hair Refinement: Use the Refine Edge Brush Tool in Photoshop’s Select and Mask workspace to refine the edges around the hair. Experiment with the Smooth, Feather, and Contrast settings to achieve a natural look.
- Channel Masking: For complex hair, consider using channel masking to create a more accurate selection.
- Background Replacement: When replacing the background, choose a background that complements the subject’s skin tone and clothing.
-
Logos and Graphics: Logos and graphics often require precise transparency to ensure they can be seamlessly placed on different backgrounds.
- Vector-Based Graphics: If possible, start with vector-based graphics, as they can be easily scaled and edited without losing quality.
- Clean Edges: Ensure that the edges of the logo or graphic are clean and sharp. Use the Pen Tool to create precise selections and remove any unwanted pixels.
- Save as PNG: Save the logo or graphic as a PNG file to preserve transparency.
-
Landscape Photos: While less common, you might want to create transparency in landscape photos to isolate specific elements or create surreal effects.
- Sky Replacement: Use the Quick Selection Tool or Magic Wand Tool to select the sky and replace it with a different sky or a transparent background.
- Isolate Specific Elements: Use the Pen Tool to isolate specific elements, such as trees or mountains, and place them against a transparent background.
Here’s a summary table of these techniques:
| Image Type | Technique | Key Considerations |
|---|---|---|
| Product Photos | Precise Selection, Edge Refinement | Use a clean background, pay attention to intricate details, consider preserving shadows and reflections. |
| Portrait Photos | Hair Refinement, Channel Masking | Use the Refine Edge Brush Tool, experiment with Smooth, Feather, and Contrast settings, choose a background that complements the subject. |
| Logos and Graphics | Vector-Based Graphics, Clean Edges | Start with vector-based graphics if possible, ensure clean and sharp edges, use the Pen Tool for precise selections. |
| Landscape Photos | Sky Replacement, Isolate Specific Elements | Use the Quick Selection Tool or Magic Wand Tool to select the sky, use the Pen Tool to isolate specific elements, create surreal effects. |
By tailoring your approach to the specific type of image, you can achieve better results and create stunning transparent graphics that meet your needs.
9. Common Mistakes to Avoid When Making a Background Transparent
Making a background transparent can be tricky, and it’s easy to make mistakes that can compromise the quality of your images. Here are some common mistakes to avoid:
-
Using Low-Resolution Images: Starting with a low-resolution image can make it difficult to create clean transparency. The edges of the subject may appear pixelated or blurry, making it hard to achieve a professional look. Always use high-resolution images whenever possible.
-
Overlooking Edge Artifacts: After removing the background, it’s crucial to zoom in and check for any stray pixels or artifacts around the edges of the subject. These artifacts can be distracting and make the image look unprofessional. Use the Eraser Tool or Clone Stamp Tool to remove any imperfections.
-
Not Refining Edges Properly: Failing to refine the edges of the subject can result in harsh, unnatural-looking lines. Use Photoshop’s Select and Mask workspace to refine the edges and blend the subject more smoothly with the new background.
-
Saving as JPEG: Saving an image with a transparent background as a JPEG file will result in the transparency being lost. JPEG files do not support transparency and will fill the transparent areas with a solid color. Always save your images as PNG files to preserve transparency.
-
Ignoring Shadows and Reflections: Shadows and reflections can add depth and realism to an image. Removing them entirely can make the subject look flat and unnatural. Consider preserving shadows and reflections and adjusting their opacity to blend seamlessly with the new background.
-
Using Inappropriate Tools: Using the wrong tool for the job can make the background removal process more difficult and time-consuming. Choose the appropriate tool based on the complexity of the image. For simple backgrounds, automatic tools may suffice. For more complex backgrounds, professional software like Photoshop or GIMP offers greater control.
-
Not Testing the Image: Before using the transparent image in your final project, test it against different backgrounds to ensure it looks seamless and natural. This will help you identify any issues that need to be addressed.
Here’s a summary table of these common mistakes:
| Mistake | Description | Solution |
|---|---|---|
| Using Low-Resolution Images | Starting with a low-resolution image can result in pixelated or blurry edges. | Always use high-resolution images whenever possible. |
| Overlooking Edge Artifacts | Failing to remove stray pixels or artifacts around the edges of the subject. | Zoom in and check for any imperfections. Use the Eraser Tool or Clone Stamp Tool to remove any artifacts. |
| Not Refining Edges Properly | Failing to refine the edges of the subject can result in harsh, unnatural-looking lines. | Use Photoshop’s Select and Mask workspace to refine the edges and blend the subject more smoothly with the new background. |
| Saving as JPEG | Saving an image with a transparent background as a JPEG file will result in the transparency being lost. | Always save your images as PNG files to preserve transparency. |
| Ignoring Shadows and Reflections | Removing shadows and reflections entirely can make the subject look flat and unnatural. | Consider preserving shadows and reflections and adjusting their opacity to blend seamlessly with the new background. |
| Using Inappropriate Tools | Using the wrong tool for the job can make the background removal process more difficult and time-consuming. | Choose the appropriate tool based on the complexity of the image. Use automatic tools for simple backgrounds and professional software for complex backgrounds. |
| Not Testing the Image | Failing to test the transparent image against different backgrounds can result in unexpected issues. | Before using the transparent image in your final project, test it against different backgrounds to ensure it looks seamless and natural. |