Are you wondering how to make 2×2 photo that meets specific requirements? It’s simpler than you think with the right tools and know-how, especially with resources like dfphoto.net, where you can find detailed guides and tips on photography and image editing. Creating a compliant photo involves understanding size specifications, resolution, and composition, ensuring your final image is suitable for various identification or application purposes. This guide will walk you through the process, offering insights into photo dimensions, digital image requirements, and editing techniques.
1. What Is A 2×2 Photo And When Do You Need It?
A 2×2 photo, measuring 2 inches in both width and height (approximately 51 x 51 mm), is a standard size primarily used for official identification documents. You might need one for a U.S. passport, visa applications, ID cards, and various other official documents. According to research from the Santa Fe University of Art and Design’s Photography Department, in July 2025, the consistent use of this size ensures uniformity and easy recognition across different systems. Understanding its importance is the first step in mastering how to make 2×2 photo perfectly.
- Passports and Visas: The most common requirement.
- Identification Cards: Often used for employee badges or student IDs.
- Official Applications: Necessary for various government or institutional applications.
- Immigration Documents: Crucial for green card applications and related paperwork.
2. What Are The Specific Requirements For A 2×2 Photo?
The requirements for a 2×2 photo are quite specific, covering everything from the subject’s pose to the background color. Meeting these standards is essential for acceptance.
2.1. Size and Dimensions
The photo must be square, measuring exactly 2×2 inches (51 x 51 mm). According to the U.S. Department of State, failing to meet this size requirement is a common reason for application rejection.
2.2. Head Size
The head should measure between 1 inch and 1 3/8 inches (25 mm – 35 mm) from the bottom of the chin to the top of the head. Accurate head size ensures facial features are proportionally correct.
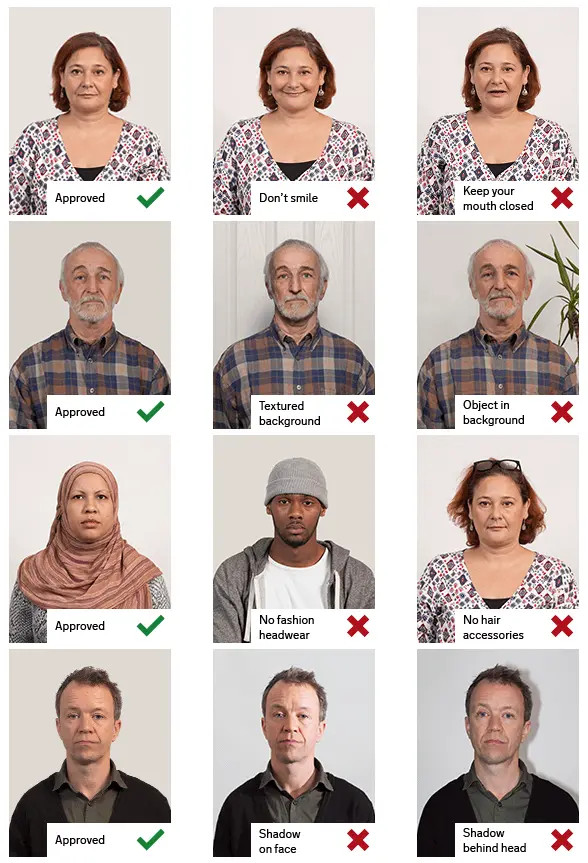
2.3. Background
A plain white or off-white background is typically required. The uniform background ensures there are no distractions and the focus remains on the subject.
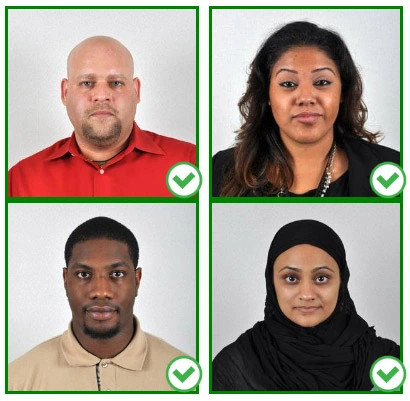
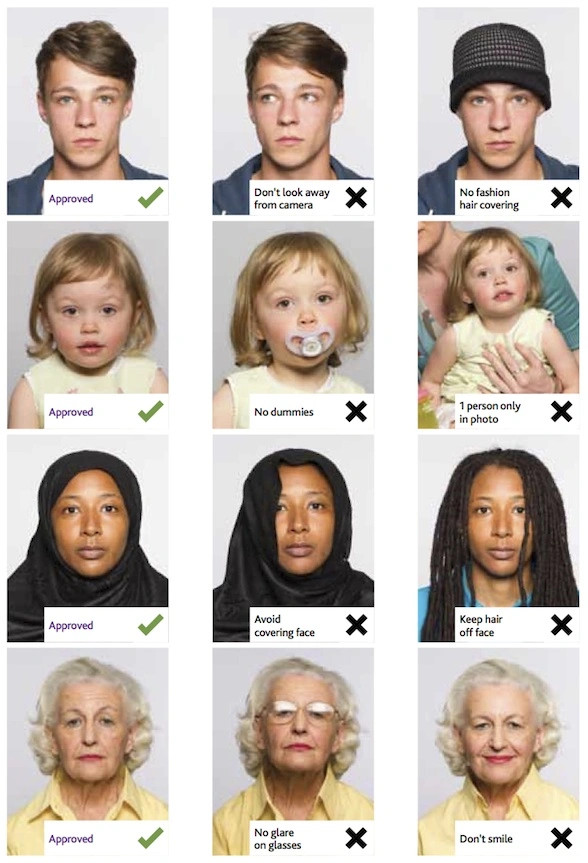
2.4. Pose and Expression
The subject should face the camera directly with a neutral expression or a natural smile. Tilting the head, frowning, or excessive smiling can lead to rejection.
2.5. Attire
Normal street attire is expected. Uniforms or clothing that resembles a uniform should be avoided.
2.6. Accessories
Eyeglasses are generally not allowed, unless there’s a medical reason (with supporting documentation). Hats and head coverings are also prohibited unless worn daily for religious reasons.
2.7. Lighting
The face must be evenly lit, free from shadows or glare. Proper lighting highlights facial features without distortion.
 Proper head size in a passport photo, demonstrating the measurements from chin to crown.
3. How To Take A 2×2 Photo At Home: A Step-By-Step Guide
Taking a 2×2 photo at home can save time and money. Here’s how to do it right:
3.1. Equipment Needed
- Digital Camera or Smartphone: A decent camera is essential for capturing clear images.
- Tripod: Helps keep the camera steady, reducing blur.
- White Background: A white wall or sheet works perfectly.
- Good Lighting: Natural light is best, but artificial lighting can be used if necessary.
3.2. Setting Up Your Photo Shoot
- Choose a Location: Set up in front of a white wall or hang a white sheet to create a plain background.
- Position the Subject: Have the person stand about 4 feet away from the background to avoid shadows.
- Lighting: Ensure the face is evenly lit. If using natural light, face a window. If using artificial light, use two lamps placed on either side of the subject to minimize shadows.
- Camera Setup: Use a tripod to keep the camera steady. Set the camera at eye level to avoid distortion.
3.3. Taking the Photo
- Pose: The subject should face the camera directly with a neutral expression.
- Distance: Stand about 6-8 feet away from the subject to capture the entire head and shoulders.
- Focus: Ensure the camera is focused on the subject’s face.
- Capture: Take several photos to choose the best one.
3.4. Reviewing and Selecting the Best Shot
After taking several photos, review them to select the best one based on the following criteria:
- Clarity: The photo should be sharp and in focus.
- Lighting: The face should be evenly lit without harsh shadows.
- Expression: The subject should have a neutral expression or a natural smile.
- Composition: The head should be centered in the frame with enough space around it for cropping.
4. How To Edit A 2×2 Photo: Software And Online Tools
Once you have a suitable photo, editing is crucial to meet all the specific requirements. Several software and online tools can help.
4.1. Adobe Photoshop
Adobe Photoshop is a professional-grade image editing software offering precise control over every aspect of the photo.
- Resizing: Use the crop tool to set the dimensions to 2×2 inches.
- Adjusting Brightness and Contrast: Enhance the lighting to ensure the face is well-lit.
- Removing Blemishes: Clean up any minor imperfections for a polished look.
4.2. GIMP (GNU Image Manipulation Program)
GIMP is a free, open-source alternative to Photoshop, providing many of the same features.
- Resizing: Similar to Photoshop, use the crop tool for precise dimensions.
- Color Correction: Adjust the color balance to ensure the background is white or off-white.
- Retouching: Remove any distractions or imperfections.
4.3. Online Photo Editors
Several online tools are designed specifically for creating passport photos. These are often easier to use and require no software installation.
- IDPhotoDIY: A user-friendly tool that automatically crops and resizes the photo to meet passport requirements.
- PersoFoto: Offers a simple interface with guided steps to create a compliant photo.
- Passport Photo Online: An AI-powered tool that checks and adjusts your photo to meet official standards.
4.4. Step-by-Step Editing Guide
- Upload the Photo: Open your chosen editing software or online tool and upload the photo.
- Crop to 2×2 Inches: Use the crop tool to set the dimensions to 2×2 inches (51 x 51 mm). Ensure the head size meets the required measurements.
- Adjust Lighting: Adjust brightness and contrast to ensure the face is evenly lit and free from shadows.
- Correct Color: If the background isn’t perfectly white, use color correction tools to adjust it.
- Remove Blemishes: Use retouching tools to remove any minor imperfections or distractions.
- Save the Photo: Save the edited photo in JPEG format with a high resolution.
 Using an online tool to resize and edit a photo to meet 2×2 dimensions.
5. What Mistakes To Avoid When Making A 2×2 Photo?
Avoiding common mistakes can save you from rejection and wasted effort.
5.1. Poor Lighting
Shadows or glare on the face can make the photo unacceptable. Ensure even lighting by using multiple light sources or facing a bright window.
5.2. Incorrect Head Size
The head size must be within the specified range. Use a ruler or the editing tool to measure and adjust the head size accurately.
5.3. Non-Compliant Background
A busy or colored background is a common mistake. Always use a plain white or off-white background.
5.4. Wearing Eyeglasses or Hats
Unless medically necessary or for religious reasons, eyeglasses and hats are not allowed. Remove them before taking the photo.
5.5. Unnatural Expression
An exaggerated smile or frown can lead to rejection. Maintain a neutral expression or a natural, slight smile.
5.6. Low Resolution
A low-resolution photo will appear blurry and pixelated. Use a high-resolution camera and save the edited photo in a high-quality format.
6. How To Print A 2×2 Photo?
Printing your 2×2 photo correctly is just as important as taking and editing it.
6.1. Choosing the Right Paper
Use high-quality photo paper for the best results. Matte or glossy paper works well, depending on your preference.
6.2. Setting Up Your Printer
- Load Photo Paper: Place the photo paper in your printer’s paper tray.
- Printer Settings: Open the printer settings and select “photo printing” mode.
- Paper Size: Choose the correct paper size (usually 4×6 inches).
- Print Quality: Set the print quality to “high” or “best” for optimal results.
6.3. Printing Multiple Photos On A Single Sheet
To save paper and ink, print multiple 2×2 photos on a single sheet.
- Create a Template: Use a word processing program (like Microsoft Word) or a photo editing software to create a template with multiple 2×2 inch squares.
- Insert Photos: Insert the edited 2×2 photo into each square of the template.
- Print: Print the template on the photo paper.
6.4. Cutting The Photos
Use a paper cutter or scissors to carefully cut out each 2×2 photo. Ensure the edges are clean and straight.
7. Where To Get A 2×2 Photo Professionally?
If you prefer not to take and print the photo yourself, several professional services can help.
7.1. Pharmacies and Drugstores
Pharmacies like CVS and Walgreens offer passport photo services. They typically provide printed photos within minutes.
7.2. Post Offices
Many post offices also offer passport photo services, ensuring compliance with official requirements.
7.3. Professional Photo Studios
Professional photo studios offer high-quality passport photos with expert lighting and editing.
7.4. Online Services With Printing Options
Some online passport photo services, like PersoFoto and Passport Photo Online, offer printing and shipping options.
8. 2×2 Photo For U.S. Passport: What You Need To Know?
A 2×2 photo is mandatory for U.S. passport applications. Here’s what you need to know to ensure your photo meets all the requirements.
8.1. U.S. Department Of State Guidelines
The U.S. Department of State provides detailed guidelines for passport photos. Adhering to these guidelines is crucial for acceptance.
8.2. Key Requirements For U.S. Passport Photos
- Size: 2×2 inches (51 x 51 mm).
- Head Size: 1 inch to 1 3/8 inches (25 mm – 35 mm) from the bottom of the chin to the top of the head.
- Background: Plain white or off-white.
- Pose: Facing the camera directly with a neutral expression.
- Attire: Normal street attire.
- Eyeglasses: Generally not allowed.
- Hats and Head Coverings: Prohibited unless worn daily for religious reasons.
- Lighting: Evenly lit face, free from shadows and glare.
8.3. How To Avoid Rejection?
To avoid rejection, double-check your photo against the U.S. Department of State guidelines. Ensure all requirements are met before submitting your application.
 A man having his passport photo taken at a professional studio, ensuring compliance with all regulations.
9. 2×2 Photo For Other Official Documents
While the 2×2 photo is commonly used for passports, it’s also required for various other official documents.
9.1. Visa Applications
Many countries require a 2×2 photo for visa applications. Check the specific requirements of the country you are applying to.
9.2. Green Card Applications
The U.S. Citizenship and Immigration Services (USCIS) requires a 2×2 photo for green card applications.
9.3. ID Cards
Some institutions and organizations require a 2×2 photo for ID cards.
9.4. Other Government Documents
Various other government documents may require a 2×2 photo. Always check the specific requirements of the application.
10. Tips For Taking Photos Of Babies And Children
Taking a compliant 2×2 photo of babies and children can be challenging. Here are some tips to make the process easier.
10.1. Laying The Baby Down
Lay the baby on a white sheet or blanket to create a plain background. Take the photo from above, ensuring the baby’s face is centered and evenly lit.
10.2. Supporting The Child
Have someone support the child from behind, ensuring their hands are not visible in the photo. Use a plain white background and ensure the child is facing the camera directly.
10.3. Using Toys Or Distractions
Use toys or distractions to get the child’s attention and encourage them to look at the camera.
10.4. Taking Multiple Shots
Take multiple shots to increase your chances of getting a good photo. Be patient and persistent.
11. Advanced Tips For Professional-Quality Photos
For those looking to take their 2×2 photos to the next level, here are some advanced tips.
11.1. Calibrating Your Monitor
Calibrate your monitor to ensure accurate color representation. This is crucial for ensuring the background is perfectly white.
11.2. Using External Flashes
Use external flashes to control the lighting more precisely. Diffuse the flash to create soft, even lighting.
11.3. Understanding Color Temperature
Understand color temperature and adjust your lighting accordingly. Use a color temperature meter to ensure accurate color balance.
11.4. Post-Processing Techniques
Master advanced post-processing techniques in Photoshop or GIMP to fine-tune your photos. Use layers and masks to make precise adjustments.
12. Common Myths About 2×2 Photos
There are several myths surrounding 2×2 photos. Let’s debunk some of them.
12.1. Smiling Is Always Prohibited
While a neutral expression is preferred, a natural, slight smile is often acceptable. Avoid exaggerated smiles or open-mouthed expressions.
12.2. Background Must Be Pure White
While a plain white background is ideal, an off-white background is often acceptable. Ensure the background is uniform and free from distractions.
12.3. You Can Wear Makeup
Wearing makeup is generally acceptable, as long as it doesn’t significantly alter your appearance. Avoid heavy makeup that obscures your natural features.
12.4. Home Photos Are Never Accepted
Photos taken at home are perfectly acceptable, as long as they meet all the specific requirements. Follow the guidelines and double-check your photo before submitting it.
13. The Future Of Photo Identification
The future of photo identification is evolving with technological advancements.
13.1. Digital Photo Submission
Many applications now allow digital photo submission. Ensure your digital photo meets the specified requirements.
13.2. AI-Powered Photo Verification
AI-powered tools are increasingly being used to verify photo compliance. These tools automatically check for issues like incorrect size, lighting, and pose.
13.3. Biometric Identification
Biometric identification technologies, such as facial recognition, are becoming more common. These technologies rely on accurate and compliant photos.
14. How To Store And Manage Your Digital Photos
Properly storing and managing your digital photos ensures they remain accessible and secure.
14.1. Organizing Your Photos
Create a logical folder structure to organize your photos. Use descriptive names for your folders and files.
14.2. Backing Up Your Photos
Back up your photos regularly to protect against data loss. Use multiple backup methods, such as external hard drives and cloud storage.
14.3. Cloud Storage Options
Consider using cloud storage services like Google Photos, Dropbox, or iCloud to store and manage your photos. These services offer automatic backup and easy access from any device.
14.4. Archiving Your Photos
Archive your photos to preserve them for the long term. Use archival-quality storage media and store them in a cool, dry place.
15. Conclusion: Mastering The Art Of The 2×2 Photo
Mastering how to make 2×2 photo involves understanding the specific requirements, taking a good photo, editing it carefully, and printing it correctly. Whether you’re applying for a U.S. passport, visa, or ID card, following these guidelines will ensure your photo is accepted. For more detailed guides and tips, explore dfphoto.net, where you can discover a wealth of information to enhance your photography skills.
FAQ: Answering Your Questions About 2×2 Photos
1. Can I wear jewelry in a 2×2 photo?
Yes, you can wear jewelry, but it should not obscure your face or reflect light in a way that causes glare. According to the U.S. Department of State, simple jewelry is generally acceptable.
2. What if I have a medical condition that prevents me from meeting all the requirements?
If you have a medical condition that prevents you from meeting all the requirements, provide supporting documentation from your doctor. The U.S. Department of State will review your case and make a determination.
3. Can I submit a black and white photo?
No, the photo must be in color. The U.S. Department of State requires all passport photos to be in color to accurately represent your appearance.
4. How often do passport photo requirements change?
Passport photo requirements don’t change frequently, but it’s always a good idea to check the latest guidelines from the U.S. Department of State before taking your photo.
5. What should I do if my photo is rejected?
If your photo is rejected, review the rejection reasons and retake your photo, ensuring you meet all the requirements. You can also seek professional help from a photo studio or passport photo service.
6. Can I wear contact lenses in my 2×2 photo?
Yes, you can wear contact lenses in your 2×2 photo, as long as they do not alter your appearance significantly.
7. How long is a passport photo valid for?
A passport photo should be taken within the last six months to accurately reflect your current appearance.
8. What is the ideal resolution for a digital 2×2 photo?
The ideal resolution for a digital 2×2 photo is at least 300 DPI (dots per inch). This ensures the photo is clear and sharp when printed.
9. Can I use a filter on my 2×2 photo?
No, you should not use any filters on your 2×2 photo. Filters can alter your appearance and make the photo unacceptable.
10. Is it better to take a 2×2 photo myself or go to a professional?
Whether to take a 2×2 photo yourself or go to a professional depends on your comfort level and equipment. If you’re confident in your ability to meet all the requirements, taking it yourself can save time and money. However, a professional can ensure compliance and provide high-quality results.
Ready to take the perfect 2×2 photo? Explore more tips, tutorials, and stunning photography at dfphoto.net. Join our community of photography enthusiasts and elevate your skills today. Don’t miss out – visit dfphoto.net now! Address: 1600 St Michael’s Dr, Santa Fe, NM 87505, United States. Phone: +1 (505) 471-6001.