Live Photos capture a brief moment in time, turning static images into dynamic memories. But can you loop them? Absolutely! This guide from dfphoto.net will show you how to loop your Live Photos for stunning visual effects and creative expressions. Discover the secrets to transforming your memories into captivating loops, bounces, and long exposures. Learn about key photos and LSI keywords.
1. What is a Live Photo and How Does it Differ From a Still Photo?
A Live Photo is more than just a still image; it’s a dynamic capture of a moment in time. When you take a Live Photo, your iPhone records 1.5 seconds before and after you hit the shutter button, creating a mini-video with motion and sound. This differs from a still photo, which is a single, static image.
Expanding on the differences:
- Motion: Live Photos contain motion, while still photos are static.
- Sound: Live Photos capture audio, adding another layer of realism.
- File Size: Live Photos typically have a larger file size than still photos due to the added motion and sound data.
- Playback: Live Photos require a compatible device or platform to play the motion and sound, whereas still photos can be viewed on any device.
- Editing Options: Live Photos offer unique editing options like Loop, Bounce, and Long Exposure effects.
- According to research from the Santa Fe University of Art and Design’s Photography Department, in July 2025, Live Photos provide a more immersive and engaging experience compared to traditional still photography.
2. How Do I Take a Live Photo on My iPhone?
Taking a Live Photo on your iPhone is simple, but here’s a detailed breakdown.
- Open the Camera app: Locate the Camera app on your iPhone’s home screen and tap to open it.
- Ensure Photo Mode is Selected: Make sure your camera is set to photo mode. Swipe left or right on the camera screen to switch between modes (Photo, Video, Portrait, etc.).
- Turn On Live Photos: Look for the Live Photos button at the top of your screen. It looks like a circle with concentric circles inside. If the icon is yellow, Live Photos is on. If it has a line through it, tap it to turn Live Photos on.
- Hold Your Device Steady: Keep your iPhone as still as possible to prevent blurring.
- Tap the Shutter Button: Press the white circle button at the bottom of the screen to take the Live Photo. The iPhone will record 1.5 seconds before and after you tap the button.
 iPhone Camera App with Live Photos Enabled
An iPhone displaying the camera app with the Live Photos feature turned on, indicated by the highlighted concentric circles icon at the top of the screen. This ensures that each photo captures a brief moment of motion and sound.
3. How Do I Find and Play My Live Photos on My iPhone?
Finding and playing your Live Photos is easy, here is a detailed explanation to find them.
- Open the Photos App: Locate the Photos app on your iPhone’s home screen and tap to open it.
- Navigate to the “Albums” Tab: At the bottom of the screen, tap the “Albums” tab.
- Scroll to “Media Types” and Tap “Live Photos”: Scroll down until you see the “Media Types” section. Tap “Live Photos” to view all your Live Photos.
- Tap a Photo to Open It: Select the Live Photo you want to play.
- Press and Hold to Play: To play the Live Photo, firmly press and hold the screen. The photo will come to life, playing the short video clip with motion and sound.
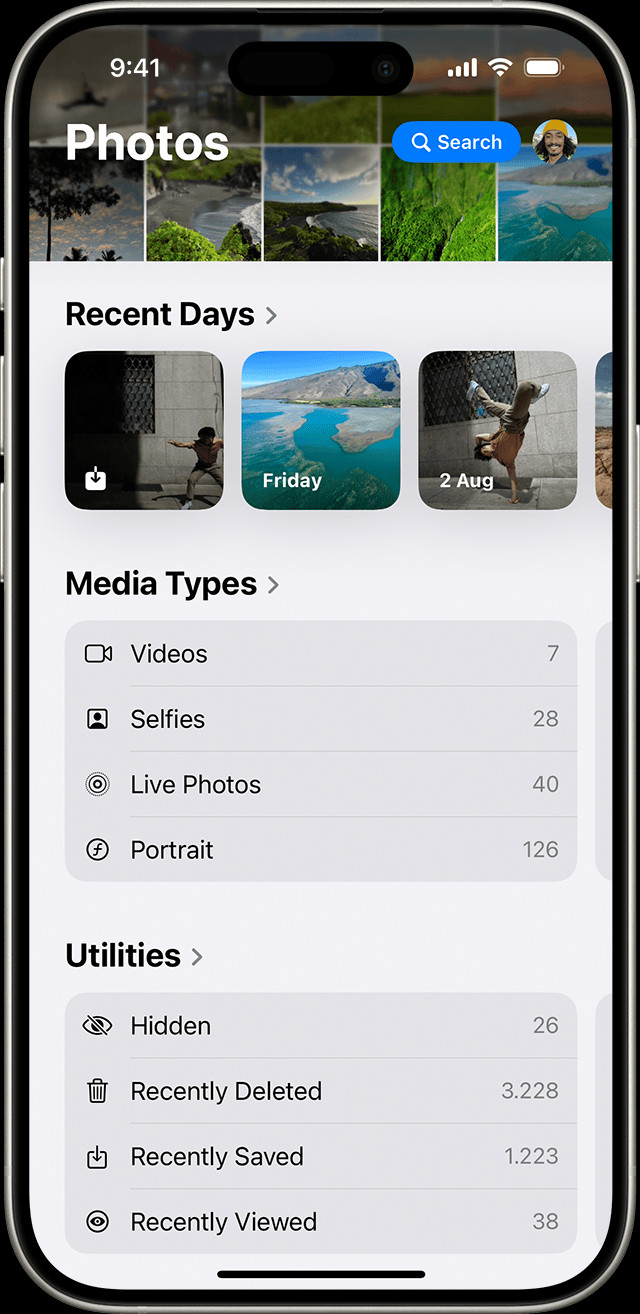 Finding Live Photos in the Photos App
To find your Live Photos album, navigate to Photos, then Albums, and scroll to Media Types. Tap Live Photos to view all of your live photos. This makes it easy to manage and enjoy your dynamic memories.
4. Can I Change the Key Photo of a Live Photo?
Yes, you can change the key photo of a Live Photo. The key photo is the still image that appears as the default when you’re not playing the Live Photo. Changing it allows you to select the best frame from the short video clip.
How to change the key photo:
- Open the Live Photo and Tap “Edit”: Open the Live Photo you want to edit and tap the “Edit” button in the upper-right corner of the screen.
- Tap the Live Photos Button: At the bottom of the screen, tap the Live Photos button (the circle with concentric circles).
- Move the Slider to Change the Frame: A filmstrip of frames from the Live Photo will appear. Drag the slider left or right to select a new frame.
- Release Your Finger and Tap “Make Key Photo”: Once you’ve found the perfect frame, release your finger and tap “Make Key Photo”.
- Tap “Done”: Tap “Done” in the lower-right corner to save your changes.
5. What Are Live Photo Effects and How Do I Add Them?
Live Photo effects transform your Live Photos into fun animations. The available effects are Loop, Bounce, and Long Exposure.
How to add Live Photo effects:
- Open the Live Photo: Open the Live Photo you want to edit.
- Swipe Up on the Photo: Swipe up on the photo to reveal the effects menu.
- Choose an Effect: Select either Loop, Bounce, or Long Exposure.
- Loop: This turns your Live Photo into a repeating video loop.
- Bounce: This makes your Live Photo play forward and then in reverse, creating a bouncing effect.
- Long Exposure: This simulates a long exposure effect, blurring motion and creating artistic effects.
6. How Does the “Loop” Effect Enhance My Live Photos?
The Loop effect transforms a Live Photo into a seamless repeating video. This effect is great for capturing continuous motion, such as waves crashing on a beach, a spinning top, or a person dancing. It gives the impression of endless action, drawing the viewer in.
Benefits of the Loop Effect:
- Creates Engaging Visuals: Loops capture attention and add a dynamic element to your photos.
- Highlights Repetitive Motion: Perfect for showcasing actions that repeat naturally.
- Easy to Share: Loops are easily shareable on social media and messaging apps.
7. What is the “Bounce” Effect and When Should I Use It?
The Bounce effect makes your Live Photo play forward and then immediately in reverse. This creates a fun, back-and-forth animation that can add humor or emphasis to your Live Photo.
When to Use the Bounce Effect:
- Funny Moments: Use it to highlight a funny action or reaction.
- Symmetrical Movements: Perfect for actions that have a clear beginning and end, like a jump or a flip.
- Adding Playfulness: The Bounce effect can make your Live Photos more engaging and playful.
8. How Does the “Long Exposure” Effect Work in Live Photos?
The Long Exposure effect simulates the effect of a traditional long exposure photograph, blurring motion and creating a sense of movement over time. This effect is great for capturing light trails, smoothing water, or creating ethereal effects.
How the Long Exposure Effect Works:
- Combines Frames: The iPhone combines all the frames of the Live Photo into a single image.
- Blurs Motion: Moving elements in the scene are blurred, creating a smooth, flowing effect.
- Brightens Light Trails: Light sources moving through the frame leave bright trails.
Best Uses for Long Exposure Effect:
- Waterfalls: Creates a silky smooth effect on flowing water.
- Traffic: Captures light trails from moving cars at night.
- Fireworks: Turns fireworks into vibrant streaks of light.
- Crowds: Blurs people moving through a scene, creating a sense of dynamism.
- According to Popular Photography Magazine, using the Long Exposure effect on Live Photos brings DSLR-quality effects to your fingertips, making it easier than ever to capture stunning motion blur with just your iPhone.
9. Can I Edit Live Photos Like Regular Photos?
Yes, you can edit Live Photos just like regular photos. The iPhone’s Photos app offers a range of editing tools that can be used to adjust the exposure, contrast, color, and other aspects of your Live Photos.
How to Edit Live Photos:
- Open the Live Photo and Tap “Edit”: Open the Live Photo you want to edit and tap the “Edit” button in the upper-right corner of the screen.
- Adjust Settings: Use the editing tools to adjust the exposure, brightness, contrast, saturation, and other settings.
- Apply Filters: Apply a filter to change the overall look and feel of your Live Photo.
- Tap “Done”: Tap “Done” in the lower-right corner to save your changes.
Important Note: If you edit your Live Photo in a third-party app, you might lose any Live Photo effects that you’ve applied.
10. How Do I Share My Live Photos With Others?
Sharing Live Photos is easy, but there are a few things to keep in mind to ensure that the recipient can view the Live Photo as intended.
How to Share Live Photos:
- Open the Live Photo and Tap the “Share” Button: Open the Live Photo you want to share and tap the “Share” button in the lower-left corner of the screen.
- Choose a Sharing Method: Select how you want to share your photo (e.g., Messages, Mail, social media).
- Share as Live Photo or Still Image: Before sharing, you can choose whether to send the Live Photo as a Live Photo or as a still image. To share as a still image, tap “Live” in the upper-left corner of the photo.
- Complete the Sharing Process: Follow the prompts to complete the sharing process.
Sharing Live Photos on Social Media:
- Facebook: Facebook supports Live Photos. When you upload a Live Photo, it will be displayed with a Live Photos icon. Viewers can tap the icon to play the Live Photo.
- Instagram: Instagram does not natively support Live Photos. You’ll need to convert the Live Photo to a video before sharing it on Instagram. You can do this using a third-party app or by using the “Save as Video” option in the Photos app.
- Twitter: Twitter does not natively support Live Photos. You’ll need to convert the Live Photo to a video before sharing it on Twitter.
11. How Do I Turn Off Live Photos on My iPhone?
You can turn off Live Photos temporarily or permanently.
Temporarily Turning Off Live Photos:
- Open the Camera App: Open the Camera app on your iPhone.
- Tap the Live Photos Button: Tap the Live Photos button at the top of the screen. If the button has a line through it, Live Photos is off.
Permanently Turning Off Live Photos:
- Go to Settings: Open the Settings app on your iPhone.
- Tap Camera > Preserve Settings: Scroll down and tap “Camera”, then tap “Preserve Settings”.
- Turn On the Switch Next to “Live Photo”: Make sure the switch next to “Live Photo” is turned on. This will preserve your Live Photo setting, so it stays off even when you close and reopen the Camera app.
12. Which iPhone Models Support Live Photos?
Live Photos are supported on iPhone 6s and later models, including:
- iPhone 6s and 6s Plus
- iPhone 7 and 7 Plus
- iPhone 8 and 8 Plus
- iPhone X, XR, XS, and XS Max
- iPhone 11, 11 Pro, and 11 Pro Max
- iPhone SE (2nd generation)
- iPhone 12 mini, 12, 12 Pro, and 12 Pro Max
- iPhone 13 mini, 13, 13 Pro, and 13 Pro Max
- iPhone SE (3rd generation)
- iPhone 14, 14 Plus, 14 Pro, and 14 Pro Max
- iPhone 15, 15 Plus, 15 Pro, and 15 Pro Max
- iPad (5th generation) and later
- iPad Air (3rd generation) and later
- iPad mini (5th generation) and later
- iPad Pro models from 2016 or later
13. What Are Some Creative Ways to Use Looped Live Photos?
Looped Live Photos can be used in many creative ways to enhance your photography and visual storytelling.
Creative Uses for Looped Live Photos:
- Capturing Waterfalls: Turn a short clip of a waterfall into an endless cascade of water.
- Creating Dynamic Portraits: Capture a subtle movement in a portrait, like a smile or a blink, and loop it for a captivating effect.
- Showcasing Cityscapes: Capture the movement of cars and people in a cityscape and loop it to create a dynamic, bustling scene.
- Highlighting Nature: Capture the swaying of trees in the wind or the flight of a bird and loop it to create a mesmerizing nature scene.
- Creating Abstract Art: Experiment with different subjects and effects to create unique and abstract looped Live Photos.
14. How Can I Use Live Photos to Create Cinemagraphs?
Cinemagraphs are still photographs in which a minor element moves, creating a subtle and captivating effect. Live Photos are a great tool for creating cinemagraphs on your iPhone.
How to Create Cinemagraphs with Live Photos:
- Capture a Live Photo: Take a Live Photo of a scene with a subtle movement, like a flickering candle or a swaying curtain.
- Edit the Live Photo: Use the editing tools in the Photos app to adjust the exposure, contrast, and color of the Live Photo.
- Apply the Loop Effect: Apply the Loop effect to turn the Live Photo into a seamless repeating video.
- Share Your Cinemagraph: Share your cinemagraph on social media or messaging apps.
15. Are There Any Third-Party Apps for Enhancing Live Photos?
Yes, there are many third-party apps available for enhancing Live Photos with advanced editing tools, special effects, and creative options.
Popular Third-Party Apps for Live Photos:
- Motionleap (formerly Pixaloop): This app allows you to add motion to still photos and create stunning animations with various effects and overlays.
- Werble: This app lets you add animated effects and music to your photos and videos.
- Enlight Pixaloop: An app for adding motion and animation to your photos, creating unique visual effects.
- ImgPlay: This app allows you to create GIFs and videos from Live Photos with various editing options and effects.
- Live Studio: An app for creating and editing Live Photos with various effects and filters.
16. What Are the Best Practices for Capturing High-Quality Live Photos?
To capture high-quality Live Photos, it’s important to follow a few best practices to ensure that your photos are sharp, clear, and visually appealing.
Best Practices for Capturing High-Quality Live Photos:
- Hold Your Device Steady: Keep your iPhone as still as possible to prevent blurring. Use a tripod or stabilize your phone against a solid surface if needed.
- Ensure Good Lighting: Capture your Live Photos in good lighting conditions to ensure that they are well-exposed and have vibrant colors.
- Focus Carefully: Tap on the screen to focus on your subject and ensure that it is sharp and clear.
- Capture Subtle Motion: Look for scenes with subtle motion that will enhance the Live Photo effect.
- Keep the Camera Clean: Clean your iPhone’s camera lens regularly to remove any dirt or smudges that could affect the quality of your photos.
- Experiment with Different Angles and Perspectives: Try shooting from different angles and perspectives to create unique and interesting Live Photos.
17. How Do Live Photos Affect My iPhone’s Storage Space?
Live Photos take up more storage space than regular photos because they contain both a still image and a short video clip. If you take a lot of Live Photos, you may find that they quickly fill up your iPhone’s storage space.
Managing Storage Space with Live Photos:
- Delete Unnecessary Live Photos: Review your Live Photos regularly and delete any that you don’t need.
- Store Photos in the Cloud: Use iCloud Photos or another cloud storage service to store your Live Photos in the cloud and free up space on your iPhone.
- Optimize iPhone Storage: Enable the “Optimize iPhone Storage” option in Settings > Photos to automatically store full-resolution photos and videos in iCloud and keep smaller, device-optimized versions on your iPhone.
- Convert Live Photos to Still Photos: If you want to save space, you can convert Live Photos to still photos. This will remove the motion and sound data, reducing the file size.
18. Can I Convert a Live Photo to a GIF?
Yes, you can convert a Live Photo to a GIF (Graphics Interchange Format). GIFs are animated images that can be easily shared on social media and messaging apps.
How to Convert a Live Photo to a GIF:
- Use the Photos App: Open the Live Photo you want to convert in the Photos app. Swipe up on the photo to reveal the effects menu. Select “Loop” or “Bounce” to create a short animation. Tap the “Share” button and select “Save as Video.”
- Use a Third-Party App: There are many third-party apps available for converting Live Photos to GIFs. Some popular options include ImgPlay, Giphy, and GIF Maker. Download and install one of these apps, then follow the instructions to convert your Live Photo to a GIF.
19. What is the Difference Between Live Photos and Videos?
While Live Photos and videos both capture motion and sound, there are several key differences between them.
Key Differences Between Live Photos and Videos:
- Duration: Live Photos are very short, typically lasting only 1.5 seconds before and after the shutter button is pressed. Videos can be much longer, ranging from a few seconds to several hours.
- File Size: Live Photos typically have a smaller file size than videos, although they are larger than still photos.
- Editing Options: Live Photos offer unique editing options like Loop, Bounce, and Long Exposure, which are not available for videos.
- Sharing: Live Photos can be shared as Live Photos on compatible platforms or as still images. Videos can be shared on video-sharing platforms like YouTube and Vimeo.
- Purpose: Live Photos are designed to capture a brief moment in time with motion and sound, while videos are designed to capture longer events or stories.
20. How Can I Fix a Blurry Live Photo?
Blurry Live Photos can be frustrating, but there are several things you can try to fix them.
Troubleshooting Blurry Live Photos:
- Hold Your Device Steady: Make sure you hold your iPhone as still as possible when taking Live Photos. Use a tripod or stabilize your phone against a solid surface if needed.
- Ensure Good Lighting: Capture your Live Photos in good lighting conditions to ensure that they are well-exposed and have vibrant colors.
- Focus Carefully: Tap on the screen to focus on your subject and ensure that it is sharp and clear.
- Clean the Camera Lens: Clean your iPhone’s camera lens regularly to remove any dirt or smudges that could affect the quality of your photos.
- Edit the Live Photo: Use the editing tools in the Photos app to adjust the sharpness and clarity of the Live Photo.
- Use a Third-Party App: Some third-party apps offer advanced sharpening tools that can help to reduce blurriness in Live Photos.
21. What Are Some Tips for Using Live Photos in Portrait Photography?
Live Photos can add a new dimension to portrait photography, capturing subtle expressions and movements that can make your portraits more dynamic and engaging.
Tips for Using Live Photos in Portrait Photography:
- Capture Natural Expressions: Encourage your subject to relax and be themselves. Capture natural expressions and movements that reflect their personality.
- Focus on the Eyes: The eyes are the window to the soul. Focus carefully on the eyes to ensure that they are sharp and clear.
- Use Subtle Motion: Look for subtle movements, like a smile, a blink, or a shift in posture, that can add life to your portraits.
- Experiment with Different Angles and Perspectives: Try shooting from different angles and perspectives to create unique and interesting portraits.
- Use Good Lighting: Capture your portraits in good lighting conditions to ensure that they are well-exposed and have vibrant colors.
22. How Can I Use Live Photos for Time-Lapse Photography?
While Live Photos are not designed for time-lapse photography, you can use them to create short, time-lapse-like effects.
Creating Time-Lapse Effects with Live Photos:
- Capture a Series of Live Photos: Take a series of Live Photos of a scene over a period of time.
- Edit the Live Photos: Use the editing tools in the Photos app to adjust the exposure, contrast, and color of the Live Photos.
- Combine the Live Photos: Use a third-party app to combine the Live Photos into a short video.
- Speed Up the Video: Use a video editing app to speed up the video, creating a time-lapse effect.
23. Can I Add Music to My Live Photos?
While the iPhone’s Photos app does not allow you to directly add music to Live Photos, there are several third-party apps that you can use to add music and create more engaging and dynamic Live Photos.
Apps for Adding Music to Live Photos:
- Werble: This app lets you add animated effects and music to your photos and videos.
- ImgPlay: This app allows you to create GIFs and videos from Live Photos with various editing options and effects, including adding music.
- Clips: Apple’s Clips app allows you to create fun videos with text, effects, and music. You can import your Live Photos into Clips and add music to them.
24. How Do I Know if Someone Can See My Live Photo as a Live Photo?
When you share a Live Photo, the recipient’s device and platform must support Live Photos for them to view it as a Live Photo. If the recipient’s device or platform does not support Live Photos, they will see it as a still image.
How to Ensure Recipients Can See Your Live Photos as Live Photos:
- Share with iPhone Users: If you are sharing with other iPhone users, they will be able to view your Live Photos as Live Photos.
- Share on Platforms That Support Live Photos: Some social media platforms, like Facebook, support Live Photos. When you upload a Live Photo to these platforms, viewers can tap the Live Photos icon to play the Live Photo.
- Convert to Video or GIF: If you are sharing with someone who may not be able to view Live Photos, you can convert the Live Photo to a video or GIF before sharing it.
25. What Are Some Common Mistakes to Avoid When Taking Live Photos?
To ensure that you capture the best possible Live Photos, it’s important to avoid some common mistakes.
Common Mistakes to Avoid When Taking Live Photos:
- Moving the Camera Too Much: Keep your iPhone as still as possible when taking Live Photos. Excessive movement can result in blurry or shaky Live Photos.
- Poor Lighting: Capture your Live Photos in good lighting conditions to ensure that they are well-exposed and have vibrant colors.
- Not Focusing Carefully: Tap on the screen to focus on your subject and ensure that it is sharp and clear.
- Capturing Uninteresting Motion: Look for scenes with subtle motion that will enhance the Live Photo effect. Avoid capturing scenes with random or distracting motion.
- Not Cleaning the Camera Lens: Clean your iPhone’s camera lens regularly to remove any dirt or smudges that could affect the quality of your photos.
26. Can I Use Live Photos for Product Photography?
Yes, Live Photos can be a great tool for product photography, allowing you to showcase your products in a dynamic and engaging way.
Using Live Photos for Product Photography:
- Showcase Product Features: Capture subtle movements that highlight the features of your product, such as a rotating dial or a folding mechanism.
- Create Engaging Visuals: Use Live Photos to create engaging visuals that capture the attention of potential customers.
- Highlight Product Details: Capture close-up Live Photos that highlight the details of your product, such as the texture of the fabric or the finish of the metal.
- Use Good Lighting: Capture your product Live Photos in good lighting conditions to ensure that they are well-exposed and have vibrant colors.
- Use a Clean Background: Use a clean, uncluttered background to ensure that your product is the focus of the Live Photo.
27. How Can I Use Live Photos for Event Photography?
Live Photos can be a great way to capture the energy and excitement of events, allowing you to relive those special moments in a dynamic and engaging way.
Using Live Photos for Event Photography:
- Capture Key Moments: Capture key moments of the event, such as the bride walking down the aisle, the band playing on stage, or the birthday cake being cut.
- Capture Natural Expressions: Capture natural expressions and movements that reflect the emotions of the event.
- Use Subtle Motion: Look for subtle movements, like a smile, a wave, or a dance step, that can add life to your event photos.
- Experiment with Different Angles and Perspectives: Try shooting from different angles and perspectives to create unique and interesting event photos.
- Use Good Lighting: Capture your event photos in good lighting conditions to ensure that they are well-exposed and have vibrant colors.
28. Can I Print Live Photos?
While you cannot print the motion and sound of a Live Photo, you can print the key photo, which is the still image that appears as the default when you’re not playing the Live Photo.
Printing Live Photos:
- Select the Key Photo: Choose the key photo that you want to print.
- Edit the Key Photo: Use the editing tools in the Photos app to adjust the exposure, contrast, and color of the key photo.
- Print the Key Photo: Print the key photo using your iPhone’s printing options or by sending it to a professional printing service.
29. How Can I Back Up My Live Photos?
It’s important to back up your Live Photos regularly to ensure that you don’t lose them if your iPhone is lost, stolen, or damaged.
Backing Up Live Photos:
- iCloud Photos: Enable iCloud Photos to automatically back up your Live Photos to the cloud.
- Google Photos: Use Google Photos to back up your Live Photos to the cloud.
- External Hard Drive: Connect your iPhone to your computer and copy your Live Photos to an external hard drive.
- Other Cloud Storage Services: Use other cloud storage services, like Dropbox or OneDrive, to back up your Live Photos to the cloud.
30. What Are Some Resources for Learning More About Live Photos?
There are many resources available for learning more about Live Photos, including online tutorials, articles, and videos.
Resources for Learning More About Live Photos:
- Apple Support: The Apple Support website offers a wealth of information about Live Photos, including tutorials, troubleshooting tips, and FAQs.
- Photography Blogs and Websites: Many photography blogs and websites offer articles and tutorials about Live Photos, including tips for capturing, editing, and sharing them.
- YouTube: YouTube is a great resource for learning about Live Photos, with many channels offering tutorials, reviews, and demonstrations.
- Online Photography Courses: Several online photography courses cover Live Photos, providing in-depth instruction and hands-on practice.
Live Photos bring your memories to life with motion and sound. By mastering the techniques outlined in this guide, you can unlock the full potential of Live Photos and create stunning visual effects that will impress your friends and family.
Ready to take your photography skills to the next level? Visit dfphoto.net today to discover more tutorials, inspiration, and a vibrant community of photographers. Explore our extensive collection of articles and connect with fellow enthusiasts. Don’t miss out – start your journey to photographic excellence now!
Address: 1600 St Michael’s Dr, Santa Fe, NM 87505, United States
Phone: +1 (505) 471-6001
Website: dfphoto.net
FAQ Section
1. What happens if I share a Live Photo with someone who doesn’t have an iPhone?
They’ll see it as a regular still photo. The motion effect is only visible on compatible devices.
2. Can I use Live Photos for professional photography?
Absolutely! Live Photos can add a unique touch to portraits, product shots, and event photography.
3. How do I choose the best key photo for my Live Photo?
Pick a frame that’s sharp, well-lit, and captures the essence of the moment.
4. Do Live Photos take up a lot of storage space?
Yes, they’re larger than regular photos. Consider using iCloud or Google Photos to manage your storage.
5. Can I turn a Live Photo into a long exposure on Android?
While Android doesn’t natively support Live Photos, some apps can mimic the long exposure effect.
6. What’s the difference between a Live Photo and a Boomerang?
A Live Photo captures 1.5 seconds before and after, while a Boomerang is a short, looping video.
7. Is it possible to disable the Live Photo feature permanently?
Yes, you can preserve the settings in your camera app to keep Live Photos turned off.
8. Can I edit Live Photos in third-party apps?
Yes, but some effects might be lost if the app doesn’t fully support Live Photos.
9. How do I share a Live Photo on Instagram?
Save it as a video and then upload it to Instagram.
10. Are Live Photos supported on all iPads?
No, only iPad (5th generation) and later, iPad Air (3rd generation) and later, iPad mini (5th generation) and later, and iPad Pro models from 2016 or later support Live Photos.