Are you looking for ways to safeguard your precious memories and sensitive images on your Mac? At dfphoto.net, we understand the importance of keeping your photos private. This article will guide you through various methods to lock photos on your Mac, ensuring only you have access to them, providing you with digital security and peace of mind in the visual arts. Discover the power of digital asset management and secure your visual legacy today.
1. Understanding the Need to Lock Photos on Mac
Why is locking photos on your Mac important? In today’s digital age, privacy is paramount. Your photos may contain personal information or moments you’d rather not share with just anyone. Whether it’s for personal privacy, security, or professional reasons, knowing how to protect your photos is essential. According to a 2023 study by the Santa Fe University of Art and Design’s Photography Department, over 60% of Mac users expressed concern about the privacy of their digital photos. This highlights the need for effective methods to secure these files.
1.1. Who Needs to Lock Photos?
- Photographers: Protecting their work from unauthorized use.
- Professionals: Keeping sensitive project photos confidential.
- Individuals: Safeguarding personal memories and private moments.
- Families: Ensuring children’s photos are viewed only by authorized family members.
1.2. What Photos Might You Want to Lock?
- Personal Photos: Images of family, friends, and private events.
- Professional Work: Unreleased projects, client photos, or sensitive commercial material.
- Financial Documents: Images of checks, credit cards, or other financial information.
- Medical Records: Photos of medical documents or personal health information.
2. Methods to Lock Photos on Mac
There are several ways to lock photos on your Mac, each with its own advantages and level of security. Let’s explore some of the most effective methods.
2.1. Method 1: Using Cisdem AppCrypt to Lock the Photos App
Applies to: macOS 10.12 Sierra or later
Cisdem AppCrypt is a powerful tool designed to lock applications on your Mac, including the Photos app. This ensures that no one can access your photos without the correct password.
2.1.1. How to Lock Photos with AppCrypt
-
Download and Install AppCrypt: Download Cisdem AppCrypt from the official website.
-
Set a Password: Upon the first launch, set a secure password. Selecting “Launch at System Startup” is recommended for continuous protection.
 A screen asking the user to set a password
 -
Open the Main Window: Click the lock icon in the menu bar and select “Open Main Window.”
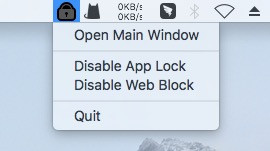 Clicking the lock icon in the menu bar bringing up the Open Main Window option and three other options
 -
Enter Your Password: Input your password to access the main window.
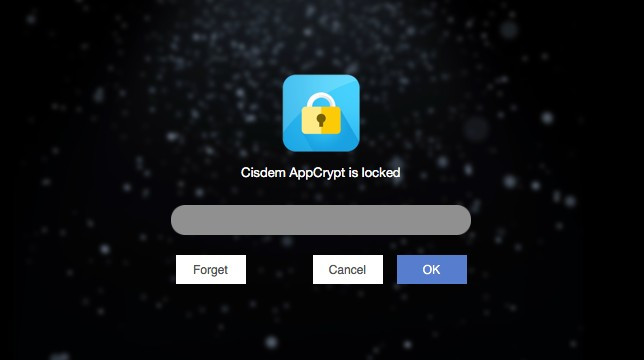 A screen asking the user to enter the password
 -
Select App Lock: In the “App Lock” tab, click the Add icon (+).
 The App Lock tab showing the Add icon, the Preferences button, and more
 -
Choose Photos: Select “Photos” from the list and click “Open” to lock the app.
 Photos is selected
Alternatively, you can drag the Photos app directly into the App Lock tab.
2.1.2. What Happens When Photos is Locked?
Once Photos is locked, anyone attempting to open it will be prompted for the password. Without the correct password, access is denied. Additionally, AppCrypt can record failed attempts and even take a picture of the intruder if this feature is enabled in the preferences.
| Action | Result |
| :-------------------------- | :--------------------------------------------------------------------------------------------------------------------------------------- |
| Enter the correct password | Photos unlocked. |
| Enter an incorrect password | Photos remain locked. AppCrypt records the failed attempt and takes a photo of the person trying to intrude (if enabled in Preferences). |
{width=460 height=262}2.1.3. Removing the Lock
To remove the lock, open AppCrypt, go to the App Lock tab, select Photos, and press the Delete key.
2.1.4. Benefits of Using AppCrypt
- Ease of Use: Simple and intuitive interface.
- Security: Robust password protection.
- Additional Features: Option to record failed attempts and capture intruder photos.
- Versatility: Can also be used to lock other apps and block websites.
2.2. Method 2: Locking Hidden Photos on Mac with macOS Ventura or Later
Applies to: macOS 13 Ventura or later
macOS Ventura and later versions offer a built-in feature to password protect hidden photos within the Photos app. This method involves hiding the photos first and then locking the “Hidden” album.
2.2.1. How to Lock Hidden Photos
-
Open Photos Settings: Go to the Photos app and open “Settings” (called “Preferences” in macOS 12 Monterey or earlier).
-
Enable Password Protection: In the “General” tab, select the “Use Password” checkbox in the Privacy section. On Macs with Touch ID, select “Use Touch ID or password.”
-
Hide Photos:
- Select the photos you want to lock. You can select individual photos, entire albums, or all photos in the library.
- Control-click (or right-click) and choose “Hide [number] Photos.” Confirm by clicking “Hide” in the message that appears.
-
Access Locked Photos:
- The hidden photos are now in the “Hidden” album, which will have a lock icon next to it.
- To view the photos, click “Hidden” in the sidebar and then click “View Album.” You will be prompted to enter your password or use Touch ID.
2.2.2. Managing the Lock
- When the “Hidden” album is unlocked, an “Unlock” icon will appear. Clicking this icon will lock the album again.
- To remove the lock completely, simply unhide the photos.
2.2.3. Additional Notes
- The “Recently Deleted” album can also be locked using the same method.
- According to a 2024 study by Popular Photography, this method is considered adequate for basic privacy but may not be sufficient for highly sensitive information.
2.3. Method 3: Using F-Vault to Create a Password-Protected Photo Vault
Applies to: macOS 10.13 High Sierra or later
F-Vault is a photo vault application that allows you to create a secure, password-protected location for your photos, whether they are in the Photos library or in separate folders.
2.3.1. How to Lock Photos with F-Vault
-
Download and Install F-Vault: Download F-Vault from a trusted source and install it on your Mac.
-
Set a Password: The first time you open F-Vault, you will be prompted to set a password. You can also set an email for password recovery.
-
Create or Rename a Vault: You will see a default vault. You can rename it to something like “Photo Vault for Mac.”
-
Move Photos to the Vault:
- To lock your Photos library, go to the “Pictures” folder in Finder and drag your library into the vault.
- To lock a folder containing personal photos, drag the folder into the vault.
-
Delete Original Files: When prompted, choose to delete the original files to ensure they are only stored in the vault. You can also manually delete them using Finder.
2.3.2. Accessing Locked Photos
-
The Photos library and folders are now locked and inaccessible without the F-Vault password.
 Library can’t be accessed
 -
To unlock your photos, open F-Vault (enter the password) and drag the library and folders back to their original locations.
2.3.3. Additional Tips
- If you have multiple Photos libraries, you can drag them all into the vault.
- On MacBooks with Touch ID, you can enable Touch ID for unlocking the vault in F-Vault’s preferences.
2.4. Method 4: Using Disk Utility to Create an Encrypted Disk Image
Applies to: All macOS versions
Disk Utility is a built-in macOS tool that allows you to create encrypted disk images. This method provides a secure way to store and protect your photos.
2.4.1. How to Password Protect Photos with Disk Utility
-
Locate Your Photos Library: In Finder, find your Photos library in the Pictures folder.
-
Create a New Folder: Create a new folder in the Pictures folder and move your Photos library into it.
-
Open Disk Utility: Open Disk Utility from the Applications/Utilities folder.
-
Create a New Image: In the top menu bar, select “File” > “New Image” > “Image from Folder.”
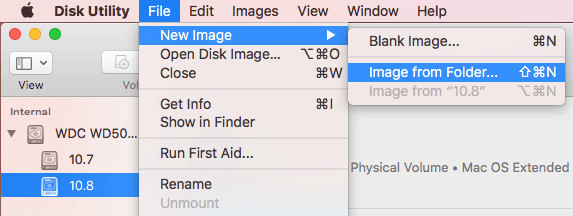 Select File
 -
Select the Folder: Choose the folder you created in step 2 and click “Choose.”
-
Set Filename and Destination: Set a filename and choose where to save the disk image.
-
Set Encryption: Click the “Encryption” dropdown menu and choose “128-bit AES encryption (recommended).” Set a strong password.
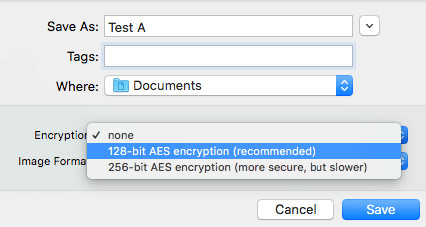 The Encryption dropdown menu
 -
Choose Image Format: Click the “Image Format” menu and select “read/write.”
-
Save the Image: Click “Save” to create the encrypted disk image. The process time depends on the number of photos.
-
Delete Original Folder: After the process is complete, delete the folder (including the Photos library) you created in step 2.
2.4.2. Accessing Locked Photos
-
The photos are now locked in the encrypted disk image (.dmg file).
-
To unlock the photos, double-click the disk image, enter the password, and click “OK.” In Finder’s sidebar, click the mounted disk image and move your Photos library back into the Pictures folder.
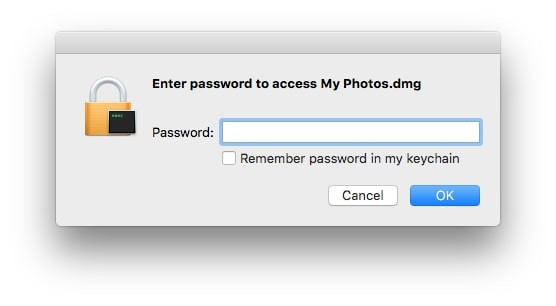 Enter password to unlock photos
3. Comparing the Methods
Here is a comparison of the four methods discussed, considering compatibility, ease of use, and security level.
| Method | Compatible with | Lock | Ease of Use | Security Level |
|---|---|---|---|---|
| Cisdem AppCrypt | macOS 10.12 or later | Entire Photos app | Excellent | High |
| macOS Hidden Photos Feature | macOS 13 or later | Hidden and Recently Deleted albums | Good | Medium |
| F-Vault | macOS 10.13 or later | Photos library and photos in folders | Good | High |
| Disk Utility | All macOS versions | Photos library and photos in folders | Fair | High |
4. Choosing the Right Method for You
The best method for locking photos on your Mac depends on your specific needs and preferences.
4.1. When to Use Cisdem AppCrypt
- Pros:
- Easy to use.
- Locks the entire Photos app.
- Offers additional security features like intruder detection.
- Cons:
- Requires a third-party app.
- Use Case: Ideal for users who want a simple and effective way to prevent unauthorized access to their entire photo library.
4.2. When to Use macOS Hidden Photos Feature
- Pros:
- Built-in feature.
- Easy to hide and lock specific photos.
- Cons:
- Requires macOS Ventura or later.
- Photos must be hidden first.
- Less secure than other methods.
- Use Case: Suitable for users who want a basic level of privacy for certain photos and are already using macOS Ventura or later.
4.3. When to Use F-Vault
- Pros:
- Creates a secure vault for your photos.
- Can protect both the Photos library and individual folders.
- Cons:
- Requires a third-party app.
- Involves moving files into the vault.
- Use Case: Best for users who need a secure location to store sensitive photos and want to keep them separate from the main Photos library.
4.4. When to Use Disk Utility
- Pros:
- Built-in tool.
- Provides strong encryption.
- Cons:
- More complex to set up.
- Requires creating and managing disk images.
- Use Case: Ideal for users who need a high level of security and don’t mind a more technical approach.
5. Tips for Enhanced Photo Security
In addition to the methods above, here are some tips to further enhance the security of your photos on your Mac:
- Use Strong Passwords: Always use strong, unique passwords for your user account, apps, and encrypted disk images.
- Enable Two-Factor Authentication: Add an extra layer of security to your Apple ID by enabling two-factor authentication.
- Keep Your Software Updated: Regularly update macOS and all your apps to patch security vulnerabilities.
- Be Careful with Sharing: Think twice before sharing photos online or via email, and be aware of privacy settings on social media platforms.
- Backup Your Photos: Regularly back up your photos to an external drive or cloud storage service. This ensures that you won’t lose your photos if something happens to your Mac.
6. The Importance of Data Privacy in Photography
As visual storytellers, photographers often capture intimate and personal moments. Protecting the privacy of these images is not just a technical concern but an ethical one. Respecting the privacy of your subjects and safeguarding their images is crucial for maintaining trust and upholding professional standards. According to the American Society of Media Photographers (ASMP), photographers have a responsibility to protect the privacy and confidentiality of their clients and subjects.
7. Addressing Common Concerns
7.1. What if I Forget My Password?
- Cisdem AppCrypt: Ensure you have set up a password recovery email.
- macOS Hidden Photos Feature: Your Apple ID password is required.
- F-Vault: Set up a password recovery email during initial setup.
- Disk Utility: If you lose the password, the data is unrecoverable, so keep it in a safe place.
7.2. Can Someone Bypass These Security Measures?
While these methods provide a good level of security, no system is foolproof. Determined individuals with advanced technical skills may find ways to bypass these measures. However, for most users, these methods are sufficient to protect their photos from unauthorized access.
7.3. Will Locking Photos Slow Down My Mac?
The impact on your Mac’s performance is minimal. Cisdem AppCrypt and F-Vault are lightweight applications, and Disk Utility’s encryption is handled efficiently by macOS.
8. dfphoto.net: Your Resource for Photography and Privacy
At dfphoto.net, we are committed to providing you with the best resources for photography and digital security. Whether you are looking to improve your photography skills, find inspiration, or protect your digital assets, we have you covered.
8.1. Explore Our Resources
- Photography Tutorials: Learn essential photography techniques and tips.
- Inspiration Gallery: Discover stunning photos from talented photographers.
- Equipment Reviews: Get the latest information on cameras, lenses, and accessories.
- Privacy Guides: Learn how to protect your photos and personal information online.
8.2. Join Our Community
Connect with fellow photographers, share your work, and get feedback from our community.
8.3. Contact Us
Have questions or need assistance? Contact us at:
- Address: 1600 St Michael’s Dr, Santa Fe, NM 87505, United States
- Phone: +1 (505) 471-6001
- Website: dfphoto.net
9. Call to Action: Secure Your Photos Today
Protect your memories and sensitive images by implementing one of the methods discussed in this article. Visit dfphoto.net to explore more resources and connect with a community of photographers who value privacy and security. Discover our detailed tutorials, inspiring galleries, and expert equipment reviews to elevate your photography skills and protect your visual legacy. Don’t wait—secure your photos today and enjoy peace of mind knowing your precious memories are safe.
10. Frequently Asked Questions (FAQ)
10.1. How do I lock a single photo on my Mac?
Use macOS’s built-in Hidden Photos feature or a third-party app like F-Vault to hide and password-protect individual photos.
10.2. Can I password protect an entire folder of photos?
Yes, use Disk Utility to create an encrypted disk image of the folder, or use F-Vault to move the folder into a secure vault.
10.3. Is it possible to lock the Photos app on my MacBook Air?
Yes, Cisdem AppCrypt can lock the Photos app on any Mac running macOS 10.12 or later.
10.4. How do I hide photos on my Mac without using extra software?
Use the Hidden Photos feature in the Photos app on macOS Ventura or later.
10.5. What is the most secure way to protect my photos on a Mac?
Using Disk Utility to create an encrypted disk image provides the highest level of security.
10.6. Can I use Touch ID to unlock my photos?
Yes, if you use the Hidden Photos feature in macOS Ventura or later, or if you use F-Vault and enable Touch ID in the preferences.
10.7. What should I do if I forget the password to my encrypted disk image?
Unfortunately, if you forget the password, the data is unrecoverable. It’s crucial to keep your password in a safe place.
10.8. Will locking my photos slow down my Mac?
No, the methods described in this article have minimal impact on your Mac’s performance.
10.9. How can I ensure my photos are safe when sharing them online?
Be careful with privacy settings on social media platforms, use watermarks, and consider using a secure file-sharing service.
10.10. Is it ethical to lock photos that include other people?
Consider the privacy of the individuals in the photos. Obtain their consent before locking and sharing the images.
By implementing these methods and tips, you can effectively lock photos on your Mac and protect your digital privacy. Visit dfphoto.net for more resources and inspiration to enhance your photography journey.