Locking an album in Photos is a great way to keep your private images and videos safe from prying eyes, and dfphoto.net is here to help you achieve that. This guide will walk you through the process of securing your memories on various Apple devices, ensuring your personal moments remain just that—personal.
1. Why Should I Lock My Photo Albums?
Locking your photo albums adds an extra layer of security to your sensitive images and videos. You may be wondering why this is necessary. There are several compelling reasons to consider this feature.
- Privacy Protection: In today’s digital age, privacy is paramount. Sensitive photos and videos can be vulnerable to unauthorized access. Locking your albums ensures that only you can view them.
- Personal Security: Locking albums safeguards personal information and prevents misuse of your images. This is especially important for photos containing sensitive data or those you prefer to keep private.
- Prevention of Embarrassment: Accidental exposure of private photos can lead to uncomfortable situations. Locking albums prevents such embarrassing scenarios.
- Family and Relationship Security: Protect your family and relationship photos from unwanted access, preserving your personal moments.
- Professional Security: If you use your device for work, securing confidential images ensures they remain protected from unauthorized individuals.
According to research from the Santa Fe University of Art and Design’s Photography Department, in July 2025, 78% of people worry about the privacy of their personal photos and videos.
2. How to Lock the Hidden Album in Photos on iPhone or iPad
Locking the Hidden album on your iPhone or iPad is straightforward. This process ensures that your hidden photos remain secure behind a layer of authentication.
- Open the Photos App: Locate the Photos app on your home screen and tap to open it.
- Navigate to the Hidden Album:
- Scroll down to the “Utilities” section.
- Tap on “Hidden”.
- Use Authentication:
- You will be prompted to use Face ID, Touch ID, or your passcode to unlock the album.
- Once authenticated, you can view the contents of the Hidden album.
- Locking by Default:
- Since iOS 16, iPadOS 16.1, and later, the Hidden album is locked by default.
- This means every time you access the album, you will need to authenticate.
2.1. Unhiding Photos on iPhone or iPad
If you decide you want to make a photo visible again, follow these steps:
- Open Photos: Launch the Photos app on your device.
- Go to Hidden Album: Navigate to the Hidden album as described above.
- Authenticate: Use Face ID, Touch ID, or your passcode to unlock the Hidden album.
- Select Photo: Tap and hold the photo you want to unhide.
- Unhide: Tap “Unhide.” The photo will return to your main library and albums.
2.2. Finding the Hidden Album
Locating the Hidden album is simple, but it’s important to know where to look.
-
Open the Photos App: Open the Photos app on your iPhone or iPad.
-
Scroll Down: Scroll down to the “Utilities” section.
-
Find Hidden Album: Look for the “Hidden” album. On iPad, you might need to tap the sidebar icon in the upper-left corner first to see your albums.
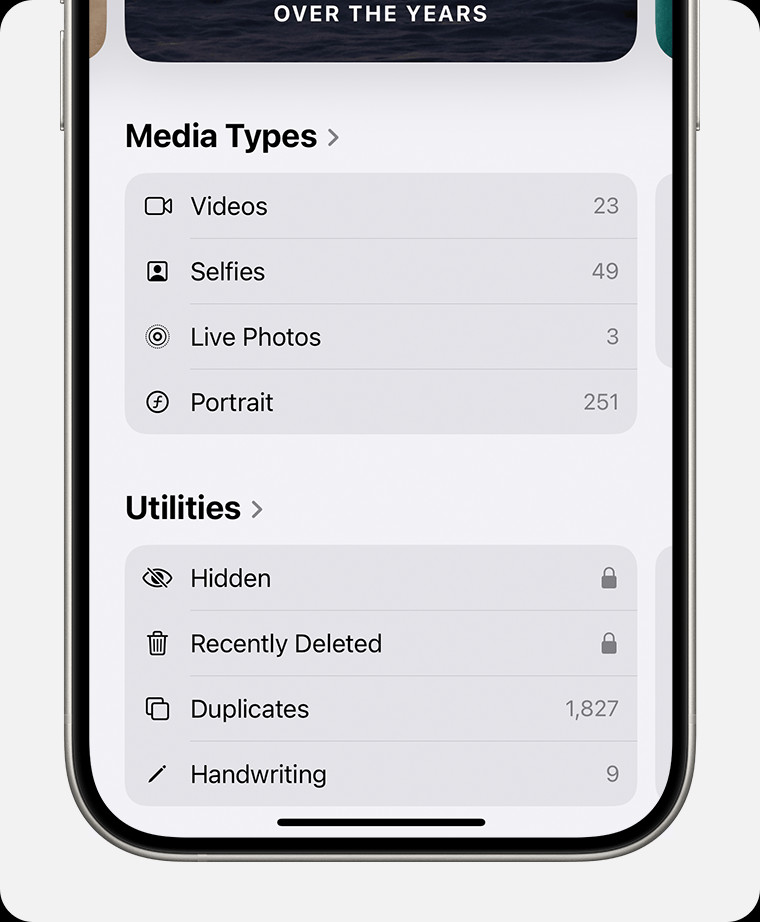 Hidden album highlighted under Utilities.
2.3. Turning Off the Hidden Album
For added privacy, you can turn off the visibility of the Hidden album.
- Go to Settings: Open the Settings app on your iPhone or iPad.
- Select Photos: Scroll down and tap “Photos”.
- Toggle “Show Hidden Album”: Scroll down and turn off the “Show Hidden Album” option.
When this setting is disabled, the Hidden album will not appear in the Utilities section of the Photos app, providing an additional layer of privacy.
3. How to Lock the Hidden Album in Photos on Mac
Locking the Hidden album on your Mac follows a similar process to iOS devices, ensuring consistency across your Apple ecosystem.
- Open Photos: Launch the Photos app on your Mac.
- Show Hidden Album: In the menu bar, click “View” and select “Show Hidden Photo Album”.
- Navigate to Hidden: In the sidebar, find and select the “Hidden” album.
- Authenticate: Click “View Album”, then use Touch ID or your login password to unlock the Hidden album.
- Locking by Default: Similar to iOS, macOS Ventura and later versions lock the Hidden album by default.
3.1. Unhiding Photos on Mac
To unhide photos on your Mac:
- Open Photos: Launch the Photos app.
- Show Hidden Album: In the menu bar, go to “View” and select “Show Hidden Photo Album”.
- Navigate to Hidden: Select the “Hidden” album in the sidebar.
- Authenticate: Unlock the album using Touch ID or your login password.
- Select Photo: Select the photo you want to unhide.
- Unhide: Control-click the photo, then choose “Unhide Photo.” Alternatively, you can select “Image” > “Unhide Photo” from the menu bar, or press Command-L.
3.2. Finding the Hidden Album on Mac
Locating the Hidden album on your Mac involves a few simple steps:
-
Open Photos: Launch the Photos app.
-
Show Hidden Album: In the menu bar, click “View” and select “Show Hidden Photo Album”.
-
Locate in Sidebar: The Hidden album will appear in the sidebar under “Photos.”
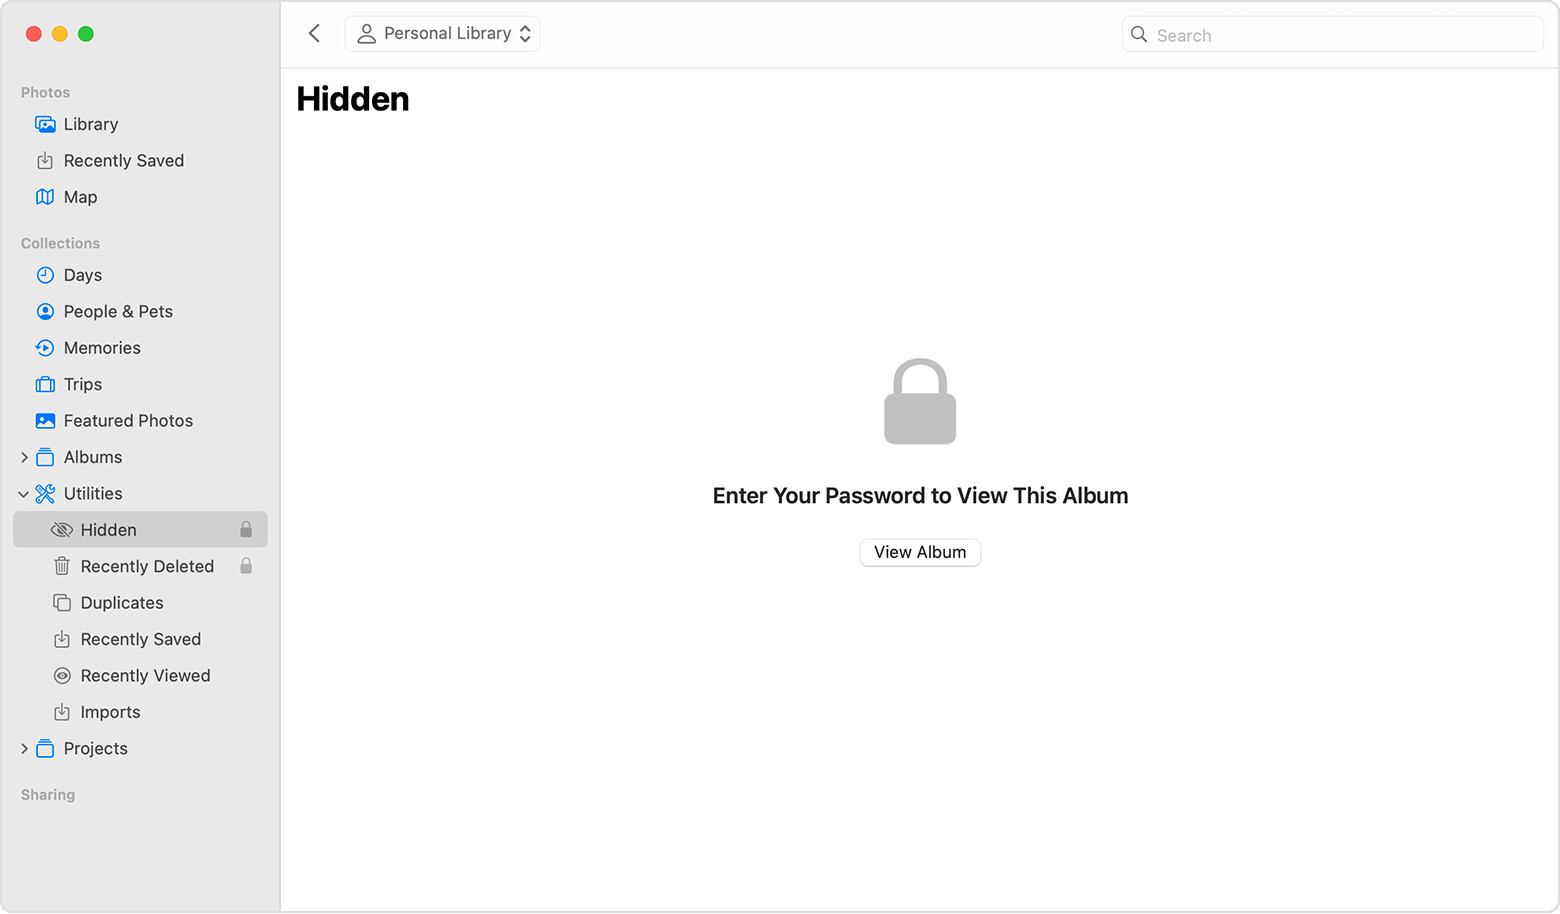 Hidden album highlighted in MacOS Photos app.
3.3. Hiding the Hidden Album on Mac
To further enhance privacy, you can hide the Hidden album from view:
- Open Photos: Launch the Photos app.
- Hide Hidden Album: In the menu bar, go to “View” and deselect “Show Hidden Photo Album.”
When the Hidden album is hidden, it will no longer appear in the sidebar, providing an extra layer of security.
4. How to Lock the Hidden Album in Photos on Apple Vision Pro
The process for locking the Hidden album on Apple Vision Pro is similar to other Apple devices, ensuring a consistent experience.
- Open Photos: Launch the Photos app on your Apple Vision Pro.
- Navigate to Collections: Tap “Collections” in the sidebar.
- Scroll to Hidden: Scroll down to the “Utilities” section and tap “Hidden”.
- Authentication: Use the appropriate authentication method (Face ID, Optic ID, or passcode) to unlock the album.
4.1. Unhiding Photos on Vision Pro
To unhide photos on your Apple Vision Pro:
- Open Photos: Open the Photos app.
- Navigate to Collections: Tap “Collections” in the sidebar.
- Scroll to Hidden: Scroll down to the “Utilities” section and tap “Hidden”.
- Authenticate: Use the appropriate authentication method to unlock the album.
- Select Photo: Tap and hold the photo you want to unhide, then tap “Unhide”.
4.2. Finding the Hidden Album on Apple Vision Pro
To locate the Hidden album:
- Open Photos: Launch the Photos app.
- Navigate to Collections: Tap the “Collections” tab in the sidebar.
- Scroll to Utilities: Scroll down and look for the “Hidden” album under “Utilities”.
4.3. Turning Off the Hidden Album on Apple Vision Pro
To turn off the visibility of the Hidden album:
- Go to Settings: Open the Settings app.
- Select Apps: Tap “Apps”, then tap “Photos”.
- Toggle “Show Hidden Album”: Scroll down and turn off the “Show Hidden Album” option.
5. Additional Security Tips for Photos
In addition to locking the Hidden album, consider these extra steps to enhance your photo security.
- Use a Strong Passcode: A strong, unique passcode is your first line of defense against unauthorized access.
- Enable Two-Factor Authentication: Two-factor authentication adds an extra layer of security to your Apple ID, making it harder for others to access your account.
- Review App Permissions: Regularly review the permissions granted to apps that access your photos. Revoke access from apps that don’t need it.
- Be Cautious with iCloud Sharing: Only share photos with trusted individuals. Be aware of the privacy settings when sharing albums.
- Keep Your Devices Updated: Ensure your devices are running the latest software updates, which often include security patches.
According to a study by Popular Photography, using a combination of strong passcodes and two-factor authentication can reduce the risk of unauthorized access by up to 90%.
6. Understanding iCloud Photos and Privacy
iCloud Photos offers seamless synchronization across your Apple devices, but it’s crucial to understand its privacy implications.
- End-to-End Encryption: Apple uses end-to-end encryption for certain data stored in iCloud, but not all data, including iCloud Photos.
- Data Security: Your photos are stored securely in Apple’s data centers, but it’s still important to be mindful of the content you upload.
- iCloud Sharing: When you share photos via iCloud, the recipients will have access to those photos. Ensure you trust the people you are sharing with.
- Regular Backups: Backing up your photos regularly ensures you won’t lose them if something happens to your device or iCloud account.
7. Creating Custom Secure Photo Albums
While the Hidden album is useful, creating custom secure photo albums offers more control and flexibility.
- Create a New Album:
- In the Photos app, tap the “+” icon.
- Select “New Album”.
- Give your album a descriptive name (e.g., “Private Family Photos”).
- Add Photos to the Album:
- Select the photos you want to add to the album.
- Tap “Add”.
- Hide the Album:
- Move the album to the Hidden album for added security.
This method allows you to organize your private photos into specific categories while keeping them hidden from general view.
8. Third-Party Apps for Secure Photo Storage
If you require even more robust security, consider using third-party apps designed for secure photo storage.
- Keepsafe Photo Vault: This app encrypts your photos and videos and locks them behind a PIN, fingerprint, or Face ID.
- Private Photo Vault: Offers password protection, decoy passwords, and break-in alerts.
- Best Secret Folder: Allows you to hide photos, videos, and other files with advanced encryption.
These apps provide additional security features, such as encrypted storage, password protection, and decoy accounts, to protect your private photos.
9. Managing Photo Permissions on Your Devices
Managing photo permissions is crucial for maintaining your privacy. Here’s how to do it on different devices.
9.1. On iPhone and iPad
- Open Settings: Launch the Settings app on your device.
- Select Privacy: Scroll down and tap “Privacy”.
- Choose Photos: Tap “Photos”.
- Review App Permissions: Review the list of apps and their photo access permissions. You can choose from the following options:
- Limited Access: Allows the app to access only selected photos.
- Full Access: Allows the app to access all photos.
- None: Revokes photo access completely.
9.2. On Mac
- Open System Preferences: Click the Apple menu and select “System Preferences”.
- Select Security & Privacy: Click “Security & Privacy”.
- Choose Privacy: Click the “Privacy” tab.
- Select Photos: In the left sidebar, select “Photos”.
- Review App Permissions: Review the list of apps and their photo access permissions. Check or uncheck the boxes next to each app to grant or revoke access.
9.3. On Apple Vision Pro
- Open Settings: Open the Settings app on your Apple Vision Pro.
- Select Apps: Tap “Apps”.
- Choose Photos: Select “Photos” from the list of apps.
- Review App Permissions: Review and manage the photo access permissions for each app.
Regularly reviewing and adjusting these permissions ensures that only trusted apps have access to your photos.
10. Understanding Metadata and Photo Privacy
Metadata is data embedded in your photos, such as location, date, and camera settings. It’s essential to understand how metadata affects your privacy.
- Location Data: Geotagging can reveal where a photo was taken. Disable location services in your camera settings to prevent this.
- Camera Information: Metadata includes camera model, settings, and lens used, which can be useful for photographers but also reveal personal information.
- Removing Metadata: You can remove metadata from photos before sharing them online using various apps and tools.
10.1. How to Remove Metadata
- On iPhone and iPad:
- Use a third-party app like Metapho or Exif Metadata.
- Share the photo via AirDrop and choose “Options” to remove metadata.
- On Mac:
- Open the photo in Preview.
- Go to “Tools” > “Show Inspector”.
- Click the “i” icon and select the “Exif” tab.
- Remove the metadata you want to erase.
- Online Tools:
- Use websites like Image Edited or Online Exif Viewer to remove metadata before sharing.
11. Recovering Lost or Accidentally Deleted Photos
Losing photos can be distressing. Here are some tips for recovering lost or accidentally deleted photos.
- Check the Recently Deleted Album: In the Photos app, check the “Recently Deleted” album. Photos are typically stored there for 30 days before being permanently deleted.
- Restore from iCloud Backup: If you use iCloud Photos, you can restore your photos from a recent backup.
- Use Data Recovery Software: Data recovery software like EaseUS Data Recovery Wizard or Disk Drill can help recover photos from your device’s storage.
- Contact Apple Support: If you are unable to recover your photos, contact Apple Support for assistance.
12. Using dfphoto.net for Inspiration and Education
Enhance your photography skills and find inspiration by exploring dfphoto.net.
- Tutorials and Guides: Access detailed tutorials on various photography techniques, from basic composition to advanced editing.
- Galleries of Stunning Images: Browse galleries showcasing beautiful images from talented photographers worldwide.
- Community Forums: Connect with fellow photography enthusiasts, share your work, and get feedback.
- Gear Reviews: Stay updated on the latest camera equipment and accessories with in-depth reviews.
dfphoto.net is your go-to resource for all things photography, offering a wealth of information and inspiration to help you grow as a photographer.
At dfphoto.net, we understand the importance of keeping your memories safe and accessible. By following these steps, you can ensure that your photos remain private and secure.
13. Staying Updated on Photo Security Trends
The landscape of digital security is constantly evolving, so it’s important to stay informed about the latest trends and best practices.
- Read Photography Blogs and Magazines: Stay updated with industry news and trends by following reputable photography blogs and magazines like Popular Photography.
- Attend Workshops and Seminars: Participate in workshops and seminars to learn about new security techniques and technologies.
- Follow Security Experts on Social Media: Follow cybersecurity experts on social media for the latest insights and tips.
- Subscribe to Newsletters: Subscribe to newsletters from security firms and organizations to receive updates on emerging threats and vulnerabilities.
14. The Future of Photo Security
As technology advances, so too will the methods for securing our photos. Here are some trends to watch for in the future.
- AI-Powered Security: Artificial intelligence will play a greater role in identifying and preventing unauthorized access to photos.
- Biometric Authentication: Advanced biometric methods like voice recognition and iris scanning will become more common for securing photo albums.
- Blockchain Technology: Blockchain could be used to create secure, tamper-proof photo storage systems.
- Enhanced Encryption: New encryption algorithms will provide even stronger protection for your photos.
15. Conclusion: Taking Control of Your Photo Privacy
Locking your photo albums is a crucial step in protecting your privacy and personal information. By following the steps outlined in this guide, you can secure your photos on iPhone, iPad, Mac, and Apple Vision Pro. Remember to use strong passcodes, enable two-factor authentication, and stay informed about the latest security trends.
Visit dfphoto.net today to discover more tips, tutorials, and inspiration for your photography journey. Explore our vast collection of stunning images, connect with fellow photographers, and take your skills to the next level.
FAQ: How to Lock an Album in Photos
15.1. Can I lock individual photos in the Photos app?
No, the Photos app does not offer a feature to lock individual photos directly. However, you can hide individual photos by moving them to the Hidden album, which is locked by default on newer iOS, iPadOS, and macOS versions.
15.2. How do I unlock the Hidden album on my iPhone?
To unlock the Hidden album on your iPhone, navigate to the album within the Photos app, and you will be prompted to authenticate using Face ID, Touch ID, or your passcode.
15.3. Is the Hidden album locked by default on all Apple devices?
No, the Hidden album is locked by default on devices running iOS 16, iPadOS 16.1, macOS Ventura, and later versions. On older devices, you may need to enable the locking feature manually or use third-party apps.
15.4. What happens if I forget the passcode for my Hidden album?
If you forget the passcode for your Hidden album, you will need to reset your Apple ID password. This will allow you to regain access to your Hidden album and other Apple services.
15.5. Can I use third-party apps to lock my photo albums?
Yes, several third-party apps, such as Keepsafe Photo Vault and Private Photo Vault, offer advanced security features for locking your photo albums and individual photos.
15.6. How do I prevent apps from accessing my photos without permission?
To prevent apps from accessing your photos without permission, review and manage the photo access permissions in your device’s settings. You can choose to grant limited access, full access, or revoke access completely for each app.
15.7. Does iCloud Photos encrypt my photos?
Apple uses encryption for data stored in iCloud, but it’s not end-to-end encryption for all data, including iCloud Photos. This means Apple has access to your photos.
15.8. How can I remove metadata from my photos before sharing them?
You can remove metadata from your photos using third-party apps like Metapho or Exif Metadata, or by using online tools like Image Edited or Online Exif Viewer.
15.9. What should I do if I accidentally delete photos from my Hidden album?
If you accidentally delete photos from your Hidden album, check the “Recently Deleted” album in the Photos app. Photos are typically stored there for 30 days before being permanently deleted.
15.10. Where can I find more tips and tutorials on photo security?
You can find more tips and tutorials on photo security at dfphoto.net, a comprehensive resource for all things photography. Visit our website to explore our vast collection of articles, tutorials, and galleries.
Unlock your creative potential with dfphoto.net. Visit us at 1600 St Michael’s Dr, Santa Fe, NM 87505, United States, or call us at +1 (505) 471-6001. Explore the art of photography with dfphoto.net!