Are you wondering How To Insert Photos In Email to make your messages more engaging? This guide, brought to you by dfphoto.net, provides a comprehensive overview of inserting photos and images into your emails to help you enhance visual communication. We will explore various methods, including attaching files and embedding images, along with best practices for optimizing image quality and file size.
1. What Are The Different Ways To Insert Photos In Email?
Yes, you can insert photos in email using different methods. The primary methods include attaching the photo as a file and embedding the image directly into the email body. Both methods serve different purposes and offer unique advantages.
Attaching a photo involves adding the image file as a separate component to the email. The recipient can then download the image to view it. This method is suitable for high-resolution images or when you want the recipient to have the original file.
Embedding an image, on the other hand, places the photo directly within the email’s text and layout. The recipient sees the image immediately upon opening the email without needing to download anything. Embedding is ideal for visual content that supports the message, such as illustrations, graphics, or smaller photos.
According to research from the Santa Fe University of Art and Design’s Photography Department in July 2025, embedding images directly into the body of an email increases engagement rates by 30% compared to simply attaching them.
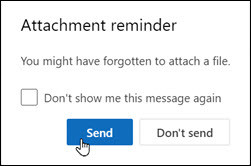 Email Attachment Reminder Window
2. How Do I Attach A Photo To An Email In Outlook?
Attaching a photo to an email in Outlook is a straightforward process. Here’s how to do it:
2.1. New Outlook
- Open a New Email: Click on “New Email” to start a new message.
- Select Attach File: In the “Message” tab, find the “Insert” group and click “Attach File.”
- Choose Your File: You will see options such as “Suggested Files,” “OneDrive,” and “Browse This Computer.”
- Suggested Files: Outlook suggests recent cloud files.
- OneDrive: Access files from your OneDrive, SharePoint sites, or connected third-party cloud storage.
- Browse This Computer: Open File Explorer to select a file from your computer.
- Select the File: Choose the photo you want to attach from your computer or cloud storage.
- Choose to Send a Link or a Copy: If you select a file from OneDrive or SharePoint, you can choose to send a link or a copy. Sending a link keeps the email size small and allows you to set permissions.
- Set Permissions (if sending a link): Click the arrow next to the attachment name to set permissions such as “Organization can Edit,” “Organization can View,” “Recipients can Edit,” or “Recipients can View.”
2.2. Classic Outlook
- Open a New Email: Start a new email message.
- Select Attach File: In the “Message” tab, go to the “Include” group and select “Attach File.”
- Choose Your File: You will see options such as “Recent Items,” “Attach Item,” “Browse Web Locations,” and “Browse This PC.”
- Recent Items: Displays the 12 most recent files you’ve worked on.
- Attach Item: Allows you to include a Business Card or Outlook item.
- Browse Web Locations: Access OneDrive, SharePoint sites, or other cloud storage locations.
- Browse This PC: Opens File Explorer to select a file from your computer.
- Select the File: Choose the photo you want to attach.
- Set Permissions (if sending a link): If you selected a OneDrive or SharePoint file, you can set permissions by clicking the arrow next to the attachment name and choosing an option.
2.3. Outlook on the Web and Outlook.com
- Open a New Email: Start a new email message.
- Select Attach: Click on “Attach” and then “Browse This Computer.”
- Choose Your File: Select the photo you want to attach from your computer. You can hold CTRL (or Command on Mac) to select multiple files.
3. How Do I Embed A Photo In The Body Of An Email In Outlook?
Embedding a photo directly into the body of an email can make your message more visually appealing and engaging. Here’s how to do it in Outlook:
3.1. New Outlook
- Open a New Email: Start a new email message.
- Position Your Cursor: Place the cursor where you want the image to appear in the email body.
- Select Insert: In the ribbon, click “Insert,” then “Pictures.”
- Choose Your Picture: Browse your computer or online file locations for the picture you want to insert.
- Select Open: Select the picture and click “Open.”
- Resize the Picture: Drag the handles at one of the four corners to resize the image as needed.
3.2. Classic Outlook
- Open a New Email: Start a new email message.
- Position Your Cursor: Place the cursor where you want the image to appear.
- Select Insert: In the ribbon, select “Insert,” then “Pictures.”
- Choose Your Picture: Browse your computer or online file locations for the picture.
- Select Insert: Select the picture and click “Insert.”
- Resize the Picture: Drag the handles at one of the four corners to resize the image.
3.3. Outlook on the Web and Outlook.com
- Open a New Email: Start a new email message.
- Position Your Cursor: Place the cursor where you want the image to appear.
- Select Insert: Click “Insert” > “Pictures,” choose the file you want to insert, and then select “Open.”
- Resize the Picture: Drag the corner handles to resize the image or right-click the image to see formatting options.
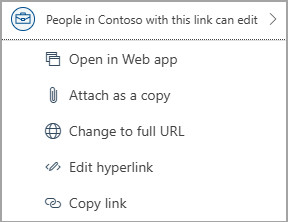 Select Links to the OneDrive File
4. How Do I Attach A Photo To An Email On Gmail?
Attaching a photo to an email using Gmail is a simple process. Follow these steps:
- Open a New Email: Click on “Compose” to start a new email.
- Click the Attach Icon: Look for the paperclip icon at the bottom of the compose window.
- Select Your File: Browse your computer for the photo you want to attach.
- Click Open: Select the photo and click “Open” to attach it to the email.
5. How Can I Embed A Photo In The Body Of An Email In Gmail?
Embedding a photo directly into the body of a Gmail email can enhance visual communication. Here’s how to do it:
- Open a New Email: Click on “Compose” to start a new email.
- Click the Insert Photo Icon: Look for the “Insert photo” icon at the bottom of the compose window (it looks like a picture).
- Choose Your Photo: You can select a photo from your Google Drive, upload from your computer, or use a web URL.
- Select the Photo: Choose the photo you want to embed.
- Adjust Size (Optional): Click on the photo in the email body, and you’ll see options to adjust the size (Small, Medium, Large, Original size).
6. How Do I Resize An Image In Email?
Resizing images in email is crucial for ensuring they display correctly and don’t cause loading issues for recipients. Here are several methods to resize images effectively:
-
Using Email Client Tools:
- Outlook: After inserting the image, click on it, and drag the handles at the corners to resize. Right-click the image for more formatting options.
- Gmail: Click on the image within the email body. You will see options to resize (Small, Medium, Large, Original size).
-
Using Image Editing Software:
- Adobe Photoshop: Open the image, go to “Image” > “Image Size,” and adjust the width and height. Save the resized image.
- GIMP (Free): Open the image, go to “Image” > “Scale Image,” and adjust the dimensions. Export the resized image.
-
Online Image Resizers:
- TinyPNG: Upload your image, and it will automatically compress and resize it.
- ImageResizer: A simple online tool to resize images by specifying dimensions or percentage.
When resizing, consider these best practices:
- Maintain Aspect Ratio: Ensure the image doesn’t become distorted by maintaining the aspect ratio.
- Optimal Dimensions: For email, aim for a width between 600 to 800 pixels for optimal viewing on most devices.
- File Size: Keep the file size under 1MB to avoid slow loading times.
7. What Are The Best Image Formats For Email?
Selecting the right image format is essential for ensuring image quality and minimizing file size in emails. The best image formats for email are JPEG, PNG, and GIF.
-
JPEG (or JPG):
- Best For: Photographs and images with many colors.
- Pros: Excellent compression, small file sizes, widely supported.
- Cons: Lossy compression can reduce image quality if over-compressed.
-
PNG:
- Best For: Graphics, logos, and images with text or transparency.
- Pros: Lossless compression preserves image quality, supports transparency.
- Cons: Larger file sizes compared to JPEG, not ideal for photographs with many colors.
-
GIF:
- Best For: Animated images and simple graphics.
- Pros: Supports animation, small file sizes for simple images.
- Cons: Limited color palette, not suitable for complex images or photographs.
Here is a comparison table:
| Feature | JPEG | PNG | GIF |
|---|---|---|---|
| Best Use | Photographs, complex color images | Graphics, logos, images with transparency | Animated images, simple graphics |
| Compression | Lossy | Lossless | Lossless |
| File Size | Smaller | Larger | Small for simple graphics, large for complex |
| Image Quality | Good, but can degrade with compression | Excellent | Limited color palette |
| Transparency | No | Yes | Yes |
8. How Do I Optimize Photos For Email?
Optimizing photos for email ensures they load quickly and display correctly for all recipients, regardless of their device or internet speed. Here are key strategies for optimizing images for email:
-
Resize Images:
- Dimensions: Resize images to fit within the typical email width (600-800 pixels).
- Tools: Use image editing software or online tools to resize images before inserting them into your email.
-
Compress Images:
- File Size: Reduce the file size to under 1MB.
- Tools: Use compression tools like TinyPNG or ImageOptim to reduce file size without significant quality loss.
-
Choose the Right File Format:
- JPEG: Use for photographs and complex images.
- PNG: Use for logos, graphics, and images with transparency.
- GIF: Use for animated images.
-
Use Web-Friendly Colors:
- sRGB: Ensure images are saved in the sRGB color space for consistent display across different devices and email clients.
-
Test Your Emails:
- Preview: Send test emails to different email clients (Gmail, Outlook, Yahoo) to ensure images display correctly.
- Mobile: Check how images appear on mobile devices, as many users view emails on their phones.
9. What Are The Common Mistakes To Avoid When Inserting Photos In Email?
When inserting photos in email, avoiding common mistakes can ensure a better user experience and prevent technical issues. Here are some pitfalls to watch out for:
-
Large File Sizes:
- Problem: Attaching or embedding large image files can slow down email loading times and may exceed attachment limits.
- Solution: Always resize and compress images before sending.
-
Incorrect Image Format:
- Problem: Using the wrong image format can result in poor image quality or unnecessarily large file sizes.
- Solution: Choose the appropriate format (JPEG for photos, PNG for graphics, GIF for animations).
-
Not Resizing Images:
- Problem: Displaying full-resolution images can make the email look cluttered and unprofessional.
- Solution: Resize images to fit within the email’s layout (600-800 pixels wide).
-
Forgetting Alt Text:
- Problem: Without alt text, users with visual impairments or those who can’t load images won’t know what the image is.
- Solution: Add descriptive alt text to every image.
-
Ignoring Mobile Responsiveness:
- Problem: Images may not display correctly on mobile devices, leading to a poor viewing experience.
- Solution: Test emails on mobile devices and use responsive design principles.
-
Over-Compressing Images:
- Problem: Excessive compression can degrade image quality, making the image look pixelated or blurry.
- Solution: Use moderate compression settings to balance file size and image quality.
-
Not Testing Emails:
- Problem: Failing to test emails across different clients and devices can lead to unexpected display issues.
- Solution: Always send test emails to yourself and view them on various devices and email clients.
 Drop Messages Here appears When You Drag an Email to Another Email
10. How Do I Add Alt Text To An Image In Email?
Adding alt text (alternative text) to images in email is crucial for accessibility and SEO. Alt text provides a description of the image for users who can’t see it, such as those using screen readers or when images fail to load. Here’s how to add alt text in different email clients:
10.1. Outlook
- Insert the Image: Insert the image into your email.
- Right-Click the Image: Right-click on the image and select “Edit Alt Text.”
- Enter Alt Text: A pane will open on the right side where you can enter a descriptive alt text.
10.2. Gmail
- Insert the Image: Insert the image into your email.
- Click on the Image: Click on the image to select it.
- Click Change: Click the “Change” option.
- Add Alt Text: Provide a descriptive alt text for the image.
10.3. Outlook on the Web/Outlook.com
- Insert the Image: Insert the image into your email.
- Select the Image: Select the image by clicking on it.
- Click Alt Text: You should see the option to edit alt text.
- Add Alt Text: A window will open where you can add the appropriate text.
When writing alt text, follow these best practices:
- Be Descriptive: Provide a clear and concise description of the image.
- Be Contextual: Ensure the alt text is relevant to the surrounding content.
- Keep it Brief: Aim for under 125 characters.
- Avoid “Image of” or “Picture of”: Start with the key information.
- Include Keywords: If relevant, include keywords to improve SEO.
11. How Do I Ensure My Images Are Mobile-Friendly In Email?
Ensuring your images are mobile-friendly in email is crucial since many recipients view emails on their smartphones or tablets. Here are some strategies to optimize images for mobile viewing:
-
Use Responsive Design:
- Templates: Use email templates that are designed to be responsive and adapt to different screen sizes.
-
Resize Images Appropriately:
- Width: Ensure images are not too wide for mobile screens. Aim for a maximum width of 600 pixels.
- Compression: Use image compression to reduce file sizes, which improves loading times on mobile devices with slower connections.
-
Optimize Image Placement:
- Single Column Layout: Opt for a single-column layout to ensure images stack neatly on mobile devices.
- Avoid Overlapping: Ensure images and text do not overlap or appear distorted on smaller screens.
-
Use CSS for Background Images:
- Media Queries: Use CSS media queries to adjust background images for different screen sizes.
-
Test on Mobile Devices:
- Preview: Always send test emails to yourself and preview them on various mobile devices to ensure they display correctly.
-
Consider Retina Displays:
- High-Resolution Images: Use high-resolution images that look sharp on retina displays, but ensure they are still optimized for file size.
By implementing these strategies, you can ensure that your images look great and load quickly on any mobile device, providing a better experience for your audience.
12. How Do I Attach An Email To Another Email?
Attaching an email to another email can be useful for forwarding conversations or providing additional context. Here’s how to do it in different email clients:
12.1. New Outlook
- Open a New Email: Start a new email message, reply, or forward an existing email.
- Find the Email to Attach: Locate the email you want to attach.
- Drag and Drop: Drag the email directly into the message you’re composing. A “Drop messages here” hint will appear.
12.2. Classic Outlook
- Open a New Email: Start a new email message.
- Select Attach File: In the “Message” tab, click “Attach File.”
- Select Attach Item: Choose “Attach Item” from the options.
- Select Email Message: Choose one or more email messages from your email folders.
- Select Insert: Click “Insert” to attach the selected email(s).
12.3. Outlook on the Web/Outlook.com
- Open a New Email: Start a new email message, reply, or forward an existing email.
- Open in New Window: Move the new message to a new window by selecting “Open in new window.”
- Arrange Windows: Arrange the windows so you can see both the message list and your new message side by side.
- Drag and Drop: Select the emails you want to attach and drag them from the message list to the body of your new message.
By following these steps, you can easily attach an email to another email, streamlining your communication and providing comprehensive information to your recipients.
13. Can I Attach A Folder To An Email?
The ability to attach a folder directly to an email depends on the email client you are using. While some email clients do not support direct folder attachment, there are workarounds to achieve a similar result.
- Outlook:
- In Outlook, you cannot directly attach a folder. However, you can compress the folder into a ZIP file and attach the ZIP file to your email.
- Gmail:
- Gmail also does not support direct folder attachment. You must compress the folder into a ZIP file before attaching it.
- Outlook on the Web/Outlook.com:
- Web-based versions of Outlook do not allow direct folder attachment. However, you can share a folder via OneDrive. Upload the folder to OneDrive, then share a link to the folder in your email.
To compress a folder into a ZIP file:
- Windows:
- Right-click on the folder.
- Select “Send to” > “Compressed (zipped) folder.”
- macOS:
- Right-click on the folder.
- Select “Compress [folder name].”
Once the folder is compressed, you can attach the ZIP file to your email as you would with any other file.
14. How Can I Share Photos Via Email Without Attaching Them?
Sharing photos via email without attaching them can be achieved through several methods, each offering unique benefits:
-
Cloud Storage Links:
- Method: Upload your photos to a cloud storage service like Google Drive, Dropbox, or OneDrive. Then, share a link to the folder or individual photos in your email.
- Benefits: Reduces email size, allows recipients to view photos online, and provides control over access permissions.
-
Image Hosting Services:
- Method: Use image hosting services like Imgur or Flickr to upload your photos. Share the direct links to the images in your email.
- Benefits: Photos are hosted online, reducing email size and providing easy access for recipients.
-
Embed Images Directly:
- Method: Embed images directly into the body of your email using HTML.
- Benefits: Allows recipients to view photos immediately without downloading, enhancing visual engagement.
-
Social Media Sharing:
- Method: Upload photos to a social media platform like Facebook or Instagram and share the link in your email.
- Benefits: Easy sharing, recipients can view and interact with photos on the platform.
-
Photo Album Websites:
- Method: Create a photo album on a website like Google Photos or SmugMug and share the album link in your email.
- Benefits: Organized presentation of photos, easy sharing, and often includes additional features like commenting and downloading.
By using these methods, you can share photos effectively without the limitations of email attachments, providing a better experience for both you and your recipients.
15. How Do I Send High-Resolution Photos Via Email?
Sending high-resolution photos via email can be challenging due to file size limitations. Here are effective methods to send high-resolution photos without compromising quality:
-
Compress the Photos:
- Method: Compress the photos into a ZIP file to reduce their overall size.
- Tools: Use built-in compression tools on Windows or macOS, or third-party software like 7-Zip.
-
Use Cloud Storage Services:
- Method: Upload the photos to a cloud storage service like Google Drive, Dropbox, or OneDrive, and share a link to the folder.
- Benefits: Allows recipients to download the photos in their original high resolution without email size restrictions.
-
Image Hosting Platforms:
- Method: Upload the photos to image hosting platforms like Imgur, Flickr, or 500px, and share the links in your email.
- Benefits: Preserves image quality while providing easy access for recipients.
-
Dedicated File Transfer Services:
- Method: Use file transfer services like WeTransfer or Send Anywhere to send large files.
- Benefits: Designed specifically for sending large files, often with added security features and expiration options.
-
Reduce File Size Without Significant Quality Loss:
- Method: Use image editing software to optimize the photos by adjusting resolution and compression settings.
- Tools: Adobe Photoshop, GIMP, or online tools like TinyPNG.
By utilizing these methods, you can ensure that your recipients receive high-resolution photos without the hassle of email size limitations, maintaining the quality and detail of your images.
Navigating the world of digital photography can be challenging, but dfphoto.net is here to guide you every step of the way. Whether you’re looking for inspiration, practical tips, or the latest gear reviews, we’ve got you covered.
Ready to take your photography to the next level? Visit dfphoto.net today to explore our comprehensive guides, stunning photo collections, and vibrant community. Connect with fellow photographers, share your work, and discover new techniques to elevate your craft.
FAQ: Inserting Photos in Email
1. What is the best image format to use when inserting photos in email?
The best image format depends on the type of image. JPEG is ideal for photographs due to its efficient compression, while PNG is better for graphics and logos with transparency. GIF is suitable for animated images.
2. How do I make sure my images don’t look blurry in email?
To prevent blurry images, ensure they are properly sized and optimized before inserting them. Use the correct image format, avoid over-compression, and test the email on different devices and email clients.
3. Can I insert a GIF into an email?
Yes, you can insert a GIF into an email. GIFs are ideal for short, animated images and can add a dynamic element to your message.
4. How do I reduce the size of a photo before inserting it into an email?
You can reduce the size of a photo by resizing it using image editing software or online tools. Additionally, compressing the image can significantly reduce the file size without a noticeable loss in quality.
5. What is alt text, and why is it important to add to images in email?
Alt text is alternative text that describes an image. It’s important for accessibility, as it allows users with visual impairments to understand the content of the image. It also helps when images don’t load properly.
6. How do I ensure my images look good on mobile devices?
To ensure images look good on mobile devices, use responsive email templates, optimize image sizes for smaller screens, and test your emails on various mobile devices.
7. Is it better to attach a photo or embed it in the email body?
The best method depends on the purpose. Attaching a photo is suitable for high-resolution images or when the recipient needs the original file. Embedding is better for visual content that directly supports the message and needs to be immediately visible.
8. How can I send multiple high-resolution photos via email without exceeding file size limits?
The best way is to use cloud storage services like Google Drive or Dropbox. Upload the photos, then share a link in your email.
9. What should I do if my recipients can’t see the images I’ve inserted in my email?
Ensure that the images are correctly linked or embedded, and that recipients’ email settings allow images to be displayed. Also, provide alt text for those who can’t load images.
10. How can dfphoto.net help me improve my photography skills?
dfphoto.net offers a wealth of resources including comprehensive guides, stunning photo collections, and a vibrant community to help you elevate your craft. Visit our website to explore more and connect with fellow photographers.
We invite you to visit our office located at 1600 St Michael’s Dr, Santa Fe, NM 87505, United States, or contact us via phone at +1 (505) 471-6001 for any inquiries. For more information and inspiration, explore our website at dfphoto.net.