Are you looking to enhance your Microsoft Word documents with stunning visuals? Inserting photos is key, and at dfphoto.net, we’re passionate about helping you master this skill. This guide will walk you through the process of “How To Insert Photos In A Word Document”, elevating your documents from simple text to engaging visual stories. Discover how to seamlessly integrate images, optimize their layout, and create visually appealing documents. Dive in to discover professional photography techniques that enhance visual communication, and master image placement in documents.
1. Understanding the Basics: Why Insert Photos in Word?
Inserting photos into your Word documents isn’t just about aesthetics; it’s about enhancing communication. Visuals can clarify complex information, add emotional depth, and make your document more engaging. Whether you’re creating a report, a presentation, or a personal letter, images can significantly improve the reader’s understanding and experience. By mastering “how to insert photos in a Word document,” you’re unlocking a powerful tool for effective communication.
- Enhance Understanding: Visual aids help in grasping complex ideas.
- Boost Engagement: Images capture attention and maintain reader interest.
- Add Personal Touch: Photos can convey emotions and personal stories.
2. Preparing Your Photos for Insertion
Before you dive into “how to insert photos in a Word document,” it’s important to prepare your images. Consider the following:
- Image Resolution: High-resolution images look great but can increase file size. Aim for a balance between quality and file size.
- File Format: JPEG is great for photos, while PNG is better for graphics with text or logos.
- Image Editing: Basic edits like cropping, brightness adjustment, and color correction can make your photos look their best.
According to research from the Santa Fe University of Art and Design’s Photography Department, in July 2025, optimizing images before insertion leads to better document performance and visual appeal.
3. Step-by-Step Guide: Inserting a Photo in Word
The process of “how to insert photos in a Word document” is straightforward. Here’s a step-by-step guide:
- Place Your Cursor: Click where you want the image to appear.
- Go to the Insert Tab: Click “Insert” on the Word ribbon.
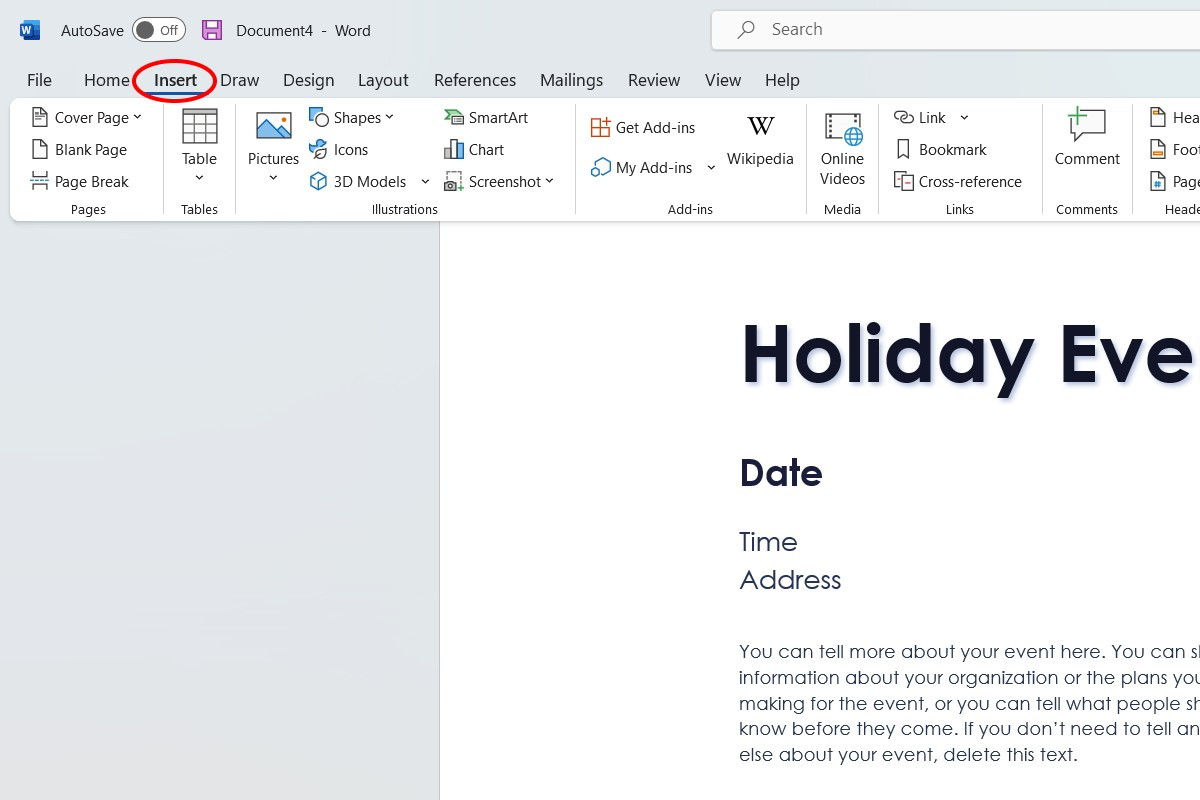 Microsoft Word insert tab with illustration section and pictures option, great for learning how to insert images
- Select Pictures: In the “Illustrations” section, click “Pictures.”
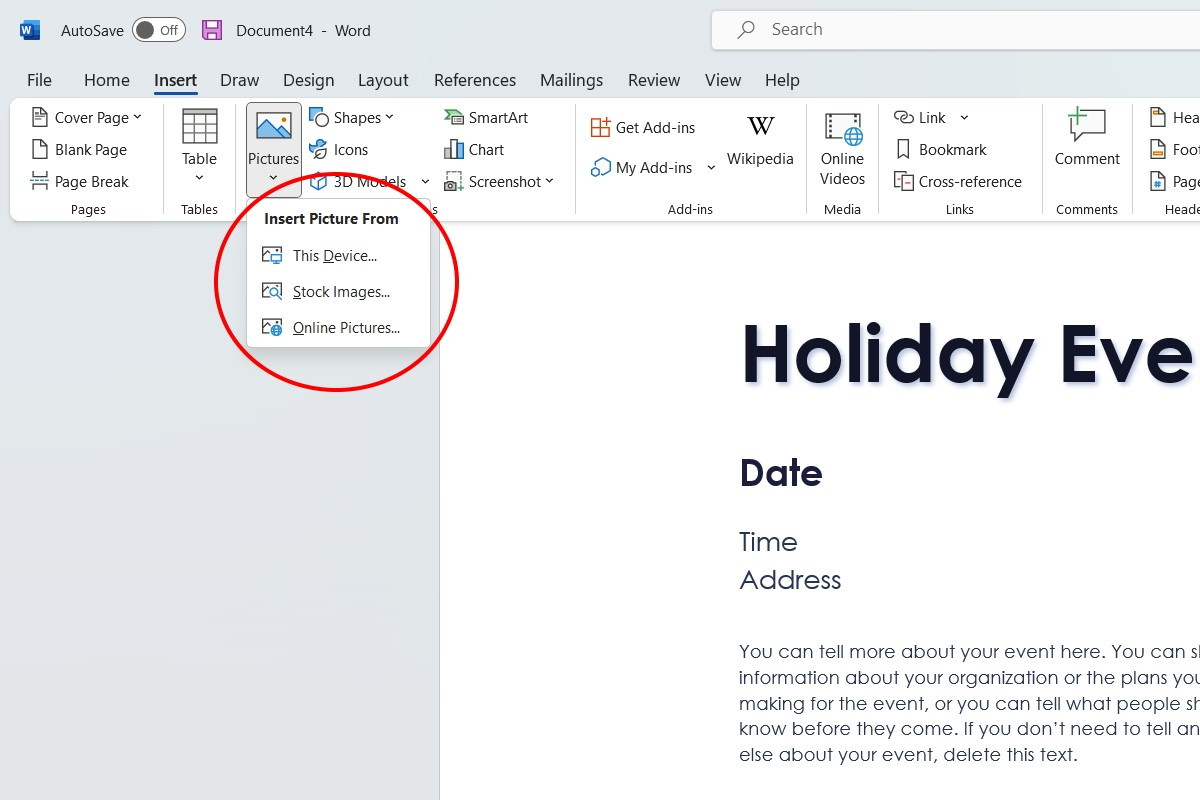 Pictures dropdown menu with stock images and online pictures options showing how to insert images in Microsoft Word
- Choose Your Source:
- This Device: Select a photo from your computer.
- Stock Images: Use royalty-free images from Microsoft’s library.
- Online Pictures: Search for images online using Bing.
- Insert the Image: Select your photo and click “Insert.”
4. Exploring Image Sources: Finding the Perfect Photo
When learning “how to insert photos in a Word document,” consider the variety of sources available:
- Personal Photos: Add a personal touch with your own images.
- Stock Photos: Websites like Unsplash, Pexels, and Shutterstock offer high-quality, royalty-free images.
- Online Search: Use Bing or other search engines to find images online, but be mindful of copyright.
5. Mastering Layout Options: Text Wrapping and Positioning
Once you’ve inserted a photo, mastering layout options is key to “how to insert photos in a Word document” effectively.
5.1. Understanding Text Wrapping
Text wrapping controls how text flows around your image. Here are the common options:
- In Line with Text: Treats the image like a character in the text.
- Square: Text wraps around the image in a square shape.
- Tight: Text wraps closely around the contours of the image.
- Through: Text flows through open areas of the image.
- Top and Bottom: Image takes up its own line, with text above and below.
- Behind Text: Image appears behind the text.
- In Front of Text: Image appears in front of the text, potentially obscuring it.
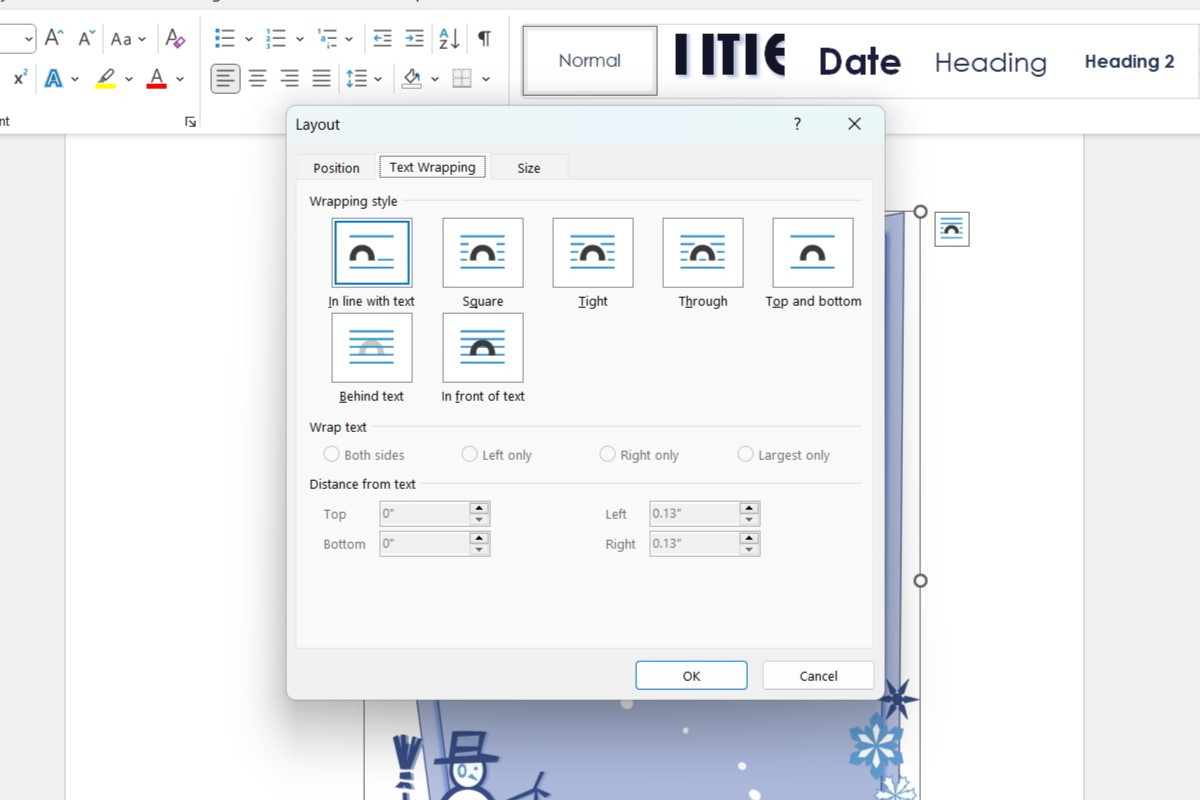 Layout options box with position, text wrapping, and size adjustments showing how to insert images in Microsoft Word
5.2. Changing Text Wrapping
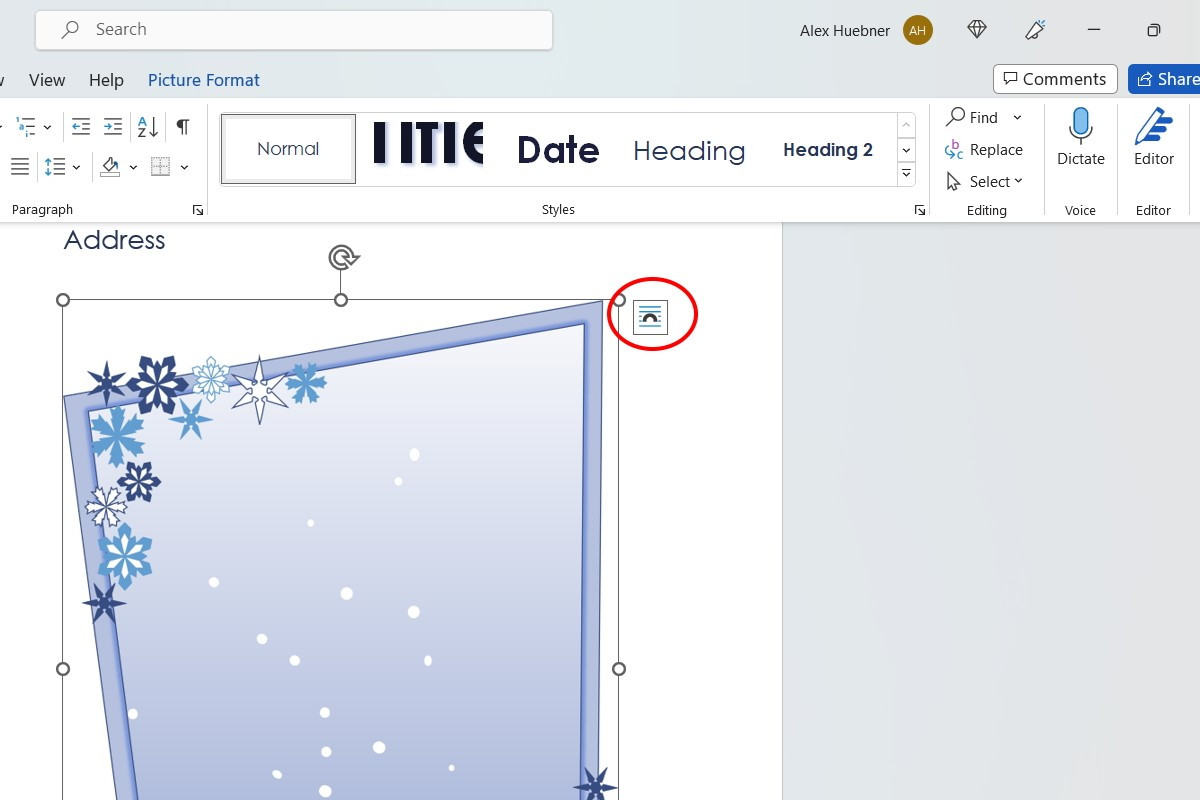
- Select the Image: Click on the image.
- Click the Layout Options Icon: A small icon appears next to the image.
- Choose a Text Wrapping Option: Select the desired option from the menu.
- See More: Select “See More” at the bottom of the menu to make manual adjustments.
 Layout options for inserting images in Microsoft Word
5.3. Positioning Your Image
You can drag and drop your image to position it within the document. For more precise control:
- Right-Click the Image: A context menu appears.
- Select “Position”: A submenu appears
- Choose a Position: Select a predefined position or “More Layout Options” for custom positioning.
6. Resizing and Cropping: Perfecting Your Image’s Dimensions
Resizing and cropping are essential aspects of “how to insert photos in a Word document.”
6.1. Resizing
- Select the Image: Click on the image.
- Drag the Corner Handles: Dragging the corner circles will resize the image proportionally. Dragging circles along the line will adjust the image vertically or horizontally.
 Adjusting image size when inserting images in Microsoft Word
6.2. Cropping
- Select the Image: Click on the image.
- Click the “Picture Format” Tab: This tab appears when an image is selected.
- Click “Crop”: The crop tool activates.
- Drag the Crop Handles: Drag the black handles to define the crop area.
- Press Enter or Click Outside the Image: The image is cropped.
7. Enhancing Your Photos: Picture Styles and Effects
Word offers various picture styles and effects to enhance your photos. This is a great way to add polish when considering “how to insert photos in a Word document.”
7.1. Applying Picture Styles
- Select the Image: Click on the image.
- Click the “Picture Format” Tab: This tab appears when an image is selected.
- Choose a Style: Select a style from the “Picture Styles” gallery.
7.2. Adding Picture Effects
- Select the Image: Click on the image.
- Click the “Picture Format” Tab: This tab appears when an image is selected.
- Click “Picture Effects”: A dropdown menu appears.
- Choose an Effect: Select an effect from the menu, such as shadow, reflection, or glow.
8. Advanced Techniques: Working with Multiple Images
When learning “how to insert photos in a Word document,” you might want to work with multiple images. Here are some advanced techniques:
8.1. Grouping Images
Grouping allows you to treat multiple images as a single object.
- Select the Images: Hold down the Ctrl key and click each image.
- Right-Click: Right-click on one of the selected images.
- Select “Group”: The images are now grouped.
8.2. Aligning Images
- Select the Images: Hold down the Ctrl key and click each image.
- Click the “Picture Format” Tab: This tab appears when an image is selected.
- Click “Align”: A dropdown menu appears.
- Choose an Alignment Option: Select an option such as “Align Top,” “Align Middle,” or “Align Bottom.”
8.3. Creating Photo Collages
You can create simple photo collages by inserting multiple images and arranging them creatively. Consider using shapes or text boxes to frame your images.
9. Optimizing Images for Web and Print
When considering “how to insert photos in a Word document,” remember to optimize your images for their intended use.
9.1. Web Optimization
- Reduce File Size: Use image compression tools to reduce file size without sacrificing too much quality.
- Use Web-Friendly Formats: JPEG and PNG are ideal for web use.
9.2. Print Optimization
- Use High Resolution: Ensure your images have a resolution of at least 300 DPI for sharp prints.
- Check Color Mode: CMYK color mode is best for printing.
10. Troubleshooting Common Issues
Even with a clear guide on “how to insert photos in a Word document,” you might encounter some issues. Here are some common problems and their solutions:
- Image Appears Blurry: Use a higher resolution image or adjust the image size.
- Image is Distorted: Ensure the image ratio is maintained when resizing.
- Text Wrapping Issues: Double-check your text wrapping settings.
- Image Won’t Move: Make sure text wrapping is not set to “In Line with Text.”
11. The Art of Visual Storytelling
Inserting photos isn’t just about adding visuals; it’s about telling a story. Here are some tips for effective visual storytelling:
- Choose Relevant Images: Select photos that directly relate to your content.
- Create a Visual Hierarchy: Use image size and placement to guide the reader’s eye.
- Maintain Consistency: Use a consistent style and tone in your images.
According to Popular Photography, visual storytelling can significantly enhance the impact of your message.
12. Inspiration from Famous Photographers
Looking to the work of famous photographers can provide inspiration for your own visual storytelling. Consider the work of:
- Ansel Adams: Known for his stunning black and white landscapes.
- Annie Leibovitz: Renowned for her iconic portraits.
- Steve McCurry: Celebrated for his vivid and compelling photojournalism.
13. Best Practices for Image Use in Documents
When mastering “how to insert photos in a Word document,” keep these best practices in mind:
- Use Captions: Provide context for your images with descriptive captions.
- Cite Your Sources: Give credit to the photographers or sources of your images.
- Respect Copyright: Only use images that you have the right to use.
14. Elevating Your Photography Skills with dfphoto.net
At dfphoto.net, we’re dedicated to helping you enhance your photography skills. We offer a wide range of resources, including:
- Photography Tutorials: Learn essential techniques and tips.
- Image Galleries: Find inspiration from stunning photographs.
- Community Forums: Connect with other photographers and share your work.
Address: 1600 St Michael’s Dr, Santa Fe, NM 87505, United States
Phone: +1 (505) 471-6001
Website: dfphoto.net
15. Staying Up-to-Date with Photography Trends in the USA
The photography landscape in the USA is constantly evolving. Stay informed about the latest trends and technologies:
| Trend | Description |
|---|---|
| Mobile Photography | The rise of high-quality smartphone cameras has made mobile photography more popular than ever. |
| Drone Photography | Drones offer unique perspectives and aerial shots. |
| Virtual Reality (VR) | VR photography creates immersive experiences. |
| Artificial Intelligence | AI is being used to enhance and automate various aspects of photography. |
16. The Role of Photography in Different Industries
Photography plays a crucial role in various industries in the USA:
| Industry | Application |
|---|---|
| Advertising | Creating compelling visuals for marketing campaigns. |
| Journalism | Documenting events and telling stories through images. |
| Fashion | Showcasing clothing and trends in a visually appealing way. |
| Real Estate | Presenting properties in their best light. |
| Scientific Research | Capturing data and documenting scientific phenomena. |
17. Ethical Considerations in Photography
As you learn “how to insert photos in a Word document,” it’s important to consider the ethical implications of photography. Be mindful of:
- Privacy: Respect the privacy of individuals when taking photos.
- Manipulation: Avoid manipulating images in a way that misrepresents reality.
- Cultural Sensitivity: Be respectful of different cultures and traditions.
18. Gear and Equipment: What You Need to Get Started
To take stunning photos for your Word documents, you’ll need the right gear:
- Camera: A DSLR, mirrorless camera, or even a smartphone can be used.
- Lenses: Choose lenses that suit your subject matter, such as wide-angle lenses for landscapes or telephoto lenses for wildlife.
- Lighting: Good lighting is essential for great photos. Consider using natural light or investing in artificial lighting equipment.
- Editing Software: Software like Adobe Photoshop or Lightroom can help you enhance your photos.
19. Joining the Photography Community in Santa Fe
If you’re in the Santa Fe area, consider joining the local photography community. The Santa Fe University of Art and Design’s Photography Department hosts events and workshops, and there are numerous photography clubs and organizations in the area.
20. The Future of Photography: What to Expect
The future of photography is bright. New technologies and trends are constantly emerging, offering exciting possibilities for photographers:
- Computational Photography: AI-powered cameras and software are transforming the way we take and edit photos.
- Augmented Reality (AR): AR is being used to create interactive and immersive photography experiences.
- Sustainable Photography: There’s a growing awareness of the environmental impact of photography, leading to more sustainable practices.
21. Real-World Examples of Effective Photo Insertion
To further illustrate “how to insert photos in a Word document,” let’s look at some real-world examples:
- Business Reports: Use charts and graphs to visualize data and support your findings.
- Marketing Materials: Showcase your products or services with high-quality photos.
- Educational Materials: Use images to illustrate concepts and engage students.
- Personal Letters: Add photos to share memories and connect with loved ones.
22. Choosing the Right Image for Your Message
The key to effective photo insertion lies in choosing the right image for your message. Consider the following:
- Relevance: Does the image directly relate to your content?
- Quality: Is the image sharp, clear, and well-composed?
- Tone: Does the image convey the appropriate mood and emotion?
- Copyright: Do you have the right to use the image?
23. The Power of Visual Consistency
Maintaining visual consistency throughout your document is crucial for creating a polished and professional look. Use a consistent style, color palette, and image size.
24. Avoiding Common Mistakes
When learning “how to insert photos in a Word document,” be aware of these common mistakes:
- Using Low-Resolution Images: Low-resolution images can appear pixelated and blurry.
- Distorting Images: Avoid stretching or squashing images, which can make them look unprofessional.
- Overusing Images: Too many images can be overwhelming and distracting.
- Ignoring Copyright: Always respect copyright laws and obtain permission before using images.
25. Optimizing Your Workflow
To streamline your photo insertion process, consider these tips:
- Create a Photo Library: Organize your photos into folders for easy access.
- Use Keyboard Shortcuts: Learn keyboard shortcuts for common tasks like inserting, resizing, and cropping images.
- Use Templates: Create templates with predefined image placeholders to save time.
26. The Benefits of Professional Photography Services
If you need high-quality photos for your Word documents, consider hiring a professional photographer. A professional can provide:
- Expertise: A professional photographer has the skills and experience to capture stunning images.
- Equipment: Professionals have access to high-end cameras, lenses, and lighting equipment.
- Editing: Professionals can edit and retouch your photos to perfection.
27. Enhancing Accessibility with Alt Text
When learning “how to insert photos in a Word document,” remember to add alt text to your images. Alt text is a brief description of the image that is read by screen readers, making your document more accessible to people with disabilities.
- Right-Click the Image: A context menu appears.
- Select “Edit Alt Text”: A panel appears on the right side of the screen.
- Enter a Description: Type a brief but descriptive description of the image.
28. Saving Your Document in Different Formats
Once you’ve inserted your photos, you can save your document in various formats:
- Word Document (.docx): This is the standard format for Word documents.
- PDF (.pdf): PDF is a widely used format that preserves the formatting of your document.
- Web Page (.html): You can save your document as a web page to display it online.
29. Sharing Your Document Online
To share your document online, you can:
- Email it: Send your document as an attachment.
- Upload it to a Cloud Storage Service: Services like Google Drive and Dropbox allow you to share documents with others.
- Post it on Social Media: You can share excerpts from your document on social media, along with images.
30. Embracing the Power of Visual Communication
By mastering “how to insert photos in a Word document,” you’re unlocking the power of visual communication. Use images to enhance your message, engage your audience, and tell compelling stories. At dfphoto.net, we’re here to support you on your photography journey.
Ready to elevate your documents with stunning visuals? Visit dfphoto.net today to discover more photography tutorials, image galleries, and community forums. Unleash your creativity and connect with the world through the power of photography.
FAQ: Inserting Photos in Word Documents
1. How do I insert a picture into a Word document?
To insert a picture, click “Insert” > “Pictures” and choose your source. This allows you to insert local files, stock images, or search online for the perfect photo.
2. How do I resize an image in Word?
Select the image and drag the corner handles to resize it proportionally. This helps ensure your images fit well without distorting them.
3. How do I wrap text around an image in Word?
Click the image, select the Layout Options icon, and choose a text wrapping option like “Square” or “Tight.” This controls how text flows around your image seamlessly.
4. How do I move an image freely in Word?
Change the text wrapping option to anything other than “In Line with Text” to move the image freely. This enables you to drag the image anywhere on the page.
5. What image format is best for Word documents?
JPEG is generally best for photos, while PNG is better for graphics with text or logos. This ensures optimal quality and file size.
6. How do I crop an image in Word?
Select the image, click the “Picture Format” tab, and then click “Crop.” This allows you to trim unwanted portions of the image easily.
7. How do I add a caption to an image in Word?
Right-click the image, select “Insert Caption,” and type your description. This provides context and improves document clarity.
8. How do I compress images in Word to reduce file size?
Click on the image, go to “Picture Format” > “Compress Pictures,” and choose a resolution. This significantly reduces file size without noticeable quality loss.
9. How do I make an image a background in Word?
Set the text wrapping option to “Behind Text” to make the image a background. This allows text to overlay the image.
10. How do I align multiple images in Word?
Hold Ctrl, click each image, go to “Picture Format” > “Align,” and choose an alignment option. This ensures a neat and professional layout.