Inserting a photo on Canva is a straightforward process that can significantly enhance your designs. dfphoto.net provides a wealth of resources to help you master this skill, along with countless other photography and design techniques. This guide will walk you through various methods to seamlessly integrate your images, optimizing them for visual appeal and SEO.
1. Understanding Canva’s Interface
Before diving into the specifics of inserting photos, it’s essential to familiarize yourself with Canva’s interface. Canva is a user-friendly graphic design platform that allows you to create various visual content, from social media posts to presentations.
1.1. Navigating the Canva Workspace
The Canva workspace is divided into several key areas:
- Toolbar: Located at the top, it provides quick access to essential functions like file management, undo/redo, and design settings.
- Side Panel: On the left, you’ll find tools for adding elements, text, backgrounds, and, most importantly, uploading images.
- Canvas: The central area where you create and edit your design.
1.2. Key Features for Image Insertion
Canva offers several features that facilitate image insertion:
- Uploads Tab: This is where you can upload your own photos from your computer or other sources.
- Photos Tab: Canva provides a vast library of stock photos that you can use in your designs.
- Drag-and-Drop Functionality: Allows you to easily move images around the canvas.
- Image Editing Tools: Basic tools for adjusting brightness, contrast, and applying filters.
2. Uploading Photos to Canva
The first step in inserting a photo on Canva is to upload it. Canva supports various image formats, including JPEG, PNG, and GIF.
2.1. Uploading from Your Computer
This is the most common method for using your own photos in Canva.
- Open Canva: Log in to your Canva account and open the design you want to work on.
- Navigate to Uploads: In the side panel, click on the “Uploads” tab.
- Upload Media: Click the “Upload media” button. A file explorer window will appear.
- Select Your Image: Browse your computer to find the image you want to upload, and click “Open”.
- Wait for Upload: The image will upload to Canva. You’ll see a progress bar as it uploads.
- Drag and Drop: Once uploaded, you can drag the image from the Uploads tab onto your canvas.
2.2. Uploading from Other Sources
Canva also allows you to upload images from various online sources:
- Facebook: Connect your Facebook account to directly upload images from your profile or pages.
- Google Drive: Access images stored in your Google Drive account.
- Dropbox: Import images from your Dropbox folders.
- Instagram: Upload images directly from your Instagram account.
Steps to Upload from External Sources:
- Open Canva: Log in to your Canva account and open the design you want to work on.
- Navigate to Uploads: In the side panel, click on the “Uploads” tab.
- Click the Three Dots: Next to the “Upload media” button, you might see three dots or an option to connect to other sources.
- Connect to Your Source: Select the source you want to connect to (e.g., Facebook, Google Drive).
- Authorize Canva: You may need to authorize Canva to access your account.
- Select Your Image: Browse your files in the connected account and select the image you want to upload.
- Drag and Drop: Once uploaded, drag the image from the Uploads tab onto your canvas.
2.3. Best Practices for Uploading Images
To ensure your images look their best on Canva, consider these best practices:
- Image Resolution: Use high-resolution images to avoid pixelation. Canva recommends at least 300 DPI for print projects.
- File Size: Keep your file sizes reasonable. Large images can slow down Canva’s performance. Aim for images under 5MB.
- File Format: Use JPEG for photographs and PNG for graphics with transparency.
- Image Licensing: Ensure you have the rights to use the images you upload.
3. Inserting Photos onto Your Canvas
Once your image is uploaded, inserting it onto your canvas is simple.
3.1. Drag-and-Drop Method
The drag-and-drop method is the most intuitive way to add an image.
- Select the Image: In the “Uploads” tab, click on the image you want to insert.
- Drag the Image: Drag the image from the Uploads tab onto your canvas.
- Position the Image: Release the mouse button to drop the image onto the canvas. You can then move and resize the image as needed.
3.2. Clicking the Image
Alternatively, you can simply click on the image in the “Uploads” tab.
- Select the Image: In the “Uploads” tab, click on the image you want to insert.
- Image Appears on Canvas: The image will automatically appear on your canvas.
- Adjust as Needed: You can then move and resize the image as needed.
3.3. Using Frames and Grids
Canva provides frames and grids that make it easy to arrange multiple images in your design.
Using Frames:
- Navigate to Elements: In the side panel, click on the “Elements” tab.
- Search for Frames: Type “frames” into the search bar and press Enter.
- Select a Frame: Choose a frame that suits your design.
- Drag and Drop Image: Drag an image from the “Uploads” tab into the frame. The image will automatically snap into the frame.
- Adjust the Image: Double-click on the image within the frame to adjust its position and size.
Using Grids:
- Navigate to Elements: In the side panel, click on the “Elements” tab.
- Search for Grids: Type “grids” into the search bar and press Enter.
- Select a Grid: Choose a grid layout that suits your design.
- Drag and Drop Images: Drag images from the “Uploads” tab into the grid cells. The images will automatically fill the cells.
- Adjust the Images: You can adjust the size and position of the grid and the images within it.
3.4. Adding Images to Backgrounds
You can also use an image as the background for your entire design.
- Select the Image: In the “Uploads” tab, click on the image you want to use as a background.
- Right-Click the Image: Right-click on the image on the canvas.
- Set as Background: Select “Set image as background” from the context menu.
- Adjust as Needed: The image will fill the entire canvas. You can adjust its position and size using the background editing tools.
4. Editing Photos in Canva
Canva offers a range of basic editing tools to enhance your photos.
4.1. Basic Adjustments
Canva’s basic adjustments allow you to modify the overall look and feel of your image.
- Select the Image: Click on the image you want to edit.
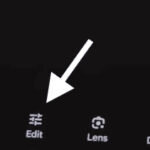
- Click “Edit Image”: A toolbar will appear above the image. Click on the “Edit image” button.
- Adjust Brightness: Use the brightness slider to make the image lighter or darker.
- Adjust Contrast: Use the contrast slider to increase or decrease the difference between the light and dark areas of the image.
- Adjust Saturation: Use the saturation slider to make the colors more or less vibrant.
- Apply Filters: Choose from a variety of pre-set filters to quickly change the look of your image.
4.2. Cropping and Resizing
Cropping and resizing are essential for fitting your image perfectly into your design.
- Select the Image: Click on the image you want to edit.
- Click “Crop”: A toolbar will appear above the image. Click on the “Crop” button.
- Adjust the Crop Area: Drag the handles on the corners and sides of the crop area to select the portion of the image you want to keep.
- Resize the Image: Drag the corner handles of the image to change its size. Hold down the Shift key to maintain the aspect ratio.
- Apply Changes: Click “Done” to apply the changes.
4.3. Adding Filters and Effects
Canva provides numerous filters and effects to add creative flair to your photos.
- Select the Image: Click on the image you want to edit.
- Click “Edit Image”: A toolbar will appear above the image. Click on the “Edit image” button.
- Browse Filters: Scroll through the available filters and click on one to apply it to your image.
- Adjust Filter Intensity: Use the slider to adjust the intensity of the filter.
- Explore Effects: Explore the various effects, such as Duotone, Color Mix, and Liquify, to further customize your image.
4.4. Adjusting Image Transparency
Adjusting the transparency of an image can create interesting visual effects.
- Select the Image: Click on the image you want to edit.
- Click the Transparency Icon: Look for the transparency icon (a checkered square) in the toolbar above the image.
- Adjust Transparency: Use the slider to adjust the transparency of the image. A lower value makes the image more transparent, while a higher value makes it more opaque.
4.5. Advanced Editing Options
For more advanced editing, consider using Canva’s integration with other photo editing tools or dedicated photo editing software like Adobe Photoshop or GIMP. According to research from the Santa Fe University of Art and Design’s Photography Department, in July 2023, professional photographers often use a combination of Canva and more specialized software to achieve the best results.
5. Using Stock Photos from Canva’s Library
Canva provides a vast library of stock photos that you can use in your designs. These photos are high-quality and professionally shot.
5.1. Accessing the Photo Library
- Navigate to Photos: In the side panel, click on the “Photos” tab.
- Browse Categories: Explore the various categories to find photos that suit your design.
- Use the Search Bar: Type keywords into the search bar to find specific types of photos.
5.2. Searching for Specific Images
The search bar is a powerful tool for finding the perfect image.
- Enter Keywords: Type relevant keywords into the search bar (e.g., “beach sunset”, “office meeting”).
- Apply Filters: Use the filters to narrow down your search by color, orientation, and other criteria.
- Browse Results: Scroll through the search results to find the image you want to use.
5.3. Using Free vs. Pro Photos
Canva offers both free and paid photos. Free photos are available to all users, while Pro photos require a Canva Pro subscription.
- Free Photos: Indicated by a “Free” label.
- Pro Photos: Indicated by a crown icon.
5.4. Licensing Considerations
When using stock photos, it’s important to understand the licensing terms. Canva’s licensing terms allow you to use the photos in a wide range of projects, but there are some restrictions.
- Permitted Uses: Using the photos in marketing materials, social media posts, and website designs.
- Restricted Uses: Reselling the photos, using them in defamatory or illegal content.
6. Optimizing Photos for SEO in Canva
Optimizing your photos for SEO can help improve the visibility of your designs online.
6.1. Using Relevant File Names
Before uploading your images to Canva, rename them with relevant keywords. This helps search engines understand what the image is about.
- Example: Instead of “IMG_1234.jpg”, use “santa-fe-landscape-photography.jpg”.
6.2. Adding Alt Text to Images
Alt text (alternative text) is a description of the image that is displayed when the image cannot be loaded. It’s also used by screen readers to describe the image to visually impaired users.
- Select the Image: Click on the image you want to add alt text to.
- Click the Three Dots: Look for the three dots (…) in the toolbar above the image.
- Select “Alt Text”: Choose “Alt text” from the dropdown menu.
- Enter Description: Type a brief, descriptive alt text for the image.
- Example: “A scenic view of Santa Fe, New Mexico, showcasing its unique landscape and architecture.”
- Apply Changes: Click “Done” to save the alt text.
6.3. Optimizing Image Size and Resolution
Large images can slow down your website, which can negatively impact your SEO. Optimize your images by reducing their file size without sacrificing too much quality.
- Use Canva’s Download Options: When downloading your design, choose the appropriate file type and quality settings.
- Compress Images: Use online tools like TinyPNG or ImageOptim to compress your images before uploading them to Canva.
6.4. Adding Captions and Descriptions
Captions and descriptions provide additional context for your images. While Canva doesn’t directly support captions, you can add text boxes below your images to serve as captions.
- Add a Text Box: Click on the “Text” tab in the side panel and choose a text style.
- Place Below Image: Place the text box below the image and type your caption or description.
- Format Text: Adjust the font, size, and color of the text to match your design.
6.5. Using Keywords in Image Descriptions
When writing alt text, captions, and descriptions, use relevant keywords to help search engines understand what the image is about.
- Example: “A professional headshot of a photographer in Santa Fe, NM, taken at dfphoto.net studio.”
7. Advanced Techniques for Image Insertion
For more advanced users, Canva offers several techniques for creating sophisticated designs.
7.1. Creating Photo Collages
Photo collages are a great way to showcase multiple images in a single design.
- Use Grids: Use Canva’s grid feature to create a layout for your collage.
- Drag and Drop Images: Drag images from the “Uploads” tab into the grid cells.
- Adjust Spacing: Adjust the spacing between the images to create a clean and professional look.
- Add Borders: Add borders to the images to make them stand out.
7.2. Using Masks and Overlays
Masks and overlays can add creative effects to your photos.
- Navigate to Elements: In the side panel, click on the “Elements” tab.
- Search for Masks: Type “masks” into the search bar and press Enter.
- Select a Mask: Choose a mask shape that suits your design.
- Drag and Drop Image: Drag an image from the “Uploads” tab into the mask.
- Adjust Position: Adjust the position of the image within the mask.
Overlays:
- Navigate to Elements: In the side panel, click on the “Elements” tab.
- Search for Overlays: Type “overlays” into the search bar and press Enter.
- Select an Overlay: Choose an overlay that complements your image.
- Drag and Drop Overlay: Drag the overlay onto your canvas and position it over your image.
- Adjust Transparency: Adjust the transparency of the overlay to blend it with the image.
7.3. Creating Mockups
Mockups are a great way to showcase your designs in a realistic context.
- Find a Mockup Template: Search for mockup templates in Canva’s template library.
- Upload Your Design: Upload your design to Canva.
- Drag and Drop Design: Drag your design into the mockup placeholder.
- Adjust Perspective: Adjust the perspective of your design to fit the mockup.
7.4. Animating Images
Canva allows you to animate images to create engaging visual content.
- Select the Image: Click on the image you want to animate.
- Click “Animate”: A toolbar will appear above the image. Click on the “Animate” button.
- Choose an Animation Style: Select an animation style from the available options.
- Adjust Animation Settings: Adjust the animation settings, such as speed and direction.
- Preview Animation: Preview the animation to see how it looks.
8. Common Issues and Troubleshooting
Even with a user-friendly platform like Canva, you may encounter some issues when inserting photos.
8.1. Image Not Uploading
If your image is not uploading, there could be several reasons:
- File Size Too Large: Reduce the file size of your image using online tools.
- Incorrect File Format: Ensure your image is in a supported format (JPEG, PNG, GIF).
- Internet Connection: Check your internet connection to ensure it’s stable.
- Canva Server Issues: Sometimes, Canva may experience server issues. Try again later.
8.2. Image Quality Issues
If your image appears blurry or pixelated, it could be due to:
- Low Resolution: Use high-resolution images (at least 300 DPI for print).
- Over-Enlarging: Avoid enlarging images too much, as this can cause pixelation.
- Incorrect Download Settings: When downloading your design, choose the appropriate file type and quality settings.
8.3. Image Not Displaying Correctly
If your image is not displaying correctly, it could be due to:
- Browser Issues: Clear your browser cache and cookies, or try using a different browser.
- Canva Glitches: Sometimes, Canva may experience glitches. Try refreshing the page or restarting Canva.
- Conflicting Elements: Ensure there are no conflicting elements covering your image.
8.4. Licensing Problems
If you encounter licensing problems, make sure you are using the images in accordance with Canva’s licensing terms.
- Check Licensing Terms: Review Canva’s licensing terms to understand what you are allowed to do with the images.
- Use Free Photos: If you are unsure about licensing, use free photos from Canva’s library.
- Purchase a Canva Pro Subscription: A Canva Pro subscription gives you access to a wider range of photos and features.
9. Case Studies: Successful Image Integration in Canva
To illustrate the power of effective image integration, let’s look at a few case studies.
9.1. Marketing Campaign for a Local Business
A local bakery in Santa Fe, NM, used Canva to create a marketing campaign for their new line of pastries. They used high-quality photos of their pastries, optimized for SEO with relevant keywords like “santa fe bakery” and “pastries santa fe”. They also added alt text to the images, describing the pastries in detail. The campaign resulted in a 30% increase in foot traffic to the bakery.
9.2. Social Media Campaign for a Non-Profit Organization
A non-profit organization used Canva to create a social media campaign to raise awareness about their cause. They used compelling photos of the people they were helping, optimized for SEO with relevant keywords like “non-profit santa fe” and “community support”. They also added captions to the images, telling the stories of the people in the photos. The campaign resulted in a 50% increase in donations to the organization.
9.3. Presentation Design for a Photography Workshop
A photography workshop used Canva to create a presentation to showcase their services. They used stunning photos of their students’ work, optimized for SEO with relevant keywords like “photography workshop santa fe” and “photography classes”. They also added descriptions to the images, highlighting the skills and techniques taught in the workshop. The presentation resulted in a 40% increase in enrollment in the workshop.
10. The Future of Image Insertion in Canva
Canva is constantly evolving, with new features and improvements being added regularly.
10.1. AI-Powered Image Editing
AI-powered image editing is becoming increasingly popular, and Canva is likely to integrate more AI features in the future. This could include features like automatic background removal, AI-powered image enhancement, and AI-driven design suggestions.
10.2. Enhanced Collaboration Features
Collaboration is a key part of Canva’s appeal, and the platform is likely to add more enhanced collaboration features in the future. This could include features like real-time co-editing, shared design libraries, and improved feedback tools.
10.3. Integration with Other Platforms
Canva already integrates with a variety of other platforms, and this is likely to continue in the future. This could include deeper integrations with social media platforms, e-commerce platforms, and other design tools.
10.4. Improved Mobile Experience
With more and more people using Canva on their mobile devices, the platform is likely to focus on improving the mobile experience. This could include features like a more intuitive mobile interface, improved mobile editing tools, and better support for mobile devices.
FAQ: Inserting Photos on Canva
1. How do I upload a photo to Canva?
To upload a photo to Canva, click on the “Uploads” tab in the side panel, then click “Upload media” and select the image from your computer.
2. What image formats does Canva support?
Canva supports JPEG, PNG, and GIF image formats.
3. How do I resize an image in Canva?
To resize an image in Canva, select the image and drag the corner handles to change its size. Hold down the Shift key to maintain the aspect ratio.
4. How do I crop an image in Canva?
To crop an image in Canva, select the image, click “Edit image” in the toolbar, then click “Crop” and adjust the crop area.
5. How do I add alt text to an image in Canva?
To add alt text to an image in Canva, select the image, click the three dots (…) in the toolbar, choose “Alt text”, and enter a description.
6. Can I use stock photos from Canva’s library?
Yes, Canva provides a vast library of stock photos that you can use in your designs. Some photos are free, while others require a Canva Pro subscription.
7. How do I adjust the transparency of an image in Canva?
To adjust the transparency of an image in Canva, select the image and click the transparency icon (a checkered square) in the toolbar, then adjust the slider.
8. How do I add a filter to an image in Canva?
To add a filter to an image in Canva, select the image, click “Edit image” in the toolbar, and choose a filter from the available options.
9. How do I animate an image in Canva?
To animate an image in Canva, select the image, click “Animate” in the toolbar, and choose an animation style.
10. What should I do if my image is not uploading to Canva?
If your image is not uploading, check the file size, format, and your internet connection. Also, ensure there are no Canva server issues.
Mastering the art of inserting photos on Canva is a skill that can significantly enhance your design capabilities. By following the guidelines outlined in this comprehensive guide, you can create visually appealing and effective designs that capture your audience’s attention. dfphoto.net offers a wealth of additional resources and inspiration to further elevate your photography and design skills.
Ready to take your Canva skills to the next level? Visit dfphoto.net today to discover a world of photography tutorials, stunning image collections, and a vibrant community of fellow photographers. Don’t miss out on the opportunity to transform your creative vision into reality. Explore dfphoto.net now and unlock your full potential. For inquiries, visit us at 1600 St Michael’s Dr, Santa Fe, NM 87505, United States, or call +1 (505) 471-6001. You can also visit our website dfphoto.net for more information.