Inserting photos directly into your email messages is a powerful way to enhance communication, whether you’re sharing snapshots with family and friends or adding visual elements to professional correspondence. Unlike attachments, embedded images appear directly in the body of your email, making them immediately visible to recipients and more engaging. This guide will walk you through the simple steps to insert photos into your emails using different versions of Outlook, ensuring your messages are both informative and visually appealing.
Inserting Pictures Inline in New Outlook
New Outlook provides a streamlined and intuitive process for embedding images directly within your email body. Follow these steps to enhance your messages with visuals:
-
Compose Your Email: Begin by opening a new email message, or replying to or forwarding an existing one. Position your cursor where you want the image to appear in the body of the message.
-
Access the Insert Menu: Navigate to the ribbon at the top of the New Outlook window. Click on the Insert tab. Within the Insert group, locate and select Pictures.
 Location of the Pictures button within the Insert menu in New Outlook
 -
Choose Your Image: A file explorer window will open, allowing you to browse your computer’s files and folders. Locate the picture you wish to insert into your email. Select the image file and click Open.
-
Resize if Necessary: Once inserted, the image will appear in your email body. To adjust its size, click on the image to reveal small circular handles at the corners. Drag these handles inwards or outwards to reduce or enlarge the image, respectively. Dragging a corner handle maintains the image’s aspect ratio, preventing distortion.
Inserting Pictures Inline in Classic Outlook
If you are using the classic version of Outlook, the process to insert a photo into the email body is slightly different but equally straightforward:
-
Start Your Email: Open a new email, reply, or forward an email in Classic Outlook. Place your cursor where you intend to insert the picture.
-
Go to the Insert Tab: In the message window, find the ribbon and click on the Insert tab. Look for the Illustrations group (or in some older versions, the Symbols group might contain the Picture option). Click on Pictures.
 Location of the Pictures button within the Insert tab in Classic Outlook
 -
Select and Insert the Image: A dialog box will appear, prompting you to choose a picture file. Navigate to the location of your photo on your computer, select the desired image, and click Insert.
-
Adjust Image Size: After insertion, you can resize the image by clicking on it and dragging the corner handles. This allows you to ensure the image fits appropriately within your email’s content and layout.
Inserting Pictures Inline in Outlook on the Web and Outlook.com
For users accessing Outlook through a web browser, whether it’s Outlook on the web for business or Outlook.com for personal use, inserting images inline is also a simple process:
-
Begin Your Email: Open a new message or reply/forward an existing one in Outlook on the web or Outlook.com. Position your cursor where you want the image to be inserted in the email body.
-
Find the Insert Pictures Option: Look for the toolbar at the bottom of the compose window. Click on the Insert pictures inline icon. This icon usually resembles a small picture or landscape. Alternatively, you might find the Insert option in the toolbar, which then provides a Pictures option.
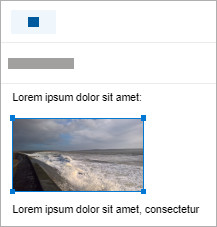 Location of the Insert pictures inline icon in Outlook on the web
 -
Select and Insert Image: A window will appear, allowing you to choose an image from your computer or OneDrive. Select the This device option to browse your local files or OneDrive to select from your cloud storage. Choose your image and click Open or Insert.
-
Resize as Needed: Once the image is in your email, click on it to select it. Corner handles will appear, enabling you to resize the image by dragging them. Adjust the size to fit your email’s design and content.
Tips for Inserting Photos into Email Effectively
- Choose the Right Image Format: For photos in emails, JPEG is generally the best format due to its good balance of quality and file size. PNG is suitable for images with transparency or graphics with text, but file sizes can be larger.
- Optimize Image Size: Large image files can slow down email loading times and consume recipient’s data. Resize your images to appropriate dimensions for email display before inserting. Aim for web-friendly resolutions (72 DPI) and consider the display size within the email.
- Consider Recipient’s Email Client: While most modern email clients support inline images, some older or text-based clients may not display them correctly. Always test your emails to ensure images appear as intended across different platforms.
- Use Alt Text: Although not directly visible as an image, remember to use the
altattribute for images in HTML emails for accessibility. In Outlook’s graphical interface, this is less directly applicable for inline images inserted through the UI, but it’s a best practice for web content and HTML email coding. - Balance Text and Visuals: Ensure that images enhance your message and don’t overwhelm it. Maintain a good balance between textual content and visual elements for optimal communication.
By following these steps, you can effectively insert photos into your email messages using various versions of Outlook. Whether you’re using New Outlook, Classic Outlook, or Outlook on the web, embedding images can significantly improve the clarity and engagement of your email communication.