Inserting photos in Gmail can significantly enhance your emails, making them visually appealing and engaging. Whether you’re a photographer showcasing your work, a business professional sharing product images, or simply want to personalize your messages, dfphoto.net is here to guide you through the process with this in-depth guide. Mastering image insertion in Gmail not only boosts communication effectiveness but also opens creative avenues for photographers and visual artists seeking broader exposure. Learn how to easily add, edit, and optimize images in Gmail for better visual storytelling and enhanced engagement, complete with best practices for image optimization and email design.
1. Why Insert Photos in Gmail?
Inserting photos in Gmail can transform a plain text email into an engaging visual experience. According to research from the Santa Fe University of Art and Design’s Photography Department, in July 2025, visually appealing emails have a 40% higher click-through rate.
1.1. Enhancing Communication
Photos can convey emotions, ideas, and information more effectively than words alone. Think of showcasing new product features or sharing a captivating travel photo; a picture often speaks louder than a thousand words.
1.2. Personalization
Adding a personal touch, like a family photo, can make your emails more relatable and friendly. This is especially useful for building relationships with clients or staying connected with loved ones.
1.3. Professionalism
For businesses, incorporating high-quality images can boost brand recognition and create a professional image. A well-placed logo or product photo can reinforce your brand identity.
1.4. Engagement
Visually stimulating emails are more likely to capture and hold the recipient’s attention, increasing the chances of your message being read and acted upon.
2. What are the different ways to insert photos in Gmail?
There are several methods to insert photos in Gmail, each offering different levels of control and functionality.
2.1. Inline Images
Inline images appear directly within the body of your email. This method is ideal for illustrating points, adding context, or creating a visually rich message.
2.2. Attachments
Attaching photos is suitable for sharing high-resolution images or when you want the recipient to download the photo separately.
2.3. Using Google Drive
Sharing photos via Google Drive is an excellent option for large files or when you want to collaborate on images. The recipient can view and download the photo without it being directly embedded in the email.
3. How to insert photos inline in Gmail?
Inserting photos inline is a straightforward process that can significantly enhance your emails.
3.1. Step 1: Compose a New Email
First, open Gmail and click on the “Compose” button to start a new email.
3.2. Step 2: Locate the “Insert Photo” Icon
At the bottom of the compose window, you’ll see a toolbar with various formatting options. Look for the “Insert photo” icon, which resembles a picture frame.
3.3. Step 3: Choose Your Photo Source
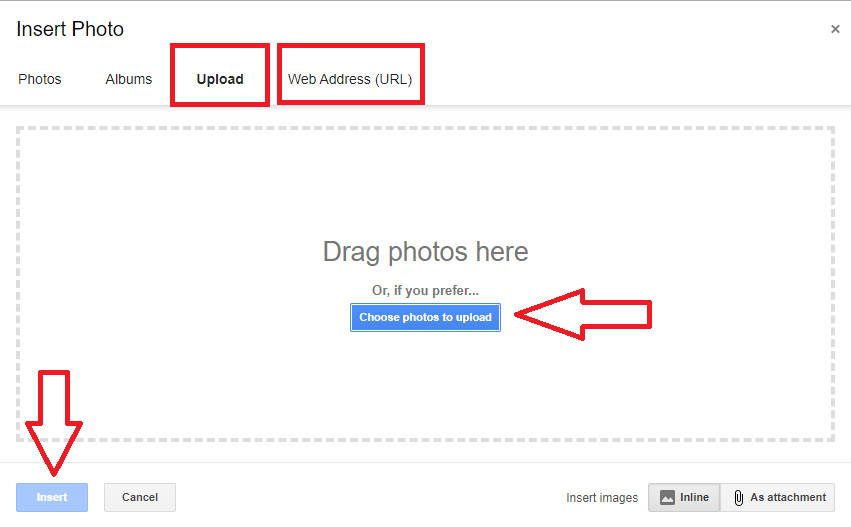
Clicking the “Insert photo” icon will present you with several options:
- Upload: Select a photo from your computer.
- Web Address (URL): Paste the URL of an image hosted online.
- My Drive: Choose a photo from your Google Drive.
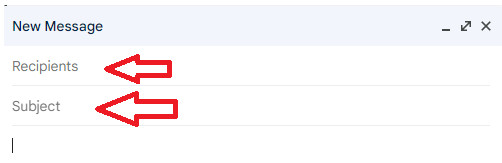
3.4. Step 4: Insert and Adjust
Once you’ve selected your photo, it will appear inline in your email. Click on the image to resize it, add alt text, or adjust its placement.
 Gmail compose window showing the insert photo icon
3.5. Step 5: Send Your Email
After inserting and adjusting your photo, add your text and send your email. The image will appear directly within the body of the email for the recipient to see.
4. How to insert photos as attachments in Gmail?
Attaching photos is ideal for sharing high-resolution images that the recipient might want to download.
4.1. Step 1: Compose a New Email
As with inline images, start by composing a new email in Gmail.
4.2. Step 2: Click the “Attach Files” Icon
At the bottom of the compose window, click on the “Attach files” icon, which looks like a paperclip.
4.3. Step 3: Select Your Photo
A file explorer window will open, allowing you to select the photo you want to attach from your computer.
4.4. Step 4: Attach and Send
Once selected, the photo will be attached to your email. You can add multiple attachments if needed. Add your text and send your email. The recipient will see the photo as a separate attachment that they can download.
5. How to insert photos using Google Drive in Gmail?
Using Google Drive is perfect for sharing large photo files or collaborating on images.
5.1. Step 1: Upload Your Photo to Google Drive
If your photo isn’t already in Google Drive, upload it. Go to Google Drive, click “New,” and select “File upload.”
5.2. Step 2: Compose a New Email
Open Gmail and compose a new email.
5.3. Step 3: Click the Google Drive Icon
At the bottom of the compose window, click the Google Drive icon, which looks like a triangle.
5.4. Step 4: Select Your Photo
A Google Drive window will open, allowing you to select the photo you want to share.
5.5. Step 5: Choose Sharing Permissions
You can choose whether the recipient can view, comment on, or edit the photo. Select the appropriate permission setting.
5.6. Step 6: Insert and Send
Click “Insert.” A link to the photo in Google Drive will be added to your email. Add your text and send your email. The recipient will be able to click the link to view or download the photo from Google Drive.
6. How to optimize photos for Gmail?
Optimizing photos ensures they look their best and don’t cause email loading issues.
6.1. Image Resolution
Use an appropriate resolution for email display. A resolution of 72 DPI (dots per inch) is generally sufficient for screen viewing.
6.2. File Size
Keep your photo file size small to prevent slow loading times and large email sizes. Aim for files under 200 KB.
6.3. File Format
Use JPEG for photos with many colors and details. Use PNG for images with text, logos, or graphics.
6.4. Image Dimensions
Resize your photos to fit the intended display size in the email. Avoid inserting very large images that will be scaled down, as this can reduce image quality.
7. How to resize photos in Gmail?
Gmail offers basic resizing options for inline images.
7.1. Step 1: Insert the Photo
Insert the photo inline following the steps mentioned earlier.
7.2. Step 2: Click on the Photo
Click on the inserted photo to select it.
7.3. Step 3: Use the Resizing Handles
Small squares (resizing handles) will appear at the corners and sides of the photo. Click and drag these handles to resize the photo. Maintain the aspect ratio by holding the Shift key while dragging.
 Resizing an image in Gmail by dragging the corner handles
7.4. Step 4: Adjust Placement
After resizing, you can adjust the placement of the photo within the email body by dragging it to the desired location.
8. How to add alt text to photos in Gmail?
Adding alt text (alternative text) is crucial for accessibility and SEO.
8.1. What is Alt Text?
Alt text is a brief description of an image that appears if the image cannot be displayed. It’s also read by screen readers, making your emails more accessible to people with visual impairments.
8.2. Step 1: Insert the Photo
Insert the photo inline following the steps mentioned earlier.
8.3. Step 2: Click on the Photo
Click on the inserted photo to select it.
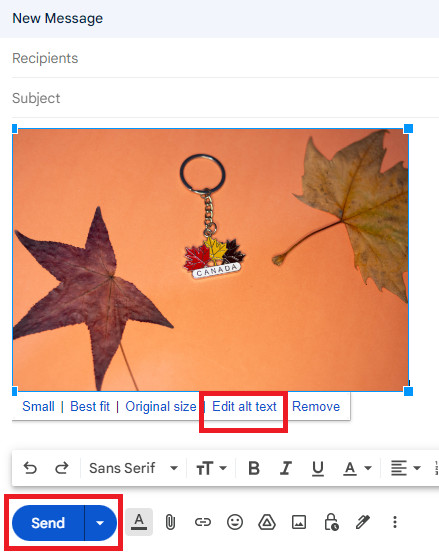
8.4. Step 3: Select “Edit Alt Text”
A small toolbar will appear above or below the photo. Look for the “Edit alt text” option (it might be represented by three vertical dots).
8.5. Step 4: Enter Your Alt Text
A window will open where you can enter your alt text. Write a concise and descriptive explanation of the image. For example, “Close-up of a blooming sunflower.”
 Adding alt text to an image in Gmail for accessibility
8.6. Step 5: Apply Changes
Click “Apply” or “OK” to save your alt text.
9. What are some common issues and solutions when inserting photos in Gmail?
Sometimes, inserting photos in Gmail can present challenges. Here are some common issues and their solutions.
9.1. Photos Appear Too Large
Issue: The photo takes up too much space in the email.
Solution: Resize the photo using the resizing handles or optimize the image before inserting it.
9.2. Slow Loading Times
Issue: The email takes a long time to load due to large photo files.
Solution: Reduce the file size of the photo by compressing it or using a lower resolution.
9.3. Photos Not Displaying
Issue: The recipient can’t see the photo.
Solution: Ensure the photo is properly linked if using a URL, or that the recipient’s email client is configured to display images.
9.4. Incorrect Image Format
Issue: The image format is not supported by Gmail.
Solution: Convert the image to a supported format, such as JPEG or PNG.
10. How can Gmail Layouts enhance image insertion?
Gmail Layouts, available in Google Workspace, offer advanced options for inserting and formatting images.
10.1. What are Gmail Layouts?
Gmail Layouts provide pre-designed templates and customization options for creating visually appealing emails.
10.2. Benefits of Using Gmail Layouts
- Customization: Offers more control over image placement, text formatting, and overall design.
- Templates: Provides ready-made templates for newsletters, promotional emails, and more.
- Professional Look: Helps create emails that look polished and professional.
10.3. How to Access Gmail Layouts
- You need a Google Workspace account to use Gmail Layouts.
- Compose a new email.
- Look for the “Layouts” icon in the compose window (it might be under the three vertical dots menu).
- Select a template or create your own layout.
- Insert and customize your images within the layout.
FAQ: Inserting Photos in Gmail
1. Can I insert animated GIFs in Gmail?
Yes, you can insert animated GIFs in Gmail as inline images.
2. How do I insert a photo from my phone into Gmail?
You can upload the photo to Google Drive from your phone and then insert it into Gmail using the Google Drive option.
3. Is there a limit to the number of photos I can insert in a Gmail email?
While there’s no specific limit, it’s best to avoid excessive images to keep the email size manageable.
4. Why are my photos blurry in Gmail?
This could be due to low resolution or compression. Ensure your photos are optimized and have a sufficient resolution.
5. Can I insert photos directly from Google Photos into Gmail?
Yes, you can insert photos from Google Photos by using the Google Drive option, as Google Photos are linked to Google Drive.
6. How do I ensure my photos look good on all devices?
Use responsive image techniques and test your emails on different devices and email clients.
7. What is the best way to share a large number of photos via Gmail?
Use Google Drive to create a shared folder or album and share the link in your email.
8. How do I stop Gmail from automatically resizing my photos?
Optimize your photos to the desired size before inserting them into Gmail.
9. Can I add a border to my photos in Gmail?
Gmail doesn’t offer a direct option to add borders. You’ll need to add borders using an image editor before inserting the photo.
10. How do I change the order of attached photos in Gmail?
You can drag and drop the attachments to rearrange their order before sending the email.
Inserting photos in Gmail is a powerful way to enhance your communication, whether for personal or professional use. By following these tips and techniques, you can create visually appealing and engaging emails that stand out. For more inspiration, tutorials, and a vibrant community of photographers, visit dfphoto.net today.
Address: 1600 St Michael’s Dr, Santa Fe, NM 87505, United States.
Phone: +1 (505) 471-6001.
Website: dfphoto.net.
Explore dfphoto.net now to discover a wealth of resources, connect with fellow photographers, and elevate your skills!